fuse BUICK RANDEZVOUS 2006 Owner's Manual
[x] Cancel search | Manufacturer: BUICK, Model Year: 2006, Model line: RANDEZVOUS, Model: BUICK RANDEZVOUS 2006Pages: 478, PDF Size: 2.97 MB
Page 9 of 478
Front Seats
Manual Seats
{CAUTION:
You can lose control of the vehicle if you try to
adjust a manual driver’s seat while the vehicle
is moving. The sudden movement could startle
and confuse you, or make you push a pedal
when you do not want to. Adjust the driver’s
seat only when the vehicle is not moving.Your vehicle may have manual seats.
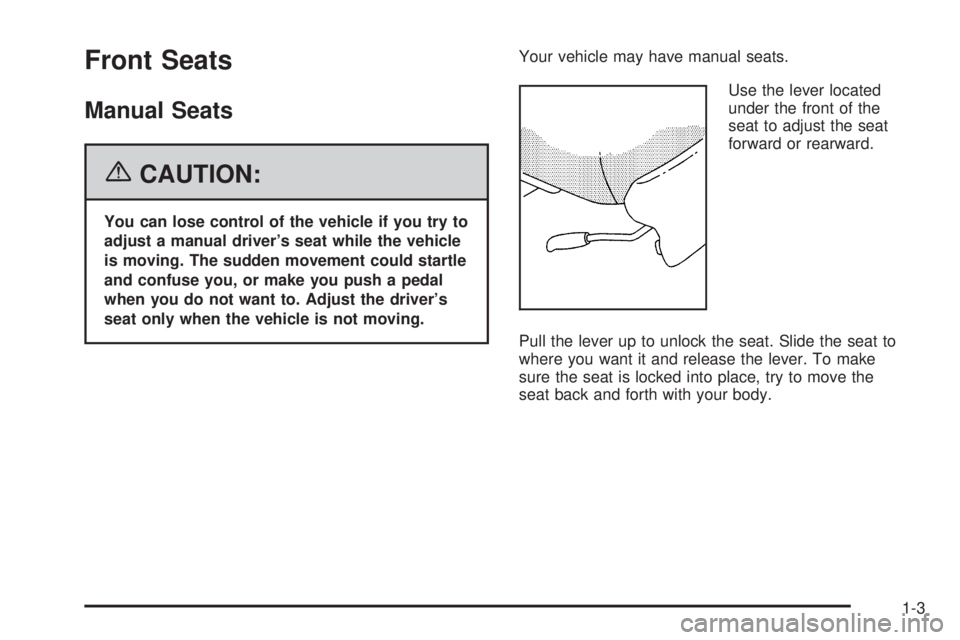
Use the lever located
under the front of the
seat to adjust the seat
forward or rearward.
Pull the lever up to unlock the seat. Slide the seat to
where you want it and release the lever. To make
sure the seat is locked into place, try to move the
seat back and forth with your body.
1-3
Page 112 of 478
PASS-Key®III Operation
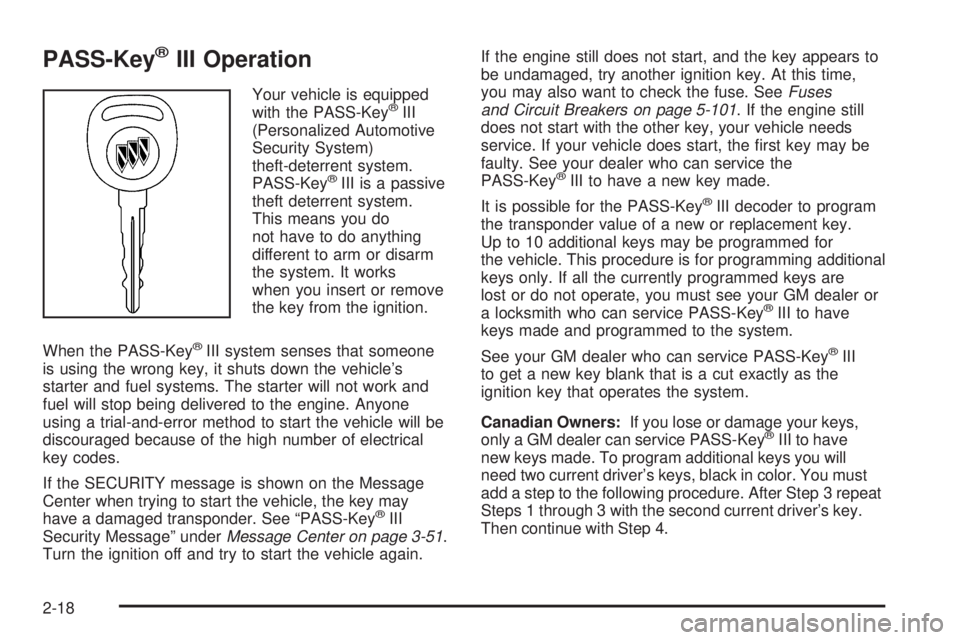
Your vehicle is equipped
with the PASS-Key®III
(Personalized Automotive
Security System)
theft-deterrent system.
PASS-Key
®III is a passive
theft deterrent system.
This means you do
not have to do anything
different to arm or disarm
the system. It works
when you insert or remove
the key from the ignition.
When the PASS-Key
®III system senses that someone
is using the wrong key, it shuts down the vehicle’s
starter and fuel systems. The starter will not work and
fuel will stop being delivered to the engine. Anyone
using a trial-and-error method to start the vehicle will be
discouraged because of the high number of electrical
key codes.
If the SECURITY message is shown on the Message
Center when trying to start the vehicle, the key may
have a damaged transponder. See “PASS-Key
®III
Security Message” underMessage Center on page 3-51.
Turn the ignition off and try to start the vehicle again.If the engine still does not start, and the key appears to
be undamaged, try another ignition key. At this time,
you may also want to check the fuse. SeeFuses
and Circuit Breakers on page 5-101. If the engine still
does not start with the other key, your vehicle needs
service. If your vehicle does start, the �rst key may be
faulty. See your dealer who can service the
PASS-Key
®III to have a new key made.
It is possible for the PASS-Key
®III decoder to program
the transponder value of a new or replacement key.
Up to 10 additional keys may be programmed for
the vehicle. This procedure is for programming additional
keys only. If all the currently programmed keys are
lost or do not operate, you must see your GM dealer or
a locksmith who can service PASS-Key
®III to have
keys made and programmed to the system.
See your GM dealer who can service PASS-Key
®III
to get a new key blank that is a cut exactly as the
ignition key that operates the system.
Canadian Owners:If you lose or damage your keys,
only a GM dealer can service PASS-Key
®III to have
new keys made. To program additional keys you will
need two current driver’s keys, black in color. You must
add a step to the following procedure. After Step 3 repeat
Steps 1 through 3 with the second current driver’s key.
Then continue with Step 4.
2-18
Page 147 of 478

The main components of the instrument panel are the following:
A. Exterior/Interior Lamps Control. SeeExterior Lamps
on page 3-14andInterior Lamps on page 3-16.
B. Turn Signal/Multifunction Lever. SeeTurn
Signal/Multifunction Lever on page 3-7.
C. Hazard Warning Flasher Button. SeeHazard
Warning Flashers on page 3-6.
D. Instrument Panel Cluster. SeeInstrument Panel
Cluster on page 3-38.
E. Shift Lever. SeeAutomatic Transaxle Operation
on page 2-23.
F. Instrument Panel Outlets. SeeOutlet Adjustment
on page 3-36.
G. Audio System. SeeAudio System(s) on page 3-74.
H. Audio Steering Wheel Controls. SeeAudio
Steering Wheel Controls on page 3-132.
I. Head-Up Display Switch and Driver Information
Center (DIC) Controls (If Equipped). SeeHead-Up
Display (HUD) on page 3-21andDIC Controls
and Displays on page 3-62.J. Hood Release. SeeHood Release on page 5-9.
K. Ignition Switch. SeeIgnition Positions on page 2-20.
L. Climate Controls. SeeClimate Control System
on page 3-28,Dual Climate Control System
on page 3-30orDual Automatic Climate Control
System on page 3-33.
M. Instrument Panel Switchbank. SeeInstrument Panel
Switchbank on page 3-20.
N. Front Armrest Storage. SeeFront Armrest Storage
Area on page 2-39.
O. Ashtray/Cigarette Lighter/Accessory Power
Outlet/Cell Phone Storage/Cupholders. See
Ashtray(s) and Cigarette Lighter on page 3-27,
Accessory Power Outlet(s) on page 3-26,Cell Phone
Storage Area on page 2-39,Floor Console Storage
Area on page 2-39andCupholder(s) on page 2-38.
P. Floor Console Fuse Block. SeeFloor Console
Fuse Block on page 5-101.
Q. Glove Box. SeeGlove Box on page 2-38.
3-5
Page 150 of 478

If a bulb is burned out, replace it to help avoid an
accident. If the arrows do not go on at all when you
signal a turn, check for burned-out bulbs and check the
fuse. SeeFuses and Circuit Breakers on page 5-101.
If you have a trailer towing option with added wiring for
the trailer lamps, the signal indicator will �ash at a
normal rate even if a turn signal bulb is burned out.
Check the front and rear turn signal lamps regularly to
make sure they are working.
Turn Signal On Chime
If either turn signal is left on for more than 3/4 mile
(1.2 km), a chime will sound to let the driver know to
turn it off.
If you need to leave the signal on for more than
3/4 mile (1.2 km), turn off the signal and then turn it
back on.
Headlamp High/Low-Beam Changer
To change the headlamps from low to high, push
the turn signal lever away from you, then release it.
To change the headlamps from high to low, pull the
lever toward you.
When the high beams
are on, this light on the
instrument panel cluster
and the HUD display
(if equipped), will also
be on.
Flash-to-Pass
When the headlamps are off, pull the lever toward you
to momentarily turn on the high beams. This will
signal that you are going to pass. When you release
the lever, they will turn off.
3-8
Page 165 of 478

3. Press the UP or DN buttons until the HUD image is
easy to see and then press the DN button until the
HUD image is as low as possible, but remains
in full view straight ahead near the front bumper.
The HUD image can only be adjusted up and down,
not side-to-side.
4. To turn the image off, turn the dimmer knob
counterclockwise until it stops.
If the sun comes out or it becomes cloudy, you may
need to adjust the HUD brightness again using
the dimmer knob. Polarized sunglasses could make the
HUD image harder to see.
When you �rst start the vehicle the display will show
BUICK and the Buick logo for a few seconds. If it is cold
outside, this display may stay on for up to a minute.
Clean the inside of the windshield as needed to remove
any dirt or �lm that reduces the sharpness or clarity
of the HUD image.To clean the HUD, spray household glass cleaner on a
soft, clean cloth. Wipe the HUD lens gently, then dry
it. Do not spray cleaner directly on the lens because the
cleaner could leak into the unit.
If the ignition is on and you cannot see the HUD image,
check to see if one of the following conditions exist:
The HUD unit is covered
The HUD dimmer knob is adjusted incorrectly
The HUD image is not adjusted to the proper height
Ambient light in the direction your vehicle is
facing, is low
A fuse is blown. SeeFuses and Circuit Breakers
on page 5-101.
Keep in mind that the windshield is part of the HUD.
SeeWindshield Replacement on page 5-49.
3-23
Page 169 of 478

Certain electrical accessories may not be compatible
with the accessory power outlet and could result
in blown vehicle or adapter fuses. If you experience a
problem, see your dealer for additional information
on the accessory power outlets.
Notice:Adding any electrical equipment to your
vehicle may damage it or keep other components
from working as they should. The repairs would not
be covered by your warranty. Do not use equipment
exceeding maximum amperage rating. Check
with your dealer before adding electrical equipment.
When adding electrical equipment, be sure to follow
the proper installation instructions included with
the equipment.
Notice:Improper use of the power outlet can cause
damage not covered by your warranty. Do not
hang any type of accessory or accessory bracket
from the plug because the power outlets are
designed for accessory power plugs only.Ashtray(s) and Cigarette Lighter
The ashtray is located on the �oor console closest to
the instrument panel. Lift the lid to expose the ashtray.
To remove the ashtray, lift it up.
The cigarette lighter is located on the �oor console in
the cell phone storage compartment closest to the
driver’s seat. Lift the lid to expose the cigarette lighter.
To use the lighter, push it in all the way and let go.
When it is ready, it will pop back out by itself.
Notice:Holding a cigarette lighter in while it is
heating will not allow the lighter to back away from
the heating element when it is hot. Damage from
overheating may occur to the lighter or heating
element, or a fuse could be blown. Do not hold a
cigarette lighter in while it is heating.
Notice:If you put papers, pins, or other �ammable
items in the ashtray, hot cigarettes or other
smoking materials could ignite them and possibly
damage your vehicle. Never put �ammable items
in the ashtray.
3-27
Page 328 of 478
Uniform Tire Quality Grading..........................5-64
Wheel Alignment and Tire Balance..................5-66
Wheel Replacement......................................5-66
Tire Chains..................................................5-67
Accessory In�ator.........................................5-68
If a Tire Goes Flat........................................5-69
Changing a Flat Tire.....................................5-70
Removing the Spare Tire and Tools................5-71
Removing the Flat Tire and Installing
the Spare Tire..........................................5-77
Secondary Latch System...............................5-81
Storing a Flat or Spare Tire and Tools................5-84
Compact Spare Tire......................................5-90
Appearance Care............................................5-91
Cleaning the Inside of Your Vehicle.................5-91
Fabric/Carpet...............................................5-92
Leather.......................................................5-93
Instrument Panel, Vinyl, and Other
Plastic Surfaces........................................5-93
Care of Safety Belts......................................5-94
Weatherstrips...............................................5-94
Washing Your Vehicle...................................5-94
Cleaning Exterior Lamps/Lenses.....................5-94Finish Care..................................................5-95
Windshield, Backglass, and Wiper Blades.........5-95
Aluminum or Chrome-Plated Wheels................5-96
Tires...........................................................5-96
Sheet Metal Damage.....................................5-97
Finish Damage.............................................5-97
Underbody Maintenance................................5-97
Chemical Paint Spotting.................................5-97
Vehicle Care/Appearance Materials..................5-98
Vehicle Identi�cation......................................5-99
Vehicle Identi�cation Number (VIN).................5-99
Service Parts Identi�cation Label.....................5-99
Electrical System..........................................5-100
Add-On Electrical Equipment.........................5-100
Headlamp Wiring........................................5-100
Windshield Wiper Fuses...............................5-100
Power Windows and Other Power Options......5-100
Fuses and Circuit Breakers..........................5-101
Floor Console Fuse Block............................5-101
Underhood Fuse Block................................5-103
Capacities and Speci�cations........................5-106
Section 5 Service and Appearance Care
5-2
Page 330 of 478

Doing Your Own Service Work
{CAUTION:
You can be injured and your vehicle could be
damaged if you try to do service work on a
vehicle without knowing enough about it.
Be sure you have sufficient knowledge,
experience, the proper replacement parts,
and tools before you attempt any vehicle
maintenance task.
Be sure to use the proper nuts, bolts,
and other fasteners. English and metric
fasteners can be easily confused. If you
use the wrong fasteners, parts can later
break or fall off. You could be hurt.
If you want to do some of your own service work,
you will want to use the proper service manual. It tells
you much more about how to service your vehicle
than this manual can. To order the proper service
manual, seeService Publications Ordering Information
on page 7-14.Your vehicle has an airbag system. Before attempting
to do your own service work, seeServicing Your
Airbag-Equipped Vehicle on page 1-85.
You should keep a record with all parts receipts and
list the mileage and the date of any service work
you perform. SeeMaintenance Record on page 6-14.
Adding Equipment to the Outside
of Your Vehicle
Things you might add to the outside of your vehicle
can affect the air�ow around it. This may cause
wind noise and affect windshield washer performance.
Check with your dealer before adding equipment to
the outside of your vehicle.
Fuel
The 8th digit of your vehicle identi�cation number (VIN)
shows the code letter or number that identi�es your
engine. You will �nd the VIN at the top left of the
instrument panel. SeeVehicle Identi�cation
Number (VIN) on page 5-99.
5-4
Page 337 of 478
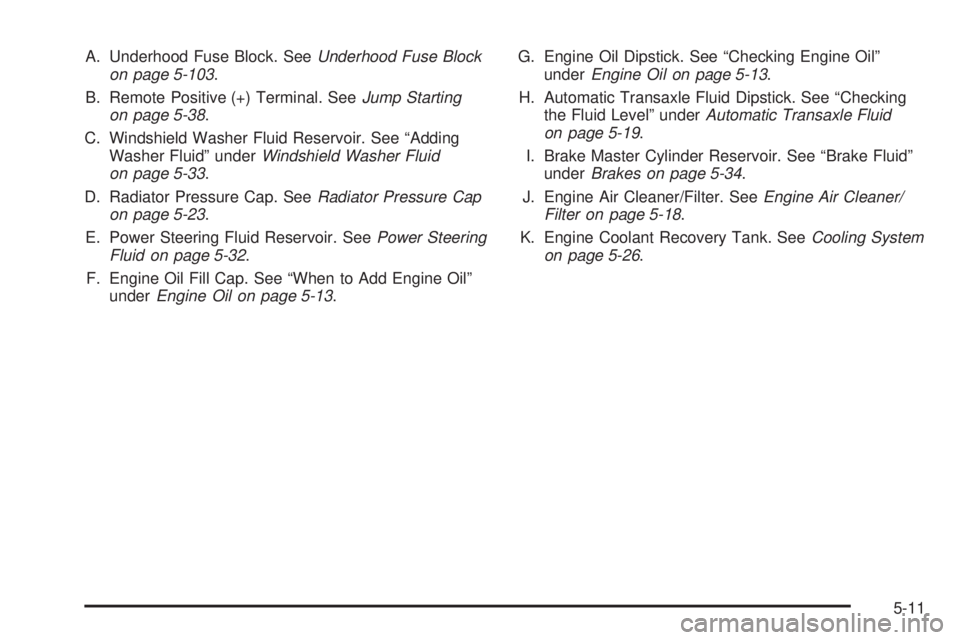
A. Underhood Fuse Block. SeeUnderhood Fuse Block
on page 5-103.
B. Remote Positive (+) Terminal. SeeJump Starting
on page 5-38.
C. Windshield Washer Fluid Reservoir. See “Adding
Washer Fluid” underWindshield Washer Fluid
on page 5-33.
D. Radiator Pressure Cap. SeeRadiator Pressure Cap
on page 5-23.
E. Power Steering Fluid Reservoir. SeePower Steering
Fluid on page 5-32.
F. Engine Oil Fill Cap. See “When to Add Engine Oil”
underEngine Oil on page 5-13.G. Engine Oil Dipstick. See “Checking Engine Oil”
underEngine Oil on page 5-13.
H. Automatic Transaxle Fluid Dipstick. See “Checking
the Fluid Level” underAutomatic Transaxle Fluid
on page 5-19.
I. Brake Master Cylinder Reservoir. See “Brake Fluid”
underBrakes on page 5-34.
J. Engine Air Cleaner/Filter. SeeEngine Air Cleaner/
Filter on page 5-18.
K. Engine Coolant Recovery Tank. SeeCooling System
on page 5-26.
5-11
Page 339 of 478
A. Windshield Washer Fluid Reservoir. See “Adding
Washer Fluid” underWindshield Washer Fluid
on page 5-33.
B. Underhood Fuse Block. SeeUnderhood Fuse Block
on page 5-103.
C. Battery. SeeBattery on page 5-37.
D. Remote Positive (+) Terminal. SeeJump Starting
on page 5-38.
E. Radiator Pressure Cap. SeeRadiator Pressure Cap
on page 5-23.
F. Power Steering Fluid Reservoir. SeePower Steering
Fluid on page 5-32.
G. Engine Oil Fill Cap. See “When to Add Engine Oil”
underEngine Oil on page 5-13.
H. Engine Oil Dipstick. See “Checking Engine Oil”
underEngine Oil on page 5-13.
I. Brake Master Cylinder Reservoir. See “Brake Fluid”
underBrakes on page 5-34.
J. Automatic Transaxle Fluid Dipstick. See “Checking
the Fluid Level” underAutomatic Transaxle Fluid
on page 5-19.
K. Engine Air Cleaner/Filter. SeeEngine Air Cleaner/
Filter on page 5-18.
L. Engine Coolant Recovery Tank. SeeEngine Coolant
on page 5-21.Engine Oil
Checking Engine Oil
It is a good idea to check your engine oil every time you
get fuel. In order to get an accurate reading, the oil
must be warm and the vehicle must be on level ground.
The engine oil dipstick handle is a yellow loop. See
Engine Compartment Overview on page 5-10for
the location of the engine oil dipstick.
1. Turn off the engine and give the oil several minutes
to drain back into the oil pan. If you do not do this,
the oil dipstick might not show the actual level.
2. Pull out the dipstick and clean it with a paper towel
or cloth, then push it back in all the way. Remove it
again, keeping the tip down, and check the level.
5-13