remote control BUICK RANDEZVOUS 2007 Owner's Guide
[x] Cancel search | Manufacturer: BUICK, Model Year: 2007, Model line: RANDEZVOUS, Model: BUICK RANDEZVOUS 2007Pages: 528, PDF Size: 2.99 MB
Page 285 of 528
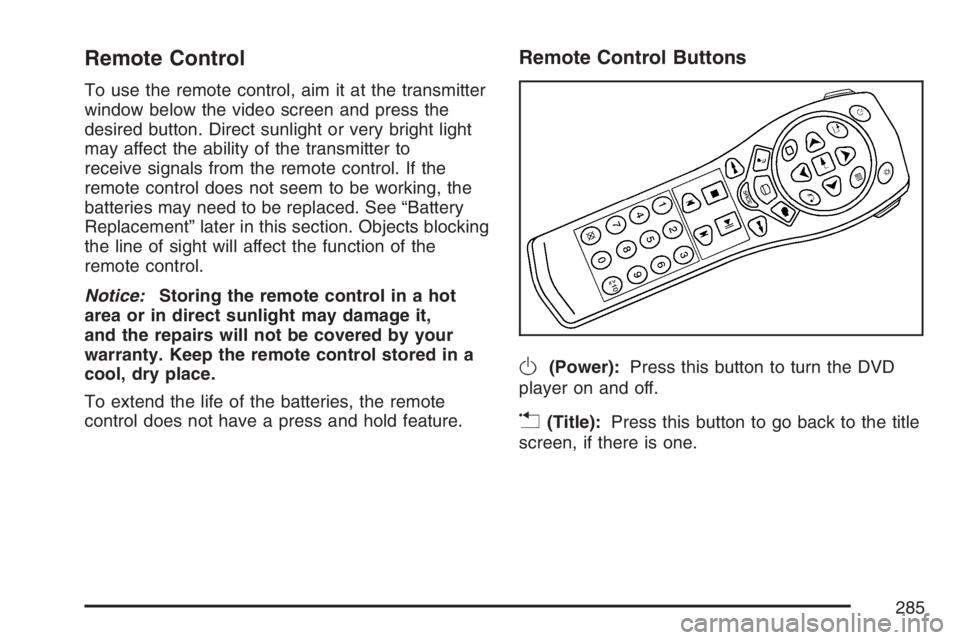
Remote Control
To use the remote control, aim it at the transmitter
window below the video screen and press the
desired button. Direct sunlight or very bright light
may affect the ability of the transmitter to
receive signals from the remote control. If the
remote control does not seem to be working, the
batteries may need to be replaced. See “Battery
Replacement” later in this section. Objects blocking
the line of sight will affect the function of the
remote control.
Notice:Storing the remote control in a hot
area or in direct sunlight may damage it,
and the repairs will not be covered by your
warranty. Keep the remote control stored in a
cool, dry place.
To extend the life of the batteries, the remote
control does not have a press and hold feature.
Remote Control Buttons
O(Power):Press this button to turn the DVD
player on and off.
v(Title):Press this button to go back to the title
screen, if there is one.
285
Page 287 of 528
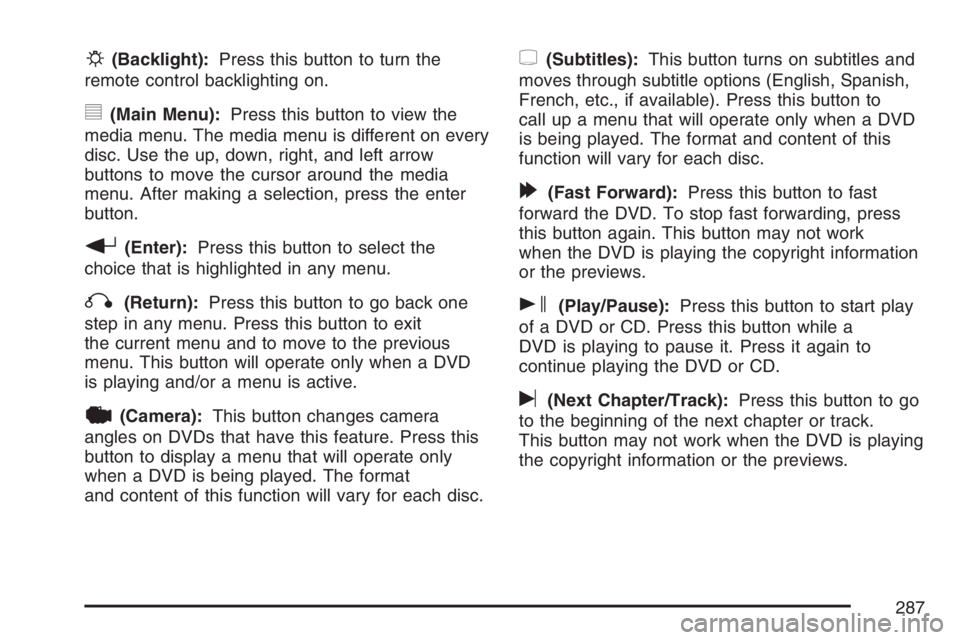
P(Backlight):Press this button to turn the
remote control backlighting on.
y(Main Menu):Press this button to view the
media menu. The media menu is different on every
disc. Use the up, down, right, and left arrow
buttons to move the cursor around the media
menu. After making a selection, press the enter
button.
r(Enter):Press this button to select the
choice that is highlighted in any menu.
q(Return):Press this button to go back one
step in any menu. Press this button to exit
the current menu and to move to the previous
menu. This button will operate only when a DVD
is playing and/or a menu is active.
|(Camera):This button changes camera
angles on DVDs that have this feature. Press this
button to display a menu that will operate only
when a DVD is being played. The format
and content of this function will vary for each disc.
{(Subtitles):This button turns on subtitles and
moves through subtitle options (English, Spanish,
French, etc., if available). Press this button to
call up a menu that will operate only when a DVD
is being played. The format and content of this
function will vary for each disc.
[(Fast Forward):Press this button to fast
forward the DVD. To stop fast forwarding, press
this button again. This button may not work
when the DVD is playing the copyright information
or the previews.
s(Play/Pause):Press this button to start play
of a DVD or CD. Press this button while a
DVD is playing to pause it. Press it again to
continue playing the DVD or CD.
u(Next Chapter/Track):Press this button to go
to the beginning of the next chapter or track.
This button may not work when the DVD is playing
the copyright information or the previews.
287
Page 288 of 528
Setup Menu
To access the setup menu, ensure that a DVD is
in the player and the video is stopped. Press
the main menu button. Once the menu is activated,
use the directional arrows and the enter button
to navigate the screen.
The setup menu allows the user to select default
preferences for Menu Language, Subtitle
Language, Audio Language, TV Aspect, TV Mode,
and Dynamic Range Compression.
Not all DVDs support all the feature defaults in the
setup menus. In the event a particular feature is
not supported, defaults will be provided by
the DVD media.
Exit the setup menu by pressing the return button
on the remote control or the DVD player. If
changes are made to the system setup defaults,
the disc will resume play from the beginning
and not where it previously left off.
Battery Replacement
To change the remote control batteries, do the
following:
1. Unclip the battery door located on the back of
the remote control.
2. Replace the two AA batteries in the
compartment. Make sure that they are
installed correctly, using the diagram on the
inside of the battery compartment.
3. Close the battery door.
If the remote control is to be stored for a long
period of time, remove the batteries and keep them
in a cool, dry place.
288
Page 289 of 528

Tips and Troubleshooting Chart
Problem Recommended Action
No power. The ignition may not be in
ACCESSORY, ON,
START, or RAP. The
parental control button
might have been pressed.
The power indicator light
will �ash.
Disc will not play. The system might be off.
The parental control
button might have been
pressed. The power
indicator light will �ash.
The system might be in
auxiliary source mode.
Press the SRCE button to
switch between the DVD
player and the auxiliary
source. The disc is upside
down or is not compatible.
Problem Recommended Action
No sound. The volume on the
headphones could be too
low. Adjust the volume on
the right earpiece on the
wireless headphones. If
the DVD system is being
heard through the vehicle
speakers, adjust the
volume from the radio.
The radio must have the
RSE enabled by using the
CD, CD TAPE, or CD
AUX button.
The picture is distorted
during fast forward or
reverse.This is normal for this
operation.
The picture does not �ll
the screen. There are
black borders on the top
and bottom or on both
sides or it looks
stretched out.Quickly press and release
the display control button
on the remote control or
the DVD player and
choose Display Mode.
Then select Full. This will
�ll the screen. If there are
borders on the top and
bottom, the movie may
have been made that way
for a standard screen.
289
Page 290 of 528
Problem Recommended Action
I ejected the disc and
tried to take it out, but it
was pulled back into
the slot.Eject the disc again.
The language in the audio
or on the screen is wrong.Press the main menu
button on the DVD player
or the remote control and
change the audio or
language selection on the
DVD menu.
The remote control does
not work.Point the remote control
directly at the transmitter
window. The batteries
could be weak or put in
wrong. The parental
control button might have
been pressed. The power
indicator light will �ash.
How do I get subtitles on
or off?Press the subtitle button
on the remote control to
go to the DVDs main
menu. Then follow the
screen prompts.Problem Recommended Action
After stopping the player, I
push the play button but
sometimes the DVD starts
where I left off, and
sometimes at the
beginning.Press the stop button on
the remote control to
resume where the DVD
left off. Press the stop
button twice to start the
DVD at the beginning. If
the power is off and the
DVD is still in the player,
press the play button.
The DVD is playing but
there is no picture or
sound. The auxiliary
source is running but
there is no picture or
sound.Press and release the
SRCE button on the
remote control or the DVD
player to get to auxiliary
input. Check to make sure
that the auxiliary source is
connected to the inputs
properly.
The audio or video skips
or jumps.The DVD could be dirty or
scratched. Try cleaning
the DVD.
290
Page 291 of 528

Problem Recommended Action
When I return to the DVD
from the system menu,
sometimes it plays from
the beginning and
sometimes from where it
left off.If the stop button was
pressed once, it resumes
play from where it left off.
If the stop button was
pressed twice, it will start
at the beginning of the
DVD. However, if a
change was made to the
menu, the DVD will start
from where it left off, even
if the stop button was only
pressed once.
The fast forward, reverse,
previous, and next
functions do not work.Some commands that do
one thing for DVDs will
not always work or
perform the same function
for audio, CDs, or games.
These functions may also
be disabled when the
DVD is playing the
copyright information or
the previews.Problem Recommended Action
My disc is stuck in the
player. The eject button
does not work.Press the eject button on
the DVD player. Turn the
power off, then on again,
then press the eject
button on the DVD player.
Do not attempt to force or
remove the disc from the
player. If the problem
persists, return to your
GM dealer for further
assistance.
I lost the remote control
and/or the headphones.Contact your GM dealer
for assistance.
Sometimes the wireless
headphone audio cuts out
or buzzes for a moment,
then it comes back.This could be caused by
interference from cell
towers or by using the
cellular telephone or other
radio transmitter device in
the vehicle.
DVD System inoperable. In severe or extreme
temperatures the DVD
system might not be
operable. Temperatures
below−4°F (−20°C) or
above 140°F (60°C) could
damage the DVD system.
Operate the DVD system
under normal or
comfortable cabin
temperature ranges.
291
Page 293 of 528

Cleaning the Video Screen
When cleaning the video screen, use only a clean
cloth dampened with clean water. Use care
when directly touching or cleaning the screen, as
damage may result.
Rear Seat Audio (RSA)
This feature allows rear seat passengers to listen
to any of the sources: radio, cassette tapes, or
CDs. However, the rear seat passengers can only
control the sources that the front seat passengers
are not listening to. For example, rear seat
passengers may listen to and control cassette
tapes or CDs through the headphones while the
driver listens to the radio through the front
speakers. The rear seat passengers have control
of the volume for each set of headphones.
The front seat audio controls always have priority
over the RSA controls. If the front seat
passengers switch the source for the main radio to
a remote source, the RSA will not be able to
control the source. You can operate the rear seat
audio when the main radio is off.If your vehicle has the Rear Seat Entertainment
(RSE) system and the system is on, the rear seat
passengers can listen to the DVDs through the
wired headphone jacks on the RSA system.
The RSE system cannot be controlled with the
RSA system.
If the front seat passengers are listening to the
RSE system through the vehicle’s speakers
and the rear seat passengers are using the wired
headphones to listen to the RSA system, the
BAND button will not access XM™ Satellite Radio
Service.
Primary Radio Controls
The following function is controlled by the main
radio:
PWR (Power):Push this knob twice to turn
RSA off.
293
Page 317 of 528
If you have the Anti-Lock Brake System (ABS),
remember: It helps avoid only the braking skid. If
you do not have ABS, then in a braking skid,
where the wheels are no longer rolling, release
enough pressure on the brakes to get the wheels
rolling again. This restores steering control.
Push the brake pedal down steadily when you
have to stop suddenly. As long as the wheels are
rolling, you will have steering control.
Driving at Night
Night driving is more dangerous than day driving.
One reason is that some drivers are likely to
be impaired — by alcohol or drugs, with night
vision problems, or by fatigue.
Here are some tips on night driving.
Drive defensively.
Do not drink and drive.
Adjust the inside rearview mirror to reduce the
glare from headlamps behind you.
Since you cannot see as well, you may need
to slow down and keep more space between
you and other vehicles.
Slow down, especially on higher speed roads.
Your vehicle’s headlamps can light up only so
much road ahead.
In remote areas, watch for animals.
If you are tired, pull off the road in a safe
place and rest.
No one can see as well at night as in the daytime.
But as we get older these differences increase.
A 50-year-old driver may require at least twice as
much light to see the same thing at night as a
20-year-old.
What you do in the daytime can also affect your
night vision. For example, if you spend the
day in bright sunshine you are wise to wear
sunglasses. Your eyes will have less trouble
adjusting to night. But if you are driving, do not
wear sunglasses at night. They may cut down on
glare from headlamps, but they also make a
lot of things invisible.
317
Page 397 of 528

Notice:If you connect a negative cable to the
engine control module (ECM), ECM mounting
bracket or any cables that attach to the
ECM bracket, you may damage the ECM.
Attach the negative cable to a heavy, unpainted
metal engine part, other than the ECM, ECM
bracket or cables attached to the ECM bracket.
Do not connect positive (+) to negative (−)or
you will get a short that would damage the
battery and maybe other parts too. And do not
connect the negative (−) cable to the
negative (−) terminal on the dead battery
because this can cause sparks.
6. Connect the red positive (+) cable to the
positive (+) terminal of the dead battery.
Use a remote positive (+) terminal if
the vehicle has one.
7. Do not let the other end touch metal. Connect
it to the positive (+) terminal of the good
battery. Use a remote positive (+) terminal if
the vehicle has one.8. Now connect the black negative (−) cable to
the negative (−) terminal of the good battery.
Use a remote negative (−) terminal if the
vehicle has one.
Do not let the other end touch anything until
the next step. The other end of the negative (−)
cable does not go to the dead battery. It
goes to a heavy, unpainted metal engine part
or to a remote negative (−) terminal on the
vehicle with the dead battery.
9. Connect the other end of the negative (−) cable
at least 18 inches (45 cm) away from the dead
battery, but not near engine parts that move.
The electrical connection is just as good there,
and the chance of sparks getting back to the
battery is much less.
10. Now start the vehicle with the good battery
and run the engine for a while.
11. Try to start the vehicle that had the dead
battery. If it will not start after a few tries, it
probably needs service.
397
Page 465 of 528
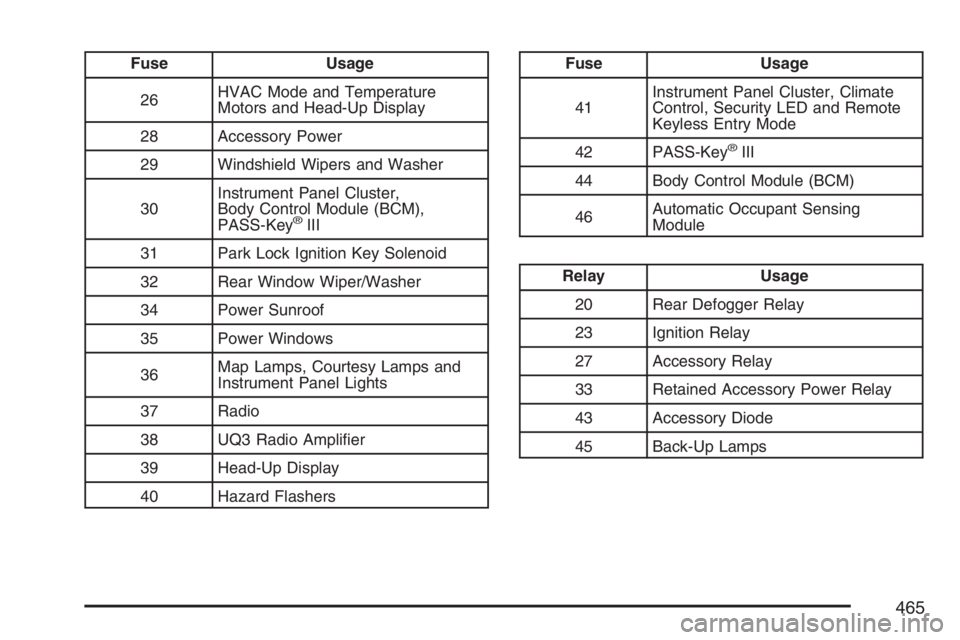
Fuse Usage
26HVAC Mode and Temperature
Motors and Head-Up Display
28 Accessory Power
29 Windshield Wipers and Washer
30Instrument Panel Cluster,
Body Control Module (BCM),
PASS-Key
®III
31 Park Lock Ignition Key Solenoid
32 Rear Window Wiper/Washer
34 Power Sunroof
35 Power Windows
36Map Lamps, Courtesy Lamps and
Instrument Panel Lights
37 Radio
38 UQ3 Radio Ampli�er
39 Head-Up Display
40 Hazard Flashers
Fuse Usage
41Instrument Panel Cluster, Climate
Control, Security LED and Remote
Keyless Entry Mode
42 PASS-Key
®III
44 Body Control Module (BCM)
46Automatic Occupant Sensing
Module
Relay Usage
20 Rear Defogger Relay
23 Ignition Relay
27 Accessory Relay
33 Retained Accessory Power Relay
43 Accessory Diode
45 Back-Up Lamps
465