horn BUICK REGAL 1997 Owners Manual
[x] Cancel search | Manufacturer: BUICK, Model Year: 1997, Model line: REGAL, Model: BUICK REGAL 1997Pages: 422, PDF Size: 21.34 MB
Page 14 of 422
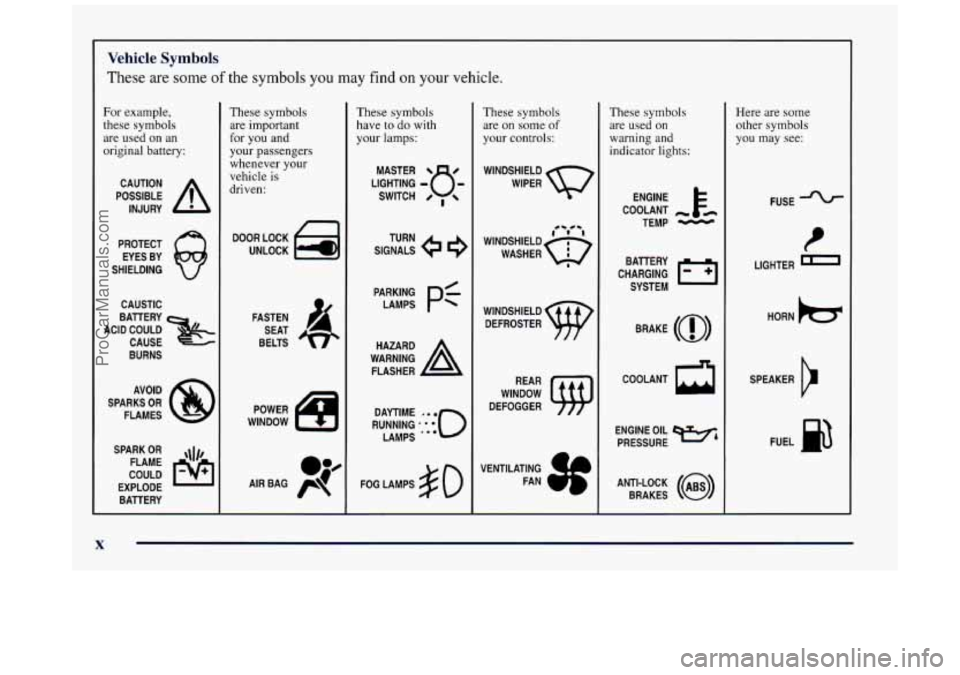
Vehicle Symbols
These are some of the symbols you may find on your vehicle.
For example,
these symbols
are used on an
original battery:
POSSIBLE A
CAUTION
INJURY
PROTECT EYES BY
SHIELDING
CAUSTIC
ACID COULD BAllERY
CAUSE
BURNS
SPARK
OR ,111,
COULD FLAME
EXPLODE BAllERY
These symbols are important
for you and
your passengers
whenever your
vehicle is
driven:
DOOR LOCK
UNLOCK
FASTEN SEAT
BELTS
These symbols
have to do with
your lamps:
SIGNALS @ e
TURN
These symbols
are
on some of
your controls:
WINDSHIELD
WIPER
WINDSHIELD DEFROSTER
WINDOW
DEFOGGER
These symbols
are used on
warning and
indicator lights:
COOLANT -
TEMP -
CHARGING I-1
BAllERY
SYSTEM
BRAKE
(0)
COOLANT a
ENGINE OIL w,
PRESSURE
ANTI-LOCK
(@)
BRAKES
Here are some
other symbols
you may see:
FUSE
I
LIGHTER n
HORN )tr
SPEAKER
b
FUEL p3
ProCarManuals.com
Page 77 of 422
Section 2 Features and Controls
Here you can learn about the many standard and optional features on your Buick, and information on starting, shifting
and braking. Also explained are the instrument panel and the warning systems that tell you
if everything is working
properly
-- and what to do if you have a problem.
2-2
2-4
2-9
2-15
2-16
2- 17
2-18
2-18
2-20
2-2 1
2-22
2-28
2-29
2-3
1
2-3 1
2-32
2-3 2
2-33 Keys
Door
Locks
Remote Keyless
Entry
Trunk
Theft
PASS-Key@
I1
New Vehicle “Break-In”
Ignition Positions
Starting Your Engine
Engine Coolant Heater Automatic Transaxle Operation
Parking Brake Shifting Into PARK
(P)
Shifting Out of PARK (P)
Parking Over Things That Burn
Engine Exhaust
Running Your Engine While You’re Parked
Windows 2-34
2-34
2-35
2-4
1
2-44
2-47
2-49
2-5 1
2-52
2-52 2-5 3
2-54
2-54
2-55
2-56 2-59
2-77 Horn
Tilt Steering Wheel
Turn Signal/Multifunction Lever
Exterior Lamps
Interior Lamps
Mirrors
Storage Compartments
Ashtrays and Lighter
Sun Visors
Accessory Outlet
Auxiliary Power Connection
Sunroof
Cellular Phone Provisions
Instrument Panel
-- Your Information System
lnstrument Panel Cluster
Warning Lights, Gages and Indicators
Driver Information Center
ProCarManuals.com
Page 87 of 422
Security Feedback
Security Feedback provides audible and/or visible
feedback that a remote keyless entry lock or unlock
command has been received and executed. Your
vehicle’s ignition must be off for this feature to work.
You may select
one of four operating modes for
reception of a lock command. You may also select one
of four operating modes for reception
of an unlock
command. The selection and programming of the lock
and unlock operating modes are independent of each
other. The following modes are available for either lock
or unlock verification:
Mode
1: No Verification
Mode
2: Horn Chirp only
Mode
3: Headlamp Flash only
Mode
4: Horn Chirp and Headlamp Flash
The operating mode
of the Security Feedback lock
function will be changed when you
perform the following
sequence with your vehicle’s doors closed and the ignition
key in
RUN:
Press and hold the power door lock switch. While
holding the door lock switch, press and release the
remote keyless entry
(RKE) transmitter lock switch.
This will initialize the customization mode. While in the
customization mode, the chime will sound the number
of chimes corresponding to the current Security
Feedback lock mode. Each additional press of the
RKE
transmitter lock switch will cause your vehicle to
advance the lock mode by
one, starting from the current
lock mode. If cycled beyond lock Mode
4, the vehicle
will enter lock Mode
1. During this procedure, the
chime will sound the number of chimes corresponding
to the current lock mode, providing you with feedback.
When the door lock switch is released, the vehicle will
remain in the most recent lock mode.
The operating mode of the Security Feedback unlock
function will be changed when you perform the
following sequence with your vehicle’s doors closed and
the ignition key in
RUN:
2-11
ProCarManuals.com
Page 88 of 422
Press and hold the power door unlock switch. While
holding the door unlock switch, press and release the
RKE transmitter unlock switch. This will initialize the
customization mode. While in the customization mode,
the chime will sound the number of chimes
corresponding to the current Security Feedback unlock
mode. Each additional press
of the RKE transmitter
unlock switch will cause your vehicle to advance the
unlock mode by one, starting from the current unlock
mode. If cycled beyond unlock Mode
4, the vehicle will
enter unlock Mode
1. During this procedure, the chime
will sound the number of chimes corresponding to the
current unlock mode, providing you with feedback.
When the door unlock switch is released, the vehicle
will remain in the most recent unlock mode.
Both the lock and unlock
Security Feedback functions will
be in operating Mode
4 when the vehicle is shipped from
the factory.
Disconnecting the vehicle’s battery for up to a year will
not change the programmed mode of the lock and
unlock Security Feedback functions.
Illumination on Remote Activation
This feature provides interior illumination when a remote
keyless entry door unlock command
is received and
executed by
your vehicle. Your vehicle’s ignition must be
off for the Illumination on Remote Activation feature to
work. The interior lamps will illuminate until your
vehicle’s ignition is turned to the RUN position or until
an illumination period of 40 seconds has elapsed. If a
door
is opened during the illumination period, the timed
illumination will be canceled, and the interior lamps will
remain on since a door
is open.
Instant Alarm
This feature allows you to activate an alarm by pressing
a switch on the remote keyless entry transmitter. Your
vehicle’s ignition must be off for the Instant Alarm to
work. When you press the special horn button on the
remote keyless entry transmitter, your vehicle’s
headlamps will flash, the
horn will honk repeatedly, and
your interior lamps will illuminate, attracting attention if
you need
it. The alarm will continue until:
1. You press the alarm button on the RISE transmitter a
second time.
2. The vehicle’s ignition is turned to the RUN position.
3. An alarm period of about two minutes has elapsed.
ProCarManuals.com
Page 90 of 422
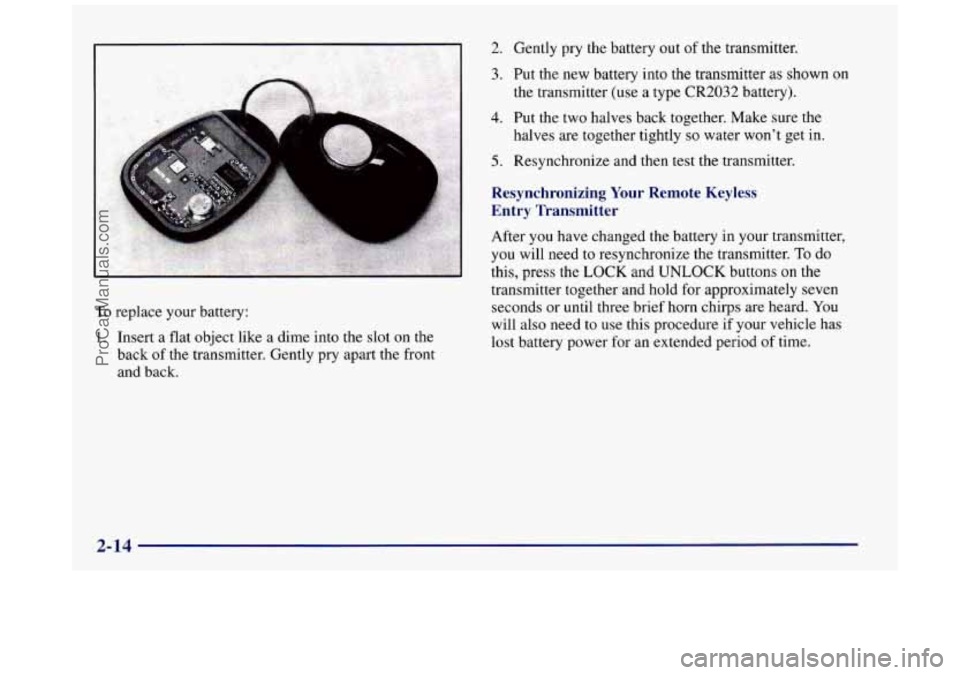
To replace your battery:
1. Insert a flat object like a dime into the slot on the
back of the transmitter. Gently pry apart the front
and back.
2.
3.
4.
5.
Gently pry the battery out of the transmitter.
Put the new battery into the transmitter
as shown on
the transmitter
(use a type CR2032 battery).
Put the two halves back together. Make sure the
halves are together tightly
so water won’t get in.
Resynchronize and then test the transmitter.
Resynchronizing Your Remote Keyless
Entry Transmitter
After you have changed the battery in your transmitter,
you will need to resynchronize the transmitter. To do
this, press the LOCK and UNLOCK buttons on the
transmitter together and hold for approximately seven
seconds or until three brief horn chirps are heard.
You
will also need to use this procedure if your vehicle has
lost battery power for an extended period of time.
2-14
ProCarManuals.com
Page 110 of 422
To stop the window while it is lowering, press the front
of the switch. To raise
the window, press and hold the
front
of the switch.
The driver’s window controls also include a lock-out
switch. Press
LOCK to stop front and rear passengers
from using their window switches. The driver can still
control all the windows with the lock on. Press the other
side of the
LOCK button for normal window operation.
Horn
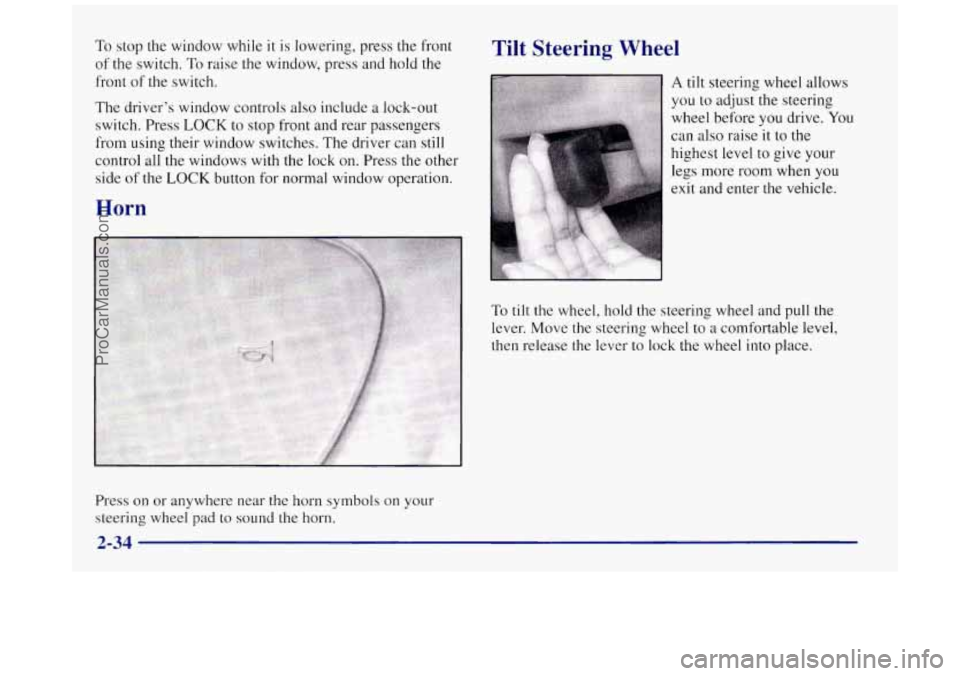
Press on or anywhere near the horn symbols on your
steering wheel pad to sound the horn.
Tilt Steering Wheel
A tilt steering wheel allows
you to adjust the steering
wheel before you drive.
You
can also raise it to the
highest level to give your
legs more room when
you
exit and enter the vehicle.
To
tilt the wheel, hold the steering wheel and pull the
lever. Move the steering wheel to a comfortable level,
then release the lever to lock the wheel into place.
2-34
ProCarManuals.com
Page 338 of 422
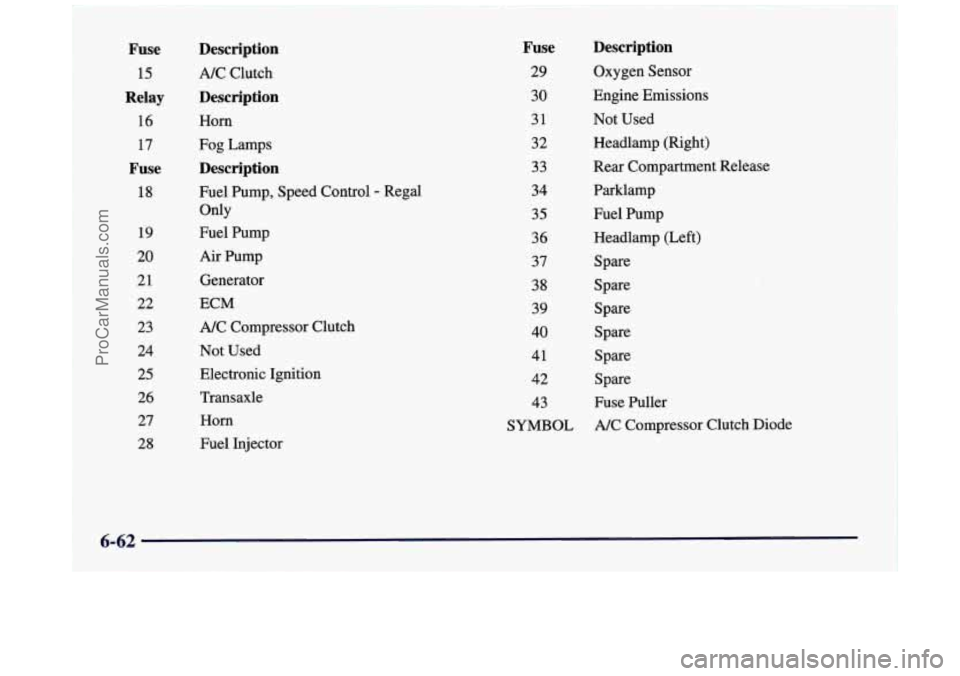
Fuse
15
Relay
16 17
Fuse
18
19
20
21
22 23
24
25
26
27
28
Description
A/C Clutch
Description
Horn
Fog Lamps
Description
Fuel Pump, Speed Control - Regal
Only
Fuel Pump
Air Pump
Generator
ECM
A/C Compressor Clutch
Not Used
Electronic Ignition
Transaxle
Horn
Fuel Injector
Fuse
29
30
31
32 33
34
35
36
37
38
39
40 41
42
43
SYMBOL
Description
Oxygen Sensor
Engine Emissions
Not Used
Headlamp (Right)
Rear Compartment Release
Parklamp
Fuel Pump
Headlamp (Left)
Spare
Spare Spare
Spare
Spare
Spare
Fuse Puller
A/C Compressor Clutch Diode
ProCarManuals.com
Page 411 of 422
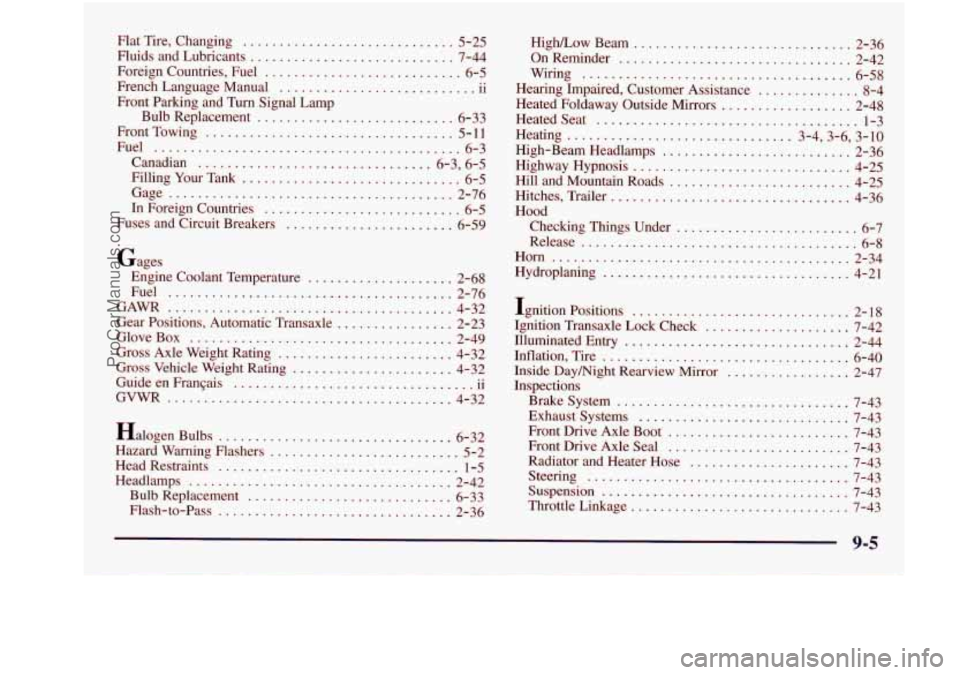
Flat Tire. Changing ............................. 5-25
Fluids and Lubricants
............................ 7-44
Foreign Countries. Fuel
........................... 6-5
French Language Manual
11
Front Parking and Turn Signal Lamp
Bulb Replacement
........................... 6-33
FrontTowing
.................................. 5-11
Fuel
.......................................... 6-3
Canadian
................................ 6-3, 6-5
Filling
Your Tank .............................. 6-5
Gage
....................................... 2-76
In Foreign Countries ........................... 6-5
Fuses and Circuit Breakers
....................... 6-59
.. ...........................
Gages Engine Coolant Temperature
.................... 2-68
Fuel
....................................... 2-76
GAWR
....................................... 4-32
Gear Positions, Automatic Transaxle
................ 2-23
GloveBox
.................................... 2-49
Gross Axle Weight Rating
........................ 4-32
Gross Vehicle Weight Rating
...................... 4-32
Guide en Franpis
11
GVWR ....................................... 4-32
.. .................................
Halogen Bulbs ................................ 6-32
Hazard Warning Flashers
.......................... 5-2
Head Restraints
................................. 1-5
Bulb Replacement ............................ 6-33
Flash-to-Pass
................................ 2-36
Headlamps
.................................... 2-42 High/LowBeam
.............................. 2-36
OnReminder
................................ 2-42
Wiring
..................................... 6-58
Hearing Impaired, Customer Assistance
.............. 8-4
Heated Foldaway Outside Mirrors
.................. 2-48
Heatedseat
.................................... 1-3
Heating
............................... 3-4,3-6, 3-10
High-Beam Headlamps
.......................... 2-36
Highway Hypnosis
.............................. 4-25
HillandMountainRoads
......................... 4-25
Hitches, Trailer
................................. 4-36
Hood Checking Things Under
......................... 6-7
Release
...................................... 6-8
Horn
......................................... 2-34
Hydroplaning
.................................. 4-21
Ignition Positions
.............................. 2-18
Ignition Transaxle Lock Check
.................... 7-42
Illuminated Entry
............................... 2-44
Inflation, Tire
.................................. 6-40
Inside Daymight Rearview
Mirror ................. 2-47
Inspections
Brakesystem
................................ 7-43
Exhaust Systems
............................. 7-43
Front Drive Axle Boot
......................... 7-43
Front Drive Axle Seal
......................... 7-43
Radiator and Heater Hose
...................... 7-43
Steering
.................................... 7-43
Suspension
.................................. 7-43
ThrottleLinkage
.............................. 7-43
9-5
ProCarManuals.com