tow BUICK REGAL 2012 Owner's Guide
[x] Cancel search | Manufacturer: BUICK, Model Year: 2012, Model line: REGAL, Model: BUICK REGAL 2012Pages: 440, PDF Size: 6.22 MB
Page 239 of 440
Black plate (17,1)Buick Regal Owner Manual - 2012
Driving and Operating 9-17
Key Lock Release
Vehicles with an automatic
transmission are equipped with an
electronic key lock release system.
This system is to prevent ignition
key removal unless the shift lever is
in P (Park).The key lock release will not work
if the battery is charged less than
9‐volts, or uncharged. Try charging
or jump starting the battery. See
Jump Starting (On-board with
eAssist Only) on page 10‑89
or
Jump Starting (with or without
eAssist) on page 10‑91
If charging or jump starting the
battery does not work, there is a
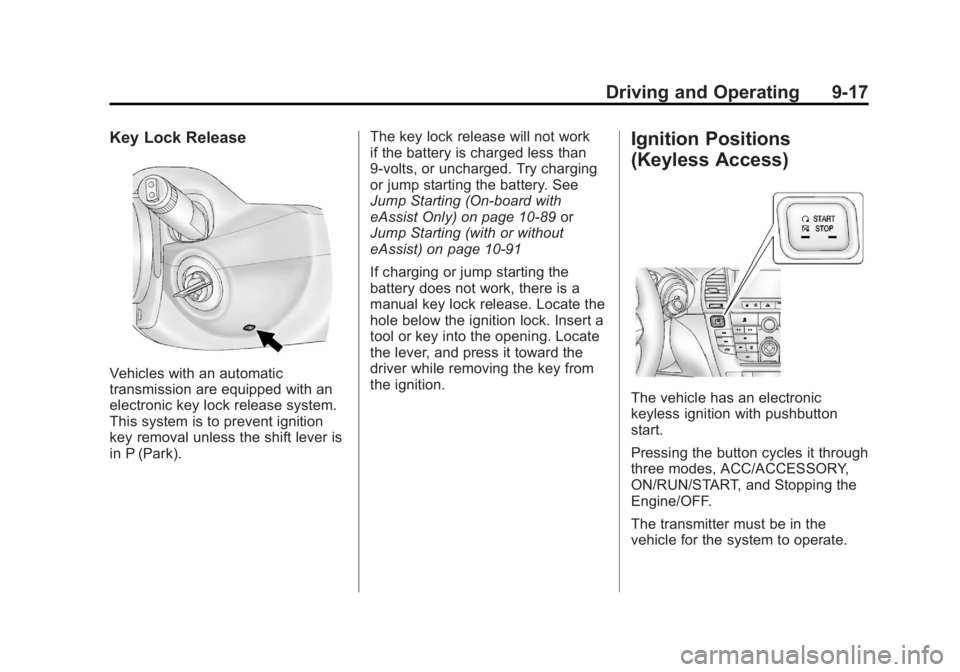
manual key lock release. Locate the
hole below the ignition lock. Insert a
tool or key into the opening. Locate
the lever, and press it toward the
driver while removing the key from
the ignition.
Ignition Positions
(Keyless Access)
The vehicle has an electronic
keyless ignition with pushbutton
start.
Pressing the button cycles it through
three modes, ACC/ACCESSORY,
ON/RUN/START, and Stopping the
Engine/OFF.
The transmitter must be in the
vehicle for the system to operate.
Page 247 of 440
Black plate (25,1)Buick Regal Owner Manual - 2012
Driving and Operating 9-25
Shifting Into Park
(Automatic Transmission)
{WARNING
It can be dangerous to get out of
the vehicle if the shift lever is not
fully in P (Park) with the parking
brake firmly set. The vehicle can
roll. If you have left the engine
running, the vehicle can move
suddenly. You or others could be
injured. To be sure the vehicle will
not move, even when you are on
fairly level ground, use the steps
that follow.
Use this procedure to shift into
P (Park):
1. Hold the brake pedal down and set the parking brake.
See Parking Brake on page 9‑34
for more information.
2. Hold the button on the shift lever and push the lever toward the
front of the vehicle into P (Park). 3. Turn the ignition to LOCK/OFF.
4. Remove the key.
Leaving the Vehicle with the
Engine Running
{WARNING
It can be dangerous to leave the
vehicle with the engine running.
The vehicle could move suddenly
if the shift lever is not fully in
P (Park) with the parking brake
firmly set. And, if you leave the
vehicle with the engine running, it
could overheat and even catch
fire. You or others could be
injured. Do not leave the vehicle
with the engine running.
If you have to leave the vehicle with
the engine running, the vehicle must
be in P (Park) and the parking
brake set.
Release the button and check that
the shift lever cannot be moved out
of P (Park).
Torque Lock
Torque lock is when the weight of
the vehicle puts too much force
on the parking pawl in the
transmission. This happens when
parking on a hill and shifting the
transmission into P (Park) is not
done properly; then it is difficult to
shift out of P (Park). To prevent
torque lock, set the parking brake
and then shift into P (Park). To find
out how, see “Shifting Into Park”
listed previously.
If torque lock does occur, the
vehicle may need to be pushed
uphill by another vehicle to relieve
the parking pawl pressure, so you
can shift out of P (Park).
Page 248 of 440
Black plate (26,1)Buick Regal Owner Manual - 2012
9-26 Driving and Operating
Shifting out of Park
(Automatic Transmission)
This vehicle is equipped with an
electronic shift lock release system.
The shift lock release is
designed to:
.Prevent ignition key removal
unless the shift lever is in
P (Park) with the shift lever
button fully released.
.Prevent movement of the shift
lever out of P (Park) unless the
ignition is in ON/RUN and the
brake pedal is applied.
The shift lock release is always
functional except in the case of an
uncharged or low voltage (less than
9‐volt) battery.
If the vehicle has an uncharged
battery or a battery with low voltage,
try charging or jump starting the
battery. See Jump Starting
(On-board with eAssist Only) on
page 10‑89 orJump Starting (with
or without eAssist) on page 10‑91. To shift out of P (Park):
1. Apply the brake pedal.
2. Turn the ignition to ON/RUN.
3. Press the shift lever button.
4. Move the shift lever to the
desired position.
If still unable to shift out of P (Park):
1. Fully release the shift lever button.
2. Hold the brake pedal down and press the shift lever button
again.
3. Move the shift lever to the desired position.
If you still cannot move the shift
lever from P (Park), consult your
dealer or a professional towing
service.
Parking
If the vehicle has a manual
transmission, before getting out of
the vehicle, move the shift lever into
R (Reverse) if parking on a downhill
slope. On a level surface or an
uphill slope, use 1 (First) gear.
Firmly apply the parking brake. Turn
the wheels toward the curb for a
downhill slope, or away from the
curb for an uphill slope. Once the
shift lever has been placed into gear
with the clutch pedal pressed in,
turn the ignition key to LOCK/OFF,
remove the key, and release the
clutch.
Page 265 of 440
Black plate (43,1)Buick Regal Owner Manual - 2012
Driving and Operating 9-43
*(Cancel):Press to disengage
cruise control without erasing the
set speed from memory.
RES/+ (Resume/Accelerate):
Move the thumbwheel up to make
the vehicle resume to a previously
set speed or to accelerate.
SET/− (Set/Coast): Move the
thumbwheel down to set the speed
and activate cruise control or make
the vehicle decelerate.
Setting Cruise Control
If the cruise button is on when not in
use, it could get bumped and go into
cruise when not desired. Keep the
cruise control switch off when cruise
is not being used.
1. Press
1to turn the cruise
control system on. The indicator
light in the instrument panel
cluster comes on.
2. Get to the speed desired. 3. Move the thumbwheel down
toward SET/− and release it.
The desired set speed briefly
appears in the instrument panel
cluster.
4. Take your foot off the accelerator pedal.
Resuming a Set Speed
If the cruise control is set at a
desired speed and then the brakes
are applied or the
*button is
pressed, the cruise control is
disengaged without erasing the set
speed from memory.
Once the vehicle reaches about
40 km/h (25 mph) or more, move the
thumbwheel up toward RES/+
briefly. The vehicle returns to the
previous set speed and stays there. Increasing Speed While Using
Cruise Control
If the cruise control system is
already activated:
.Move the thumbwheel up toward
RES/+ and hold it until the
vehicle accelerates to the
desired speed, then release it.
.To increase the speed in small
amounts, move the thumbwheel
up toward RES/+ briefly and
then release it. Each time this is
done, the vehicle goes about
1.6 km/h (1 mph) faster.
Reducing Speed While Using
Cruise Control
If the cruise control system is
already activated:
.Move the thumbwheel toward
SET/− and hold until the desired
lower speed is reached, then
release it.
.To slow down in small amounts,
move the thumbwheel toward
SET/− briefly and then release it.
Page 274 of 440
Black plate (52,1)Buick Regal Owner Manual - 2012
9-52 Driving and Operating
Towing
General Towing
Information
The vehicle is neither designed nor
intended to tow a trailer.
Conversions and
Add-Ons
Add-On Electrical
Equipment
Notice:Do not add anything
electrical to the vehicle unless
you check with your dealer first.
Some electrical equipment can
damage the vehicle and the
damage would not be covered by
the vehicle's warranty. Some
add-on electrical equipment can
keep other components from
working as they should. Add-on equipment can drain the
vehicle's 12‐volt battery, even if the
vehicle is not operating.
The vehicle has an airbag system.
Before attempting to add anything
electrical to the vehicle, see
Servicing the Airbag-Equipped
Vehicle on page 3‑32
andAdding
Equipment to the Airbag-Equipped
Vehicle on page 3‑32.
Page 276 of 440
Black plate (2,1)Buick Regal Owner Manual - 2012
10-2 Vehicle Care
Tire Terminology andDefinitions . . . . . . . . . . . . . . . . 10-49
Tire Pressure . . . . . . . . . . . . . . . 10-52
Tire Pressure for High-Speed Operation . . . . . . . . . . . . . . . . . 10-53
Tire Pressure Monitor System . . . . . . . . . . . . . . . . . . . 10-54
Tire Pressure Monitor Operation . . . . . . . . . . . . . . . . . 10-55
Tire Inspection . . . . . . . . . . . . . . 10-58
Tire Rotation . . . . . . . . . . . . . . . 10-58
When It Is Time for New Tires . . . . . . . . . . . . . . . . . . . . . . 10-60
Buying New Tires . . . . . . . . . . . 10-60
Different Size Tires and Wheels . . . . . . . . . . . . . . . . . . . 10-62
Uniform Tire Quality Grading . . . . . . . . . . . . . . . . . . . 10-62
Wheel Alignment and Tire Balance . . . . . . . . . . . . . . . . . . . 10-64
Wheel Replacement . . . . . . . . 10-64
Tire Chains . . . . . . . . . . . . . . . . . 10-65
If a Tire Goes Flat . . . . . . . . . . 10-65
Tire Sealant and Compressor Kit (With Pressure Relief
Button) . . . . . . . . . . . . . . . . . . . . 10-67 Tire Sealant and Compressor
Kit (With Pressure Deflation
Button) . . . . . . . . . . . . . . . . . . . . 10-74
Storing the Tire Sealant and Compressor Kit . . . . . . . . . . . 10-82
Tire Changing . . . . . . . . . . . . . . 10-83
Compact Spare Tire . . . . . . . . 10-89
Jump Starting
Jump Starting (On-board with eAssist Only) . . . . . . . . . 10-89
Jump Starting (with or without eAssist) . . . . . . . . . . . 10-91
Towing
Towing the Vehicle . . . . . . . . . 10-95
Recreational VehicleTowing . . . . . . . . . . . . . . . . . . . . 10-95
Appearance Care
Exterior Care . . . . . . . . . . . . . . . 10-98
Interior Care . . . . . . . . . . . . . . . 10-101
Floor Mats . . . . . . . . . . . . . . . . 10-103
General Information
For service and parts needs, visit
your dealer. You will receive
genuine GM parts and GM-trained
and supported service people.
Genuine GM parts have one of
these marks:
Page 286 of 440
Black plate (12,1)Buick Regal Owner Manual - 2012
10-12 Vehicle Care
2. Pull out the dipstick and clean itwith a paper towel or cloth, then
push it back in all the way.
Remove it again, keeping the tip
down, and check the level.
When to Add Engine Oil
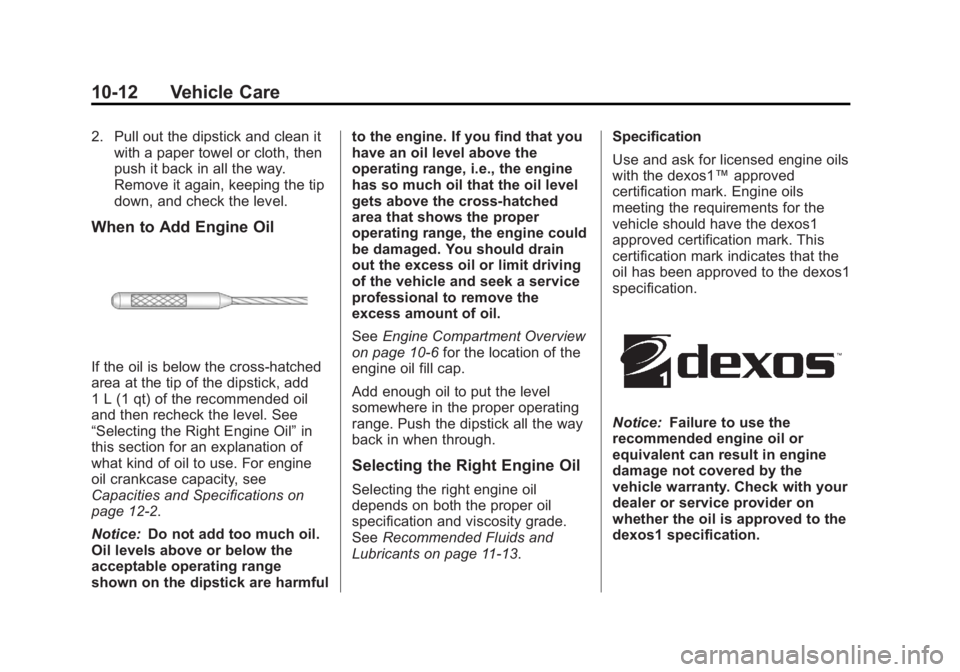
If the oil is below the cross-hatched
area at the tip of the dipstick, add
1 L (1 qt) of the recommended oil
and then recheck the level. See
“Selecting the Right Engine Oil” in
this section for an explanation of
what kind of oil to use. For engine
oil crankcase capacity, see
Capacities and Specifications on
page 12‑2.
Notice: Do not add too much oil.
Oil levels above or below the
acceptable operating range
shown on the dipstick are harmful to the engine. If you find that you
have an oil level above the
operating range, i.e., the engine
has so much oil that the oil level
gets above the cross-hatched
area that shows the proper
operating range, the engine could
be damaged. You should drain
out the excess oil or limit driving
of the vehicle and seek a service
professional to remove the
excess amount of oil.
See
Engine Compartment Overview
on page 10‑6 for the location of the
engine oil fill cap.
Add enough oil to put the level
somewhere in the proper operating
range. Push the dipstick all the way
back in when through.
Selecting the Right Engine Oil
Selecting the right engine oil
depends on both the proper oil
specification and viscosity grade.
See Recommended Fluids and
Lubricants on page 11‑13. Specification
Use and ask for licensed engine oils
with the dexos1™
approved
certification mark. Engine oils
meeting the requirements for the
vehicle should have the dexos1
approved certification mark. This
certification mark indicates that the
oil has been approved to the dexos1
specification.
Notice: Failure to use the
recommended engine oil or
equivalent can result in engine
damage not covered by the
vehicle warranty. Check with your
dealer or service provider on
whether the oil is approved to the
dexos1 specification.
Page 291 of 440
Black plate (17,1)Buick Regal Owner Manual - 2012
Vehicle Care 10-17
3. Disconnect the electricalconnector (C).
4. Remove the screws (A) on top of the engine air cleaner/filter
housing.
5. Lift the filter cover housing away from the engine.
6. Pull out the filter.
7. Inspect or replace the engine air cleaner/filter.
8. Reverse Steps 2 through 4 to reinstall the filter cover housing.
2.4L L4 Engine with eAssist
1. Open the hood. See Hood on
page 10‑5.
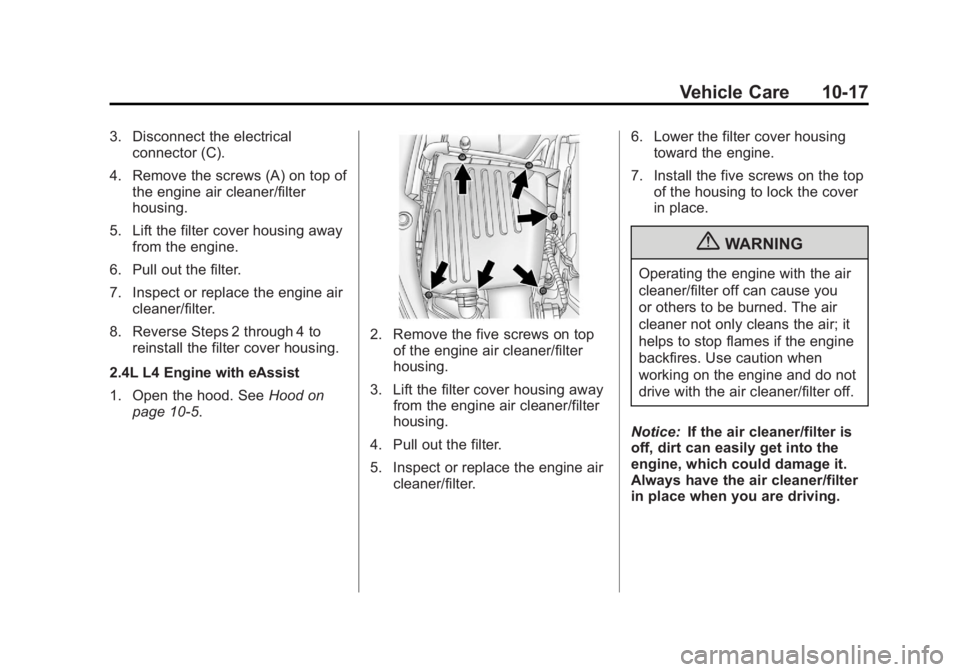
2. Remove the five screws on top of the engine air cleaner/filter
housing.
3. Lift the filter cover housing away from the engine air cleaner/filter
housing.
4. Pull out the filter.
5. Inspect or replace the engine air cleaner/filter. 6. Lower the filter cover housing
toward the engine.
7. Install the five screws on the top of the housing to lock the cover
in place.
{WARNING
Operating the engine with the air
cleaner/filter off can cause you
or others to be burned. The air
cleaner not only cleans the air; it
helps to stop flames if the engine
backfires. Use caution when
working on the engine and do not
drive with the air cleaner/filter off.
Notice: If the air cleaner/filter is
off, dirt can easily get into the
engine, which could damage it.
Always have the air cleaner/filter
in place when you are driving.
Page 306 of 440
Black plate (32,1)Buick Regal Owner Manual - 2012
10-32 Vehicle Care
.To check the P (Park)
mechanism's holding ability:
With the engine running, shift to
P (Park). Then release the
parking brake followed by the
regular brake.
Contact your dealer if service is
required.
Wiper Blade Replacement
Windshield wiper blades should be
inspected for wear or cracking. See
Maintenance Schedule on
page 11‑3 for more information.
It is a good idea to clean the wiper
blade assembly on a regular basis.
When worn, or cleaning is
ineffective, replace the wiper blade.
For proper windshield wiper blade
length and type, see Maintenance
Replacement Parts on page 11‑15. Notice:
Allowing the wiper arm to
touch the windshield when no
wiper blade is installed could
damage the windshield. Any
damage that occurs would not be
covered by your warranty. Do not
allow the wiper arm to touch the
windshield.
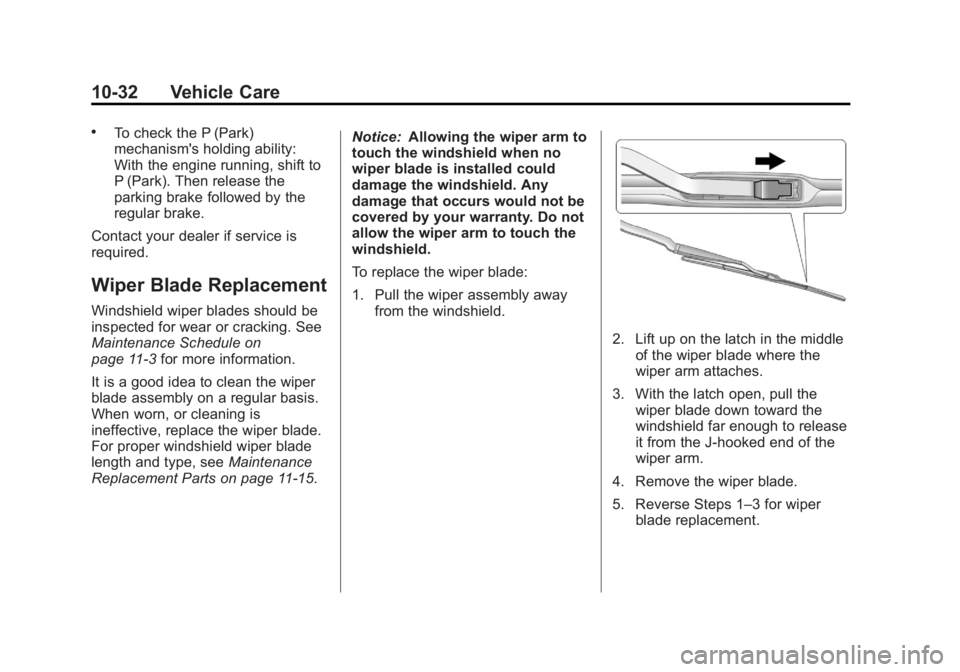
To replace the wiper blade:
1. Pull the wiper assembly away
from the windshield.
2. Lift up on the latch in the middleof the wiper blade where the
wiper arm attaches.
3. With the latch open, pull the wiper blade down toward the
windshield far enough to release
it from the J-hooked end of the
wiper arm.
4. Remove the wiper blade.
5. Reverse Steps 1–3 for wiper blade replacement.
Page 310 of 440
Black plate (36,1)Buick Regal Owner Manual - 2012
10-36 Vehicle Care
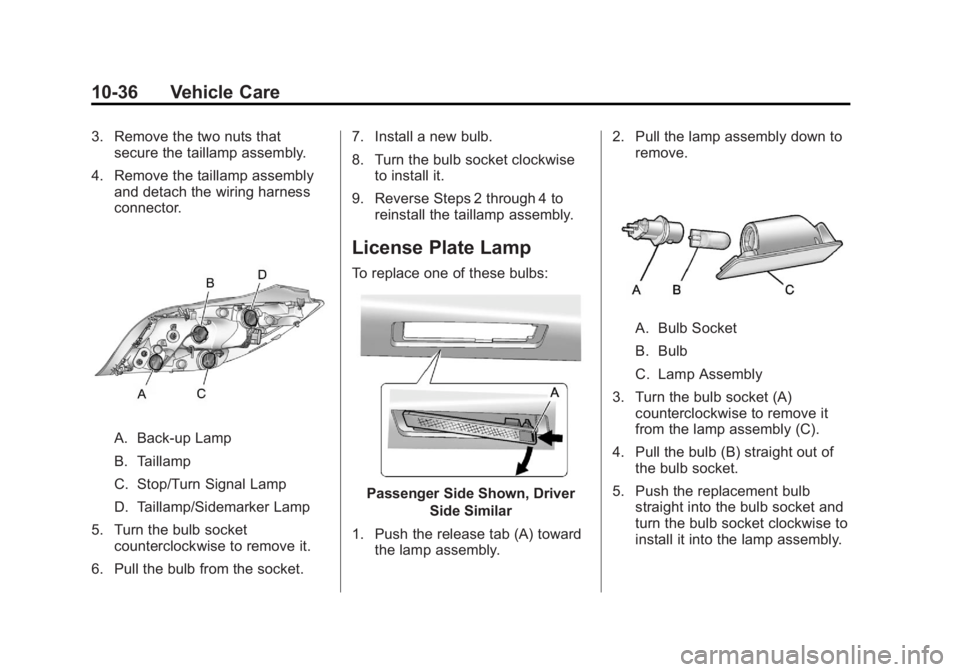
3. Remove the two nuts thatsecure the taillamp assembly.
4. Remove the taillamp assembly and detach the wiring harness
connector.
A. Back-up Lamp
B. Taillamp
C. Stop/Turn Signal Lamp
D. Taillamp/Sidemarker Lamp
5. Turn the bulb socket counterclockwise to remove it.
6. Pull the bulb from the socket. 7. Install a new bulb.
8. Turn the bulb socket clockwise
to install it.
9. Reverse Steps 2 through 4 to reinstall the taillamp assembly.
License Plate Lamp
To replace one of these bulbs:
Passenger Side Shown, Driver
Side Similar
1. Push the release tab (A) toward the lamp assembly. 2. Pull the lamp assembly down to
remove.
A. Bulb Socket
B. Bulb
C. Lamp Assembly
3. Turn the bulb socket (A) counterclockwise to remove it
from the lamp assembly (C).
4. Pull the bulb (B) straight out of the bulb socket.
5. Push the replacement bulb straight into the bulb socket and
turn the bulb socket clockwise to
install it into the lamp assembly.