clock BUICK REGAL 2015 Owner's Manual
[x] Cancel search | Manufacturer: BUICK, Model Year: 2015, Model line: REGAL, Model: BUICK REGAL 2015Pages: 399, PDF Size: 4.96 MB
Page 38 of 399
Black plate (7,1)Buick Regal Owner Manual (GMNA-Localizing-U.S./Canada/Mexico-
7576024) - 2015 - CRC - 9/15/14
Keys, Doors, and Windows 2-7
2. Insert the vehicle key of the newtransmitter into the key lock
cylinder located on the outside
of the driver door and turn the
key counterclockwise to the
unlock position five times within
10 seconds.
The Driver Information Center
(DIC) displays READY FOR
REMOTE #2, 3, 4 or 5.
3. Place the new transmitter into the transmitter pocket with the
buttons facing up. The
transmitter pocket is located
inside the center console
cupholder.
4. Press the ENGINE START/ STOP button. When the
transmitter is learned, the DIC
will show that it is ready to
program the next transmitter.
5. Remove the transmitter from the transmitter pocket and press
K.
To program additional
transmitters, repeat Steps 3–5. When all additional transmitters
are programmed, press and hold
the ignition for 12 seconds to
exit programming mode.
Reinstall the rubber cupliner.
Programming without a
Recognized Transmitter (Keyless
Access Vehicles Only)
If there are no currently recognized
transmitters available, follow this
procedure to program up to eight
transmitters. This feature is not
available in Canada. This procedure
will take approximately 30 minutes
to complete. The vehicle must be off
and all of the transmitters you wish
to program must be with you.
1. Insert the vehicle key of the transmitter into the key lock
cylinder located on the outside
of the driver door and turn the
key to the unlock position,
counterclockwise, five times
within 10 seconds. The Driver Information Center
(DIC) displays REMOTE LEARN
PENDING, PLEASE WAIT.
2. Wait for 10 minutes until the DIC displays PRESS ENGINE
START BUTTON TO LEARN
and then press the ENGINE
START/STOP button.
The DIC display will again show
REMOTE LEARN PENDING,
PLEASE WAIT.
3. Repeat Step 2 two additional times. After the third time all
previously known transmitters
will no longer work with the
vehicle. Remaining transmitters
can be relearned during the next
steps.
The DIC display should now
show READY FOR REMOTE
# 1.
Page 110 of 399
Black plate (1,1)Buick Regal Owner Manual (GMNA-Localizing-U.S./Canada/Mexico-
7576024) - 2015 - CRC - 9/15/14
Instruments and Controls 5-1
Instruments and
Controls
Controls
Steering Wheel Adjustment . . . 5-2
Steering Wheel Controls . . . . . . 5-2
Heated Steering Wheel . . . . . . . 5-2
Horn . . . . . . . . . . . . . . . . . . . . . . . . . . 5-3
Windshield Wiper/Washer . . . . . 5-3
Compass . . . . . . . . . . . . . . . . . . . . . 5-4
Clock . . . . . . . . . . . . . . . . . . . . . . . . . 5-4
Power Outlets . . . . . . . . . . . . . . . . . 5-5
Cigarette Lighter . . . . . . . . . . . . . . 5-6
Ashtrays . . . . . . . . . . . . . . . . . . . . . . 5-6
Warning Lights, Gauges, and
Indicators
Warning Lights, Gauges, andIndicators . . . . . . . . . . . . . . . . . . . . 5-7
Instrument Cluster (Base Level Cluster) . . . . . . . . . . . . . . . . . . . . . . 5-8
Instrument Cluster (Uplevel Cluster) . . . . . . . . . . . . . . . . . . . . 5-12
Speedometer . . . . . . . . . . . . . . . . 5-15
Odometer . . . . . . . . . . . . . . . . . . . . 5-15
Trip Odometer . . . . . . . . . . . . . . . 5-15
Tachometer . . . . . . . . . . . . . . . . . . 5-15 Fuel Gauge . . . . . . . . . . . . . . . . . . 5-16
Engine Coolant Temperature
Gauge . . . . . . . . . . . . . . . . . . . . . . 5-17
Safety Belt Reminders . . . . . . . 5-18
Airbag Readiness Light . . . . . . 5-18
Passenger Airbag Status Indicator . . . . . . . . . . . . . . . . . . . . 5-19
Charging System Light . . . . . . 5-20
Malfunction Indicator Lamp . . . . . . . . . . . . . 5-20
Brake System Warning Light . . . . . . . . . . . . . . . . . . . . . . . 5-23
Electric Parking Brake Light . . . . . . . . . . . . . . . . . . . . . . . 5-24
Service Electric Parking Brake Light . . . . . . . . . . . . . . . . . . . . . . . 5-24
Antilock Brake System (ABS) Warning Light . . . . . . . . . . . . . . 5-24
Up-Shift Light . . . . . . . . . . . . . . . . 5-25
Lane Departure Warning (LDW) Light . . . . . . . . . . . . . . . . 5-25
Vehicle Ahead Indicator . . . . . . 5-26
Traction Off Light . . . . . . . . . . . . 5-26
StabiliTrak
®OFF Light . . . . . . . 5-26
Traction Control System (TCS)/StabiliTrak
®Light . . . . 5-27
Engine Coolant Temperature Warning Light . . . . . . . . . . . . . . 5-27
Tire Pressure Light . . . . . . . . . . 5-28 Engine Oil Pressure Light . . . . 5-28
Low Fuel Warning Light . . . . . . 5-29
Security Light . . . . . . . . . . . . . . . . 5-29
High-Beam On Light . . . . . . . . . 5-29
Front Fog Lamp Light . . . . . . . . 5-29
Lamps On Reminder . . . . . . . . . 5-30
Cruise Control Light . . . . . . . . . 5-30
Door Ajar Light . . . . . . . . . . . . . . 5-30
Information Displays
Power Flows
(eAssist Only) . . . . . . . . . . . . . . 5-31
Energy Information (eAssist Only) . . . . . . . . . . . . . . 5-32
Driver Information Center (DIC) (Base Level
Cluster) . . . . . . . . . . . . . . . . . . . . 5-32
Driver Information Center (DIC) (Uplevel Cluster) . . . . . 5-35
Vehicle Messages
Vehicle Messages . . . . . . . . . . . 5-38
Battery Voltage and ChargingMessages . . . . . . . . . . . . . . . . . . 5-38
Brake System Messages . . . . 5-39
Compass Messages . . . . . . . . . 5-39
Cruise Control Messages . . . . 5-39
Door Ajar Messages . . . . . . . . . 5-40
Page 113 of 399
Black plate (4,1)Buick Regal Owner Manual (GMNA-Localizing-U.S./Canada/Mexico-
7576024) - 2015 - CRC - 9/15/14
5-4 Instruments and Controls
nL(Windshield Washer): Pull
the windshield wiper lever toward
you to spray washer fluid and
activate the wipers. The wipers will
continue until the lever is released
or the maximum wash time is
reached. When the lever is
released, additional wipes may
occur depending on how long the
windshield washer had been
activated. See Washer Fluid on
page 10-23 for information on filling
the windshield washer fluid
reservoir.
{Warning
In freezing weather, do not use
the washer until the windshield is
warmed. Otherwise the washer
fluid can form ice on the
windshield, blocking your vision.
Compass
The vehicle may have a compass
display on the Driver Information
Center (DIC). The compass receives
its heading and other information
from the Global Positioning
System (GPS) antenna,
StabiliTrak
®, and vehicle speed
information.
The compass system is designed to
operate for a certain number of
miles or degrees of turn before
needing a signal from the GPS
satellites. When the compass
display shows CAL, drive the
vehicle for a short distance in an
open area where it can receive a
GPS signal. The compass system
will automatically determine when a
GPS signal is restored and provide
a heading again. See Compass
Messages on page 5-39 for the
messages that may be displayed for
the compass.
Clock
Setting the Time and Date
To set the time or date:
1. Select Settings from the Home
Page, then select Time and Date
Settings.
2. Select the desired function.
To set the time or date, press
«or
ªto change the hour, minutes,
AM, PM, day, month, or year.
To change the 12-24 Hr setting,
press the 12-24 Hr button.
To turn Auto Set on and off, press
the Auto Set button.
If auto timing is set, the time
displayed on the clock may not
update immediately when driving
into a new time zone.
Press
qBACK to go to the last
menu and save the changes or
{to
return to the Home Page.
Page 157 of 399
Black plate (48,1)Buick Regal Owner Manual (GMNA-Localizing-U.S./Canada/Mexico-
7576024) - 2015 - CRC - 9/15/14
5-48 Instruments and Controls
Personalization Menus
The following list of features may be
available:
.Time and Date
.Language (Language)
.Valet Mode
.Radio
.Vehicle
.Bluetooth
.Voice
.Display
.Rear Camera
.Return to Factory Settings
.Software Information
Each menu is detailed in the
following information.
Time and Date
Manually set the time and date. See
Clock on page 5-4.
Language (Language)
Select Language, then select from
the available language(s).
Valet Mode
To turn Valet Mode on and off, see
“Valet Mode” under“Settings” in the
infotainment manual.
Radio
To manage the radio features, see
“Radio” under“Settings” in the
infotainment manual.
Vehicle
Select and the following may
display:
.Climate and Air Quality
.Collision/Detection Systems
.Comfort and Convenience
.Lighting
.Power Door Locks
.Remote Lock, Unlock, Start Climate and Air Quality
Select and the following may
display:
.Auto Fan Max Speed
.Auto Defog
.Auto Rear Defog
Auto Fan Max Speed
This feature will set the maximum
auto fan speed.
Select Low, Medium, or High.
Auto Defog
When set to On, the front defog will
automatically react to temperature
and humidity conditions that may
cause fogging.
Select Off or On.
Auto Rear Defog
If equipped, this allows the Auto
Rear Defog to be turned on or off.
This feature will automatically turn
on the rear window defogger when it
is cold outside.
Select Off or On.
Page 244 of 399
Black plate (63,1)Buick Regal Owner Manual (GMNA-Localizing-U.S./Canada/Mexico-
7576024) - 2015 - CRC - 9/15/14
Driving and Operating 9-63
Warning (Continued)
.Fuel can spray out if the fuel
cap is opened too quickly.
This spray can happen if the
tank is nearly full, and is
more likely in hot weather.
Open the fuel cap slowly and
wait for any hiss noise to stop
then unscrew the cap all
the way.
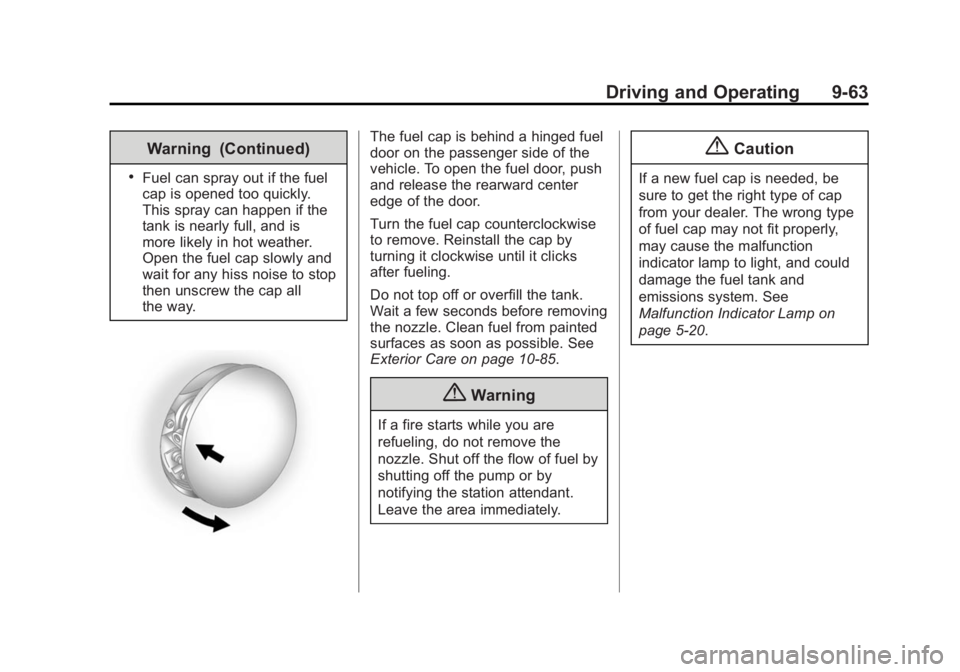
The fuel cap is behind a hinged fuel
door on the passenger side of the
vehicle. To open the fuel door, push
and release the rearward center
edge of the door.
Turn the fuel cap counterclockwise
to remove. Reinstall the cap by
turning it clockwise until it clicks
after fueling.
Do not top off or overfill the tank.
Wait a few seconds before removing
the nozzle. Clean fuel from painted
surfaces as soon as possible. See
Exterior Care on page 10-85.
{Warning
If a fire starts while you are
refueling, do not remove the
nozzle. Shut off the flow of fuel by
shutting off the pump or by
notifying the station attendant.
Leave the area immediately.
{Caution
If a new fuel cap is needed, be
sure to get the right type of cap
from your dealer. The wrong type
of fuel cap may not fit properly,
may cause the malfunction
indicator lamp to light, and could
damage the fuel tank and
emissions system. See
Malfunction Indicator Lamp on
page 5-20.
Page 268 of 399
Black plate (21,1)Buick Regal Owner Manual (GMNA-Localizing-U.S./Canada/Mexico-
7576024) - 2015 - CRC - 9/15/14
Vehicle Care 10-21
water and DEX-COOL coolant at the
coolant surge tank, but be sure the
cooling system, including the
coolant surge tank pressure cap, is
cool before you do it.
{Warning
Steam and scalding liquids from a
hot cooling system can blow out
and burn you badly. Never turn
the cap when the cooling system,
including the surge tank pressure
cap, is hot. Wait for the cooling
system and surge tank pressure
cap to cool.
{Caution
In cold weather, water can freeze
and crack the engine, radiator,
heater core, and other parts. Use
the recommended coolant and
the proper coolant mixture.
{Warning
You can be burned if you spill
coolant on hot engine parts.
Coolant contains ethylene glycol
and it will burn if the engine parts
are hot enough. Do not spill
coolant on a hot engine.
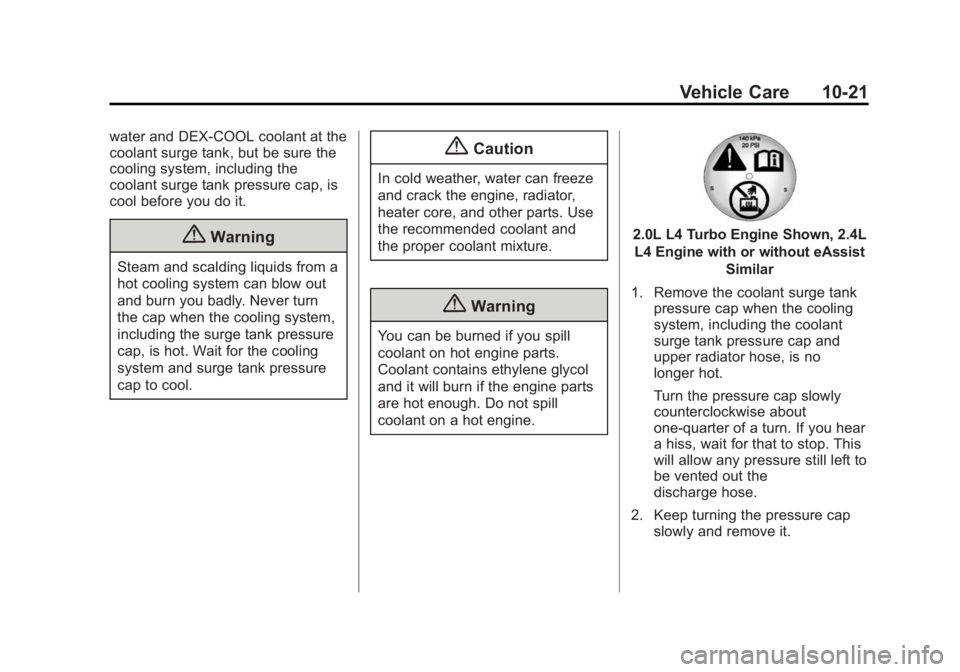
2.0L L4 Turbo Engine Shown, 2.4LL4 Engine with or without eAssist Similar
1. Remove the coolant surge tank pressure cap when the cooling
system, including the coolant
surge tank pressure cap and
upper radiator hose, is no
longer hot.
Turn the pressure cap slowly
counterclockwise about
one-quarter of a turn. If you hear
a hiss, wait for that to stop. This
will allow any pressure still left to
be vented out the
discharge hose.
2. Keep turning the pressure cap slowly and remove it.
Page 279 of 399
Black plate (32,1)Buick Regal Owner Manual (GMNA-Localizing-U.S./Canada/Mexico-
7576024) - 2015 - CRC - 9/15/14
10-32 Vehicle Care
Front Turn Signal and
Sidemarker Lamps (Base and
Uplevel)
1. Remove the outside cap fromthe uplevel headlamp assembly.
2. Remove the bulb socket from the headlamp assembly.
3. Remove the bulb from the socket.
4. Reverse steps 1–3 to install.
Fog Lamps
To replace the fog lamp bulb:
1. Locate the bulb assembly under the front fascia.
2. Disconnect the electrical connector from the bulb
assembly.
3. Remove the bulb by turning it counterclockwise and pulling it
straight out of the assembly.
4. Install the new bulb by turning it clockwise into the assembly. 5. Reconnect the electrical
connector to the bulb assembly.
Taillamps, Turn Signal,
Stoplamps, and Back-Up
Lamps
To replace any one of these bulbs:
1. Open the trunk. See Trunk
Release on page 1-6.
2. Remove the trunk trim panel push pin.
3. Pull the trunk trim panel back to gain access to the taillamp
assembly.
4. Remove the three nuts that secure the taillamp assembly.
5. Remove the taillamp assembly and disconnect the wiring
harness connector.
6. Turn the bulb socket counterclockwise to remove it.
7. Pull the bulb from the socket.
8. Install a new bulb. 9. Turn the bulb socket clockwise
to install it.
10. Reverse Steps 2–4 to reinstall the taillamp assembly.
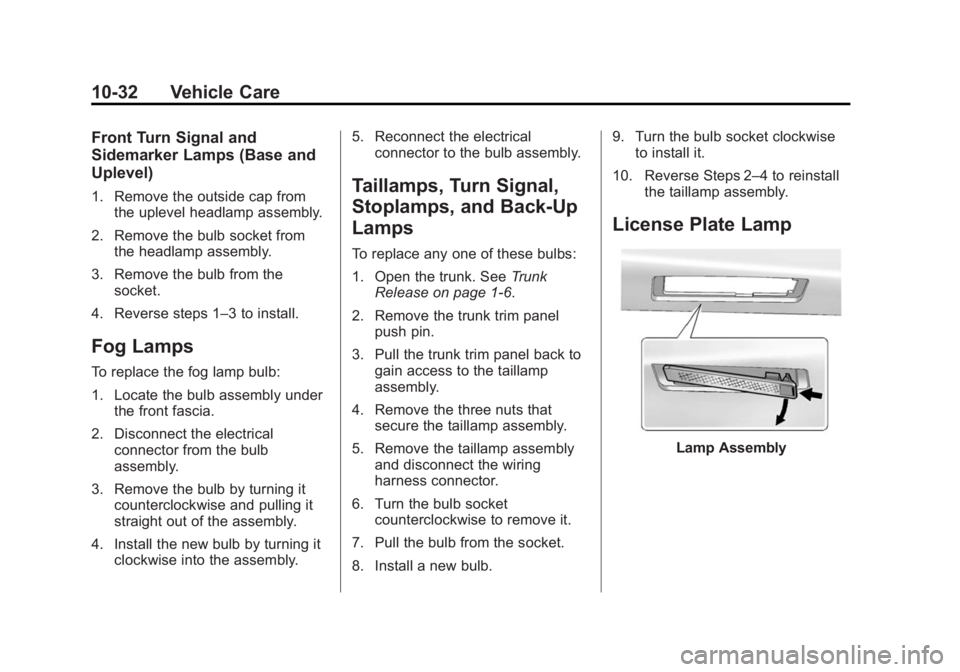
License Plate Lamp
Lamp Assembly
Page 280 of 399
Black plate (33,1)Buick Regal Owner Manual (GMNA-Localizing-U.S./Canada/Mexico-
7576024) - 2015 - CRC - 9/15/14
Vehicle Care 10-33
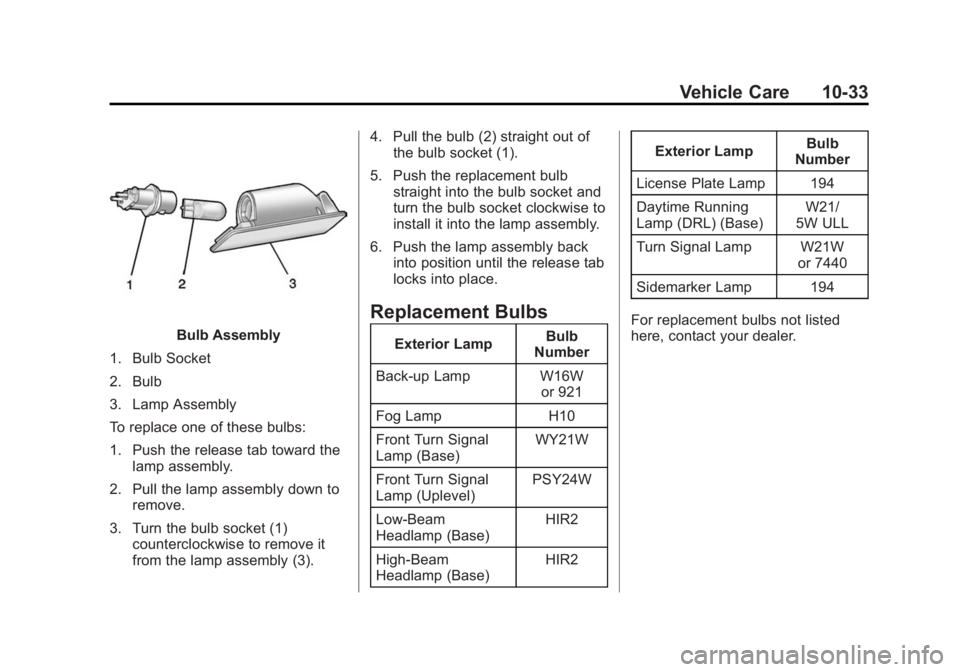
Bulb Assembly
1. Bulb Socket
2. Bulb
3. Lamp Assembly
To replace one of these bulbs:
1. Push the release tab toward the lamp assembly.
2. Pull the lamp assembly down to remove.
3. Turn the bulb socket (1) counterclockwise to remove it
from the lamp assembly (3). 4. Pull the bulb (2) straight out of
the bulb socket (1).
5. Push the replacement bulb straight into the bulb socket and
turn the bulb socket clockwise to
install it into the lamp assembly.
6. Push the lamp assembly back into position until the release tab
locks into place.
Replacement Bulbs
Exterior Lamp Bulb
Number
Back-up Lamp W16W or 921
Fog Lamp H10
Front Turn Signal
Lamp (Base) WY21W
Front Turn Signal
Lamp (Uplevel) PSY24W
Low-Beam
Headlamp (Base) HIR2
High-Beam
Headlamp (Base) HIR2Exterior Lamp
Bulb
Number
License Plate Lamp 194
Daytime Running
Lamp (DRL) (Base) W21/
5W ULL
Turn Signal Lamp W21W or 7440
Sidemarker Lamp 194
For replacement bulbs not listed
here, contact your dealer.
Page 313 of 399
Black plate (66,1)Buick Regal Owner Manual (GMNA-Localizing-U.S./Canada/Mexico-
7576024) - 2015 - CRC - 9/15/14
10-66 Vehicle Care
When using the tire sealant and
compressor kit during cold
temperatures, warm the kit in aheated environment for five minutes.
This will help to inflate the tire
faster.
If a tire goes flat, avoid further tire
and wheel damage by driving slowly
to a level place. Turn on the hazard
warning flashers. See
Hazard
Warning Flashers on page 6-3.
See If a Tire Goes Flat on
page 10-62 for other important
safety warnings.
Do not remove any objects that
have penetrated the tire.
1. Remove the tire sealant and compressor kit from its storage
location. See Storing the Tire
Sealant and Compressor Kit on
page 10-71.
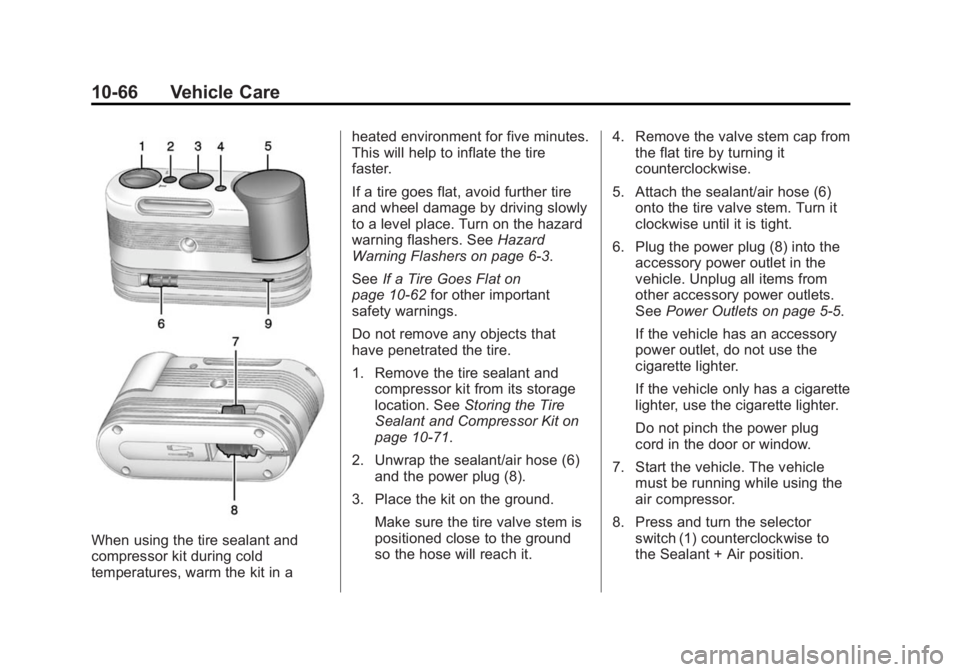
2. Unwrap the sealant/air hose (6) and the power plug (8).
3. Place the kit on the ground. Make sure the tire valve stem is
positioned close to the ground
so the hose will reach it. 4. Remove the valve stem cap from
the flat tire by turning it
counterclockwise.
5. Attach the sealant/air hose (6) onto the tire valve stem. Turn it
clockwise until it is tight.
6. Plug the power plug (8) into the accessory power outlet in the
vehicle. Unplug all items from
other accessory power outlets.
See Power Outlets on page 5-5.
If the vehicle has an accessory
power outlet, do not use the
cigarette lighter.
If the vehicle only has a cigarette
lighter, use the cigarette lighter.
Do not pinch the power plug
cord in the door or window.
7. Start the vehicle. The vehicle must be running while using the
air compressor.
8. Press and turn the selector switch (1) counterclockwise to
the Sealant + Air position.
Page 314 of 399
Black plate (67,1)Buick Regal Owner Manual (GMNA-Localizing-U.S./Canada/Mexico-
7576024) - 2015 - CRC - 9/15/14
Vehicle Care 10-67
9. Press the on/off button (2) toturn the tire sealant and
compressor kit on.
The compressor will inject
sealant and air into the tire.
The pressure gauge (3) will
initially show a high pressure
while the compressor pushes the
sealant into the tire. Once the
sealant is completely dispersed
into the tire, the pressure will
quickly drop and start to rise
again as the tire inflates with
air only.
10. Inflate the tire to the recommended inflation
pressure using the pressure
gauge (3). The recommended
inflation pressure can be found
on the Tire and Loading
Information label. See Tire
Pressure on page 10-48.
The pressure gauge (3) may
read higher than the actual tire
pressure while the compressor
is on. Turn the compressor off
to get an accurate pressure reading. The compressor may
be turned on/off until the
correct pressure is reached.
{Caution
If the recommended pressure
cannot be reached after
approximately 25 minutes, the
vehicle should not be driven
farther. The tire is too severely
damaged and the tire sealant and
compressor kit cannot inflate the
tire. Remove the power plug from
the accessory power outlet and
unscrew the inflating hose from
the tire valve. See
Roadside
Assistance Program on
page 13-5.
11. Press the on/off button (2) to turn the tire sealant and
compressor kit off. The tire is not sealed and will
continue to leak air until the
vehicle is driven and the
sealant is distributed in the tire;
therefore, Steps 12–18 must be
done immediately after
Step 11.
Be careful while handling the
tire sealant and compressor kit
as it could be warm after
usage.
12. Unplug the power plug (8) from the accessory power outlet in
the vehicle.
13. Turn the sealant/air hose (6) counterclockwise to remove it
from the tire valve stem.
14. Replace the tire valve stem cap.
15. Replace the sealant/air hose (6), and the power plug (8)
back in their original location.