10-6 BUICK VERANO 2012 Owner's Manual
[x] Cancel search | Manufacturer: BUICK, Model Year: 2012, Model line: VERANO, Model: BUICK VERANO 2012Pages: 388, PDF Size: 5.26 MB
Page 2 of 388
Black plate (2,1)Buick Verano Owner Manual - 2012 - CRC - 1/10/12
2012 Buick Verano Owner ManualM
Vehicle Care. . . . . . . . . . . . . . . . . 10-1
General Information . . . . . . . . . . 10-2
Vehicle Checks . . . . . . . . . . . . . . . 10-3
Headlamp Aiming . . . . . . . . . . . 10-22
Bulb Replacement . . . . . . . . . . 10-22
Electrical System . . . . . . . . . . . . 10-26
Wheels and Tires . . . . . . . . . . . 10-34
Jump Starting . . . . . . . . . . . . . . . 10-64
Towing . . . . . . . . . . . . . . . . . . . . . . 10-67
Appearance Care . . . . . . . . . . . 10-71 Service and Maintenance
. . . 11-1
General Information . . . . . . . . . . 11-1
Maintenance Schedule . . . . . . . 11-3
Special Application
Services . . . . . . . . . . . . . . . . . . . . 11-8
Additional Maintenance and Care . . . . . . . . . . . . . . . . . . . . 11-8
Recommended Fluids,
Lubricants, and Parts . . . . . . 11-12
Maintenance Records . . . . . . . 11-14
Technical Data . . . . . . . . . . . . . . . 12-1
Vehicle Identification . . . . . . . . . 12-1
Vehicle Data . . . . . . . . . . . . . . . . . . 12-2 Customer Information
. . . . . . . 13-1
Customer Information . . . . . . . . 13-1
Reporting Safety Defects . . . . 13-12
Vehicle Data Recording and
Privacy . . . . . . . . . . . . . . . . . . . . 13-14
OnStar . . . . . . . . . . . . . . . . . . . . . . . 14-1
OnStar Overview . . . . . . . . . . . . . 14-1
OnStar Services . . . . . . . . . . . . . . 14-2
OnStar Additional
Information . . . . . . . . . . . . . . . . . . 14-5
Index . . . . . . . . . . . . . . . . . . . . . i-1
Page 255 of 388
Black plate (1,1)Buick Verano Owner Manual - 2012 - CRC - 1/10/12
Vehicle Care 10-1
Vehicle Care
General Information
General Information . . . . . . . . . . 10-2
California Proposition65 Warning . . . . . . . . . . . . . . . . . 10-2
California Perchlorate Materials Requirements . . . . 10-2
Accessories and Modifications . . . . . . . . . . . . . . . 10-3
Vehicle Checks
Doing Your OwnService Work . . . . . . . . . . . . . . . 10-3
Hood . . . . . . . . . . . . . . . . . . . . . . . . 10-4
Engine Compartment Overview . . . . . . . . . . . . . . . . . . . 10-6
Engine Oil . . . . . . . . . . . . . . . . . . . 10-7
Engine Oil Life System . . . . . . 10-9
Automatic Transmission Fluid . . . . . . . . . . . . . . . . . . . . . . 10-10
Engine Air Cleaner/Filter . . . . 10-11
Cooling System . . . . . . . . . . . . 10-12
Engine Coolant . . . . . . . . . . . . . 10-12
Engine Overheating . . . . . . . . 10-16
Washer Fluid . . . . . . . . . . . . . . . 10-16 Brakes . . . . . . . . . . . . . . . . . . . . . 10-17
Brake Fluid . . . . . . . . . . . . . . . . . 10-18
Battery . . . . . . . . . . . . . . . . . . . . . 10-19
Starter Switch Check . . . . . . . 10-20
Automatic Transmission Shift
Lock Control Function
Check . . . . . . . . . . . . . . . . . . . . . 10-20
Ignition Transmission Lock Check . . . . . . . . . . . . . . . . . . . . . 10-20
Park Brake and P (Park) Mechanism Check . . . . . . . . 10-21
Wiper Blade Replacement . . . . . . . . . . . . . . 10-21Headlamp Aiming
Headlamp Aiming . . . . . . . . . . 10-22
Bulb Replacement
Bulb Replacement . . . . . . . . . . 10-22
Headlamps, Front TurnSignal and Parking
Lamps . . . . . . . . . . . . . . . . . . . . 10-22
Fog Lamps . . . . . . . . . . . . . . . . . 10-23
Taillamps, Turn Signal, Stoplamps, and Back-Up
Lamps . . . . . . . . . . . . . . . . . . . . 10-23
License Plate Lamp . . . . . . . . 10-25
Replacement Bulbs . . . . . . . . . 10-25
Electrical System
Electrical System Overload . . . . . . . . . . . . . . . . . . 10-26
Fuses and Circuit Breakers . . . . . . . . . . . . . . . . . . 10-26
Engine Compartment Fuse
Block . . . . . . . . . . . . . . . . . . . . . 10-27
Instrument Panel Fuse Block . . . . . . . . . . . . . . . . . . . . . 10-30
Rear Compartment Fuse Block . . . . . . . . . . . . . . . . . . . . . 10-32
Wheels and Tires
Tires . . . . . . . . . . . . . . . . . . . . . . . . 10-34
Winter Tires . . . . . . . . . . . . . . . . 10-35
Low-Profile Tires . . . . . . . . . . . 10-35
Tire Sidewall Labeling . . . . . . 10-36
Tire Designations . . . . . . . . . . . 10-38
Tire Terminology andDefinitions . . . . . . . . . . . . . . . . 10-39
Tire Pressure . . . . . . . . . . . . . . . 10-42
Tire Pressure Monitor System . . . . . . . . . . . . . . . . . . . 10-43
Tire Pressure Monitor Operation . . . . . . . . . . . . . . . . . 10-44
Tire Inspection . . . . . . . . . . . . . . 10-47
Tire Rotation . . . . . . . . . . . . . . . 10-47
When It Is Time for New Tires . . . . . . . . . . . . . . . . . . . . . . 10-48
Page 256 of 388
Black plate (2,1)Buick Verano Owner Manual - 2012 - CRC - 1/10/12
10-2 Vehicle Care
Buying New Tires . . . . . . . . . . . 10-49
Different Size Tires andWheels . . . . . . . . . . . . . . . . . . . 10-51
Uniform Tire Quality Grading . . . . . . . . . . . . . . . . . . . 10-51
Wheel Alignment and Tire Balance . . . . . . . . . . . . . . . . . . . 10-53
Wheel Replacement . . . . . . . . 10-54
Tire Chains . . . . . . . . . . . . . . . . . 10-55
If a Tire Goes Flat . . . . . . . . . . 10-55
Tire Changing . . . . . . . . . . . . . . 10-57
Compact Spare Tire . . . . . . . . 10-64
Jump Starting
Jump Starting . . . . . . . . . . . . . . 10-64
Towing
Towing the Vehicle . . . . . . . . . 10-67
Recreational Vehicle Towing . . . . . . . . . . . . . . . . . . . . 10-69
Appearance Care
Exterior Care . . . . . . . . . . . . . . . 10-71
Interior Care . . . . . . . . . . . . . . . . 10-74
Cleaning the CenterStack . . . . . . . . . . . . . . . . . . . . . 10-77
Floor Mats . . . . . . . . . . . . . . . . . . 10-77
General Information
For service and parts needs, visit
your dealer. You will receive
genuine GM parts and GM-trained
and supported service people.
Genuine GM parts have one of
these marks:
California Proposition
65 Warning
Most motor vehicles, including this
one, contain and/or emit chemicals
known to the State of California to
cause cancer and birth defects or
other reproductive harm. Engine
exhaust, many parts and systems,
many fluids, and some component
wear by-products contain and/or
emit these chemicals.
California Perchlorate
Materials Requirements
Certain types of automotive
applications, such as airbag
initiators, safety belt pretensioners,
and lithium batteries contained in
Remote Keyless Entry transmitters,
may contain perchlorate materials.
Special handling may be necessary.
For additional information, see
www.dtsc.ca.gov/hazardouswaste/
perchlorate.
Page 260 of 388

Black plate (6,1)Buick Verano Owner Manual - 2012 - CRC - 1/10/12
10-6 Vehicle Care
Engine Compartment Overview
Page 314 of 388

Black plate (60,1)Buick Verano Owner Manual - 2012 - CRC - 1/10/12
10-60 Vehicle Care
{WARNING
Lifting a vehicle and getting under
it to do maintenance or repairs
is dangerous without the
appropriate safety equipment and
training. If a jack is provided with
the vehicle, it is designed only for
changing a flat tire. If it is used for
anything else, you or others could
be badly injured or killed if the
vehicle slips off the jack. If a jack
is provided with the vehicle, only
use it for changing a flat tire.
Hex Head Jack Shown, Coin/Pierce Jack Similar
8. Raise the jack by turning the handle clockwise until it comes
in contact with the notch in the
flange.Make sure the jack lift head
notch is placed in the flange
notch.
Raise the vehicle far enough off
the ground so there is enough
room for the road tire to clear the
ground.
Page 315 of 388
Black plate (61,1)Buick Verano Owner Manual - 2012 - CRC - 1/10/12
Vehicle Care 10-61
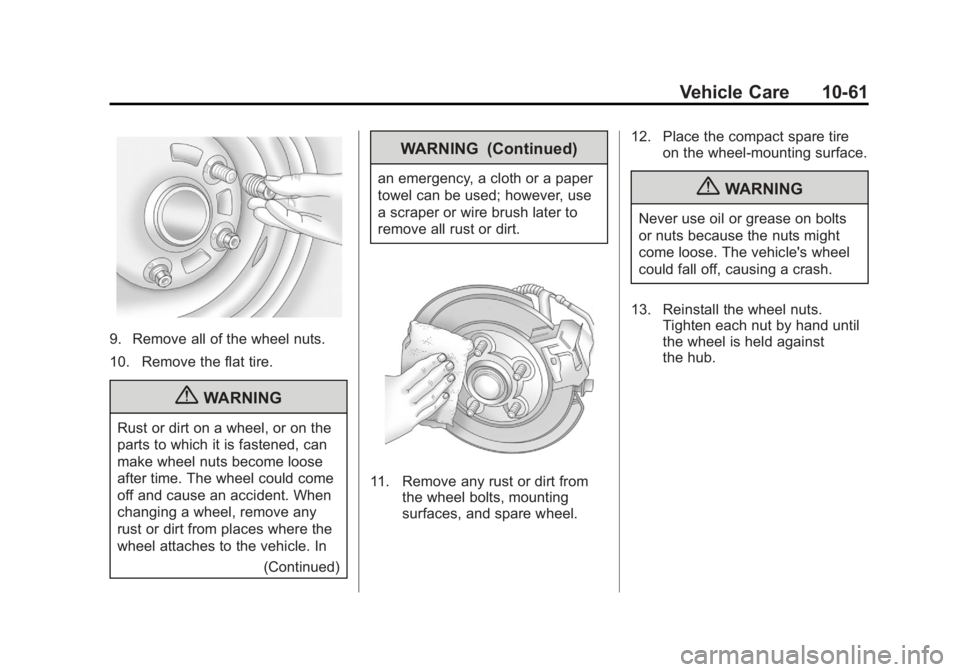
9. Remove all of the wheel nuts.
10. Remove the flat tire.
{WARNING
Rust or dirt on a wheel, or on the
parts to which it is fastened, can
make wheel nuts become loose
after time. The wheel could come
off and cause an accident. When
changing a wheel, remove any
rust or dirt from places where the
wheel attaches to the vehicle. In(Continued)
WARNING (Continued)
an emergency, a cloth or a paper
towel can be used; however, use
a scraper or wire brush later to
remove all rust or dirt.
11. Remove any rust or dirt fromthe wheel bolts, mounting
surfaces, and spare wheel. 12. Place the compact spare tire
on the wheel-mounting surface.
{WARNING
Never use oil or grease on bolts
or nuts because the nuts might
come loose. The vehicle's wheel
could fall off, causing a crash.
13. Reinstall the wheel nuts. Tighten each nut by hand until
the wheel is held against
the hub.
Page 316 of 388

Black plate (62,1)Buick Verano Owner Manual - 2012 - CRC - 1/10/12
10-62 Vehicle Care
14. Lower the vehicle byturning the jack handle
counterclockwise.
{WARNING
Wheel nuts that are improperly or
incorrectly tightened can cause
the wheels to become loose or
come off. The wheel nuts should
be tightened with a torque wrench
to the proper torque specification
after replacing. Follow the torque
specification supplied by the
aftermarket manufacturer when
using accessory locking wheel
nuts. See Capacities and
Specifications on page 12‑2 for
original equipment wheel nut
torque specifications. Notice:
Improperly tightened
wheel nuts can lead to brake
pulsation and rotor damage. To
avoid expensive brake repairs,
evenly tighten the wheel nuts in
the proper sequence and to the
proper torque specification. See
Capacities and Specifications on
page 12‑2 for the wheel nut
torque specification.
15. Tighten the wheel nuts firmly in a crisscross sequence, as
shown. 16. Lower the jack all the way and
remove the jack from under the
vehicle.
17. Tighten the wheel nuts firmly with the wheel wrench.
18. Remove the wheel blocks and return them to their proper
storage location.
When reinstalling the wheel cover
or center cap on the full-size tire,
tighten all five plastic caps hand
snug with the aid of the wheel
wrench and tighten them with
the wheel wrench an additional
one‐quarter of a turn.
Notice: Wheel covers will not fit
on the vehicle's compact spare.
If you try to put a wheel cover on
the compact spare, the cover or
the spare could be damaged.
Page 317 of 388

Black plate (63,1)Buick Verano Owner Manual - 2012 - CRC - 1/10/12
Vehicle Care 10-63
Storing a Flat or Spare Tire
and Tools
{WARNING
Storing a jack, a tire, or other
equipment in the passenger
compartment of the vehicle could
cause injury. In a sudden stop or
collision, loose equipment could
strike someone. Store all these in
the proper place.
Storing the Flat Tire and Tools
1. Replace the wheel wrench and wheel blocks in the tool bag.
2. Remove the foam container from the rear storage compartment.
Coin/Pierce Jack Shown, Hex
Head Jack Similar
3. Place the flat tire in the storage compartment with the valve
stem down.
4. Place the jack and jack handle extension, if the vehicle has one,
in the foam container. 5. Place the foam container inside
the flat tire. Align the hole with
the stow rod.
6. Place the tool bag tether over the stow rod and the tool bag
rear of the flat tire.
7. Turn the retainer nut clockwise until tight.
8. Replace the load floor.
The load floor may not lay flat.
The compact spare is for temporary
use only. Replace the compact
spare tire with a full-size tire as
soon as you can.
Storing the Compact Spare Tire
and Tools
Reverse the instructions for
removing the spare tire and tools to
store the compact spare tire.
Page 318 of 388
Black plate (64,1)Buick Verano Owner Manual - 2012 - CRC - 1/10/12
10-64 Vehicle Care
Compact Spare Tire
{WARNING
Driving with more than one
compact spare tire at a time could
result in loss of braking and
handling. This could lead to a
crash and you or others could be
injured. Use only one compact
spare tire at a time.
If this vehicle has a compact spare
tire, it was fully inflated when the
vehicle was new; however, it can
lose air after a time. Check the
inflation pressure regularly. It should
be 420 kPa (60 psi).
Stop as soon as possible and
check that the spare tire is correctly
inflated after installing the spare on
the vehicle. The compact spare
is designed to perform well at
speeds up to 105 km/h (65 mph) for
distances up to 5 000 km (3,000 mi),
so a trip can be completed and the full-size tire repaired or replaced
when possible. However, the
compact spare tire will last longer
and be in good shape if it is
replaced as soon as possible.
Notice:
When the compact spare
is installed, do not take the
vehicle through an automatic
car wash with guide rails. The
compact spare can get caught on
the rails which can damage the
tire, wheel, and other parts of the
vehicle.
Do not use the compact spare on
other vehicles.
Do not mix the compact spare tire
or wheel with other wheels or tires.
They will not fit. Keep the spare tire
and its wheel together.
Notice: Tire chains will not fit the
compact spare. Using them can
damage the vehicle and can
damage the chains too. Do not
use tire chains on the compact
spare.
Jump Starting
For more information about the
vehicle battery, see Battery on
page 10‑19.
If the battery has run down, try to
use another vehicle and some
jumper cables to start your vehicle.
Be sure to use the following steps to
do it safely.
{WARNING
Batteries can hurt you. They can
be dangerous because:
.They contain acid that can
burn you.
.They contain gas that can
explode or ignite.
.They contain enough
electricity to burn you.
If you do not follow these steps
exactly, some or all of these
things can hurt you.
Page 319 of 388

Black plate (65,1)Buick Verano Owner Manual - 2012 - CRC - 1/10/12
Vehicle Care 10-65
Notice:Ignoring these steps
could result in costly damage to
the vehicle that would not be
covered by the warranty.
Trying to start the vehicle by
pushing or pulling it will not
work, and it could damage the
vehicle.
The jump start positive post (B) is
located in the engine compartment
on the driver side of the vehicle. The jump start negative grounding
point (D) is the engine block or an
engine mounting bolt. Connect
to a spot as far away from the
discharged battery as possible.
These locations are used instead of
a direct connection to the battery.
The positive jump start connection
is under a trim cover. Open the
cover door to expose the terminal.
1. Check the other vehicle. It must
have a 12-volt battery with a
negative ground system.
Notice: Only use a vehicle that
has a 12-volt system with a
negative ground for jump
starting. If the other vehicle does
not have a 12-volt system with a
negative ground, both vehicles
can be damaged.
2. Position the two vehicles so that they are not touching.
3. Set the parking brake firmly and put the shift lever in P (Park).
See Shifting Into Park on
page 9‑23. Notice:
If any accessories are
left on or plugged in during the
jump starting procedure, they
could be damaged. The repairs
would not be covered by the
vehicle warranty. Whenever
possible, turn off or unplug all
accessories on either vehicle
when jump starting the vehicle.
4. Turn the ignition to LOCK/OFF.
Turn off all lights and
accessories in both vehicles,
except the hazard warning
flashers if needed.
{WARNING
An electric fan can start up even
when the engine is not running
and can injure you. Keep hands,
clothing and tools away from any
underhood electric fan.