buttons CADILLAC ATS 2013 1.G User Guide
[x] Cancel search | Manufacturer: CADILLAC, Model Year: 2013, Model line: ATS, Model: CADILLAC ATS 2013 1.GPages: 450, PDF Size: 6.98 MB
Page 178 of 450
Black plate (6,1)Cadillac ATS Owner Manual - 2013 - CRC - 10/5/12
7-6 Infotainment System
Radio Setup
While at the active screen, such as
AM, FM, or SiriusXM (if equipped),
press and hold the area just above
the chrome bar and below one of
the preset screen buttons to save
the current station as a favorite.
Press the area just above the
chrome bar to recall a favorite
station.
From the Home Screen, turn the
MENU knob to select Settings
application and push the MENU
knob to select. Turn again to select
"Radio" settings menu and push
to select. Turn again to select
"Manage Favorites" and push to
select.From the RADIO screen icon, the
following may be displayed:
Manage Favorites:
.Turn the MENU knob and push
to select a Favorite.
.Push the area just above the
chrome bar and below the
DELETE screen button to delete
a favorite.
.While a station is highlighted,
press the MOVE screen button.
The screen button will change to
DROP. Turn the MENU knob and
the station tab will follow the
path to the desired location.
Press the area just above the
chrome bar and below the
DROP screen button to relocate
the station.Number of Favorites Shown:
To
set the number of favorites for
display, select Auto to automatically
adjust the number of Favorites
pages shown as Favorites are
added and removed. Another way
to adjust is to select a number from
5–25 to show that selection of
favorites. Press
SBACK to go back
to the previous menu.
Audible Touch Feedback: Select
Audible Touch Feedback to turn
feedback Off or On. Press
SBACK
to go back to the previous menu.
Auto Volume (If Equipped): This
feature adjusts the volume based
on vehicle speed. The options are
Off, Low, Medium-Low, Medium,
Medium-High, or High. Select the
desired volume. Press
SBACK to
go back to the previous menu.
Page 182 of 450
Black plate (10,1)Cadillac ATS Owner Manual - 2013 - CRC - 10/5/12
7-10 Infotainment System
EQ (Equalizer) Settings:For
vehicles equipped with a Bose
Sound System the available choices
are Manual and Talk.
DSP Modes: If equipped with a
Bose
®Surround Sound System, it
will have the following four DSP
modes:
.Normal: Adjusts the audio to
normal mode. This provides the
best sound quality for all seating
positions.
.Driver: Adjusts the audio to give
the driver the best possible
sound quality.
.Rear: Adjusts the audio to give
the rear seat occupants the best
possible sound quality.
.Centerpoint®: Turns on Bose
Centerpoint®surround
technology.
Centerpoint creates a surround
sound from nearly any audio
source; existing CD collection,
satellite radio, and audio players. Options for SiriusXM Only
XM View:
XM view allows the
channel list to be viewed by channel
name, artist playing on channel,
or song playing on channel. Turn
the MENU knob to highlight XM
view and press the MENU knob to
select. Press
SBACK to go to the
previous menu.
Channel List: Select to display a
list of SiriusXM stations. Turn
the MENU knob to highlight and
press the MENU knob to select.
Press
SBACK to go to the
previous menu.
Also see the radio settings common
for all sources earlier in this section.
Finding a Station
Seeking a Station
Press
7or6to search for the
previous or next strongest station. Tuning a Station
Turn the MENU knob to manually
find a station.
Storing Radio Station Presets
Favorites are stored in the favorites
area at the bottom of the screen.
Up to 25 preset stations can be
stored under the following:
AM, FM, or SiriusXM (if
equipped):
While on the active
source main page, such as AM, FM,
and SiriusXM (if equipped), press
and hold the area just above the
chrome bar and below one of the
preset screen buttons to save the
current station as a favorite. Press
the area just above the chrome bar
to recall a favorite station.
Favorites
Favorites can be stored including
radio stations and media.
To display the favorites page, press
the FAV button on the radio
faceplate.
Page 194 of 450
Black plate (22,1)Cadillac ATS Owner Manual - 2013 - CRC - 10/5/12
7-22 Infotainment System
Bluetooth Controls
Use the buttons on the faceplate
and the steering wheel to operate
the Bluetooth system.
Steering Wheel Controls
g(Push to Talk):Press to answer
incoming calls, confirm system
information, and start voice
recognition.
c(End Call): Press to end a call,
reject a call, or cancel an operation.
Press to mute or unmute the
infotainment system.
Infotainment System Controls
For information about how to
navigate the menu system using the
infotainment controls, see Overview
on page 7‑3.
MENU: Turn to scroll through the
phone menu, including Contact,
Recent Calls, Keypad, and
Bluetooth Devices. Press to select
an entry and dial when appropriate.
{(Home Page): Press to go to the
Home Page. See Home Page on
page 7‑4.
PHONE: Press to enter the phone
main menu. See Bluetooth
(Infotainment Controls) on
page 7‑23 orBluetooth (Voice
Recognition) on page 7‑27 or
Bluetooth (Overview) on page 7‑21.
Voice Recognition
The voice recognition system uses
commands to control the system
and dial phone numbers.
Noise: The system may not
recognize voice commands if there
is too much background noise.
When to Speak: A tone sounds to
indicate that the system is ready for
a voice command. Wait for the tone
and then speak.
How to Speak: Speak clearly in a
calm and natural voice.
Audio System
When using the Bluetooth system,
sound comes through the vehicle's
front audio system speakers and
overrides the audio system. Use the
Oknob during a call to change the
volume level. The system maintains
a minimum volume level.
Bluetooth Audio Quality
Turn off the Echo and Noise
cancellation feature on your phone,
if supported, for the best hands-free
performance.
See www.gm.com/bluetooth.
Other Information
The Bluetooth®word mark and
logos are owned by the Bluetooth®
SIG, Inc. and any use of such marks
by General Motors is under license.
Other trademarks and trade names
are those of their respective owners.
Page 208 of 450
Black plate (2,1)Cadillac ATS Owner Manual - 2013 - CRC - 10/5/12
8-2 Climate Controls
10. Rear Window Defogger
11. Recirculation
Automatic Operation
The system automatically controls
the fan speed, air delivery, air
conditioning, and recirculation in
order to heat or cool the vehicle to
the desired temperature.
When the indicator light is on or
AUTO is displayed on the screen,
the system is in full automatic
operation. If the air delivery mode or
fan setting is manually adjusted, the
auto indicator turns off and the
display will show the selected
settings.
For automatic operation:
1. Press AUTO.
2. Set the temperature. Allow thesystem time to stabilize. Then
adjust the temperature as
needed for best comfort.
To improve fuel efficiency and to
cool the vehicle faster, recirculation
may be automatically selected in warm weather. The recirculation
light will not come on. Press
@to
select recirculation; press it again to
select outside air.
English units can be changed to
metric units through the instrument
cluster. See “Settings”under
Instrument Cluster on page 5‑9.
OFF (Fan): Press to turn the fan on
or off. The temperature control and
air delivery mode can still be
adjusted.
w/x(Driver and Passenger
Temperature Controls): The
temperature can be adjusted
separately for the driver and the
passenger. Press to increase or
decrease the temperature. Press
and hold to rapidly increase or
decrease the temperature.
SYNC (Synchronized
Temperature): Press SYNC to link
all climate zone settings to the
driver settings. The SYNC indicator
will be lit. Adjust the driver side
temperature control to change the
linked temperature. When the passenger settings are adjusted, the
temperatures are unlinked and the
SYNC indicator turns off.
Manual Operation
z 9or9 y(Fan Control):
Press the fan control buttons to
increase or decrease the fan speed.
Press and hold the buttons to adjust
speed more quickly. The fan speed
setting displays. Pressing either
button cancels automatic fan control
and the fan can be controlled
manually. Press AUTO to return to
automatic operation. To turn off the
fan, press OFF.
z N y(Air Delivery Mode
Control): Press the air delivery
mode buttons to change the
direction of the airflow. Selecting
any of the air delivery modes
cancels automatic air delivery
control and the direction of the
airflow can be controlled manually.
Press AUTO to return to automatic
operation.
Page 211 of 450
Black plate (5,1)Cadillac ATS Owner Manual - 2013 - CRC - 10/5/12
Climate Controls 8-5
Sensors
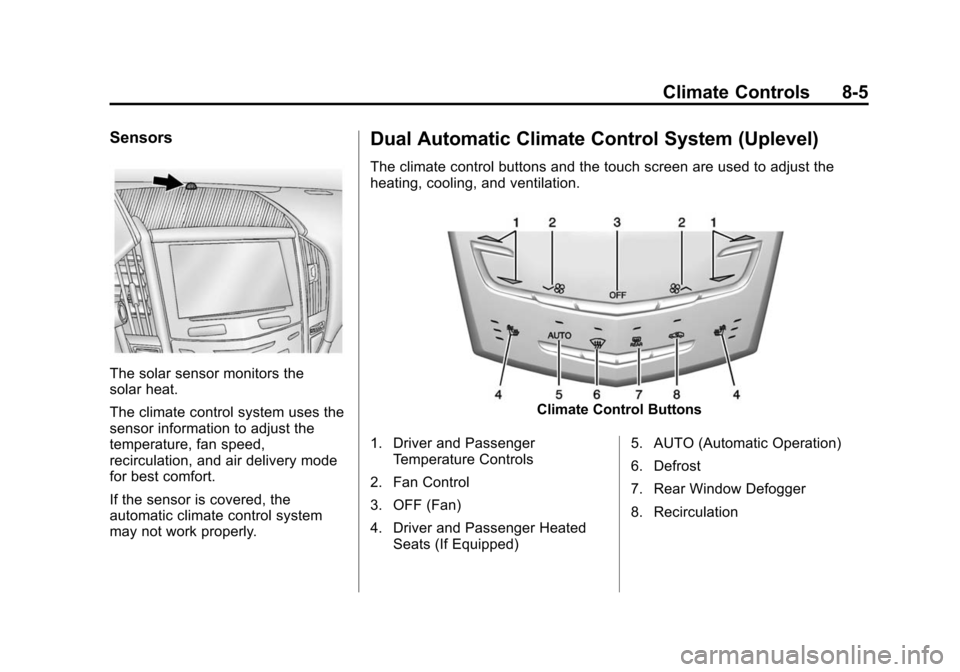
The solar sensor monitors the
solar heat.
The climate control system uses the
sensor information to adjust the
temperature, fan speed,
recirculation, and air delivery mode
for best comfort.
If the sensor is covered, the
automatic climate control system
may not work properly.
Dual Automatic Climate Control System (Uplevel)
The climate control buttons and the touch screen are used to adjust the
heating, cooling, and ventilation.
Climate Control Buttons
1. Driver and Passenger Temperature Controls
2. Fan Control
3. OFF (Fan)
4. Driver and Passenger Heated Seats (If Equipped) 5. AUTO (Automatic Operation)
6. Defrost
7. Rear Window Defogger
8. Recirculation
Page 212 of 450
Black plate (6,1)Cadillac ATS Owner Manual - 2013 - CRC - 10/5/12
8-6 Climate Controls
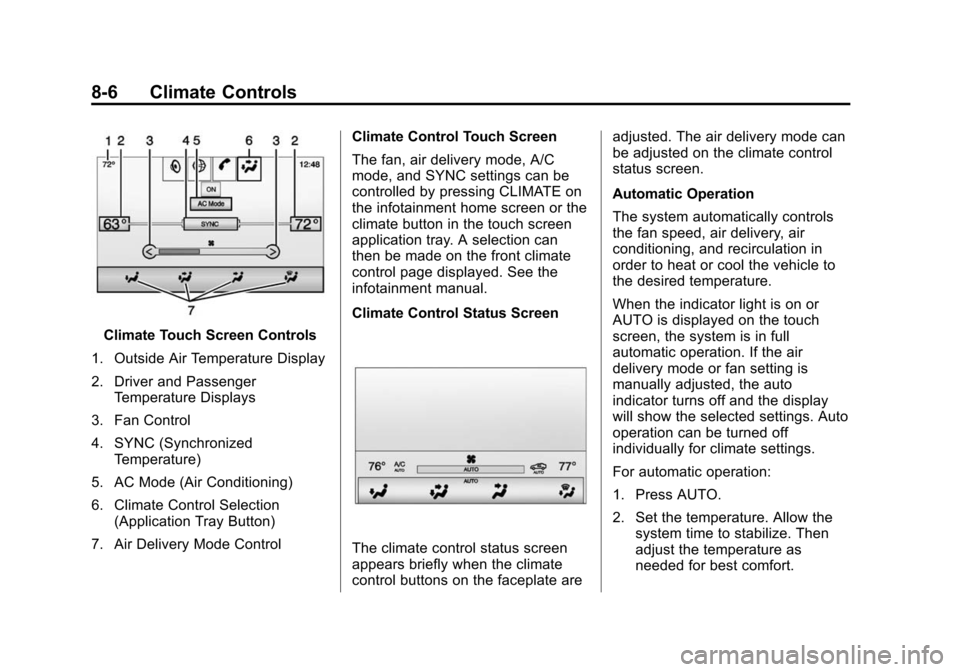
Climate Touch Screen Controls
1. Outside Air Temperature Display
2. Driver and Passenger Temperature Displays
3. Fan Control
4. SYNC (Synchronized Temperature)
5. AC Mode (Air Conditioning)
6. Climate Control Selection (Application Tray Button)
7. Air Delivery Mode Control Climate Control Touch Screen
The fan, air delivery mode, A/C
mode, and SYNC settings can be
controlled by pressing CLIMATE on
the infotainment home screen or the
climate button in the touch screen
application tray. A selection can
then be made on the front climate
control page displayed. See the
infotainment manual.
Climate Control Status Screen
The climate control status screen
appears briefly when the climate
control buttons on the faceplate areadjusted. The air delivery mode can
be adjusted on the climate control
status screen.
Automatic Operation
The system automatically controls
the fan speed, air delivery, air
conditioning, and recirculation in
order to heat or cool the vehicle to
the desired temperature.
When the indicator light is on or
AUTO is displayed on the touch
screen, the system is in full
automatic operation. If the air
delivery mode or fan setting is
manually adjusted, the auto
indicator turns off and the display
will show the selected settings. Auto
operation can be turned off
individually for climate settings.
For automatic operation:
1. Press AUTO.
2. Set the temperature. Allow the
system time to stabilize. Then
adjust the temperature as
needed for best comfort.
Page 213 of 450
Black plate (7,1)Cadillac ATS Owner Manual - 2013 - CRC - 10/5/12
Climate Controls 8-7
To improve fuel efficiency and to
cool the vehicle faster, recirculation
may be automatically selected in
warm weather. The recirculation
light will not come on. Press
@to
select recirculation; press it again to
select outside air.
English units can be changed to
metric units through the instrument
cluster. See “Settings”under
Instrument Cluster on page 5‑9.
OFF (Fan): Press to turn the fan on
or off. The temperature control and
air delivery mode can still be
adjusted.
w/x(Driver and Passenger
Temperature Controls): The
temperature can be adjusted
separately for the driver and the
passenger. Press to increase or
decrease the temperature. Press
and hold to rapidly increase or
decrease the temperature. SYNC (Synchronized
Temperature):
Press SYNC on the
touch screen to link all climate zone
settings to the driver settings. Adjust
the driver side temperature control
to change the linked temperature.
When the passenger settings are
adjusted, the SYNC button is
displayed when the temperatures
are unlinked.
Manual Operation
z 9or9 y(Fan Control):
Press the fan control buttons or the
touch screen fan control, to increase
or decrease the fan speed. Press
and hold the buttons or the touch
screen control to adjust speed more
quickly. The fan speed setting
displays. Pressing either button
cancels automatic fan control and
the fan can be controlled manually.
Press AUTO to return to automatic
operation. To turn off the fan and
climate control system, press and
hold the fan down button or touch
screen fan control until it is off. Air Delivery Mode Control:
Press
the CLIMATE touch screen button to
select climate control. Press the air
delivery mode touch screen button
to change the direction of the
airflow. The selected air delivery
mode button is lit. Pressing any of
the air delivery buttons cancels
automatic air delivery control and
the direction of the airflow can be
controlled manually. Press AUTO to
return to automatic operation.
To change the current mode, select
one of the following:
Y(Vent): Air is directed to the
instrument panel outlets.
\(Bi-Level): Air is divided
between the instrument panel
outlets and the floor outlets.
[(Floor): Air is directed to the
floor outlets, with some air to the
windshield and side windows.
Page 269 of 450
Black plate (51,1)Cadillac ATS Owner Manual - 2013 - CRC - 10/5/12
Driving and Operating 9-51
WARNING (Continued)
Under many conditions, these
systems will not:
.Detect children, pedestrians,
bicyclists, or animals.
.Detect vehicles or objects
outside the area monitored by
the system.
.Work at all driving speeds.
.Warn you or provide you with
enough time to avoid a crash.
.Work under poor visibility or
bad weather conditions.
.Work if the detection sensor
is not cleaned or is covered
by ice, snow, mud, or dirt.
Complete attention is always
required while driving, and you
should be ready to take action
and apply the brakes and/or steer
the vehicle to avoid crashes. Audible or Safety Alert Seat
Some driver assistance features
alert the driver of obstacles by
beeping. To change the volume of
the warning chime, see
“Comfort
and Convenience” underVehicle
Personalization on page 5‑43.
If equipped with the Safety Alert
Seat, the driver seat cushion may
provide a vibrating pulse alert
instead of beeping. To change this,
see “Collision/Detection Systems”
under Vehicle Personalization on
page 5‑43.
Assistance Systems for
Parking or Backing
When the vehicle is in R (Reverse),
the Rear Vision Camera (RVC) and
Rear Parking Assist may help the
driver to avoid a crash or to reduce
crash damage. Some models may
also have the Rear Automatic
Braking and Backing Warning
System, Rear Cross Traffic Alert
(RCTA), and/or Front Parking
Assist.
When the vehicle is shifted into
R (Reverse), the RVC displays an
image of the area behind the vehicle
in the center stack display. When
the vehicle is shifted out of
R (Reverse), the screen returns to
the previous content, after a short
delay. To see this screen sooner,
press one of the radio buttons. If the
message Service Rear Camera
System is displayed, the vehicle
may need service.
Page 427 of 450
Black plate (1,1)Cadillac ATS Owner Manual - 2013 - CRC - 10/5/12
OnStar 14-1
OnStar
OnStar Overview
OnStar Overview . . . . . . . . . . . . 14-1
OnStar Services
Emergency . . . . . . . . . . . . . . . . . . 14-2
Security . . . . . . . . . . . . . . . . . . . . . . 14-2
Navigation . . . . . . . . . . . . . . . . . . . 14-2
Connections . . . . . . . . . . . . . . . . . 14-4
Diagnostics . . . . . . . . . . . . . . . . . . 14-5
OnStar Additional Information
OnStar AdditionalInformation . . . . . . . . . . . . . . . . . 14-5
OnStar Overview
If equipped, this vehicle has a
comprehensive, in-vehicle system
that can connect to a live Advisor
for Emergency, Security, Navigation,
Connection, and Diagnostic
Services.
The OnStar system status light is
next to the OnStar buttons. If the
status light is:
.Solid Green: System is ready.
.Flashing Green: On a call.
.Red: Indicates a problem.
Press
Qor call 1-888-4ONSTAR
(1-888-466-7827) to speak to an
Advisor. Press
=to:
.Make a call, end a call,
or answer an incoming call.
.Give OnStar Hands-Free Calling
voice commands.
.Give OnStar Turn-by-Turn
Navigation voice commands.
Requires the available Directions
and Connections service plan.
Press
Qto connect to a live
Advisor to:
.Verify account information or
update contact information.
.Get driving directions. Requires
the available Directions and
Connections service plan.
.Receive On-Demand
Diagnostics for a check of the
vehicle’s key operating systems.
.Receive Roadside Assistance.