Push to start CADILLAC ATS 2014 Owner's Guide
[x] Cancel search | Manufacturer: CADILLAC, Model Year: 2014, Model line: ATS, Model: CADILLAC ATS 2014Pages: 434, PDF Size: 5.61 MB
Page 245 of 434
Black plate (31,1)Cadillac ATS Owner Manual (GMNA-Localizing-U.S./Canada/Mexico-
6014430) - 2014 - 2nd Edition - 8/23/13
Driving and Operating 9-31
EPB Apply
To apply the EPB:
1. Be sure the vehicle is at acomplete stop.
2. Lift up the EPB switch momentarily.
The red parking brake status light
will flash and then stay on once the
EPB is fully applied. If the red
parking brake status light flashes
continuously, then the EPB is only
partially applied or there is a
problem with the EPB. A DIC
message will display. Release the
EPB and try to apply it again. If the
light does not come one, or keeps
flashing, have the vehicle serviced.
Do not drive the vehicle if the red
parking brake status light is flashing.
See your dealer. See Parking Brake
Light on page 5-19.
If the amber parking brake warning
light is on, lift up on the EPB switch
and hold it up. Continue to hold the
switch until the red parking brake status light remains on. If the amber
parking brake warning light is on,
see your dealer.
If the EPB is applied while the
vehicle is moving, the vehicle will
decelerate as long as the switch is
held up. If the switch is held up until
the vehicle comes to a stop, the
EPB will remain applied.
The vehicle may automatically apply
the EPB in some situations when
the vehicle is not moving. This is
normal, and is done to periodically
check the correct operation of the
EPB system.
If the EPB fails to apply, the rear
wheels should be blocked to
prevent vehicle movement.
EPB Release
To release the EPB:
1. Place the ignition in the ACC/
ACCESSORY or ON/RUN/
START position.
2. Apply and hold the brake pedal. 3. Push down momentarily on the
EPB switch.
The EPB is released when the red
parking brake status light is off.
If the amber parking brake warning
light is on, release the EPB by
pushing down on the EPB switch
and holding it down. Continue to
hold the switch until the red parking
brake status light is off. If either light
stays on after release is attempted,
see your dealer.
{Caution
Driving with the parking brake on
can overheat the brake system
and cause premature wear or
damage to brake system parts.
Make sure that the parking brake
is fully released and the brake
warning light is off before driving.
Page 246 of 434
Black plate (32,1)Cadillac ATS Owner Manual (GMNA-Localizing-U.S./Canada/Mexico-
6014430) - 2014 - 2nd Edition - 8/23/13
9-32 Driving and Operating
Automatic EPB Release
The EPB will automatically release if
the vehicle is running, placed into
gear, and an attempt is made to
drive away. Avoid rapid acceleration
when the EPB is applied, to
preserve parking brake lining life.
The EPB can also be used to
prevent roll back for vehicles with a
manual transmission taking off on a
hill. When no roll back is desired, an
applied EPB will allow both feet to
be used for the clutch and
accelerator pedals in preparation for
starting the vehicle moving in the
intended direction. In this case,
there is no need to push the switch
to release the EPB.
If parking on a hill, or if the vehicle
is pulling a trailer, seeDriving
Characteristics and Towing Tips on
page 9-67.
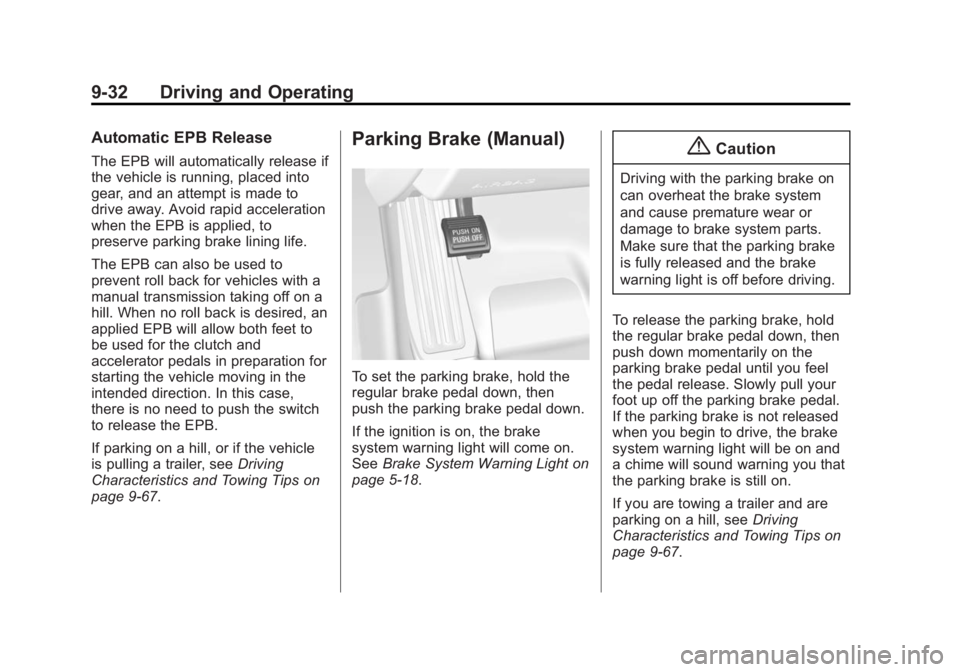
Parking Brake (Manual)
To set the parking brake, hold the
regular brake pedal down, then
push the parking brake pedal down.
If the ignition is on, the brake
system warning light will come on.
See Brake System Warning Light on
page 5-18.
{Caution
Driving with the parking brake on
can overheat the brake system
and cause premature wear or
damage to brake system parts.
Make sure that the parking brake
is fully released and the brake
warning light is off before driving.
To release the parking brake, hold
the regular brake pedal down, then
push down momentarily on the
parking brake pedal until you feel
the pedal release. Slowly pull your
foot up off the parking brake pedal.
If the parking brake is not released
when you begin to drive, the brake
system warning light will be on and
a chime will sound warning you that
the parking brake is still on.
If you are towing a trailer and are
parking on a hill, see Driving
Characteristics and Towing Tips on
page 9-67.
Page 313 of 434

Black plate (27,1)Cadillac ATS Owner Manual (GMNA-Localizing-U.S./Canada/Mexico-
6014430) - 2014 - 2nd Edition - 8/23/13
Vehicle Care 10-27
1. Before starting this check, besure there is enough room
around the vehicle.
2. Apply both the parking brake and the regular brake.
Do not use the accelerator
pedal, and be ready to turn off
the engine immediately if it
starts.
3. For automatic transmission vehicles, try to start the engine
in each gear. The vehicle should
start only in P (Park) or
N (Neutral). If the vehicle starts
in any other position, contact
your dealer for service.
For manual transmission
vehicles, put the shift lever in
Neutral, push the clutch pedal
down halfway, and try to start
the engine. The vehicle should
start only when the clutch pedal
is pushed down all the way to
the floor. If the vehicle starts
when the clutch pedal is not
pushed all the way down,
contact your dealer for service.Automatic Transmission
Shift Lock Control
Function Check
{Warning
When you are doing this
inspection, the vehicle could
move suddenly. If the vehicle
moves, you or others could be
injured.
1. Before starting this check, be sure there is enough room
around the vehicle. It should be
parked on a level surface.
2. Apply the parking brake. Be ready to apply the regular brake
immediately if the vehicle begins
to move.
3. With the engine off, turn the ignition on, but do not start the
engine. Without applying the
regular brake, try to move the
shift lever out of P (Park) with normal effort. If the shift lever
moves out of P (Park), contact
your dealer for service.
Park Brake and P (Park)
Mechanism Check
{Warning
When you are doing this check,
the vehicle could begin to move.
You or others could be injured
and property could be damaged.
Make sure there is room in front
of the vehicle in case it begins to
roll. Be ready to apply the regular
brake at once should the vehicle
begin to move.
Park on a fairly steep hill, with the
vehicle facing downhill. Keeping
your foot on the regular brake, set
the parking brake.
.To check the parking brake's
holding ability: With the engine
running and the transmission in
N (Neutral), slowly remove foot
Page 317 of 434
Black plate (31,1)Cadillac ATS Owner Manual (GMNA-Localizing-U.S./Canada/Mexico-
6014430) - 2014 - 2nd Edition - 8/23/13
Vehicle Care 10-31
4. Pull the bulb (2) straight out ofthe bulb socket (1).
5. Push the replacement bulb straight into the bulb socket and
turn the bulb socket clockwise to
install it into the lamp assembly.
6. Push the lamp assembly back into position until the release tab
locks into place.
Replacement Bulbs
Exterior Lamp Bulb
Number
Back-Up Lamp 921 (W16W)
License Plate Lamp W5W LL
For replacement bulbs not listed
here, contact your dealer.
Electrical System
Electrical System
Overload
The vehicle has fuses and circuit
breakers to protect against an
electrical system overload.
When the current electrical load is
too heavy, the circuit breaker opens
and closes, protecting the circuit
until the current load returns to
normal or the problem is fixed. This
greatly reduces the chance of circuit
overload and fire caused by
electrical problems.
Fuses and circuit breakers protect
power devices in the vehicle.
Replace a bad fuse with a new one
of the identical size and rating.
If there is a problem on the road and
a fuse needs to be replaced, the
same amperage fuse can be
borrowed. Choose some feature of
the vehicle that is not needed to use
and replace it as soon as possible.
Headlamp Wiring
An electrical overload may cause
the lamps to go on and off, or in
some cases to remain off. Have the
headlamp wiring checked right away
if the lamps go on and off or
remain off.
Windshield Wipers
If the wiper motor overheats due to
heavy snow or ice, the windshield
wipers will stop until the motor cools
and will then restart.
Although the circuit is protected
from electrical overload, overload
due to heavy snow or ice may
cause wiper linkage damage.
Always clear ice and heavy snow
from the windshield before using the
windshield wipers.
If the overload is caused by an
electrical problem and not snow or
ice, be sure to get it fixed.
Page 353 of 434
Black plate (67,1)Cadillac ATS Owner Manual (GMNA-Localizing-U.S./Canada/Mexico-
6014430) - 2014 - 2nd Edition - 8/23/13
Vehicle Care 10-67
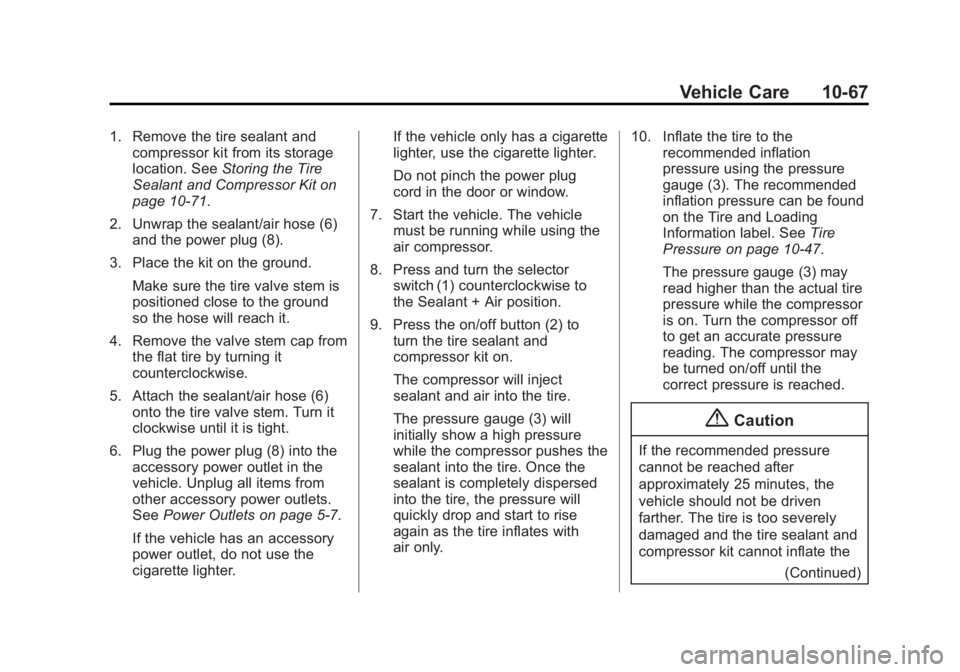
1. Remove the tire sealant andcompressor kit from its storage
location. See Storing the Tire
Sealant and Compressor Kit on
page 10-71.
2. Unwrap the sealant/air hose (6) and the power plug (8).
3. Place the kit on the ground. Make sure the tire valve stem is
positioned close to the ground
so the hose will reach it.
4. Remove the valve stem cap from the flat tire by turning it
counterclockwise.
5. Attach the sealant/air hose (6) onto the tire valve stem. Turn it
clockwise until it is tight.
6. Plug the power plug (8) into the accessory power outlet in the
vehicle. Unplug all items from
other accessory power outlets.
See Power Outlets on page 5-7.
If the vehicle has an accessory
power outlet, do not use the
cigarette lighter. If the vehicle only has a cigarette
lighter, use the cigarette lighter.
Do not pinch the power plug
cord in the door or window.
7. Start the vehicle. The vehicle must be running while using the
air compressor.
8. Press and turn the selector switch (1) counterclockwise to
the Sealant + Air position.
9. Press the on/off button (2) to turn the tire sealant and
compressor kit on.
The compressor will inject
sealant and air into the tire.
The pressure gauge (3) will
initially show a high pressure
while the compressor pushes the
sealant into the tire. Once the
sealant is completely dispersed
into the tire, the pressure will
quickly drop and start to rise
again as the tire inflates with
air only. 10. Inflate the tire to the
recommended inflation
pressure using the pressure
gauge (3). The recommended
inflation pressure can be found
on the Tire and Loading
Information label. See Tire
Pressure on page 10-47.
The pressure gauge (3) may
read higher than the actual tire
pressure while the compressor
is on. Turn the compressor off
to get an accurate pressure
reading. The compressor may
be turned on/off until the
correct pressure is reached.
{Caution
If the recommended pressure
cannot be reached after
approximately 25 minutes, the
vehicle should not be driven
farther. The tire is too severely
damaged and the tire sealant and
compressor kit cannot inflate the
(Continued)
Page 358 of 434
Black plate (72,1)Cadillac ATS Owner Manual (GMNA-Localizing-U.S./Canada/Mexico-
6014430) - 2014 - 2nd Edition - 8/23/13
10-72 Vehicle Care
Jump Starting
For more information about the
vehicle battery, seeBattery on
page 10-25.
If the battery has run down, try to
use another vehicle and some
jumper cables to start your vehicle.
Be sure to use the following steps to
do it safely.
{Warning
Batteries can hurt you. They can
be dangerous because:
.They contain acid that can
burn you.
.They contain gas that can
explode or ignite.
.They contain enough
electricity to burn you.
If you do not follow these steps
exactly, some or all of these
things can hurt you.
{Caution
Ignoring these steps could result
in costly damage to the vehicle
that would not be covered by the
vehicle warranty. Trying to start
the vehicle by pushing or pulling it
will not work, and it could damage
the vehicle.
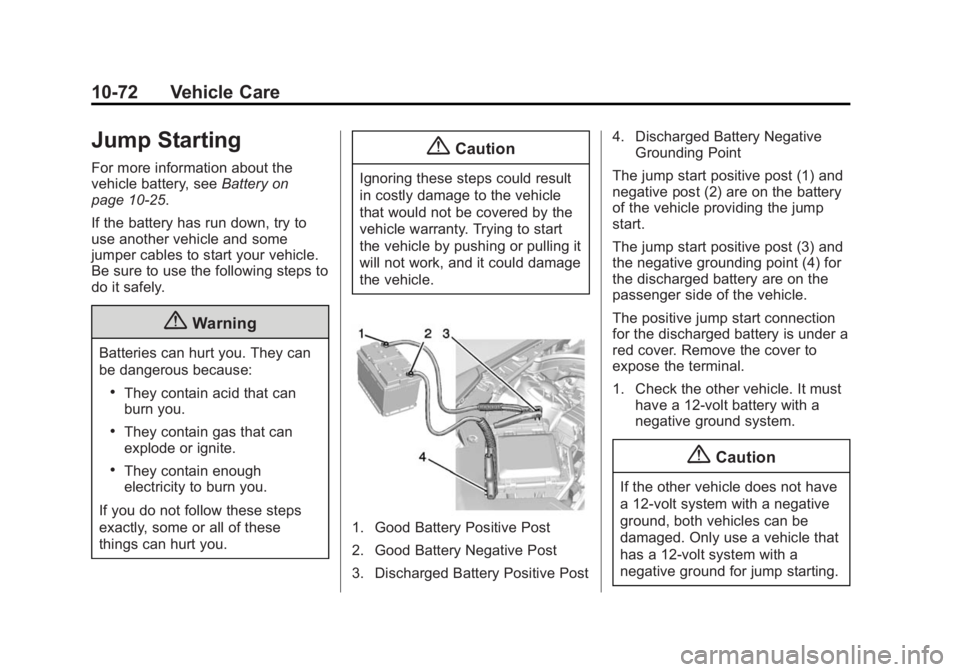
1. Good Battery Positive Post
2. Good Battery Negative Post
3. Discharged Battery Positive Post 4. Discharged Battery Negative
Grounding Point
The jump start positive post (1) and
negative post (2) are on the battery
of the vehicle providing the jump
start.
The jump start positive post (3) and
the negative grounding point (4) for
the discharged battery are on the
passenger side of the vehicle.
The positive jump start connection
for the discharged battery is under a
red cover. Remove the cover to
expose the terminal.
1. Check the other vehicle. It must have a 12-volt battery with a
negative ground system.
{Caution
If the other vehicle does not have
a 12-volt system with a negative
ground, both vehicles can be
damaged. Only use a vehicle that
has a 12-volt system with a
negative ground for jump starting.