tow CADILLAC ATS 2017 1.G Owner's Guide
[x] Cancel search | Manufacturer: CADILLAC, Model Year: 2017, Model line: ATS, Model: CADILLAC ATS 2017 1.GPages: 335, PDF Size: 3.73 MB
Page 224 of 335
Cadillac ATS/ATS-V Owner Manual (GMNA-Localizing-MidEast-10287885) -
2017 - crc - 6/16/16
DRIVING AND OPERATING 223
The LCA sensor covers a zone of
approximately one lane over from
both sides of the vehicle, or 3.5 m
(11 ft). The height of the zone is
approximately between 0.5 m (1.5 ft)
and 2 m (6 ft) off the ground. The Side
Blind Zone Alert (SBZA) warning area
starts at approximately the middle of
the vehicle and goes back 5 m (16 ft).
Drivers are also warned of vehicles
rapidly approaching from up to 25 m
(82 ft) behind the vehicle.
How the System Works
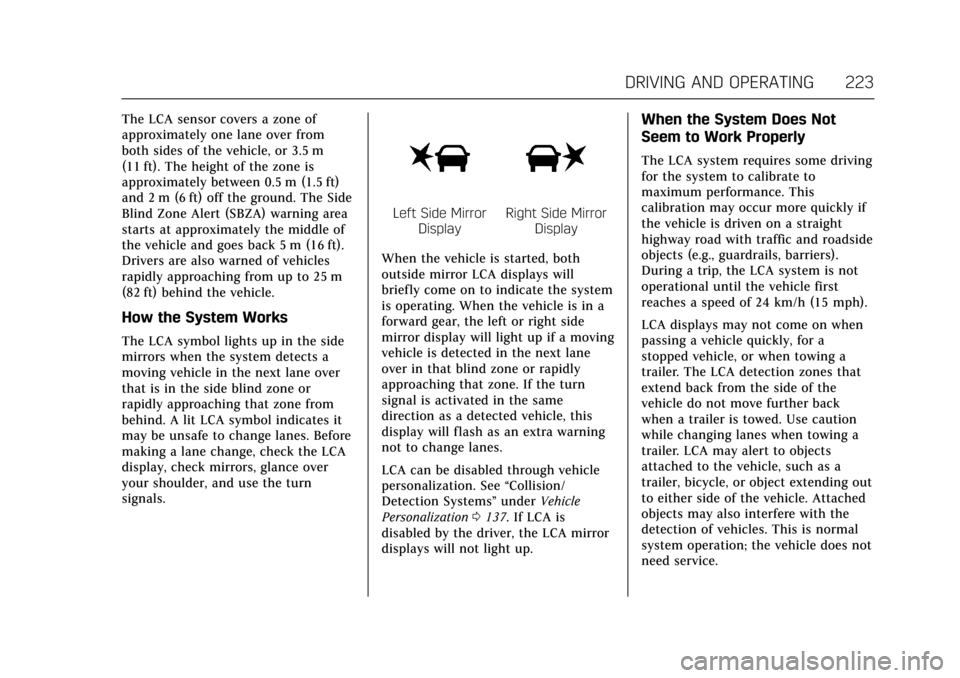
The LCA symbol lights up in the side
mirrors when the system detects a
moving vehicle in the next lane over
that is in the side blind zone or
rapidly approaching that zone from
behind. A lit LCA symbol indicates it
may be unsafe to change lanes. Before
making a lane change, check the LCA
display, check mirrors, glance over
your shoulder, and use the turn
signals.
Left Side MirrorDisplayRight Side Mirror Display
When the vehicle is started, both
outside mirror LCA displays will
briefly come on to indicate the system
is operating. When the vehicle is in a
forward gear, the left or right side
mirror display will light up if a moving
vehicle is detected in the next lane
over in that blind zone or rapidly
approaching that zone. If the turn
signal is activated in the same
direction as a detected vehicle, this
display will flash as an extra warning
not to change lanes.
LCA can be disabled through vehicle
personalization. See “Collision/
Detection Systems” underVehicle
Personalization 0137. If LCA is
disabled by the driver, the LCA mirror
displays will not light up.
When the System Does Not
Seem to Work Properly
The LCA system requires some driving
for the system to calibrate to
maximum performance. This
calibration may occur more quickly if
the vehicle is driven on a straight
highway road with traffic and roadside
objects (e.g., guardrails, barriers).
During a trip, the LCA system is not
operational until the vehicle first
reaches a speed of 24 km/h (15 mph).
LCA displays may not come on when
passing a vehicle quickly, for a
stopped vehicle, or when towing a
trailer. The LCA detection zones that
extend back from the side of the
vehicle do not move further back
when a trailer is towed. Use caution
while changing lanes when towing a
trailer. LCA may alert to objects
attached to the vehicle, such as a
trailer, bicycle, or object extending out
to either side of the vehicle. Attached
objects may also interfere with the
detection of vehicles. This is normal
system operation; the vehicle does not
need service.
Page 225 of 335

Cadillac ATS/ATS-V Owner Manual (GMNA-Localizing-MidEast-10287885) -
2017 - crc - 6/16/16
224 DRIVING AND OPERATING
LCA may not always alert the driver to
vehicles in the next lane over,
especially in wet conditions or when
driving on sharp curves. The system
does not need to be serviced. The
system may light up due to guardrails,
signs, trees, shrubs, and other
non-moving objects. This is normal
system operation; the vehicle does not
need service.
LCA may not operate when the LCA
sensors in the left or right corners of
the rear bumper are covered with
mud, dirt, snow, ice, or slush, or in
heavy rainstorms. For cleaning
instructions, see "Washing the
Vehicle" underExterior Care0298.
If the DIC still displays the system
unavailable message after cleaning
both sides of the vehicle toward the
rear corners of the vehicle, see your
dealer.
If the LCA displays do not light up
when moving vehicles are in the side
blind zone or rapidly approaching this
zone and the system is clean, the
system may need service. Take the
vehicle to your dealer.Lane Departure
Warning (LDW)
If equipped, LDW may help avoid
crashes due to unintentional lane
departures. It may provide a warning
if the vehicle is crossing a detected
lane marking without using a turn
signal in the lane departure direction.
Since this system is part of the Lane
Keep Assist (LKA) system, read the
entire LKA section before using this
feature.
Lane Keep Assist (LKA)
If equipped, LKA may help avoid
crashes due to unintentional lane
departures. It may assist by gently
turning the steering wheel if the
vehicle approaches a detected lane
marking without using a turn signal in
that direction. It may also provide a
Lane Departure Warning (LDW)
system alert as the lane marking is
crossed. The LKA system will not
assist or provide an LDW alert if it
detects that you are actively steering.
Override LKA by turning the steering wheel. LKA uses a camera to detect
lane markings between 60 km/h (37
mph) and 180 km/h (112 mph).
{Warning
The LKA system does not
continuously steer the vehicle.
It may not keep the vehicle in the
lane or give a Lane Departure
Warning (LDW) alert, even if a lane
marking is detected.
The LKA and LDW systems
may not:
. Provide an alert or enough
steering assist to avoid a lane
departure or crash.
. Detect lane markings under
poor weather or visibility
conditions. This can occur if
the windshield or headlamps
are blocked by dirt, snow,
or ice, if they are not in
proper condition, or if the sun
shines directly into the
camera.
. Detect road edges.
(Continued)
Page 226 of 335

Cadillac ATS/ATS-V Owner Manual (GMNA-Localizing-MidEast-10287885) -
2017 - crc - 6/16/16
DRIVING AND OPERATING 225
Warning (Continued)
.Detect lanes on winding or
hilly roads.
If LKA only detects lane markings
on one side of the road, it will only
assist or provide an LDW alert
when approaching the lane on the
side where it has detected a lane
marking. Even with LKA and LDW,
you must steer the vehicle. Always
keep your attention on the road and
maintain proper vehicle position
within the lane, or vehicle damage,
injury, or death could occur. Always
keep the windshield, headlamps,
and camera sensors clean and in
good repair. Do not use LKA in bad
weather conditions.
{Warning
Using LKA while towing a trailer or
on slippery roads could cause loss
of control of the vehicle and a
crash. Turn the system off.
How the System Works
The LKA camera sensor is on the
windshield ahead of the rearview
mirror.
To turn LKA on and off, press
Ato
the left of the steering wheel.
When on,
Ais green if LKA is
available to assist and provide LDW
alerts. It may assist by gently turning
the steering wheel and display
A
as amber if the vehicle approaches a
detected lane marking without
using a turn signal in that direction.
It may also provide an LDW alert by
flashing
Aamber as the lane
marking is crossed. Additionally, there
will be three beeps, or the driver seat
will pulse three times, on the right or
left, depending on the lane departure
direction.
The LKA system does not
continuously steer the vehicle. If LKA
does not detect active driver steering,
an alert and chime may be provided.
Steer the vehicle to dismiss.
When the System Does Not
Seem to Work Properly
The system performance may be
affected by:
. Close vehicles ahead.
. Sudden lighting changes, such as
when driving through tunnels.
. Banked roads.
. Roads with poor lane markings,
such as two-lane roads.
If the LKA system is not functioning
properly when lane markings are
clearly visible, cleaning the windshield
may help.
LKA assistance and/or LDW alerts
may occur due to tar marks, shadows,
cracks in the road, temporary or
construction lane markings, or other
road imperfections. This is normal
system operation; the vehicle does not
need service. Turn LKA off if these
conditions continue.
Page 231 of 335
Cadillac ATS/ATS-V Owner Manual (GMNA-Localizing-MidEast-10287885) -
2017 - crc - 6/16/16
230 DRIVING AND OPERATING
Trailer Towing
General Towing
Information
The vehicle is neither designed nor
intended to tow a trailer or another
vehicle.
For information on towing a disabled
vehicle, seeTowing the Vehicle 0295.
For information on towing the vehicle
behind another vehicle such as a
motor home, see Recreational Vehicle
Towing 0296.
Conversions and
Add-Ons
Add-On Electrical
Equipment
{Warning
The Data Link Connector (DLC) is
used for vehicle service and
Emission Inspection/Maintenance
testing. See Malfunction Indicator
Lamp (Check Engine Light) 0114.
A device connected to the DLC —
such as an aftermarket fleet or
driver-behavior tracking device —
may interfere with vehicle systems.
This could affect vehicle operation
and cause a crash. Such devices
may also access information stored
in the vehicle’s systems.
Caution
Some electrical equipment can
damage the vehicle or cause
components to not work and would
not be covered by the vehicle
warranty. Always check with your
dealer before adding electrical
equipment.
Add-on equipment can drain the
vehicle's 12-volt battery, even if the
vehicle is not operating.
The vehicle has an airbag system.
Before attempting to add anything
electrical to the vehicle, see Servicing
the Airbag-Equipped Vehicle 077 and
Adding Equipment to the
Airbag-Equipped Vehicle 077.
Page 232 of 335
Cadillac ATS/ATS-V Owner Manual (GMNA-Localizing-MidEast-10287885) -
2017 - crc - 6/16/16
VEHICLE CARE 231
Vehicle Care
General Information
General Information . . . . . . . . . . . . . 232
Accessories andModifications . . . . . . . . . . . . . . . . . . . 232
Vehicle Checks
Doing Your OwnService Work . . . . . . . . . . . . . . . . . . . . 233
Hood . . . . . . . . . . . . . . . . . . . . . . . . . . . . . . 233
Engine Compartment Overview . . . . . . . . . . . . . . . . . . . . . . . . . 234
Engine Oil . . . . . . . . . . . . . . . . . . . . . . . . . 241
Engine Oil Life System . . . . . . . . . . . 243
Automatic Transmission Fluid . . . . . . . . . . . . . . . . . . . . . . . . . . . . . 244
Engine Air Cleaner/Filter . . . . . . . . . 245
Cooling System (Engine) . . . . . . . . . 246
Cooling System (Intercooler) . . . . 248
Engine Coolant . . . . . . . . . . . . . . . . . . . 248
Engine Overheating . . . . . . . . . . . . . . 251
Washer Fluid . . . . . . . . . . . . . . . . . . . . . 253
Brakes . . . . . . . . . . . . . . . . . . . . . . . . . . . . . 253
Brake Fluid . . . . . . . . . . . . . . . . . . . . . . . 254
Battery . . . . . . . . . . . . . . . . . . . . . . . . . . . . 255
Starter Switch Check . . . . . . . . . . . . . 256
Automatic Transmission Shift Lock Control Function
Check . . . . . . . . . . . . . . . . . . . . . . . . . . . . 257 Park Brake and P (Park)
Mechanism Check . . . . . . . . . . . . . . 257
Wiper Blade Replacement . . . . . . . 257
Windshield Replacement . . . . . . . . 258
Headlamp Aiming
Headlamp Aiming . . . . . . . . . . . . . . . . 258
Bulb Replacement
Bulb Replacement . . . . . . . . . . . . . . . . 259
Halogen Bulbs . . . . . . . . . . . . . . . . . . . . 259
High Intensity Discharge (HID) Lighting . . . . . . . . . . . . . . . . . . . . . . . . . 259
LED Lighting . . . . . . . . . . . . . . . . . . . . . 259
Back-Up Lamps . . . . . . . . . . . . . . . . . . . 259
License Plate Lamp . . . . . . . . . . . . . . 260
Replacement Bulbs . . . . . . . . . . . . . . . 261
Electrical System
Electrical System Overload . . . . . . 261
Fuses and Circuit Breakers . . . . . . 261
Engine Compartment Fuse Block . . . . . . . . . . . . . . . . . . . . . . . . . . . . 262
Instrument Panel Fuse Block . . . . 265
Rear Compartment Fuse Block . . . . . . . . . . . . . . . . . . . . . . . . . . . . 267
Wheels and Tires
Tires . . . . . . . . . . . . . . . . . . . . . . . . . . . . . . . 270
All-Season Tires . . . . . . . . . . . . . . . . . . 271
Winter Tires . . . . . . . . . . . . . . . . . . . . . . 271
Run-Flat Tires . . . . . . . . . . . . . . . . . . . . 271 Summer Tires . . . . . . . . . . . . . . . . . . . . 272
Tire Pressure . . . . . . . . . . . . . . . . . . . . . . 273
Tire Pressure for High-Speed
Operation . . . . . . . . . . . . . . . . . . . . . . . . 274
Tire Pressure Monitor System . . . 274
Tire Pressure Monitor
Operation . . . . . . . . . . . . . . . . . . . . . . . . 275
Tire Inspection . . . . . . . . . . . . . . . . . . . 278
Tire Rotation . . . . . . . . . . . . . . . . . . . . . 278
When It Is Time for New Tires . . . . . . . . . . . . . . . . . . . . . . . . . . . . . 280
Buying New Tires . . . . . . . . . . . . . . . . 280
Different Size Tires and Wheels . . . . . . . . . . . . . . . . . . . . . . . . . . 282
Wheel Alignment and Tire Balance . . . . . . . . . . . . . . . . . . . . . . . . . . 282
Wheel Replacement . . . . . . . . . . . . . . 282
Tire Chains . . . . . . . . . . . . . . . . . . . . . . . 284
If a Tire Goes Flat . . . . . . . . . . . . . . . . 284
Tire Sealant and Compressor Kit . . . . . . . . . . . . . . . . . 286
Storing the Tire Sealant and Compressor Kit . . . . . . . . . . . . . . . . . 292
Jump Starting
Jump Starting . . . . . . . . . . . . . . . . . . . . . 292
Towing the Vehicle
Towing the Vehicle . . . . . . . . . . . . . . . 295
Recreational Vehicle Towing . . . . 296
Page 234 of 335
Cadillac ATS/ATS-V Owner Manual (GMNA-Localizing-MidEast-10287885) -
2017 - crc - 6/16/16
VEHICLE CARE 233
Vehicle Checks
Doing Your Own
Service Work
{Warning
It can be dangerous to work on
your vehicle if you do not have the
proper knowledge, service manual,
tools, or parts. Always follow
owner’s manual procedures and
consult the service manual for your
vehicle before doing any
service work.
If doing some of your own service
work, use the proper service manual.
It tells you much more about how to
service the vehicle than this
manual can.
This vehicle has an airbag system.
Before attempting to do your own
service work, see Airbag System
Check 078.
Keep a record with all parts receipts
and list the mileage and the date of
any service work performed.
Caution
Even small amounts of
contamination can cause damage to
vehicle systems. Do not allow
contaminants to contact the fluids,
reservoir caps, or dipsticks.
Hood
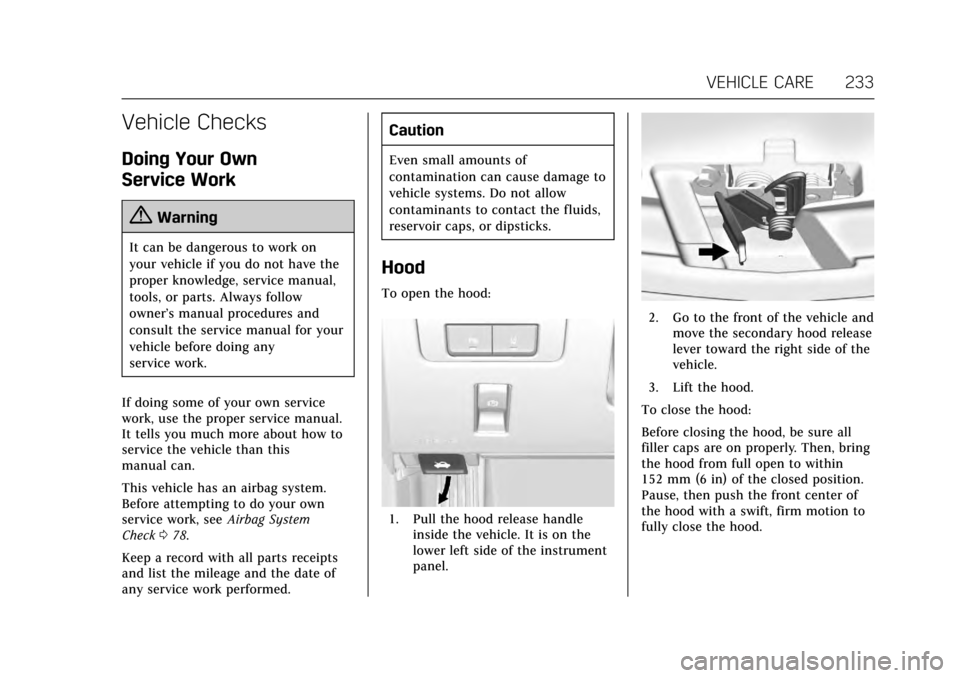
To open the hood:
1. Pull the hood release handle inside the vehicle. It is on the
lower left side of the instrument
panel.
2. Go to the front of the vehicle andmove the secondary hood release
lever toward the right side of the
vehicle.
3. Lift the hood.
To close the hood:
Before closing the hood, be sure all
filler caps are on properly. Then, bring
the hood from full open to within
152 mm (6 in) of the closed position.
Pause, then push the front center of
the hood with a swift, firm motion to
fully close the hood.
Page 242 of 335
Cadillac ATS/ATS-V Owner Manual (GMNA-Localizing-MidEast-10287885) -
2017 - crc - 6/16/16
VEHICLE CARE 241
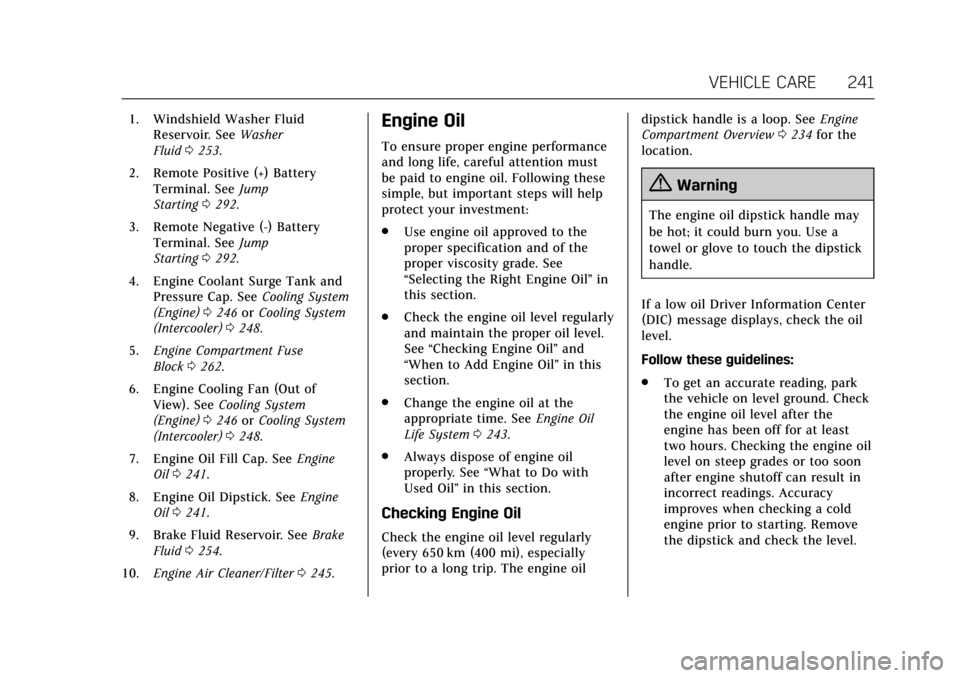
1. Windshield Washer FluidReservoir. See Washer
Fluid 0253.
2. Remote Positive (+) Battery Terminal. See Jump
Starting 0292.
3. Remote Negative (-) Battery Terminal. See Jump
Starting 0292.
4. Engine Coolant Surge Tank and Pressure Cap. See Cooling System
(Engine) 0246 orCooling System
(Intercooler) 0248.
5. Engine Compartment Fuse
Block 0262.
6. Engine Cooling Fan (Out of View). See Cooling System
(Engine) 0246 orCooling System
(Intercooler) 0248.
7. Engine Oil Fill Cap. See Engine
Oil 0241.
8. Engine Oil Dipstick. See Engine
Oil 0241.
9. Brake Fluid Reservoir. See Brake
Fluid 0254.
10. Engine Air Cleaner/Filter 0245.Engine Oil
To ensure proper engine performance
and long life, careful attention must
be paid to engine oil. Following these
simple, but important steps will help
protect your investment:
.
Use engine oil approved to the
proper specification and of the
proper viscosity grade. See
“Selecting the Right Engine Oil” in
this section.
. Check the engine oil level regularly
and maintain the proper oil level.
See “Checking Engine Oil” and
“When to Add Engine Oil” in this
section.
. Change the engine oil at the
appropriate time. See Engine Oil
Life System 0243.
. Always dispose of engine oil
properly. See “What to Do with
Used Oil” in this section.
Checking Engine Oil
Check the engine oil level regularly
(every 650 km (400 mi), especially
prior to a long trip. The engine oil dipstick handle is a loop. See
Engine
Compartment Overview 0234 for the
location.
{Warning
The engine oil dipstick handle may
be hot; it could burn you. Use a
towel or glove to touch the dipstick
handle.
If a low oil Driver Information Center
(DIC) message displays, check the oil
level.
Follow these guidelines:
. To get an accurate reading, park
the vehicle on level ground. Check
the engine oil level after the
engine has been off for at least
two hours. Checking the engine oil
level on steep grades or too soon
after engine shutoff can result in
incorrect readings. Accuracy
improves when checking a cold
engine prior to starting. Remove
the dipstick and check the level.
Page 243 of 335
Cadillac ATS/ATS-V Owner Manual (GMNA-Localizing-MidEast-10287885) -
2017 - crc - 6/16/16
242 VEHICLE CARE
.If unable to wait two hours, the
engine must be off for at least
15 minutes if the engine is warm,
or at least 30 minutes if the
engine is not warm. Pull out the
dipstick, wipe it with a clean paper
towel or cloth, then push it back
in all the way. Remove it again,
keeping the tip down, and check
the level.
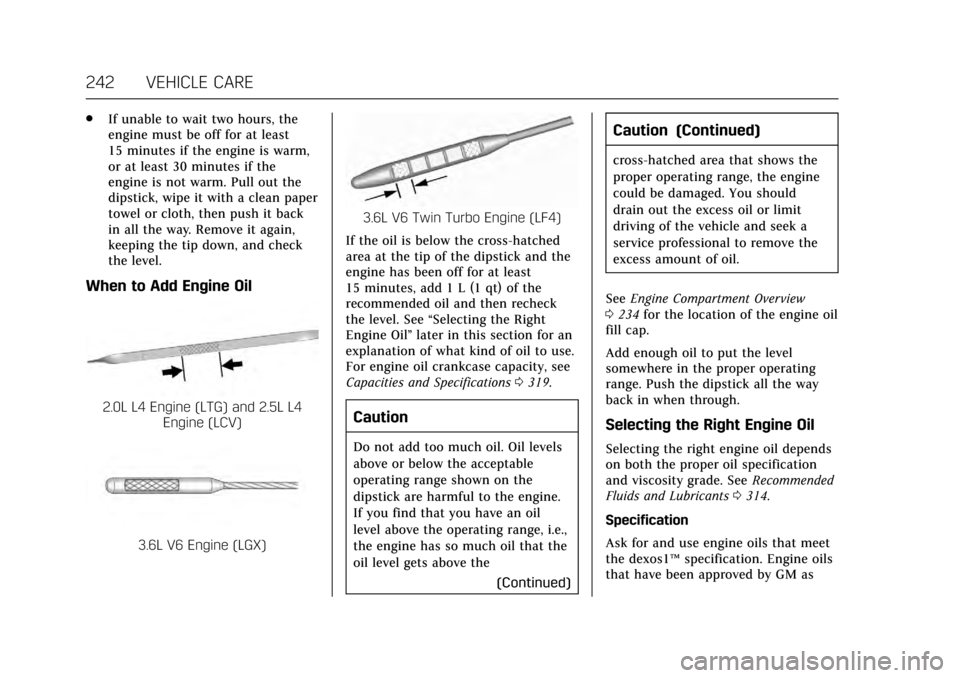
When to Add Engine Oil
2.0L L4 Engine (LTG) and 2.5L L4
Engine (LCV)
3.6L V6 Engine (LGX)
3.6L V6 Twin Turbo Engine (LF4)
If the oil is below the cross-hatched
area at the tip of the dipstick and the
engine has been off for at least
15 minutes, add 1 L (1 qt) of the
recommended oil and then recheck
the level. See “Selecting the Right
Engine Oil” later in this section for an
explanation of what kind of oil to use.
For engine oil crankcase capacity, see
Capacities and Specifications 0319.
Caution
Do not add too much oil. Oil levels
above or below the acceptable
operating range shown on the
dipstick are harmful to the engine.
If you find that you have an oil
level above the operating range, i.e.,
the engine has so much oil that the
oil level gets above the
(Continued)
Caution (Continued)
cross-hatched area that shows the
proper operating range, the engine
could be damaged. You should
drain out the excess oil or limit
driving of the vehicle and seek a
service professional to remove the
excess amount of oil.
See Engine Compartment Overview
0 234 for the location of the engine oil
fill cap.
Add enough oil to put the level
somewhere in the proper operating
range. Push the dipstick all the way
back in when through.
Selecting the Right Engine Oil
Selecting the right engine oil depends
on both the proper oil specification
and viscosity grade. See Recommended
Fluids and Lubricants 0314.
Specification
Ask for and use engine oils that meet
the dexos1™ specification. Engine oils
that have been approved by GM as
Page 259 of 335

Cadillac ATS/ATS-V Owner Manual (GMNA-Localizing-MidEast-10287885) -
2017 - crc - 6/16/16
258 VEHICLE CARE
2. Lift up on the latch in the middleof the wiper blade where the
wiper arm attaches.
3. With the latch open, pull the wiper blade down toward the
windshield far enough to release
it from the J-hooked end of the
wiper arm.
4. Remove the wiper blade. Allowing the wiper blade arm to
touch the windshield when no
wiper blade is installed could
damage the windshield. Any
damage that occurs would not be
covered by the vehicle warranty.
Do not allow the wiper blade arm
to touch the windshield. 5. Reverse Steps 1–3 for wiper
blade replacement.
Windshield Replacement
HUD System
If equipped with a HUD system, the
windshield is part of the HUD. If the
windshield must be replaced, get one
that is designed for HUD or the HUD
image may look out of focus.
Driver Assistance Systems
When a windshield replacement is
needed and the vehicle is equipped
with a front-looking camera sensor for
the Driver Assistance Systems, the
windshield must be installed
according to GM specifications for
these systems to work properly. If it is
not, there may be unexpected
behavior and/or messages from these
systems. See Object Detection System
Messages 0131.
Headlamp Aiming
Headlamp aim has been preset and
should need no further adjustment.
If the vehicle is damaged in a crash,
the headlamp aim may be affected.
If adjustment to the headlamps is
necessary, see your dealer.
Page 261 of 335

Cadillac ATS/ATS-V Owner Manual (GMNA-Localizing-MidEast-10287885) -
2017 - crc - 6/16/16
260 VEHICLE CARE
To replace one of these bulbs:1. Reach under the rear fascia and locate the back-up lamp
assembly.
2. Remove the bulb socket (1) by turning counterclockwise and
pulling straight out of the lamp
assembly (2).
3. Pull the bulb out of the socket.
4. Install the new bulb in the bulb socket.
5. Install the bulb socket by turning clockwise.License Plate Lamp
Lamp Assembly
Bulb Assembly
1. Bulb Socket
2. Bulb
3. Lamp Assembly
To replace one of these bulbs:
1. Push the lamp assembly (3) toward the center of the vehicle.
2. Pull the lamp assembly down to remove.
3. Turn the bulb socket (1) counterclockwise to remove it
from the lamp assembly (3).
4. Pull the bulb (2) straight out of the bulb socket (1).
5. Push the replacement bulb straight into the bulb socket and
turn the bulb socket clockwise to
install it into the lamp assembly.
6. Push the lamp assembly back into position until the release tab
locks into place.