CADILLAC CATERA 1998 1.G Owners Manual
Manufacturer: CADILLAC, Model Year: 1998, Model line: CATERA, Model: CADILLAC CATERA 1998 1.GPages: 346, PDF Size: 19.13 MB
Page 301 of 346
Downloaded from www.Manualslib.com manuals search engine Underbody Maintenance
Chemicals used for ice and snow removal and dust control
can collect on the underbody.
If these are not removed,
accelerated corrosion (rust) can occur
on the underbody
system even though they have corrosion protection.
1 parts such as fuel lines, fiame, floor pan and exhaust
At least every spring, flush these materials from the
underbody with plain water. Clean any areas where mud
and other debris can collect.
Dirt packed in closed areas
of the frame should be loosened before being flushed.
Your dealer
or an underbody car washing system can do
this for you.
Chemical Paint Spotting
Some weather and atmospheric conditions can create a
chemical fallout. Airborne pollutants can fall upon and
attack painted surfaces on your vehicle. This damage
can take two
forms: blotchy, ringlet-shaped
discolorations, and small irregular dark spots etched into
the paint surface.
Although no defect in the paint job causes this, Cadillac
will repair, at no charge
to the owner, the surfaces of
new vehicles damaged by this fallout condition within
12 months or 12,000 miles (20 0oO km) of purchase,
whichever occurs first.
Page 302 of 346
Downloaded from www.Manualslib.com manuals search engine Appearance Care Materials Chart
~
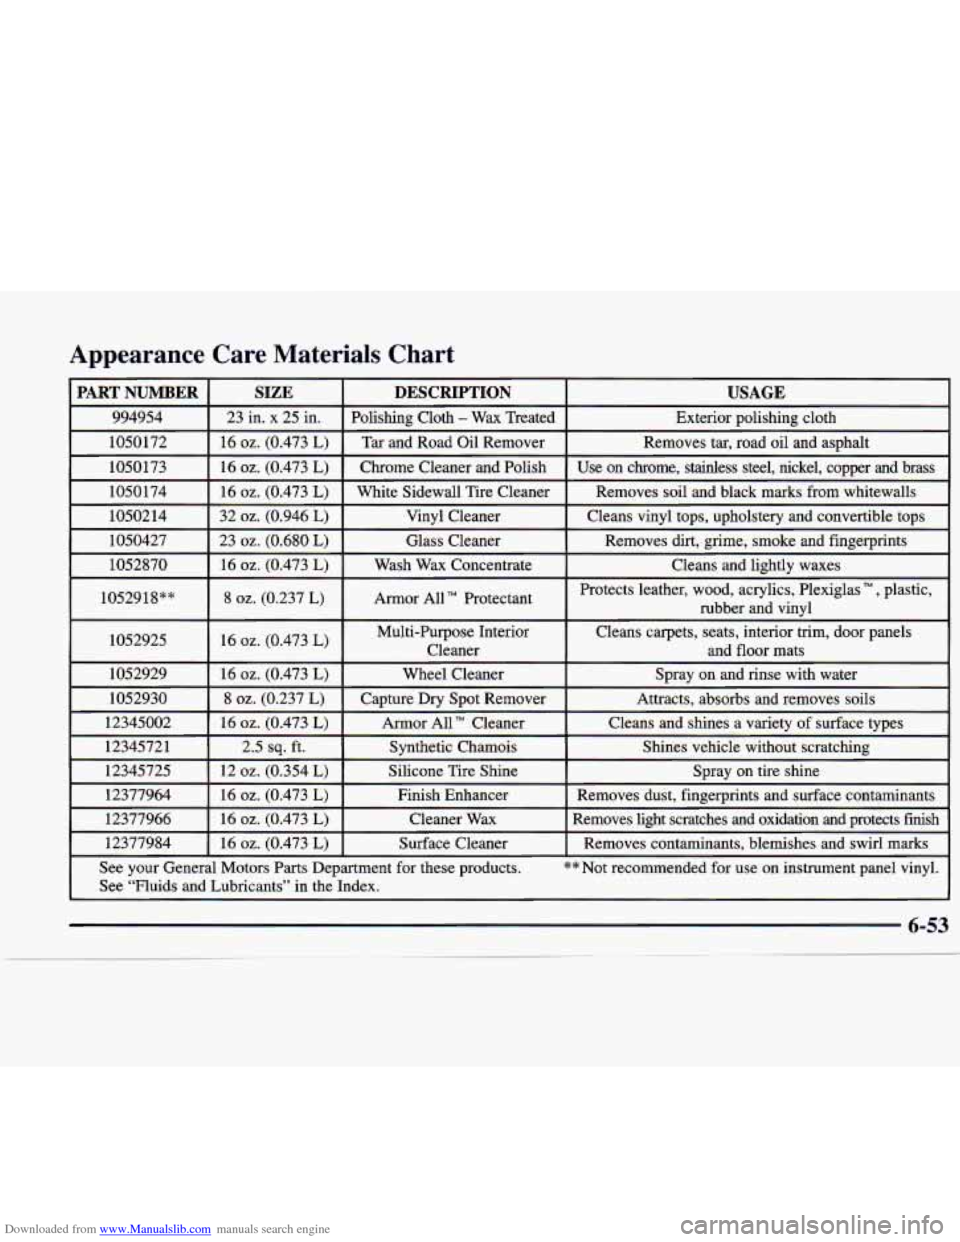
PART NUMBER USAGE DESCRIPTION SIZE
994954 Exterior polishing cloth
Polishing Cloth - Wax Treated 23 in. x 25
in.
1050172
Cleans and lightly waxes Wash Wax Concentrate
16
oz. (0.473 L) 1052870 Removes dirt, grime, smoke and fingerprints
Glass Cleaner
23
oz. (0.680 L) 1050427 Cleans vinyl tops, upholstery and convertible tops
Vinyl Cleaner
32
oz. (0.946 L) 1050214 Removes soil and black marks from whitewalls White Sidewall Tir\
e Cleaner 16
oz. (0.473 L) 1050174 Use on chrome, stainless steel, nickel, copper and brass Chrome\
Cleaner and Polish
16 oz. (0.473 L) 1050173
Removes tar, road oil and asphalt
Tar and Road Oil Remover 16
oz. (0.473 L)
1052918**
Armor All TM Protectant 8 oz. (0.237 L) Protects leather, wood, acrylics, Plexiglas TM, plastic,
rubber and vinyl
1052925 16
oz. (0.473 L) Multi-Purpose Interior Cleans carpets, seats, interior trim, door\
panels
Cleaner and floor mats
1052929
Cleans and shines a variety of surface types Armor All
TM Cleaner 16 oz. (0.473 L) 12345002 Attracts, absorbs and removes soils
Capture
Dry Spot Remover 8 oz. (0.237 L) 1052930 Wheel Cleaner 16
oz. (0.473 L)
~ ~~
Spray on and rinse with water
1234572 1 12
oz. (0.354 L) 12345725 Shines vehicle without scratching Synthetic Chamois
2.5
sq. ft.
See your General Motors Parts Department for these products. **Not recommended for use on instrument panel vinyl.
Removes contaminants, blemishes and swirl marks Surface Cleaner \
16
oz. (0.473 L) 12377984
Removes light scratches and oxidation and protects finish
Cleaner
Wax
16
oz. (0.473 L) 12377966 Removes dust, fingerprints and surface contaminants
Finish Enhancer
16 oz. (0.473 L) 12377964 Spray on tire shine Silicone Tire Shine
See “Fluids and Lubricants” in the Index.
Page 303 of 346
Downloaded from www.Manualslib.com manuals search engine Vehicle Identification Number (VIN) Engine Identification
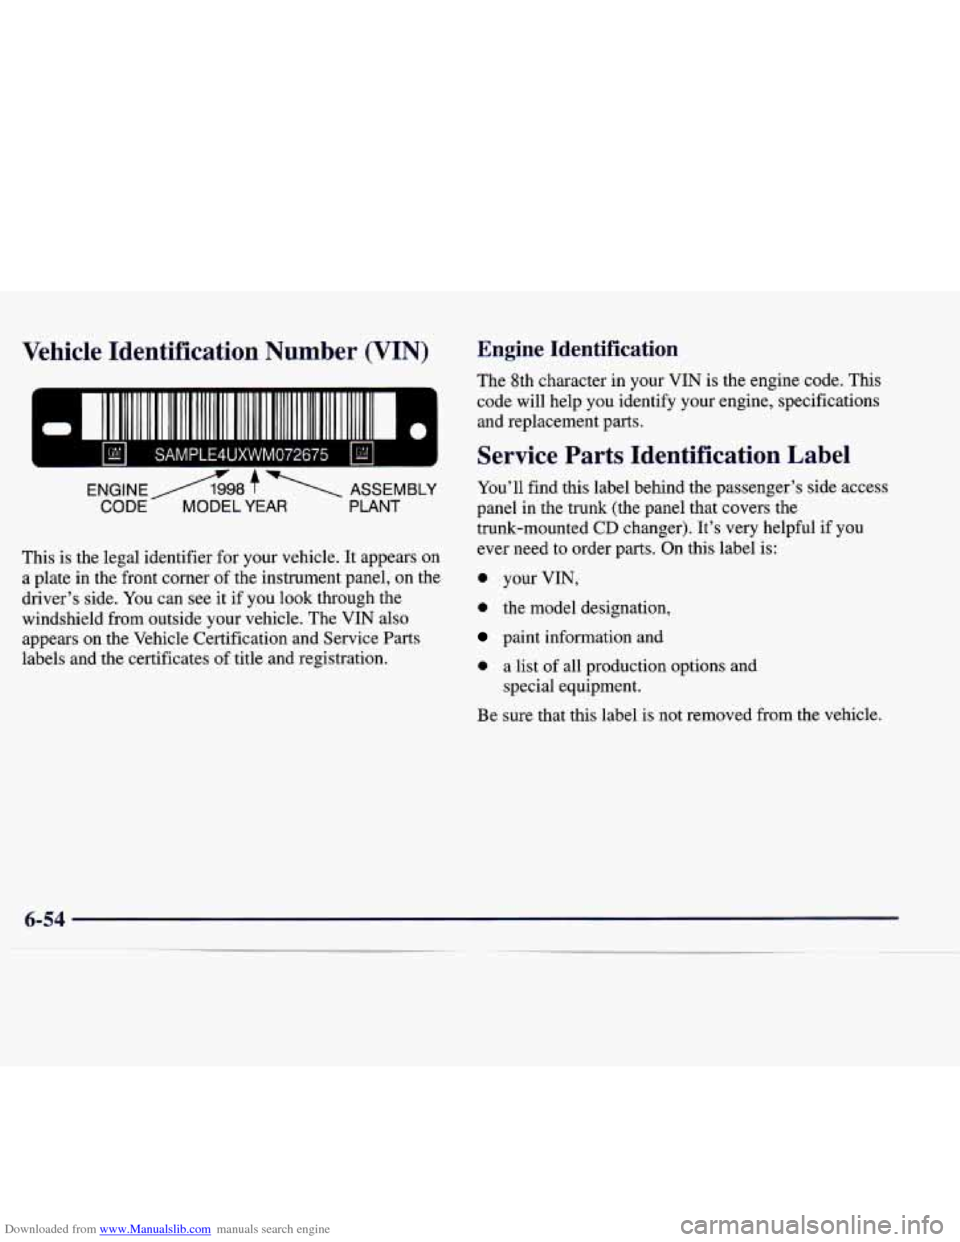
The 8th character in your VIN is the engine code. This
code will help you identify your engine, specifications and replacement parts.
m AD A Service Parts Identification Label
ENGlNEbL + ASSEMBLY You’ll find this label behind the passenger’s side access
CODE MODEL YEAR PLANT panel in the trunk (the panel that covers the
trunk-mounted
CD changer). It’s very helpful if you
ever need to order
parts. On this label is:
This is the legal identifier for your vehicle. It appears on
a plate in the front corner
of the instrument panel, on the
driver’s side. You can see it if you look through the
windshield from outside your vehicle. The
VIN also
appears on the Vehicle Certification and Service
Parts
labels and the certificates of title and registration.
- your VIN,
0 the model designation,
paint information and
0 a list of all production options and
special equipment.
Be sure that this label is not removed from the vehicle.
6-54
Page 304 of 346
Downloaded from www.Manualslib.com manuals search engine Electrical System
Add-on Electrical Equipment
I NOTICE:
Don’t add anything electrical to your vehicle
unless you check with your dealer first. Some electrical equipment can damage your vehicle
and the damage wouldn’t be covered by your
warranty. Some add-on electrical equipment
can keep other components from working as
they should.
Headlamp Wiring
The headlamp wiring has several fuses which are
powered by a MaxiFuse@. An electrical overload will
cause the lamps to go on and off, or in some cases to
remain
off. If this happens, have the headlamp wiring
checked right away.
MaxiFuse is a registered trademark of Little Fuse
Incorporated.
Windshield Wiper Fuses
If the windshield wiper motor overheats due to heavy
snow, etc., the wipers will stop until the motor cools. If
the overload is caused by some electrical problem, be
sure to have it fixed.
Your vehicle has an air bag system. Before attempting
to
add anything electrical to your vehicle, see “Servicing
Your Air Bag-Equipped Vehicle” in the Index.
Power Windows and Other Power Options
Circuit breakers protect the power windows and other
power accessories. When the current load is
too heavy,
the circuit breaker opens and closes, protecting the
circuit until the problem is fixed or goes away.
Page 305 of 346
Downloaded from www.Manualslib.com manuals search engine Power Distribution Fuse Block Fuses and Circuit Breakers
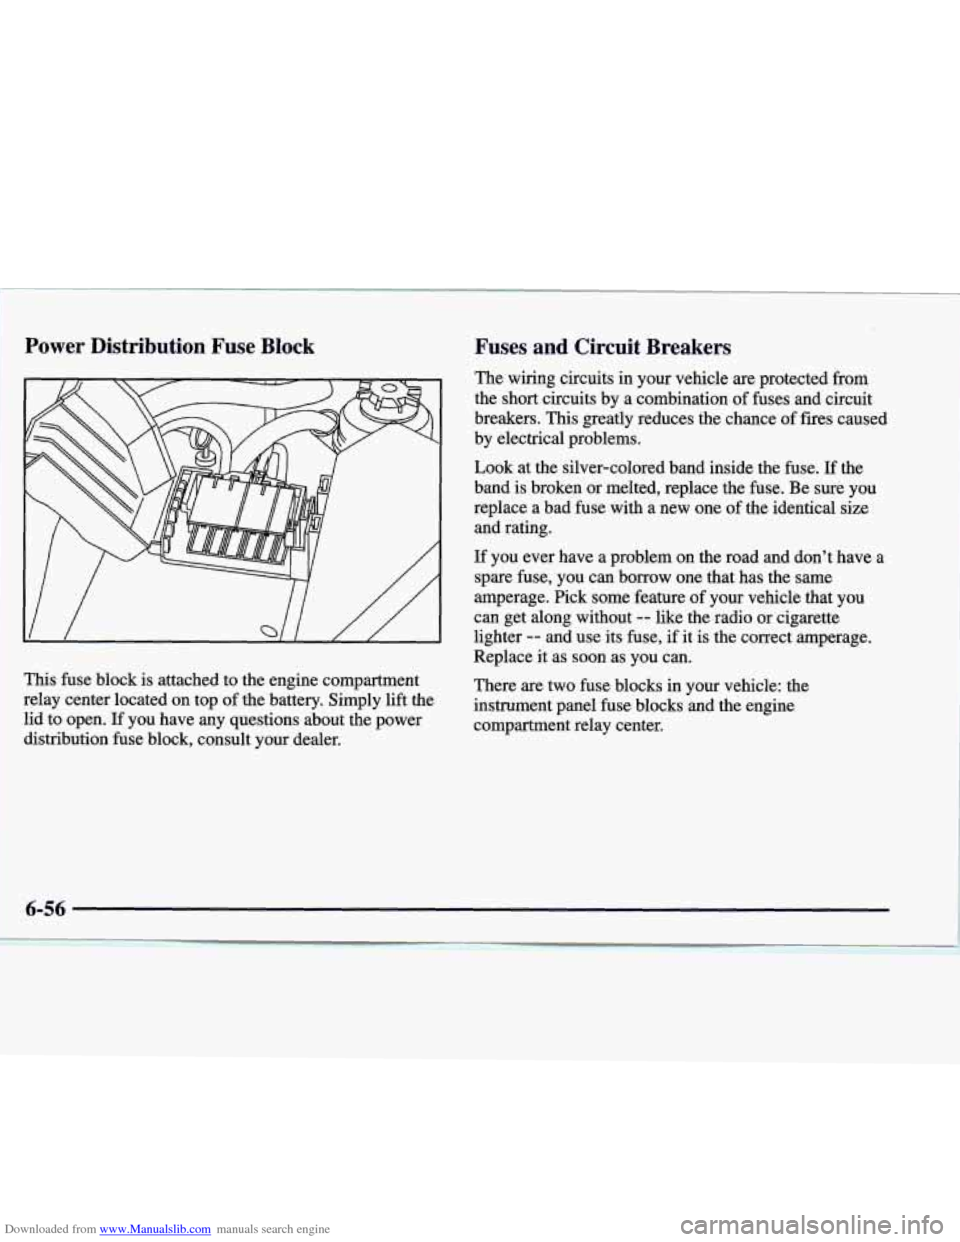
This fuse block is attached to the engine compartment
relay center located on top of the battery. Simply lift the
lid to open. If you have any questions about the power
distribution fuse block, consult your dealer. The
wiring circuits in your vehicle are protected from
the
short circuits by a combination of fuses and circuit
breakers.
This greatly reduces the chance of fires caused
by electrical problems.
Look at the silver-colored band inside the fuse.
If the
band is broken or melted, replace the
fuse. Be sure you
replace a bad fuse with a new one of the identical size
and rating.
If you ever have a problem on the road and don’t have a
spare fuse, you can borrow one that has the same
amperage. Pick some feature of your vehicle that
you
can get along without -- like the radio or cigarette
lighter
-- and use its fuse, if it is the correct amperage.
Replace it as soon as you can.
There
are two €use blocks in your vehicle: the
instrument panel fuse blocks and the engine
compartment relay center.
6-56
Page 306 of 346
Downloaded from www.Manualslib.com manuals search engine Instrument Panel Fuse Block (Driver's Side)
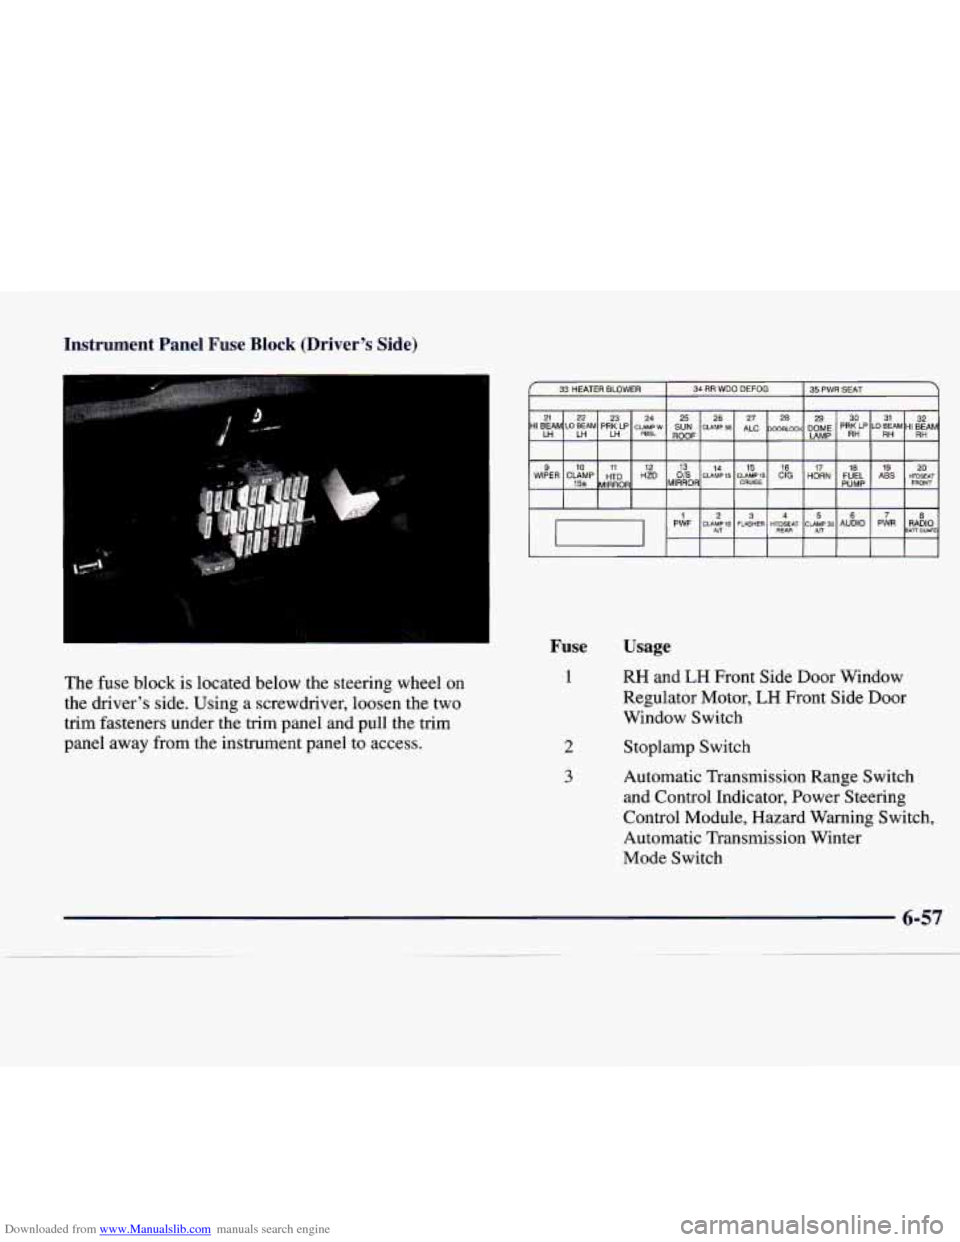
The fuse block is located below the steering wheel on
the driver's side. Using a screwdriver, loosen the two
trim fasteners under the trim panel and pull the trim
panel away from the instrument panel to access.
33 HEATER BLOWER
34 RR WDO DEFOG 35 PWR SEAT I I 7
Fuse
1
2
3
Usage
RH and LH Front Side Door Window
Regulator Motor,
LH Front Side Door
Window Switch
Stoplamp Switch
Automatic Transmission Range Switch
and Control Indicator, Power Steering
Control Module, Hazard Warning Switch,
Automatic Transmission Winter
Mode Switch
Page 307 of 346
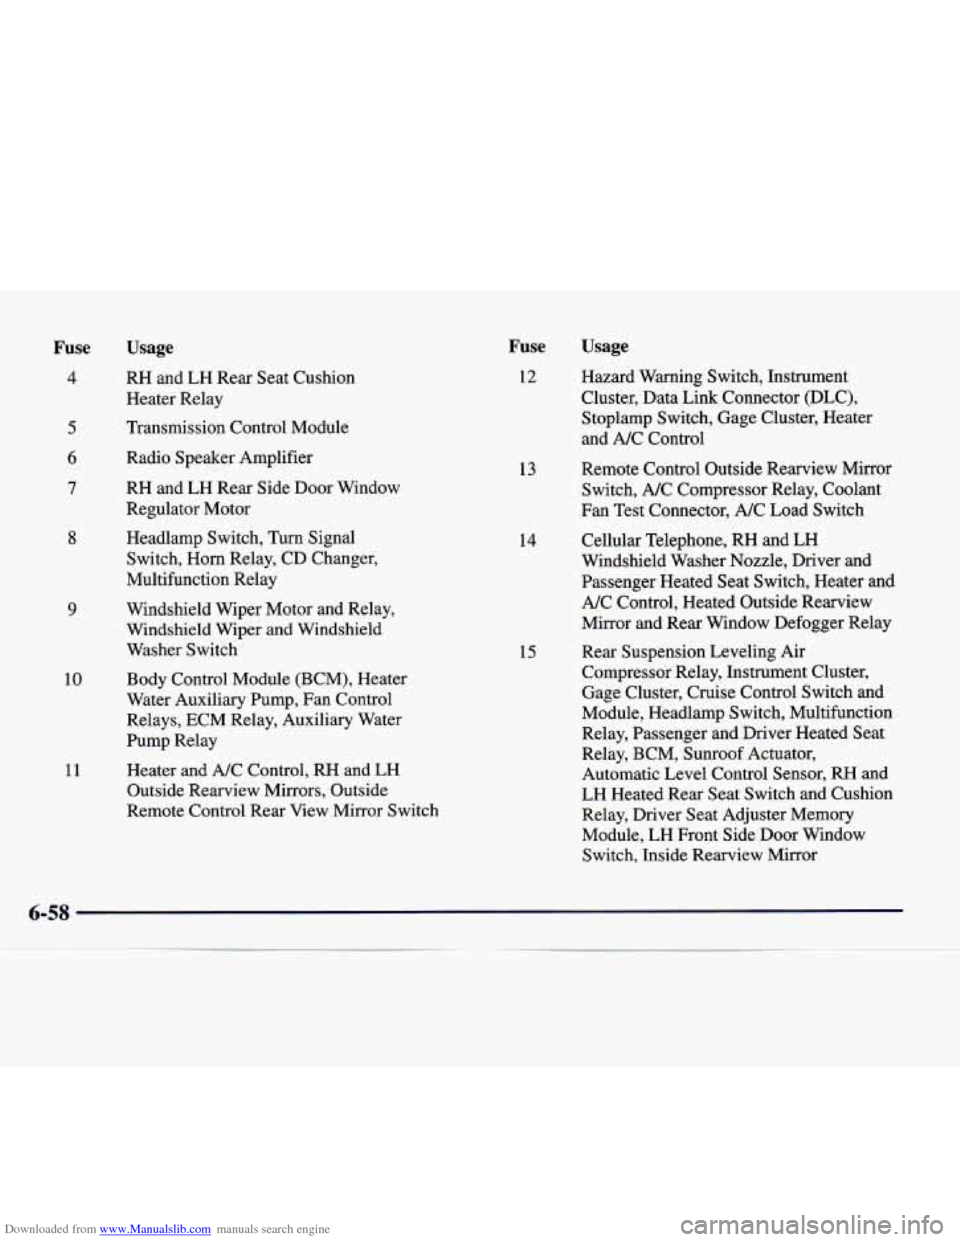
Downloaded from www.Manualslib.com manuals search engine Fuse Usage
4 RH and LH Rear Seat Cushion
Heater Relay
8
9
10
11
Transmission Control Module
Radio Speaker Amplifier
RH and LH Rear Side Door Window
Regulator Motor
Headlamp Switch,
Turn Signal
Switch, Horn Relay, CD Changer,
Multifunction Relay
Windshield Wiper Motor and Relay,
Windshield Wiper and Windshield Washer Switch
Body Control Module (BCM), Heater
Water Auxiliary Pump, Fan Control
Relays, ECM Relay, Auxiliary Water
Pump Relay
Heater and A/C Control, RH and LH
Outside Rearview Mirrors, Outside
Remote Control Rear View Mirror Switch
Fuse
12
13
14
15
Usage
Hazard Warning Switch, Instrument
Cluster, Data Link Connector (DLC),
Stoplamp Switch, Gage Cluster, Heater
and A/C Control
Remote Control Outside Rearview Mirror
Switch,
A/C Compressor Relay, Coolant
Fan Test Connector, A/C Load Switch
Cellular Telephone, RH and LH
Windshield Washer Nozzle, Driver and
Passenger Heated Seat Switch, Heater and
A/C Control, Heated Outside Rearview
Mirror and Rear Window Defogger Relay
Rear Suspension Leveling Air
Compressor Relay, Instrument Cluster,
Gage Cluster, Cruise Control Switch and
Module, Headlamp Switch, Multifunction
Relay, Passenger and Driver Heated Seat
Relay, BCM, Sunroof Actuator,
Automatic Level Control Sensor,
RH and
LH Heated Rear Seat Switch and Cushion
Relay, Driver Seat Adjuster Memory
Module, LH Front Side Door Window
Switch, Inside Rearview Mirror
6-58
Page 308 of 346
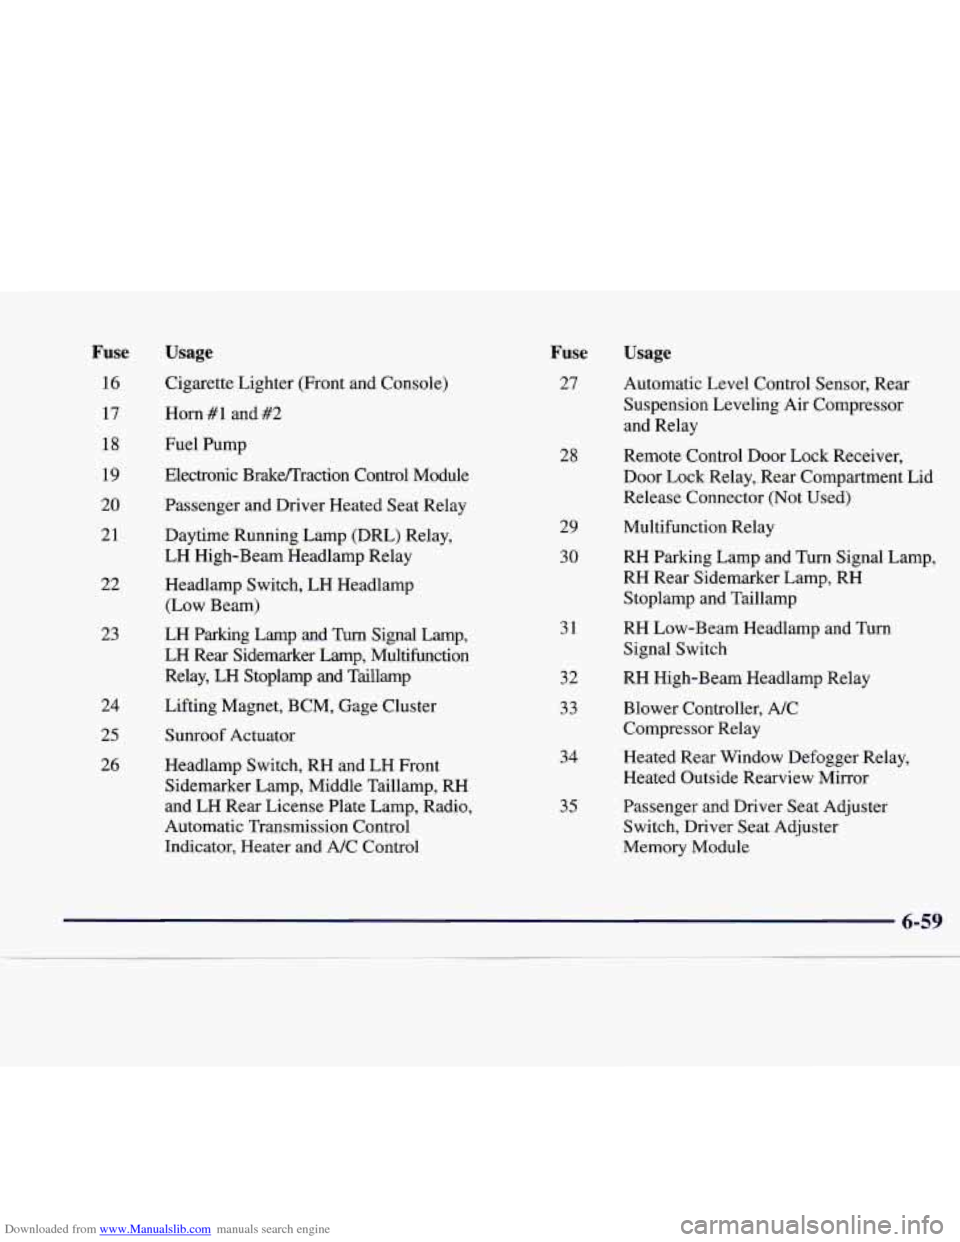
Downloaded from www.Manualslib.com manuals search engine Fuse Usage Usage
16
17
18
19
20
21
22
23
24
25
26 Cigarette Lighter (Front and Console)
Horn #1 and #2
Fuel Pump
Electronic BrakeD'raction Control Module
Passenger and Driver Heated Seat Relay
Daytime Running Lamp (DRL) Relay,
LH High-Beam Headlamp Relay
Headlamp
Switch, LH Headlamp
(Low Beam)
LH Parking Lamp and
Turn Signal Lamp,
LH Rear Sidemarker Lamp, Multifunction
Relay, LH Stoplamp and Taillamp
Lifting Magnet, BCM, Gage Cluster Sunroof Actuator
Headlamp Switch, RH and LH Front
Sidemarker Lamp, Middle Taillamp, RH
and LH Rear License Plate Lamp, Radio,
Automatic Transmission Control
Indicator, Heater and A/C Control
Fuse
27
28 29
30
31
32
33
34
35 Automatic Level Control Sensor, Rear
Suspension Leveling Air Compressor
and Relay
Remote Control Door Lock Receiver, Door Lock Relay, Rear Compartment Lid
Release Connector (Not Used)
Multifunction Relay
RH Parking Lamp and Turn Signal Lamp,
RH Rear Sidemarker Lamp, RH
Stoplamp and Taillamp
RH Low-Beam Headlamp and Turn Signal Switch
RH High-Beam Headlamp Relay
Blower Controller, A/C
Compressor Relay
Heated Rear Window Defogger Relay,
Heated Outside Rearview Mirror
Passenger and Driver Seat Adjuster
Switch, Driver Seat Adjuster
Memory Module
6-59
Page 309 of 346
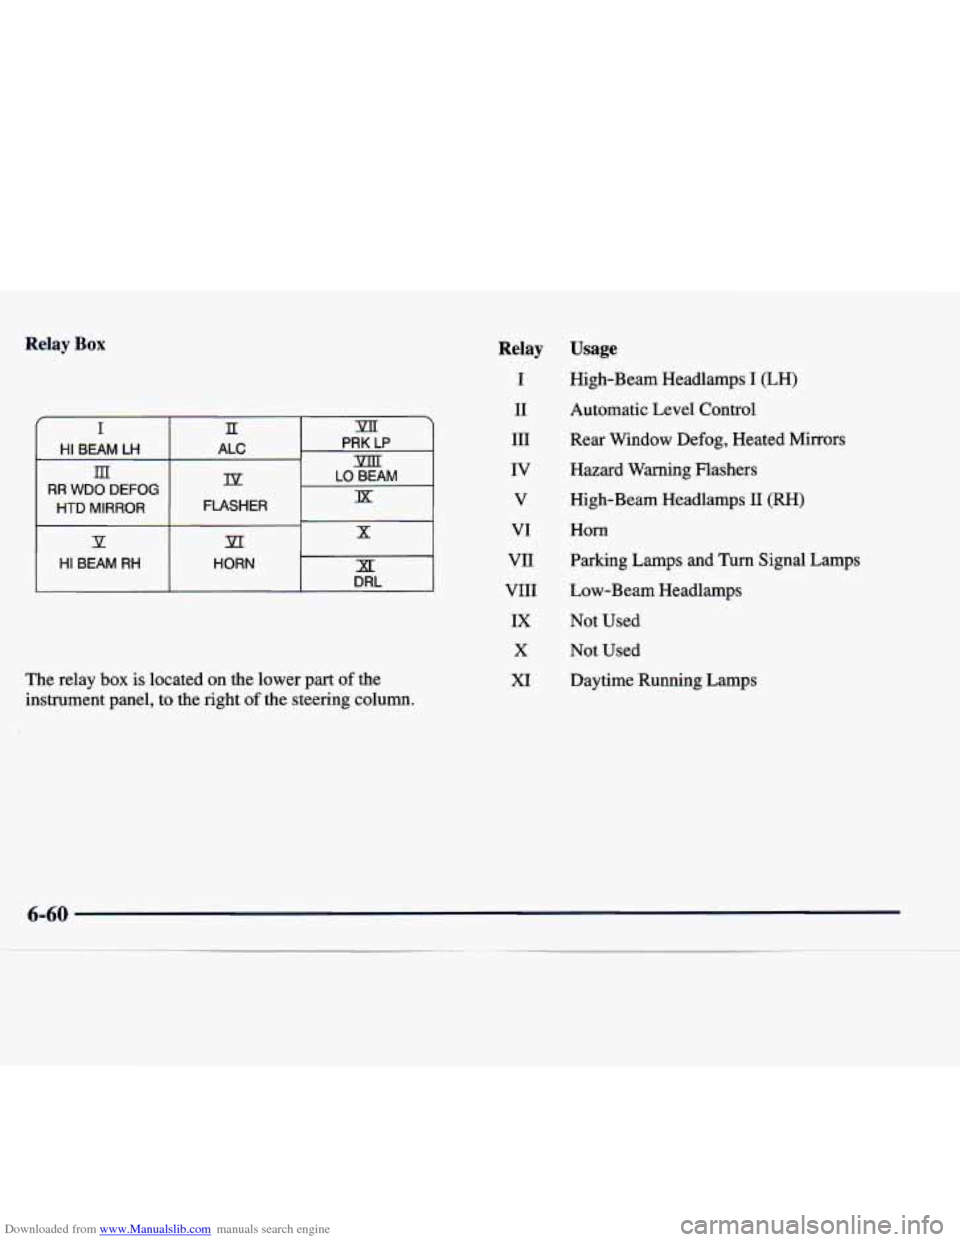
Downloaded from www.Manualslib.com manuals search engine Relay Box
f I rn II
XI: HORN HI BEAM RH
x
HTD MIRROR lx FLASHER
RR WDO DEFOG
m m
PRK LP
HI BEAM LH ALC
Ip LO BEAM
P PI
DRL
The relay box is located on the lower part of the
instrument panel, to the right
of the steering column.
Relay
I
I1
I11
IV
V
VI
VI1
VI11 IX X
XI
Usage
High-Beam Headlamps I' &IF>
Automatic Level Control
Rear Window Defog, Heated Mirrors
Hazard Warning Flashers
High-Beam Headlamps
I1 (RH)
Horn
Parking Lamps and Turn Signal Lamps
Low-Beam Headlamps
Not Used
Not Used Daytime Running Lamps
6-60
Page 310 of 346
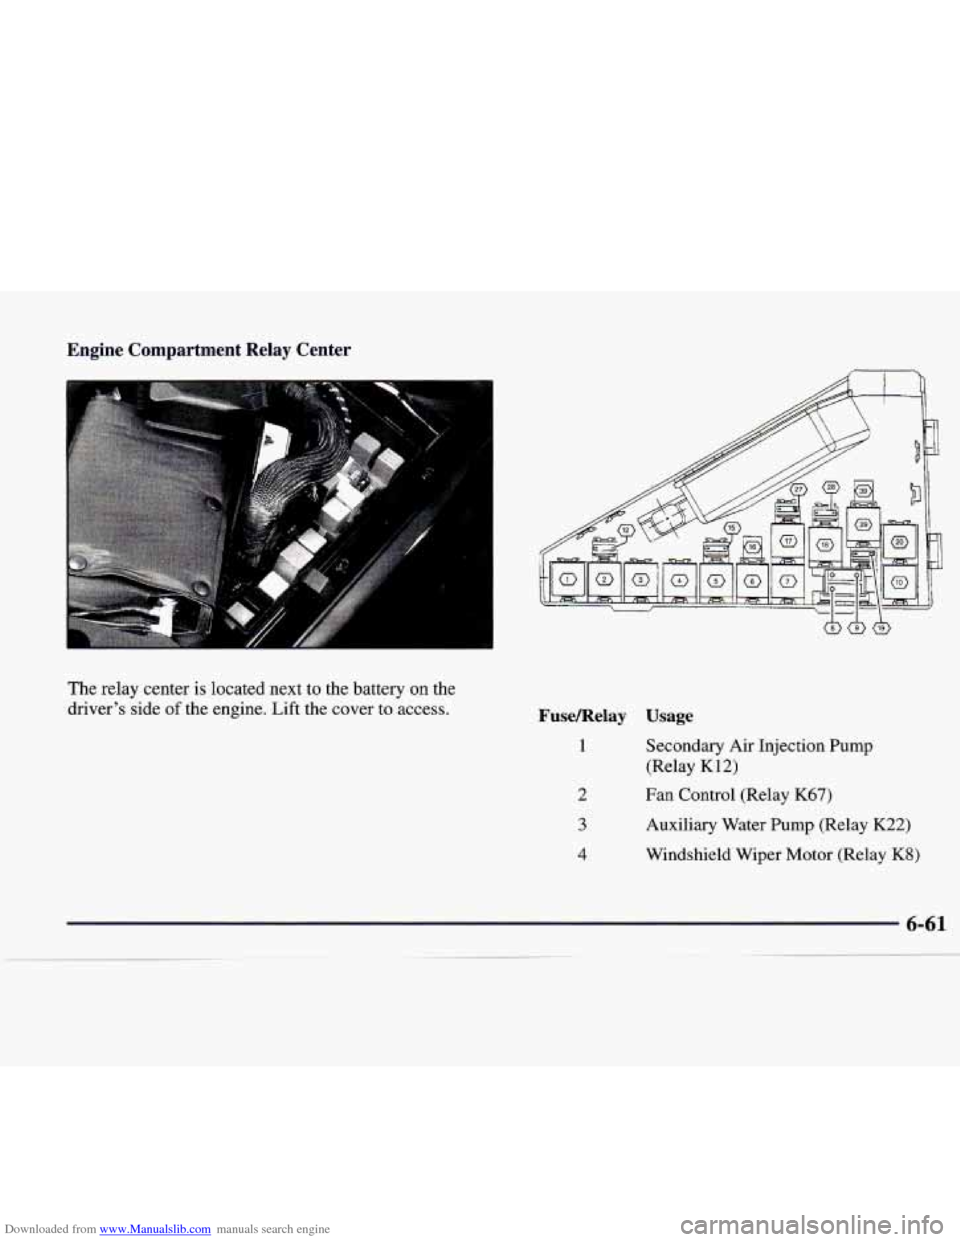
Downloaded from www.Manualslib.com manuals search engine Engine Compartment Relay Center
The relay center is located next to the battery on the
driver’s
side of the engine. Lift the cover to access. Fusemelay Usage
1 Secondary Air Injection Pump
(Relay
K12)
Fan Control (Relay K67)
Auxiliary Water Pump (Relay K22)
Windshield Wiper Motor (Relay
K8)
6-61