sensor CADILLAC CT4 2021 Owner's Guide
[x] Cancel search | Manufacturer: CADILLAC, Model Year: 2021, Model line: CT4, Model: CADILLAC CT4 2021Pages: 434, PDF Size: 8.3 MB
Page 289 of 434
Cadillac CT4 Owner Manual (GMNA-Localizing-U.S./Canada-14584335) -
2021 - CRC - 12/4/20
288 DRIVING AND OPERATING
Warning (Continued)
Be ready to take action and apply
the brakes. For more information,
seeDefensive Driving 0204. Keep
the windshield, headlamps, and FPB
sensor clean and in good repair.
FPB can be set to Off, Alert, or Alert &
Brake through vehicle personalization.
See “Front Pedestrian Detection ”in
“Collision/Detection Systems” under
Vehicle Personalization 0117.
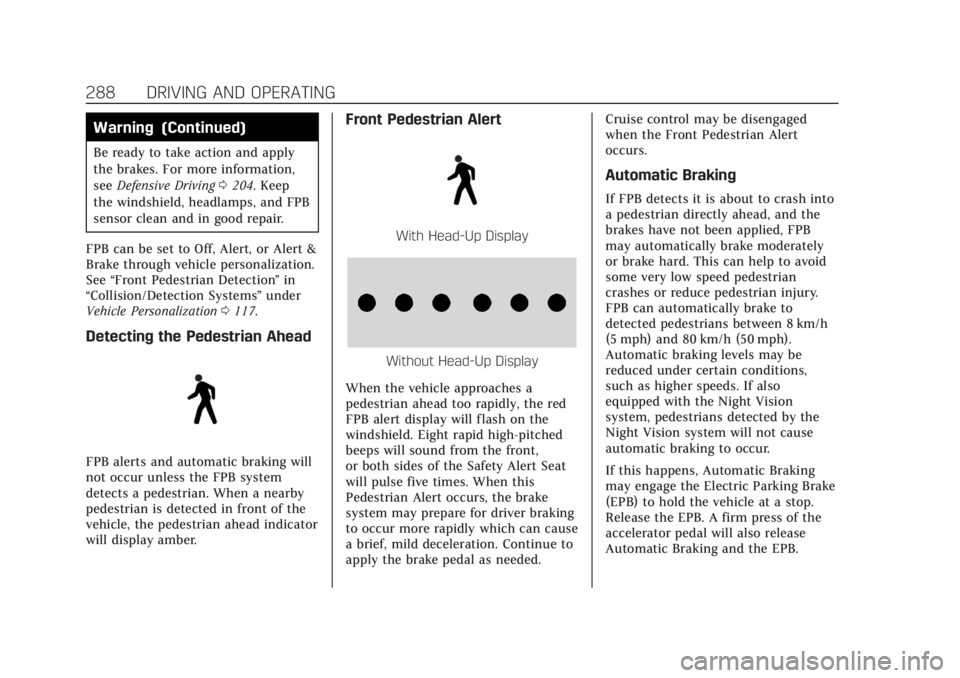
Detecting the Pedestrian Ahead
FPB alerts and automatic braking will
not occur unless the FPB system
detects a pedestrian. When a nearby
pedestrian is detected in front of the
vehicle, the pedestrian ahead indicator
will display amber.
Front Pedestrian Alert
With Head-Up Display
Without Head-Up Display
When the vehicle approaches a
pedestrian ahead too rapidly, the red
FPB alert display will flash on the
windshield. Eight rapid high-pitched
beeps will sound from the front,
or both sides of the Safety Alert Seat
will pulse five times. When this
Pedestrian Alert occurs, the brake
system may prepare for driver braking
to occur more rapidly which can cause
a brief, mild deceleration. Continue to
apply the brake pedal as needed. Cruise control may be disengaged
when the Front Pedestrian Alert
occurs.
Automatic Braking
If FPB detects it is about to crash into
a pedestrian directly ahead, and the
brakes have not been applied, FPB
may automatically brake moderately
or brake hard. This can help to avoid
some very low speed pedestrian
crashes or reduce pedestrian injury.
FPB can automatically brake to
detected pedestrians between 8 km/h
(5 mph) and 80 km/h (50 mph).
Automatic braking levels may be
reduced under certain conditions,
such as higher speeds. If also
equipped with the Night Vision
system, pedestrians detected by the
Night Vision system will not cause
automatic braking to occur.
If this happens, Automatic Braking
may engage the Electric Parking Brake
(EPB) to hold the vehicle at a stop.
Release the EPB. A firm press of the
accelerator pedal will also release
Automatic Braking and the EPB.
Page 291 of 434
Cadillac CT4 Owner Manual (GMNA-Localizing-U.S./Canada-14584335) -
2021 - CRC - 12/4/20
290 DRIVING AND OPERATING
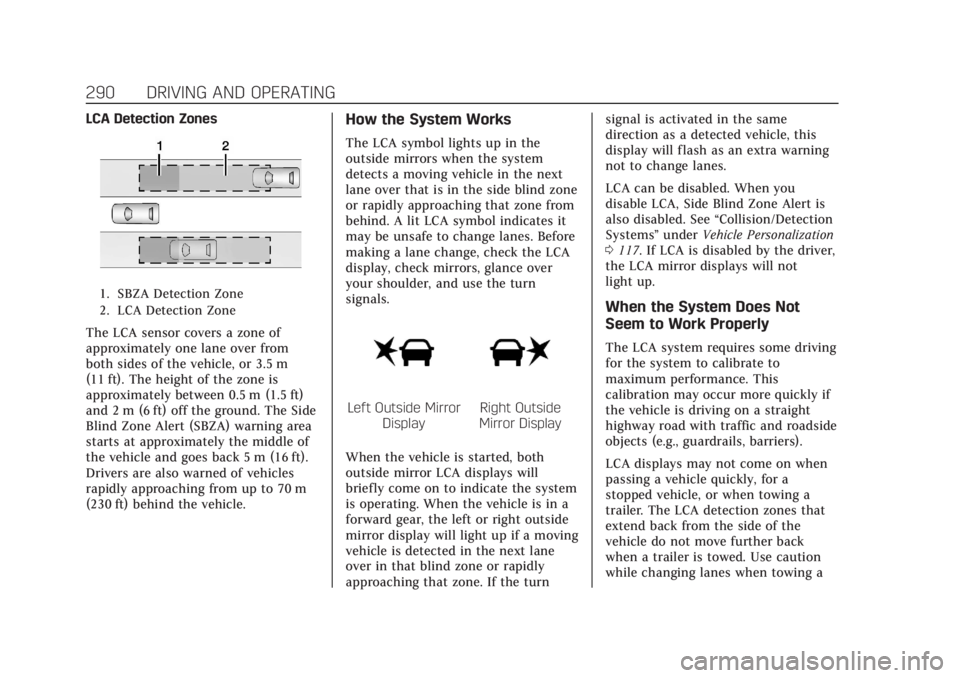
LCA Detection Zones
1. SBZA Detection Zone
2. LCA Detection Zone
The LCA sensor covers a zone of
approximately one lane over from
both sides of the vehicle, or 3.5 m
(11 ft). The height of the zone is
approximately between 0.5 m (1.5 ft)
and 2 m (6 ft) off the ground. The Side
Blind Zone Alert (SBZA) warning area
starts at approximately the middle of
the vehicle and goes back 5 m (16 ft).
Drivers are also warned of vehicles
rapidly approaching from up to 70 m
(230 ft) behind the vehicle.
How the System Works
The LCA symbol lights up in the
outside mirrors when the system
detects a moving vehicle in the next
lane over that is in the side blind zone
or rapidly approaching that zone from
behind. A lit LCA symbol indicates it
may be unsafe to change lanes. Before
making a lane change, check the LCA
display, check mirrors, glance over
your shoulder, and use the turn
signals.
Left Outside MirrorDisplayRight Outside
Mirror Display
When the vehicle is started, both
outside mirror LCA displays will
briefly come on to indicate the system
is operating. When the vehicle is in a
forward gear, the left or right outside
mirror display will light up if a moving
vehicle is detected in the next lane
over in that blind zone or rapidly
approaching that zone. If the turn signal is activated in the same
direction as a detected vehicle, this
display will flash as an extra warning
not to change lanes.
LCA can be disabled. When you
disable LCA, Side Blind Zone Alert is
also disabled. See
“Collision/Detection
Systems” underVehicle Personalization
0 117. If LCA is disabled by the driver,
the LCA mirror displays will not
light up.
When the System Does Not
Seem to Work Properly
The LCA system requires some driving
for the system to calibrate to
maximum performance. This
calibration may occur more quickly if
the vehicle is driving on a straight
highway road with traffic and roadside
objects (e.g., guardrails, barriers).
LCA displays may not come on when
passing a vehicle quickly, for a
stopped vehicle, or when towing a
trailer. The LCA detection zones that
extend back from the side of the
vehicle do not move further back
when a trailer is towed. Use caution
while changing lanes when towing a
Page 292 of 434

Cadillac CT4 Owner Manual (GMNA-Localizing-U.S./Canada-14584335) -
2021 - CRC - 12/4/20
DRIVING AND OPERATING 291
trailer. LCA may alert to objects
attached to the vehicle, such as a
trailer, bicycle, or object extending out
to either side of the vehicle. Attached
objects may also interfere with the
detection of vehicles. This is normal
system operation; the vehicle does not
need service.
LCA may not always alert the driver to
vehicles in the next lane over,
especially in wet conditions or when
driving on sharp curves. The system
does not need to be serviced. The
system may light up due to guardrails,
signs, trees, shrubs, and other
non-moving objects. This is normal
system operation; the vehicle does not
need service.
LCA may not operate when the LCA
sensors in the left or right corners of
the rear bumper are covered with
mud, dirt, snow, ice, or slush, or in
heavy rainstorms. For cleaning
instructions, see "Washing the
Vehicle" underExterior Care0370.
If the DIC still displays the system
unavailable message after cleaning both sides of the vehicle toward the
rear corners of the vehicle, see your
dealer.
If the LCA displays do not light up
when moving vehicles are in the side
blind zone or are rapidly approaching
this zone and the system is clean, the
system may need service. Take the
vehicle to your dealer.
Radio Frequency Information
See
Radio Frequency Statement 0409.
Lane Keep Assist (LKA)
If equipped, LKA may help avoid
crashes due to unintentional lane
departures. This system uses a camera
to detect lane markings between
60 km/h (37 mph) and 180 km/h
(112 mph). It may assist by gently
turning the steering wheel if the
vehicle approaches a detected lane
marking. It may also provide a Lane
Departure Warning (LDW) alert if the
vehicle crosses a detected lane
marking. LKA can be overridden by
turning the steering wheel. This
system is not intended to keep the
vehicle centered in the lane. LKA will not assist and alert if the turn signal
is active in the direction of lane
departure, or if it detects that you are
accelerating, braking or actively
steering.
{Warning
The LKA system does not
continuously steer the vehicle.
It may not keep the vehicle in the
lane or give a Lane Departure
Warning (LDW) alert, even if a lane
marking is detected.
The LKA and LDW systems
may not:
.Provide an alert or enough
steering assist to avoid a lane
departure or crash.
.Detect lane markings under poor
weather or visibility conditions.
This can occur if the windshield
or headlamps are blocked by dirt,
snow, or ice; if they are not in
proper condition; or if the sun
shines directly into the camera.
.Detect road edges.
(Continued)
Page 293 of 434

Cadillac CT4 Owner Manual (GMNA-Localizing-U.S./Canada-14584335) -
2021 - CRC - 12/4/20
292 DRIVING AND OPERATING
Warning (Continued)
.Detect lanes on winding or hilly
roads.
If LKA only detects lane markings
on one side of the road, it will only
assist or provide an LDW alert
when approaching the lane on the
side where it has detected a lane
marking. Even with LKA and LDW,
you must steer the vehicle. Always
keep your attention on the road and
maintain proper vehicle position
within the lane, or vehicle damage,
injury, or death could occur. Always
keep the windshield, headlamps,
and camera sensors clean and in
good repair. Do not use LKA in bad
weather conditions or on roads with
unclear lane markings, such as
construction zones.
{Warning
Using LKA while towing a trailer or
on slippery roads could cause loss
of control of the vehicle and a
crash. Turn the system off.
How the System Works
LKA uses a camera sensor installed on
the windshield ahead of the rearview
mirror to detect lane markings. It may
provide brief steering assist if it
detects an unintended lane departure.
It may further provide an audible alert
or the driver seat may pulse indicating
that a lane marking has been crossed.
To turn LKA on and off, press
Aon
the center stack. If equipped, the
indicator light on the button comes
on when LKA is on and turns off
when LKA is disabled.
When on,
Ais white, if equipped,
indicating that the system is not ready
to assist.
Ais green if LKA is ready
to assist. LKA may assist by gently
turning the steering wheel if the
vehicle approaches a detected lane
marking.
Ais amber when
assisting. It may also provide a Lane
Departure Warning (LDW) alert by
flashing
Aamber if the vehicle
crosses a detected lane marking.
Additionally, there may be three
beeps, or the driver seat may pulse three times, on the right or left,
depending on the lane departure
direction.
Take Steering
The LKA system does not
continuously steer the vehicle. If LKA
does not detect active driver steering,
an alert and chime may be provided.
Steer the vehicle to dismiss. LKA may
become temporarily unavailable after
repeated take steering alerts.
When the System Does Not
Seem to Work Properly
The system performance may be
affected by:
.Close vehicles ahead.
.Sudden lighting changes, such as
when driving through tunnels.
.Banked roads.
.Roads with poor lane markings,
such as two-lane roads.
If the LKA system is not functioning
properly when lane markings are
clearly visible, cleaning the windshield
may help.
Page 325 of 434
Cadillac CT4 Owner Manual (GMNA-Localizing-U.S./Canada-14584335) -
2021 - CRC - 11/23/20
324 VEHICLE CARE
Caution
Continuing to drive with worn-out
brake linings could result in costly
brake repairs.
Some driving conditions or climates
can cause a brake squeal when the
brakes are first applied, clearing up
following several applications. This
does not mean something is wrong
with the brakes.
Properly torqued wheel nuts are
necessary to help prevent brake
pulsation. When tires are rotated,
inspect brake linings for wear and
evenly tighten wheel nuts in the
proper sequence to torque
specifications. See Capacities and
Specifications 0396.
Brake pads should be replaced as
complete axle sets.
Brake Pedal Travel
See your dealer if the brake pedal does
not return to normal height, or if
there is a rapid increase in pedal
travel. This could be a sign that brake
service may be required.
Replacing Brake System Parts
Always replace brake system parts
with new, approved replacement parts.
If this is not done, the brakes may not
work properly. The braking
performance can change in many
ways if the wrong brake parts are
installed or if parts are improperly
installed.
Brake Pad Life System (If
Equipped)
When to Change Brake Pads
This vehicle has a system that
estimates the remaining life of the
front and rear brake pads. Brake pad
life is displayed in the Driver
Information Center (DIC), along with
a percentage for each axle. The system
must be reset every time the brake
pads are changed.
When the system has determined that
the brake pads need to be replaced, a
message will display, which may
include mileage remaining.
Brake pads should always be replaced
as complete axle sets.
How to Reset the Brake Pad Life
System
The system will automatically detect
when significantly worn brake pads
and sensors are replaced. When the
ignition is turned on after new pads
and sensors are installed, a message
will display. Follow the prompts to
reset the system.
The brake pad life system can also be
manually reset: 1. Display Brake Pad Life on the DIC. See Driver Information Center (DIC)
(Base Level) 0107 or
Driver Information Center (DIC)
(Uplevel) 0110.
2. Press the thumbwheel. Select front or rear pads as appropriate.
3. Select YES on the confirmation message. Repeat for pads on the
other axle if they were also
replaced.
Page 326 of 434

Cadillac CT4 Owner Manual (GMNA-Localizing-U.S./Canada-14584335) -
2021 - CRC - 11/23/20
VEHICLE CARE 325
How to Disable the Brake Pad
Life System
The brake pad life system can be
turned off. This may be necessary if
aftermarket brake pads without wear
sensors are installed. When the
system is turned off, the front and
rear brake pad life percentages will
not display. However, the built-in wear
indicators that make a high-pitched
warning sound when the brake pads
are worn can still determine when the
pads should be replaced. SeeBrakes
0 323.
To turn off the brake pad life system: 1. Display Brake Pad Life on the DIC. See Driver Information Center (DIC)
(Base Level) 0107 or
Driver Information Center (DIC)
(Uplevel) 0110.
2. Select DISABLE.
To turn the brake pad life system back
on, follow the above steps but select
ENABLE in Step 2.
Brake Fluid
The brake master cylinder reservoir is
filled with GM approved DOT 4 brake
fluid as indicated on the reservoir cap.
See Engine Compartment Overview
0 309 for the location of the reservoir.
Checking Brake Fluid
With the vehicle in P (Park) on a level
surface, the brake fluid level should be
between the minimum and maximum
marks on the brake fluid reservoir.
There are only two reasons why the
brake fluid level in the reservoir may
go down:
.Normal brake lining wear. When
new linings are installed, the fluid
level goes back up.
.A fluid leak in the brake hydraulic
system. Have the brake hydraulic
system fixed. With a leak, the
brakes will not work well. Always clean the brake fluid reservoir
cap and the area around the cap
before removing it.
Do not top off the brake fluid. Adding
fluid does not correct a leak. If fluid is
added when the linings are worn,
there will be too much fluid when
new brake linings are installed. Add or
remove fluid, as necessary, only when
work is done on the brake hydraulic
system.
{Warning
If too much brake fluid is added, it
can spill on the engine and burn,
if the engine is hot enough. You or
others could be burned, and the
vehicle could be damaged. Add
brake fluid only when work is done
on the brake hydraulic system.
When the brake fluid falls to a low
level, the brake warning light comes
on. See Brake System Warning Light
0 99.
Page 329 of 434

Cadillac CT4 Owner Manual (GMNA-Localizing-U.S./Canada-14584335) -
2021 - CRC - 11/23/20
328 VEHICLE CARE
To replace the windshield wiper blade:1. Pull the windshield wiper assembly away from the windshield.
2. Lift up on the latch in the middleof the wiper blade where the wiper
arm attaches.
3. With the latch open, pull the wiper blade down toward the windshield
far enough to release it from the
J-hooked end of the wiper arm.
4. Remove the wiper blade.
5. Reverse Steps 1–3 for wiper blade replacement.
Windshield Replacement
HUD System
The windshield is part of the HUD
system. If the windshield needs to be
replaced, be sure to get one that is
designed for HUD or the HUD image
may look out of focus.
Driver Assistance Systems
If the windshield needs to be replaced
and the vehicle is equipped with a
front camera sensor for the Driver
Assistance Systems, a GM
replacement windshield is
recommended. The replacement
windshield must be installed
according to GM specifications for
proper alignment. If it is not, these
systems may not work properly, they
may display messages, or they may
not work at all. See your dealer for
proper windshield replacement.
Acoustic Windshield
The vehicle is equipped with an
acoustic windshield. If the windshield
needs to be replaced be sure to get an acoustic windshield so you will
continue to have the benefits an
acoustic windshield can provide.
Gas Strut(s)
This vehicle is equipped with gas
strut(s) to provide assistance in lifting
and holding open the hood/trunk/
liftgate system in full open position.
{Warning
If the gas struts that hold open the
hood, trunk, and/or liftgate fail, you
or others could be seriously injured.
Take the vehicle to your dealer for
service immediately. Visually
inspect the gas struts for signs of
wear, cracks, or other damage
periodically. Check to make sure the
hood/trunk/liftgate is held open
with enough force. If struts are
failing to hold the hood/trunk/
liftgate, do not operate. Have the
vehicle serviced.
Page 334 of 434
Cadillac CT4 Owner Manual (GMNA-Localizing-U.S./Canada-14584335) -
2021 - CRC - 11/23/20
VEHICLE CARE 333
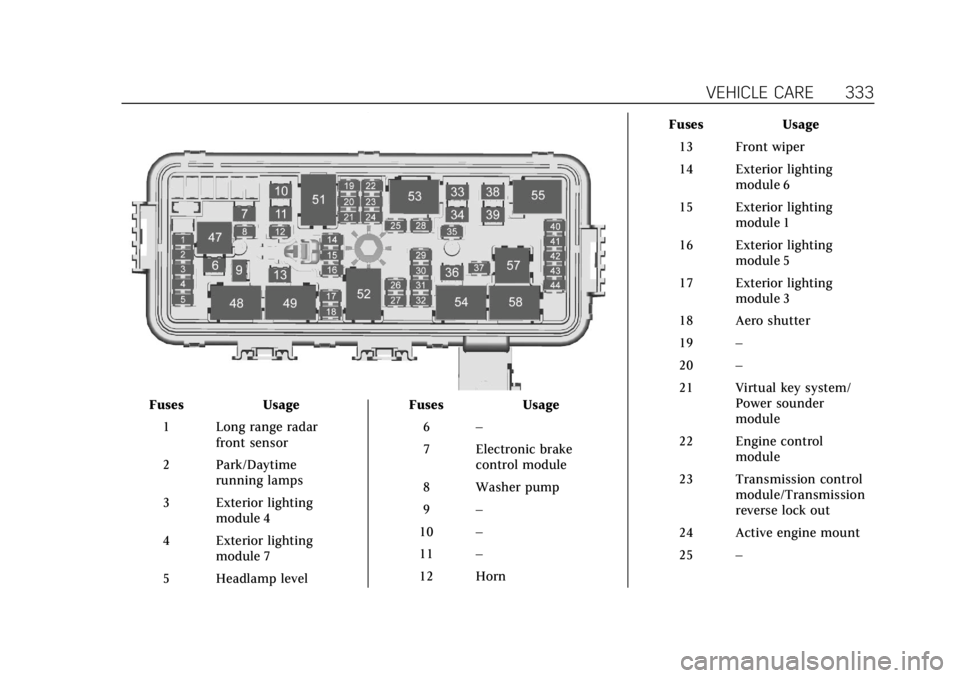
FusesUsage
1 Long range radar front sensor
2 Park/Daytime running lamps
3 Exterior lighting module 4
4 Exterior lighting module 7
5 Headlamp level Fuses
Usage
6 –
7 Electronic brake control module
8 Washer pump
9 –
10 –
11 –
12 Horn Fuses
Usage
13 Front wiper
14 Exterior lighting module 6
15 Exterior lighting module 1
16 Exterior lighting module 5
17 Exterior lighting module 3
18 Aero shutter
19 –
20 –
21 Virtual key system/ Power sounder
module
22 Engine control module
23 Transmission control module/Transmission
reverse lock out
24 Active engine mount
25 –
Page 336 of 434
Cadillac CT4 Owner Manual (GMNA-Localizing-U.S./Canada-14584335) -
2021 - CRC - 11/23/20
VEHICLE CARE 335
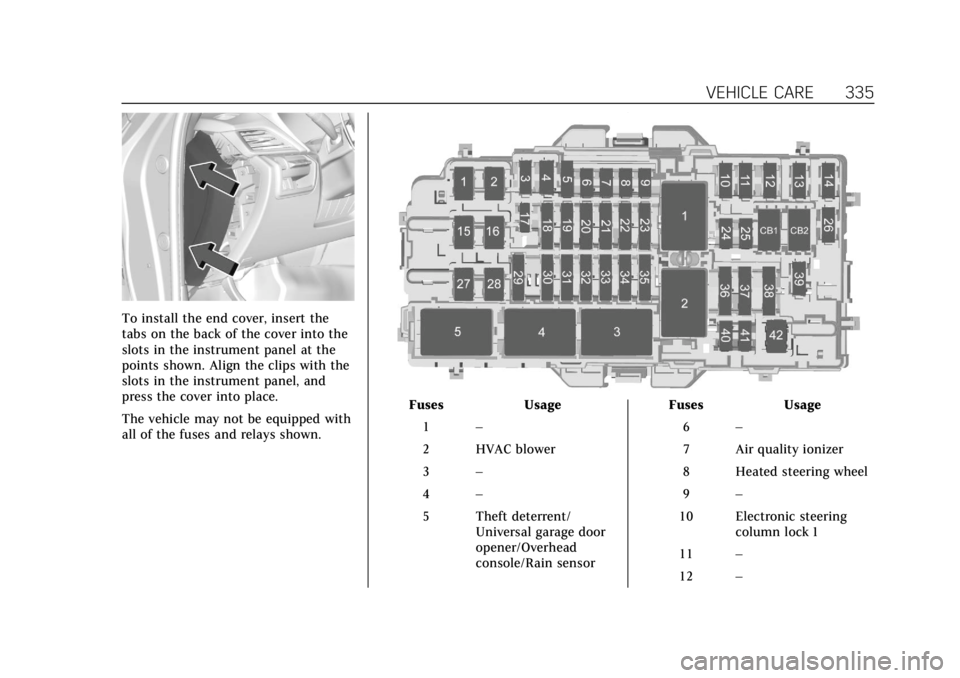
To install the end cover, insert the
tabs on the back of the cover into the
slots in the instrument panel at the
points shown. Align the clips with the
slots in the instrument panel, and
press the cover into place.
The vehicle may not be equipped with
all of the fuses and relays shown.
FusesUsage
1 –
2 HVAC blower
3 –
4 –
5 Theft deterrent/ Universal garage door
opener/Overhead
console/Rain sensor Fuses
Usage
6 –
7 Air quality ionizer
8 Heated steering wheel
9 –
10 Electronic steering column lock 1
11 –
12 –
Page 348 of 434
Cadillac CT4 Owner Manual (GMNA-Localizing-U.S./Canada-14584335) -
2021 - CRC - 11/23/20
VEHICLE CARE 347
the vehicle has not been driven for
at least three hours or no more
than 1.6 km (1 mi).
Remove the valve cap from the
tire valve stem. Press the tire
gauge firmly onto the valve to get
a pressure measurement. If the
cold tire inflation pressure
matches the recommended
pressure on the Tire and Loading
Information label, no further
adjustment is necessary. If the
inflation pressure is low, add air
until the recommended pressure is
reached. If the inflation pressure
is high, press on the metal stem in
the center of the tire valve to
release air.
Recheck the tire pressure with the
tire gauge.
Put the valve caps back on the
valve stems to keep out dirt and
moisture. Use only valve caps
designed for the vehicle by GM.TPMS sensors could be damaged
and would not be covered by the
vehicle warranty.
Tire Pressure for
High-Speed Operation
{Warning
Driving at high speeds, 160 km/h
(100 mph) or higher, puts additional
strain on tires. Sustained
high-speed driving causes excessive
heat buildup and can cause sudden
tire failure. This could cause a
crash, and you or others could be
killed. Some high-speed rated tires
require inflation pressure
adjustment for high-speed
operation. When speed limits and
road conditions allow the vehicle to
be driven at high speeds, make sure
the tires are rated for high-speed
operation, are in excellent
condition, and are set to the correct
cold tire inflation pressure for the
vehicle load. Vehicles with tire sizes listed in the
High Speed Operation Inflation
Pressures table require inflation
pressure adjustment when driving the
vehicle at speeds of 160 km/h
(100 mph) or higher. Set the cold tire
inflation pressure to the
corresponding value in the table for
the tire size on the vehicle.