run flat CADILLAC CT4 2021 Owner's Manual
[x] Cancel search | Manufacturer: CADILLAC, Model Year: 2021, Model line: CT4, Model: CADILLAC CT4 2021Pages: 434, PDF Size: 8.3 MB
Page 76 of 434
Cadillac CT4 Owner Manual (GMNA-Localizing-U.S./Canada-14584335) -
2021 - CRC - 11/23/20
SEATS AND RESTRAINTS 75
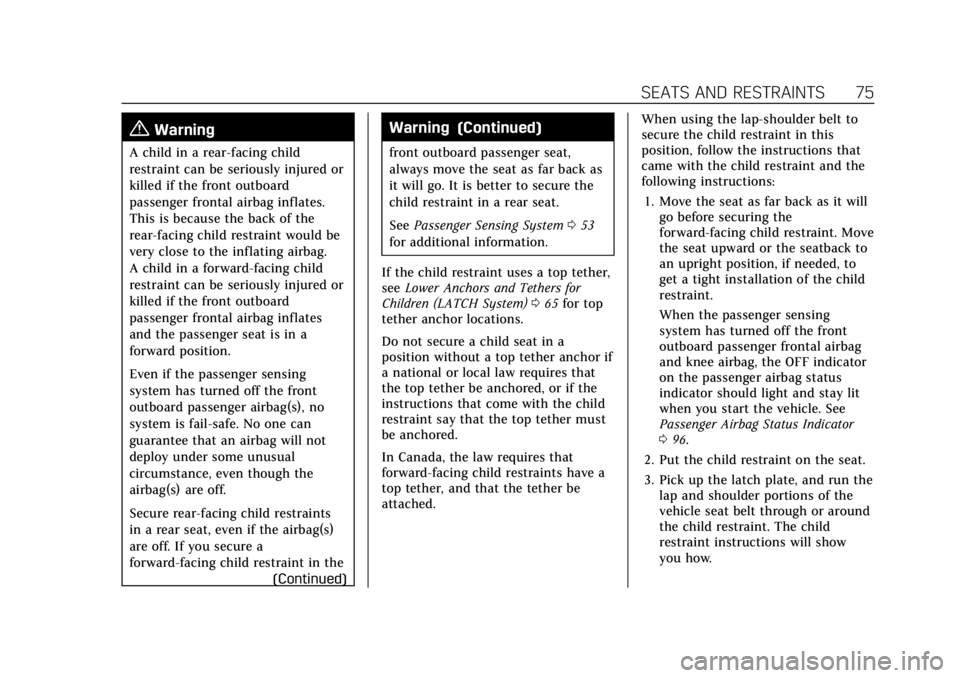
{Warning
A child in a rear-facing child
restraint can be seriously injured or
killed if the front outboard
passenger frontal airbag inflates.
This is because the back of the
rear-facing child restraint would be
very close to the inflating airbag.
A child in a forward-facing child
restraint can be seriously injured or
killed if the front outboard
passenger frontal airbag inflates
and the passenger seat is in a
forward position.
Even if the passenger sensing
system has turned off the front
outboard passenger airbag(s), no
system is fail-safe. No one can
guarantee that an airbag will not
deploy under some unusual
circumstance, even though the
airbag(s) are off.
Secure rear-facing child restraints
in a rear seat, even if the airbag(s)
are off. If you secure a
forward-facing child restraint in the(Continued)
Warning (Continued)
front outboard passenger seat,
always move the seat as far back as
it will go. It is better to secure the
child restraint in a rear seat.
SeePassenger Sensing System 053
for additional information.
If the child restraint uses a top tether,
see Lower Anchors and Tethers for
Children (LATCH System) 065 for top
tether anchor locations.
Do not secure a child seat in a
position without a top tether anchor if
a national or local law requires that
the top tether be anchored, or if the
instructions that come with the child
restraint say that the top tether must
be anchored.
In Canada, the law requires that
forward-facing child restraints have a
top tether, and that the tether be
attached. When using the lap-shoulder belt to
secure the child restraint in this
position, follow the instructions that
came with the child restraint and the
following instructions:
1. Move the seat as far back as it will go before securing the
forward-facing child restraint. Move
the seat upward or the seatback to
an upright position, if needed, to
get a tight installation of the child
restraint.
When the passenger sensing
system has turned off the front
outboard passenger frontal airbag
and knee airbag, the OFF indicator
on the passenger airbag status
indicator should light and stay lit
when you start the vehicle. See
Passenger Airbag Status Indicator
096.
2. Put the child restraint on the seat.
3. Pick up the latch plate, and run the lap and shoulder portions of the
vehicle seat belt through or around
the child restraint. The child
restraint instructions will show
you how.
Page 98 of 434
Cadillac CT4 Owner Manual (GMNA-Localizing-U.S./Canada-14584335) -
2021 - CRC - 12/4/20
INSTRUMENTS AND CONTROLS 97
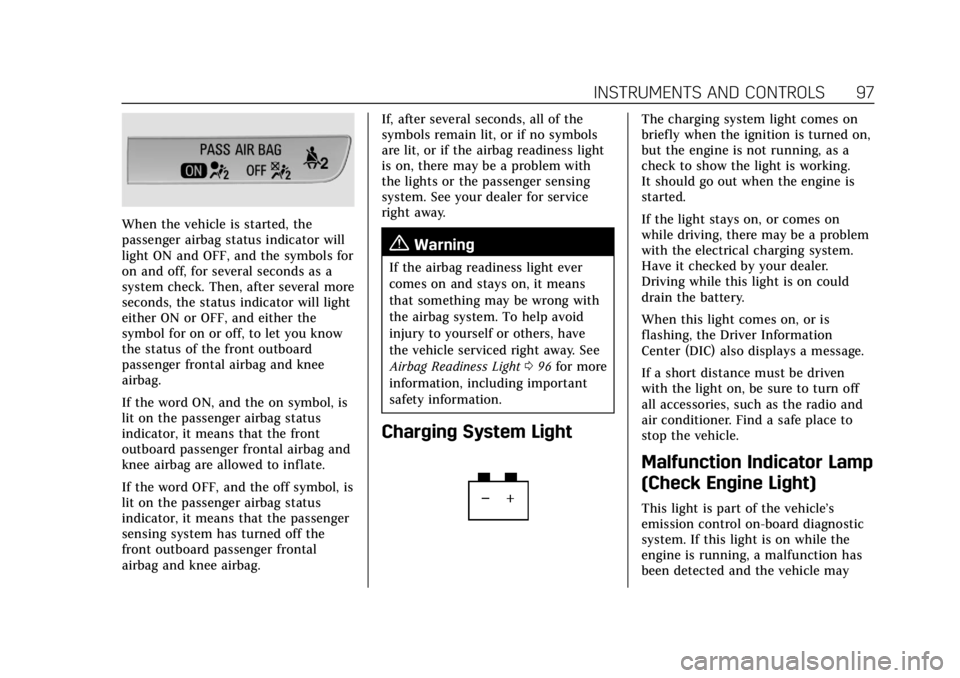
When the vehicle is started, the
passenger airbag status indicator will
light ON and OFF, and the symbols for
on and off, for several seconds as a
system check. Then, after several more
seconds, the status indicator will light
either ON or OFF, and either the
symbol for on or off, to let you know
the status of the front outboard
passenger frontal airbag and knee
airbag.
If the word ON, and the on symbol, is
lit on the passenger airbag status
indicator, it means that the front
outboard passenger frontal airbag and
knee airbag are allowed to inflate.
If the word OFF, and the off symbol, is
lit on the passenger airbag status
indicator, it means that the passenger
sensing system has turned off the
front outboard passenger frontal
airbag and knee airbag.If, after several seconds, all of the
symbols remain lit, or if no symbols
are lit, or if the airbag readiness light
is on, there may be a problem with
the lights or the passenger sensing
system. See your dealer for service
right away.
{Warning
If the airbag readiness light ever
comes on and stays on, it means
that something may be wrong with
the airbag system. To help avoid
injury to yourself or others, have
the vehicle serviced right away. See
Airbag Readiness Light
096 for more
information, including important
safety information.
Charging System Light
The charging system light comes on
briefly when the ignition is turned on,
but the engine is not running, as a
check to show the light is working.
It should go out when the engine is
started.
If the light stays on, or comes on
while driving, there may be a problem
with the electrical charging system.
Have it checked by your dealer.
Driving while this light is on could
drain the battery.
When this light comes on, or is
flashing, the Driver Information
Center (DIC) also displays a message.
If a short distance must be driven
with the light on, be sure to turn off
all accessories, such as the radio and
air conditioner. Find a safe place to
stop the vehicle.
Malfunction Indicator Lamp
(Check Engine Light)
This light is part of the vehicle’s
emission control on-board diagnostic
system. If this light is on while the
engine is running, a malfunction has
been detected and the vehicle may
Page 211 of 434
Cadillac CT4 Owner Manual (GMNA-Localizing-U.S./Canada-14584335) -
2021 - CRC - 12/4/20
210 DRIVING AND OPERATING
and pedal travel may increase. After
the procedure, the brake pads may
appear white at the rotor contact.
Perform this procedure only on dry
pavement, in a safe manner, and in
compliance with all local and state
ordinances/laws regarding motor
vehicle operation.
Brake Burnish Procedure1. Apply the brakes 25 times starting at 100 km/h (60 mph) to 50 km/h
(30 mph) while decelerating at
0.4 g. This is a medium brake
application. Drive for at least 1 km
(0.6 mi) between applying the
brakes. This first step may be
skipped if there are more than
320 km (200 mi) on the brake pads.
2. Apply the brakes 25 times starting at 100 km/h (60 mph) to 25 km/h
(15 mph) while decelerating at
0.8 g. This is a hard brake
application, without activating the
Antilock Brake System (ABS). Drive
for at least 1 km (0.6 mi) between
applications.
3. Cool down: Drive at 100 km/h (60 mph) for approximately 15 km
(10 mi) without using the brakes. 4. Apply the brakes 25 times from
100 km/h (60 mph) to 50 km/h
(30 mph) while decelerating at
0.4 g. This is a medium brake
application. Drive for at least 1 km
(0.6 mi) between applications.
As with all high performance brake
systems, some amount of brake squeal
is normal.
Wheel Alignment
Wheel alignment suggested specs for
track use:
.Front: -2.0 deg camber, 0.2 deg
total toe
.Rear: -1.7 deg camber, 0.2 deg
total toe
Vehicles Equipped with the
Original Equipment Tires
Follow the requirements and
recommendations for tire inflation
pressures while driving on various
types of tracks/courses. This helps to
achieve a well-balanced vehicle and
enhance tire traction performance.
Use good judgment to determine the
appropriate tire inflation pressure and
speeds for the track/course configuration and environmental
conditions. Contact the tire
manufacturer if further assistance is
needed.
To maximize tire life, drive 800 km
(500 mi) prior to racetrack driving or
complete the minimum track running
that will increase the tire pressures by
35 kPa (5 psi). After this, immediately
let the tires cool to cold pressures.
Tire Inflation Pressure
Guidelines
Tire inflation pressures affect vehicle
handling and tire life, and should be
adjusted for various types of tracks/
courses.
Inspect the tires prior to every track/
course session. Track/course driving
will reduce the tire tread life.
Driving and Operating
{Warning
Operating the vehicle at high speeds
can be dangerous. Improper tire
inflation pressure can put
additional strain on the tires and
(Continued)
Page 213 of 434
Cadillac CT4 Owner Manual (GMNA-Localizing-U.S./Canada-14584335) -
2021 - CRC - 12/4/20
212 DRIVING AND OPERATING
{Warning
Wet brakes can cause crashes. They
might not work as well in a quick
stop and could cause pulling to one
side. You could lose control of the
vehicle.
After driving through a large puddle
of water or a car/vehicle wash,
lightly apply the brake pedal until
the brakes work normally.
Flowing or rushing water creates
strong forces. Driving through
flowing water could cause the
vehicle to be carried away. If this
happens, you and other vehicle
occupants could drown. Do not
ignore police warnings and be very
cautious about trying to drive
through flowing water.
Hydroplaning
Hydroplaning is dangerous. Water can
build up under the vehicle's tires so
they actually ride on the water. This
can happen if the road is wet enoughand you are going fast enough. When
the vehicle is hydroplaning, it has
little or no contact with the road.
There is no hard and fast rule about
hydroplaning. The best advice is to
slow down when the road is wet.
Other Rainy Weather Tips
Besides slowing down, other wet
weather driving tips include:
.Allow extra following distance.
.Pass with caution.
.Keep windshield wiping equipment
in good shape.
.Keep the windshield washer fluid
reservoir filled.
.Have good tires with proper tread
depth. See
Tires0339.
.Turn off cruise control.
Hill and Mountain Roads
Driving on steep hills or through
mountains is different than driving on
flat or rolling terrain. Tips include:
.Keep the vehicle serviced and in
good shape.
.Check all fluid levels and brakes,
tires, cooling system, and
transmission.
.Shift to a lower gear when going
down steep or long hills.
{Warning
Using the brakes to slow the vehicle
on a long downhill slope can cause
brake overheating, can reduce brake
performance, and could result in a
loss of braking. Shift the
transmission to a lower gear to let
the engine assist the brakes on a
steep downhill slope.
{Warning
Coasting downhill in N (Neutral) or
with the ignition off is dangerous.
This can cause overheating of the
brakes and loss of steering assist.
Always have the engine running
and the vehicle in gear.
.Drive at speeds that keep the
vehicle in its own lane. Do not
swing wide or cross the center line.
Page 305 of 434
Cadillac CT4 Owner Manual (GMNA-Localizing-U.S./Canada-14584335) -
2021 - CRC - 11/23/20
304 VEHICLE CARE
Vehicle Care
General Information
General Information . . . . . . . . . . . . . 305
California Proposition65 Warning . . . . . . . . . . . . . . . . . . . . . 305
California Perchlorate Materials Requirements . . . . . . . . . . . . . . . . . . . 306
Accessories and Modifications . . . . . . . . . . . . . . . . . . . 306
Vehicle Checks
Doing Your OwnService Work . . . . . . . . . . . . . . . . . . . . 306
Hood . . . . . . . . . . . . . . . . . . . . . . . . . . . . . . 307
Engine Compartment Overview . . . . . . . . . . . . . . . . . . . . . . . . . 309
Engine Oil . . . . . . . . . . . . . . . . . . . . . . . . . 312
Engine Oil Life System . . . . . . . . . . . 314
Automatic Transmission Fluid . . . . . . . . . . . . . . . . . . . . . . . . . . . . . 315
Engine Air Filter Life System . . . . 315
Engine Air Cleaner/Filter . . . . . . . . . 316
Cooling System . . . . . . . . . . . . . . . . . . . 317
Engine Overheating . . . . . . . . . . . . . . 322
Washer Fluid . . . . . . . . . . . . . . . . . . . . . 323
Brakes . . . . . . . . . . . . . . . . . . . . . . . . . . . . . 323 Brake Pad Life System (If
Equipped) . . . . . . . . . . . . . . . . . . . . . . . 324
Brake Fluid . . . . . . . . . . . . . . . . . . . . . . . 325
Battery - North America . . . . . . . . . 326
All-Wheel Drive . . . . . . . . . . . . . . . . . . 327
Park Brake and P (Park) Mechanism Check . . . . . . . . . . . . . . 327
Wiper Blade Replacement . . . . . . . 327
Windshield Replacement . . . . . . . . 328
Gas Strut(s) . . . . . . . . . . . . . . . . . . . . . . . 328
Headlamp Aiming
Front Headlamp Aiming . . . . . . . . . 329
Bulb Replacement
Bulb Replacement . . . . . . . . . . . . . . . . 329
Halogen Bulbs . . . . . . . . . . . . . . . . . . . . 330
High Intensity Discharge (HID) Lighting . . . . . . . . . . . . . . . . . . . . . . . . . 330
LED Lighting . . . . . . . . . . . . . . . . . . . . . 330
Front Turn Signal Lamps . . . . . . . . 330
Electrical System
Electrical System Overload . . . . . . 330
Fuses and Circuit Breakers . . . . . . 331
Engine Compartment Fuse Block . . . . . . . . . . . . . . . . . . . . . . . . . . . . 332
Instrument Panel Fuse Block . . . . 334
Rear Compartment Fuse Block . . . . . . . . . . . . . . . . . . . . . . . . . . . . 337
Wheels and Tires
Tires . . . . . . . . . . . . . . . . . . . . . . . . . . . . . . . 339
All-Season Tires . . . . . . . . . . . . . . . . . . 339
Winter Tires . . . . . . . . . . . . . . . . . . . . . . 340
Run-Flat Tires . . . . . . . . . . . . . . . . . . . . 340
Self-Sealing Tires . . . . . . . . . . . . . . . . . 341
Low-Profile Tires . . . . . . . . . . . . . . . . . 341
Summer Tires . . . . . . . . . . . . . . . . . . . . 341
Tire Sidewall Labeling . . . . . . . . . . . 342
Tire Designations . . . . . . . . . . . . . . . . . 343
Tire Terminology andDefinitions . . . . . . . . . . . . . . . . . . . . . . 344
Tire Pressure . . . . . . . . . . . . . . . . . . . . . . 346
Tire Pressure for High-Speed Operation . . . . . . . . . . . . . . . . . . . . . . . . 347
Tire Pressure Monitor System . . . 348
Tire Pressure Monitor Operation . . . . . . . . . . . . . . . . . . . . . . . . 349
Tire Inspection . . . . . . . . . . . . . . . . . . . 352
Tire Rotation . . . . . . . . . . . . . . . . . . . . . 352
When It Is Time for New Tires . . . . . . . . . . . . . . . . . . . . . . . . . . . . . 353
Buying New Tires . . . . . . . . . . . . . . . . 354
Different Size Tires and Wheels . . . . . . . . . . . . . . . . . . . . . . . . . . 356
Uniform Tire Quality Grading . . . 356
Wheel Alignment and Tire Balance . . . . . . . . . . . . . . . . . . . . . . . . . . 357
Page 341 of 434
Cadillac CT4 Owner Manual (GMNA-Localizing-U.S./Canada-14584335) -
2021 - CRC - 11/23/20
340 VEHICLE CARE
all-season tires can be identified by
the last two characters of this TPC
code, which will be“MS.”
Consider installing winter tires on the
vehicle if frequent driving on snow or
ice-covered roads is expected.
All-season tires provide adequate
performance for most winter driving
conditions, but they may not offer the
same level of traction or performance
as winter tires on snow or ice-covered
roads. See Winter Tires 0340.
Winter Tires
This vehicle was not originally
equipped with winter tires. Winter
tires are designed for increased
traction on snow and ice-covered
roads. Consider installing winter tires
on the vehicle if frequent driving on
ice or snow covered roads is expected.
See your dealer for details regarding
winter tire availability and proper tire
selection. Also, see Buying New Tires
0 354.
With winter tires, there may be
decreased dry road traction, increased
road noise, and shorter tread life. After changing to winter tires, be alert
for changes in vehicle handling and
braking.
If using winter tires:
.Use tires of the same brand and
tread type on all four wheel
positions.
.Use only radial ply tires of the same
size, load range, and speed rating as
the original equipment tires.
Winter tires with the same speed
rating as the original equipment tires
may not be available for H, V, W, Y,
and ZR speed rated tires. If winter
tires with a lower speed rating are
chosen, never exceed the tire's
maximum speed capability.
Run-Flat Tires
This vehicle, when new, may have had
run-flat tires. There is no spare tire,
no tire changing equipment, and no
place to store a tire in the vehicle.
{Warning
While driving with run-flat tires at
a reduced inflation pressure, avoid
making sudden stops or severe
maneuvers as the handling
capabilities of the tires will be
reduced. Driving too fast could
cause loss of control and you or
others could be injured. Do not
drive over 80 km/h (50 mph) with
the tire operating at low pressure.
Drive cautiously and check the tire
pressure as soon as possible.
Run-flat tires can be driven up to
80 km (50 mi) at speeds less than
80 km/h (50 mph) after a loss of
inflation pressure has occurred. There
is no need to stop on the side of the
road to change the tire. The possible
driving range after a pressure loss will
vary based on the vehicle load and
driving conditions. As soon as
possible, contact the nearest
authorized GM or run-flat servicing
facility for inspection and repair or
replacement.
Page 342 of 434
Cadillac CT4 Owner Manual (GMNA-Localizing-U.S./Canada-14584335) -
2021 - CRC - 11/23/20
VEHICLE CARE 341
When driving on a deflated run-flat
tire, avoid potholes and other road
hazards that could damage the tire
and/or wheel beyond repair. When a
tire has been damaged, or if driven
any distance while deflated, check
with an authorized run-flat tire
service center to determine whether
the tire can be repaired or should be
replaced. To maintain the run-flat
feature, all replacement tires must be
run-flat tires.
To locate the nearest GM or run-flat
servicing facility, call Customer
Assistance.
Self-Sealing Tires
This vehicle may have self-sealing
tires. These tires have a material
inside that can seal punctures from
common road hazards, such as nails
and screws, in the tread area. The tire
may lose air pressure if the sidewall is
damaged or the tread puncture is too
large. If the Tire Pressure Monitor
System indicates the tire pressure is
low, inspect the tire for damage and
inflate it to the recommended
pressure. If the tire is unable to
maintain the recommended pressure,contact the nearest authorized GM
servicing facility immediately for
inspection and repair or replacement.
To locate the nearest GM servicing
facility, call GM Customer Assistance.
Caution
Do not drive on a deflated
self-sealing tire as this could
damage the tire. Make sure the tire
is inflated to the recommended
pressure or have it immediately
repaired or replaced.
When tire replacement is needed
replace with a self-sealing tire,
because the vehicle does not come
with a spare tire or tire changing
equipment.
Low-Profile Tires
If the vehicle has 225/45R17 91V,
235/40R18 91V, 235/40R18 XL
95Y, or 235/35R19 XL 91V size
tires, they are classified as
low-profile tires. Caution
Low-profile tires are more
susceptible to damage from road
hazards or curb impact than
standard profile tires. Tire and/or
wheel assembly damage can occur
when coming into contact with
road hazards like potholes, or sharp
edged objects, or when sliding into
a curb. The warranty does not cover
this type of damage. Keep tires set
to the correct inflation pressure and
when possible, avoid contact with
curbs, potholes, and other road
hazards.
Summer Tires
High Performance Summer Tires
This vehicle may come with
235/40R18 XL 95Y high performance
summer tires. These tires have a
special tread and compound that are
optimized for maximum dry and wet
road performance. This special tread
and compound will have decreased
performance in cold climates, and on
ice and snow. It is recommended that
winter tires be installed on the vehicle
Page 360 of 434
Cadillac CT4 Owner Manual (GMNA-Localizing-U.S./Canada-14584335) -
2021 - CRC - 11/23/20
VEHICLE CARE 359
Caution
If the vehicle is equipped with a
tire size other than 235/40R18 or
235/35R19, use tire chains only
where legal and only when
necessary. Use low profile chains
that add no more than 12 mm
thickness to the tire tread and inner
sidewall. Use chains that are the
proper size for the tires. Install
them on the tires of the rear axle.
Don't use chains on the tires of the
front axle. Tighten them as tightly
as possible with the ends securely
fastened. Drive slowly and follow
the chain manufacturer's
instructions. If the chains contact
the vehicle, stop and retighten
them. If the contact continues, slow
down until it stops. Driving too fast
or spinning the wheels with chains
on will damage the vehicle.
If a Tire Goes Flat
It is unusual for a tire to blow out
while driving, especially if the tires are
maintained properly. If air goes out of
a tire, it is much more likely to leak
out slowly. SeeTires0339 for
additional information. But if there
ever is a blowout, here are a few tips
about what to expect and what to do:
If a front tire fails, the flat tire creates
a drag that pulls the vehicle toward
that side. Take your foot off the
accelerator pedal and grip the steering
wheel firmly. Steer to maintain lane
position, and then gently brake to a
stop, well off the road, if possible.
A rear blowout, particularly on a
curve, acts much like a skid and may
require the same correction as used in
a skid. Stop pressing the accelerator
pedal and steer to straighten the
vehicle. It may be very bumpy and
noisy. Gently brake to a stop, well off
the road, if possible.{Warning
Driving on a flat tire will cause
permanent damage to the tire.
Re-inflating a tire after it has been
driven on while severely
underinflated or flat may cause a
blowout and a serious crash. Never
attempt to re-inflate a tire that has
been driven on while severely
underinflated or flat. Have your
dealer or an authorized tire service
center repair or replace the flat tire
as soon as possible.
If the vehicle has run-flat tires, there
is no need to stop on the side of the
road to change a flat tire. See Run-Flat
Tires 0340.
{Warning
Special tools and procedures are
required to service a run-flat tire.
If these special tools and
procedures are not used, injury or
vehicle damage may occur. Always
(Continued)
Page 361 of 434
Cadillac CT4 Owner Manual (GMNA-Localizing-U.S./Canada-14584335) -
2021 - CRC - 11/23/20
360 VEHICLE CARE
Warning (Continued)
be sure the proper tools and
procedures, as described in the
service manual, are used.
If a tire goes flat, avoid further tire
and wheel damage by driving slowly
to a level place, well off the road,
if possible. Turn on the hazard
warning flashers. See Hazard Warning
Flashers 0129.
The vehicle has no spare tire, no tire
changing equipment, and no place to
store a tire.
If the vehicle has self-sealing tires, see
Self-Sealing Tires 0341. Tread
punctures typically will not cause tires
to lose air. However, if the vehicle
does get a flat tire, there is no spare
tire, tire changing equipment, or place
to store a tire. Contact Roadside
Service for help.
This vehicle may come with a tire
sealant and compressor kit. To use the
tire sealant and compressor kit, see
Tire Sealant and Compressor Kit 0360.
Tire Sealant and
Compressor Kit
{Warning
Idling a vehicle in an enclosed area
with poor ventilation is dangerous.
Engine exhaust may enter the
vehicle. Engine exhaust contains
carbon monoxide (CO) which
cannot be seen or smelled. It can
cause unconsciousness and even
death. Never run the engine in an
enclosed area that has no fresh air
ventilation. For more information,
see Engine Exhaust 0226.
{Warning
Overinflating a tire could cause the
tire to rupture and you or others
could be injured. Be sure to read
and follow the tire sealant and
compressor kit instructions and
inflate the tire to its recommended
pressure. Do not exceed the
recommended pressure.
{Warning
Storing the tire sealant and
compressor kit or other equipment
in the passenger compartment of
the vehicle could cause injury. In a
sudden stop or collision, loose
equipment could strike someone.
Store the tire sealant and
compressor kit in its original
location.
If this vehicle has a tire sealant and
compressor kit, there may not be a
spare tire or tire changing equipment,
and on some vehicles there may not
be a place to store a tire.
The tire sealant and compressor can
be used to temporarily seal punctures
up to 6 mm (0.25 in) in the tread area
of the tire. It can also be used to
inflate an underinflated tire.
If the tire has been separated from the
wheel, has damaged sidewalls, or has
a large puncture, the tire is too
severely damaged for the tire sealant
and compressor kit to be effective. See
Roadside Service 0403.
Page 363 of 434
Cadillac CT4 Owner Manual (GMNA-Localizing-U.S./Canada-14584335) -
2021 - CRC - 11/23/20
362 VEHICLE CARE
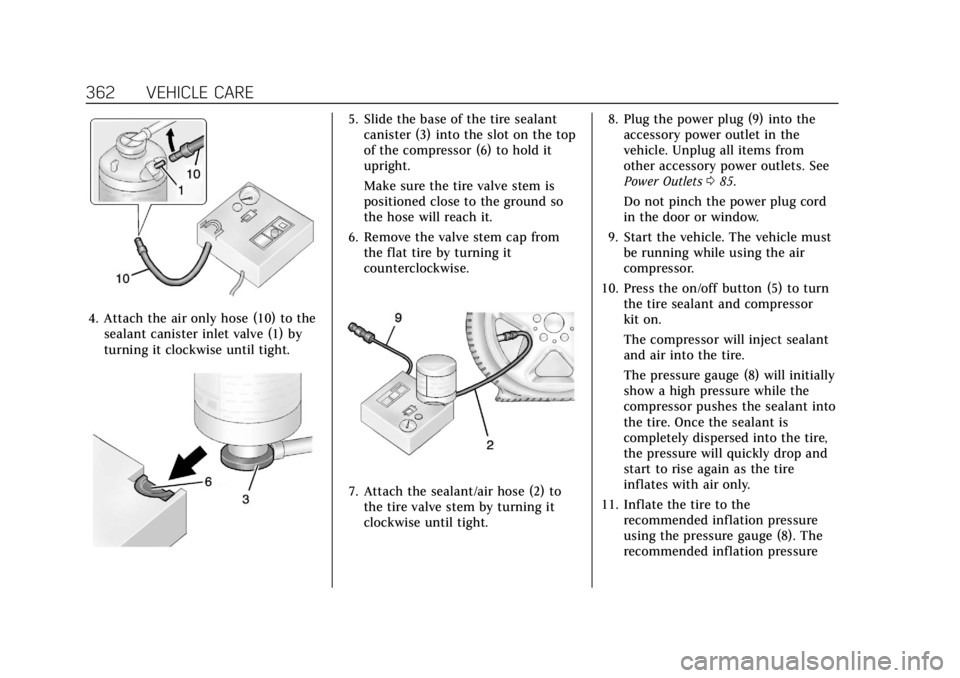
4. Attach the air only hose (10) to thesealant canister inlet valve (1) by
turning it clockwise until tight.
5. Slide the base of the tire sealantcanister (3) into the slot on the top
of the compressor (6) to hold it
upright.
Make sure the tire valve stem is
positioned close to the ground so
the hose will reach it.
6. Remove the valve stem cap from the flat tire by turning it
counterclockwise.
7. Attach the sealant/air hose (2) tothe tire valve stem by turning it
clockwise until tight. 8. Plug the power plug (9) into the
accessory power outlet in the
vehicle. Unplug all items from
other accessory power outlets. See
Power Outlets 085.
Do not pinch the power plug cord
in the door or window.
9. Start the vehicle. The vehicle must be running while using the air
compressor.
10. Press the on/off button (5) to turn the tire sealant and compressor
kit on.
The compressor will inject sealant
and air into the tire.
The pressure gauge (8) will initially
show a high pressure while the
compressor pushes the sealant into
the tire. Once the sealant is
completely dispersed into the tire,
the pressure will quickly drop and
start to rise again as the tire
inflates with air only.
11. Inflate the tire to the recommended inflation pressure
using the pressure gauge (8). The
recommended inflation pressure