radio CADILLAC CT5 2022 Owners Manual
[x] Cancel search | Manufacturer: CADILLAC, Model Year: 2022, Model line: CT5, Model: CADILLAC CT5 2022Pages: 466, PDF Size: 7.21 MB
Page 8 of 466
Cadillac CT5 Owner Manual (GMNA-Localizing-U.S./Canada-15268585) -
2022 - CRC - 10/11/21
KEYS, DOORS, AND WINDOWS 7
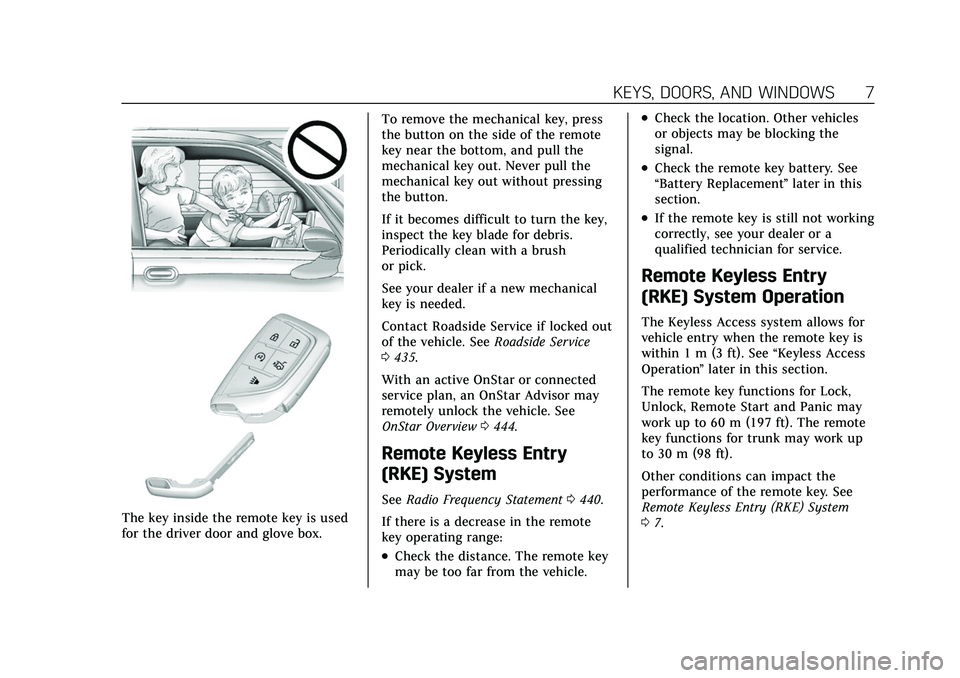
The key inside the remote key is used
for the driver door and glove box.To remove the mechanical key, press
the button on the side of the remote
key near the bottom, and pull the
mechanical key out. Never pull the
mechanical key out without pressing
the button.
If it becomes difficult to turn the key,
inspect the key blade for debris.
Periodically clean with a brush
or pick.
See your dealer if a new mechanical
key is needed.
Contact Roadside Service if locked out
of the vehicle. See
Roadside Service
0 435.
With an active OnStar or connected
service plan, an OnStar Advisor may
remotely unlock the vehicle. See
OnStar Overview 0444.
Remote Keyless Entry
(RKE) System
See Radio Frequency Statement 0440.
If there is a decrease in the remote
key operating range:
.Check the distance. The remote key
may be too far from the vehicle.
.Check the location. Other vehicles
or objects may be blocking the
signal.
.Check the remote key battery. See
“Battery Replacement ”later in this
section.
.If the remote key is still not working
correctly, see your dealer or a
qualified technician for service.
Remote Keyless Entry
(RKE) System Operation
The Keyless Access system allows for
vehicle entry when the remote key is
within 1 m (3 ft). See “Keyless Access
Operation ”later in this section.
The remote key functions for Lock,
Unlock, Remote Start and Panic may
work up to 60 m (197 ft). The remote
key functions for trunk may work up
to 30 m (98 ft).
Other conditions can impact the
performance of the remote key. See
Remote Keyless Entry (RKE) System
0 7.
Page 26 of 466
Cadillac CT5 Owner Manual (GMNA-Localizing-U.S./Canada-15268585) -
2022 - CRC - 10/11/21
KEYS, DOORS, AND WINDOWS 25
.A message that the steering wheel
must be turned and the vehicle
must be started again indicates that
the column lock mechanism is
bound, the column locking device
was unable to unlock the steering
column, and the vehicle did not
start. If this happens, immediately
turn the steering wheel from side to
side to unbind the column lock.
If this does not unlock the steering
column, turn the vehicle off and
open the driver door to reset the
system. Then turn the vehicle on
and immediately turn the steering
wheel side to side for about
15 seconds. In some cases, it may
take significant force to unbind the
column.
To keep the steering column from
binding, straighten the front wheels
before turning off the vehicle.
Immobilizer
See Radio Frequency Statement 0440.
Immobilizer Operation
This vehicle has a passive
theft-deterrent system. The system does not have to be
manually armed or disarmed.
The vehicle is automatically
immobilized when the vehicle is
turned off.
The immobilization system is
disarmed when the ignition is turned
on or to ACC/ACCESSORY and a valid
remote key is present in the vehicle.
The security light, in the instrument
cluster, comes on if there is a problem
with arming or disarming the
theft-deterrent system.
The system has one or more remote
keys matched to an immobilizer
control unit in the vehicle. Only a
correctly matched remote key will
start the vehicle. If the remote key is
ever damaged, you may not be able to
start your vehicle.
When trying to start the vehicle, the
security light may come on briefly.If the engine does not start and the
security light stays on, there is a
problem with the system. Turn the
ignition off and try again.
If the vehicle will not change ignition
modes (ACC/ACCESSORY, on, off), and
the remote key appears to be
undamaged, try another remote key.
Or, you may try placing the remote
key in the backup location. See
Remote Keyless Entry (RKE) System
Operation
07.
If the ignition modes will not change
with the other remote key or in the
backup location, the vehicle needs
service. If the ignition does change
modes, the first remote key may be
faulty. See your dealer.
It is possible for the immobilizer
system to learn new or replacement
remote keys. Up to eight remote keys
can be programmed for the vehicle. To
program additional remote keys, see
“Programming Remote Keys to the
Vehicle ”under Remote Keyless Entry
(RKE) System Operation 07.
Do not leave the remote key or device
that disarms or deactivates the
theft-deterrent system in the vehicle.
Page 94 of 466
Cadillac CT5 Owner Manual (GMNA-Localizing-U.S./Canada-15268585) -
2022 - CRC - 10/11/21
INSTRUMENTS AND CONTROLS 93
Caution
Hanging heavy equipment from the
power outlet can cause damage not
covered by the vehicle warranty.
The power outlets are designed for
accessory power plugs only, such as
cell phone charge cords.
Always unplug electrical equipment
when not in use and do not plug in
equipment that exceeds the maximum
15 amps rating.
Wireless Charging
If equipped and enabled, the vehicle
has wireless charging in the bin below
the climate control system. The
system operates at 145 kHz and
wirelessly charges one Qi compatible
smartphone. The power output of the
system is capable of charging at a rate
up to 3 amp (15 W), as requested by
the compatible smartphone. See Radio
Frequency Statement 0440.
{Warning
Wireless charging may affect the
operation of an implanted
pacemaker or other medical devices.
If you have one, it is recommended
to consult with your doctor before
using the wireless charging system.
The vehicle must be on, in ACC/
ACCESSORY, or Retained Accessory
Power (RAP) must be active. The
wireless charging feature may not
correctly indicate charging when the
vehicle is in RAP, during a Bluetooth
phone call, or when phone projection
(e.g. Apple CarPlay / Android Auto) is
active. See Retained Accessory Power
(RAP) 0243.
The operating temperature is −40 °C
(−40 °F) to 85 °C (185 °F) for the
charging system and 0 °C (32 °F) to
35 °C (95 °F) for the phone. A charging
stopped alert may be displayed on the
infotainment screen, if the wireless
charger or smartphone are outside of
normal operating temperature. Charging will automatically resume
when a normal operating temperature
is reached.
{Warning
Remove all objects from the charger
before charging your compatible
smartphone. Objects, such as coins,
keys, rings, paper clips, or cards,
between the smartphone and
charger may become very hot.
On the rare occasion that the
charging system does not detect an
object, and the object gets wedged
between the smartphone and
charger, remove the smartphone
and allow the object to cool before
removing it from the charger, to
prevent burns.
Page 107 of 466

Cadillac CT5 Owner Manual (GMNA-Localizing-U.S./Canada-15268585) -
2022 - CRC - 10/11/21
106 INSTRUMENTS AND CONTROLS
If, after several seconds, all of the
symbols remain lit, or if no symbols
are lit, or if the airbag readiness light
is on, there may be a problem with
the lights or the passenger sensing
system. See your dealer for service
right away.
{Warning
If the airbag readiness light ever
comes on and stays on, it means
that something may be wrong with
the airbag system. To help avoid
injury to yourself or others, have
the vehicle serviced right away. See
Airbag Readiness Light0105 for
more information, including
important safety information.
Charging System Light
The charging system light comes on
briefly when the ignition is turned on,
but the engine is not running, as a
check to show the light is working.
It should go out when the engine is
started.
If the light stays on, or comes on
while driving, there may be a problem
with the electrical charging system.
Have it checked by your dealer.
Driving while this light is on could
drain the battery.
When this light comes on, or is
flashing, the Driver Information
Center (DIC) also displays a message.
If a short distance must be driven
with the light on, be sure to turn off
all accessories, such as the radio and
air conditioner. Find a safe place to
stop the vehicle.
Malfunction Indicator Lamp
(Check Engine Light)
This light is part of the vehicle’s
emission control on-board diagnostic
system. If this light is on while the
engine is running, a malfunction has
been detected and the vehicle may require service. The light should come
on to show that it is working when
the ignition is in Service Mode. See
Ignition Positions
0238.
Malfunctions are often indicated by
the system before any problem is
noticeable. Being aware of the light
and seeking service promptly when it
comes on may prevent damage.
Caution
If the vehicle is driven continually
with this light on, the emission
control system may not work as
well, the fuel economy may be
lower, and the vehicle may not run
smoothly. This could lead to costly
repairs that might not be covered
by the vehicle warranty.
Page 123 of 466
Cadillac CT5 Owner Manual (GMNA-Localizing-U.S./Canada-15268585) -
2022 - CRC - 10/11/21
122 INSTRUMENTS AND CONTROLS
Head-Up Display (HUD)
{Warning
If the HUD image is too bright or
too high in your field of view, it
may take you more time to see
things you need to see when it is
dark outside. Be sure to keep the
HUD image dim and placed low in
your field of view.
If equipped with HUD, some
information concerning the operation
of the vehicle is projected onto the
windshield. The information is
projected through the HUD lens on
the driver side of the instrument
panel and focused out toward the
front of the vehicle.
Caution
If you try to use the HUD image as
a parking aid, you may misjudge
the distance and damage your
vehicle. Do not use the HUD image
as a parking aid. The HUD information can be
displayed in various languages in
some vehicles. The speedometer
reading and other numerical values
can be displayed in either English or
metric units.
The language selection is changed
through the radio and the units of
measurement is changed through the
instrument cluster. See
Settings0189
and “Options” underInstrument Cluster
(Base Level) 096 or
Instrument Cluster (Uplevel) 098.
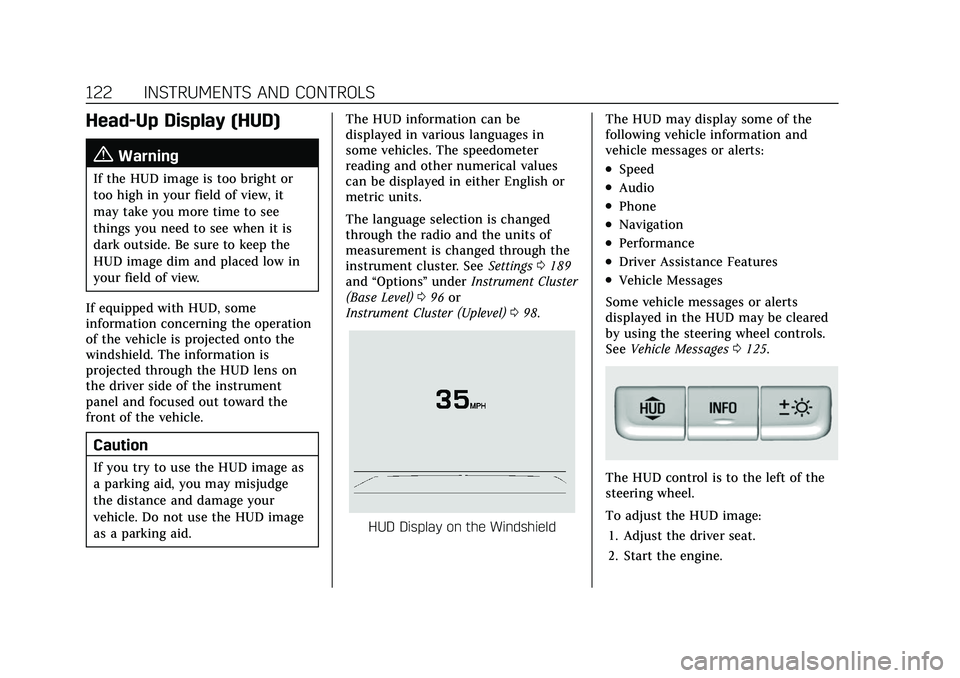
HUD Display on the Windshield The HUD may display some of the
following vehicle information and
vehicle messages or alerts:
.Speed
.Audio
.Phone
.Navigation
.Performance
.Driver Assistance Features
.Vehicle Messages
Some vehicle messages or alerts
displayed in the HUD may be cleared
by using the steering wheel controls.
See Vehicle Messages 0125.
The HUD control is to the left of the
steering wheel.
To adjust the HUD image:
1. Adjust the driver seat.
2. Start the engine.
Page 125 of 466
Cadillac CT5 Owner Manual (GMNA-Localizing-U.S./Canada-15268585) -
2022 - CRC - 10/11/21
124 INSTRUMENTS AND CONTROLS
English
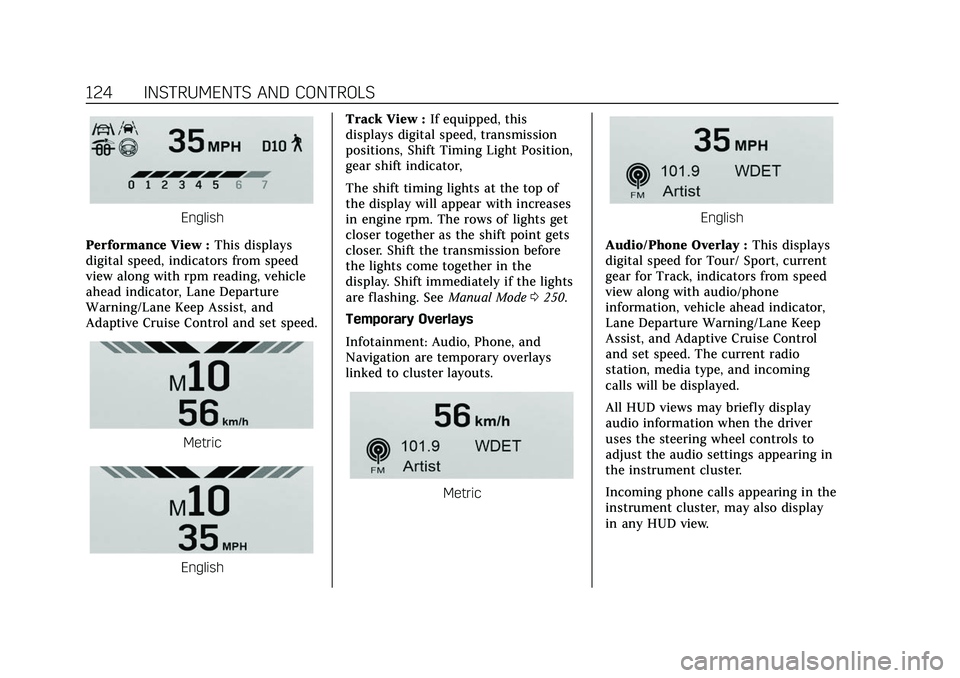
Performance View : This displays
digital speed, indicators from speed
view along with rpm reading, vehicle
ahead indicator, Lane Departure
Warning/Lane Keep Assist, and
Adaptive Cruise Control and set speed.
Metric
English Track View :
If equipped, this
displays digital speed, transmission
positions, Shift Timing Light Position,
gear shift indicator,
The shift timing lights at the top of
the display will appear with increases
in engine rpm. The rows of lights get
closer together as the shift point gets
closer. Shift the transmission before
the lights come together in the
display. Shift immediately if the lights
are flashing. See Manual Mode0250.
Temporary Overlays
Infotainment: Audio, Phone, and
Navigation are temporary overlays
linked to cluster layouts.
Metric
English
Audio/Phone Overlay : This displays
digital speed for Tour/ Sport, current
gear for Track, indicators from speed
view along with audio/phone
information, vehicle ahead indicator,
Lane Departure Warning/Lane Keep
Assist, and Adaptive Cruise Control
and set speed. The current radio
station, media type, and incoming
calls will be displayed.
All HUD views may briefly display
audio information when the driver
uses the steering wheel controls to
adjust the audio settings appearing in
the instrument cluster.
Incoming phone calls appearing in the
instrument cluster, may also display
in any HUD view.
Page 133 of 466
Cadillac CT5 Owner Manual (GMNA-Localizing-U.S./Canada-15268585) -
2022 - CRC - 10/11/21
132 INSTRUMENTS AND CONTROLS
2. Touch Enter to go to theconfirmation screen.
3. Re-enter the four-digit code.
Touch Lock or Unlock to lock or
unlock the system. Touch Back to go
back to the previous menu.
Universal Remote
System
See Radio Frequency Statement 0440.
Universal Remote System
Programming
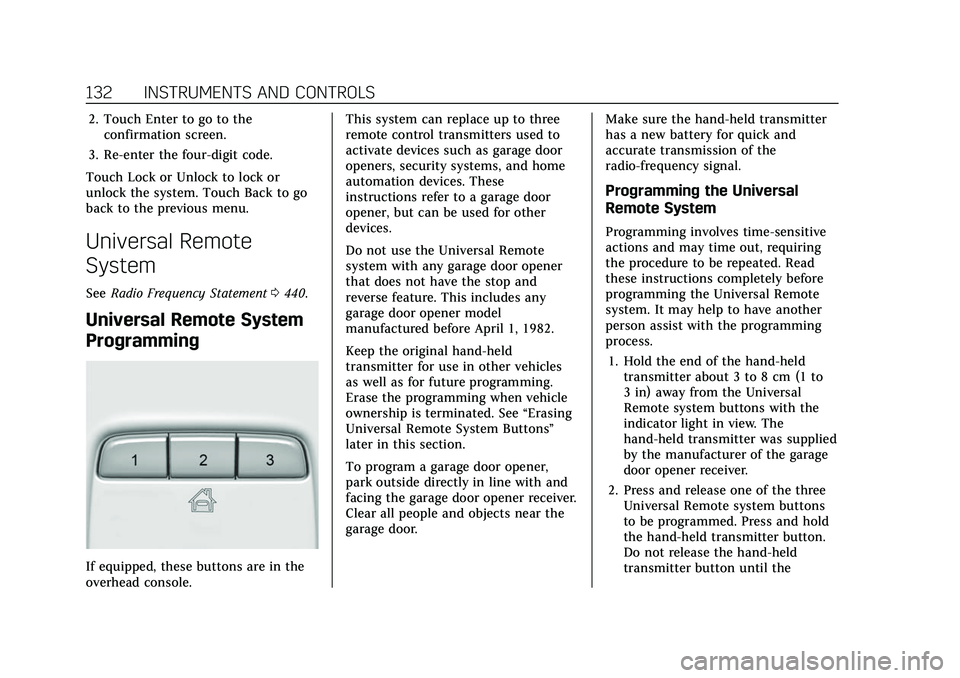
If equipped, these buttons are in the
overhead console. This system can replace up to three
remote control transmitters used to
activate devices such as garage door
openers, security systems, and home
automation devices. These
instructions refer to a garage door
opener, but can be used for other
devices.
Do not use the Universal Remote
system with any garage door opener
that does not have the stop and
reverse feature. This includes any
garage door opener model
manufactured before April 1, 1982.
Keep the original hand-held
transmitter for use in other vehicles
as well as for future programming.
Erase the programming when vehicle
ownership is terminated. See
“Erasing
Universal Remote System Buttons”
later in this section.
To program a garage door opener,
park outside directly in line with and
facing the garage door opener receiver.
Clear all people and objects near the
garage door. Make sure the hand-held transmitter
has a new battery for quick and
accurate transmission of the
radio-frequency signal.
Programming the Universal
Remote System
Programming involves time-sensitive
actions and may time out, requiring
the procedure to be repeated. Read
these instructions completely before
programming the Universal Remote
system. It may help to have another
person assist with the programming
process.
1. Hold the end of the hand-held transmitter about 3 to 8 cm (1 to
3 in) away from the Universal
Remote system buttons with the
indicator light in view. The
hand-held transmitter was supplied
by the manufacturer of the garage
door opener receiver.
2. Press and release one of the three Universal Remote system buttons
to be programmed. Press and hold
the hand-held transmitter button.
Do not release the hand-held
transmitter button until the
Page 134 of 466

Cadillac CT5 Owner Manual (GMNA-Localizing-U.S./Canada-15268585) -
2022 - CRC - 10/11/21
INSTRUMENTS AND CONTROLS 133
indicator light changes from a slow
to a rapid flash or continuous light.
Then release the hand-held
transmitter button.
Some garage door openers may
require substitution of Step 2 with
the procedure under“Radio Signals
for Some Gate Operators ”later in
this section.
3. Press and hold the newly programmed Universal Remote
system button for five seconds
while watching the indicator light
and garage door activation.
.If the indicator light stays on
continuously or the garage door
moves when the button is
pressed, then programming is
complete. There is no need to
complete Steps 4–6.
.If the indicator light does not
come on or the garage door does
not move, a second button press
may be required. For a second
time, press and hold the newly
programmed button for
five seconds. If the indicator
light stays on continuously or
the garage door moves when the button is pressed, then
programming is complete. There
is no need to complete
Steps 4–6.
.If the garage door does not
move, continue with
programming Steps 4–6.
Learn or Smart Button
4. After completing Steps 1–3, locate the Learn or Smart button inside
garage on the garage door opener
receiver. The name and color of the
button may vary by manufacturer.
5. Press and release the Learn or Smart button. Step 6 must be
completed within 30 seconds of
pressing this button.
6. Return to the vehicle and firmly press and hold the trained
Universal Remote system button for two seconds and release. Repeat
the
“press/hold/release ”sequence
up to three times to complete the
training process.
The Universal Remote system should
now activate the garage door. Repeat
the process for programming the
remaining two buttons.
For questions or programming help,
see www.homelink.com/gm or call
1-800-355-3515. For calls placed
outside the U.S., Canada, or Puerto
Rico, international rates will apply and
may differ based on landline or mobile
phone.Radio Signals for Some Gate
Operators
Some gate operators and
radio-frequency laws require
transmitter signals to time out or quit
after several seconds of transmission.
This may not be long enough for the
Universal Remote system to pick up
the signal during programming.
If the programming did not work,
replace Step 2 under “Programming
the Universal Remote System ”with
the following:
Page 144 of 466
Cadillac CT5 Owner Manual (GMNA-Localizing-U.S./Canada-15268585) -
2022 - CRC - 10/11/21
INFOTAINMENT SYSTEM 143
Infotainment System
Introduction
Introduction . . . . . . . . . . . . . . . . . . . . . . 143
Overview . . . . . . . . . . . . . . . . . . . . . . . . . . 144
Steering Wheel Controls . . . . . . . . . 146
Using the System . . . . . . . . . . . . . . . . . 146
Software Updates . . . . . . . . . . . . . . . . . 149
Radio
AM-FM Radio . . . . . . . . . . . . . . . . . . . . . 149
HD Radio Technology . . . . . . . . . . . . 152
Radio Data System (RDS) . . . . . . . . 152
Satellite Radio . . . . . . . . . . . . . . . . . . . . 153
Radio Reception . . . . . . . . . . . . . . . . . . 153
Multi-Band Antenna . . . . . . . . . . . . . 154
Audio Players
Avoiding Untrusted MediaDevices . . . . . . . . . . . . . . . . . . . . . . . . . . 154
USB Port . . . . . . . . . . . . . . . . . . . . . . . . . . 154
Bluetooth Audio . . . . . . . . . . . . . . . . . . 157
Navigation
Using the Navigation System . . . . 158
Maps . . . . . . . . . . . . . . . . . . . . . . . . . . . . . . 161
Navigation Symbols . . . . . . . . . . . . . . 161
Destination . . . . . . . . . . . . . . . . . . . . . . . 163
OnStar System . . . . . . . . . . . . . . . . . . . . 168
Global Positioning System (GPS) . . . . . . . . . . . . . . . . . . . 169 Vehicle Positioning . . . . . . . . . . . . . . . 170
Problems with Route
Guidance . . . . . . . . . . . . . . . . . . . . . . . . 170
If the System Needs Service . . . . . 171
Map Data Updates . . . . . . . . . . . . . . . 171
Database Coverage Explanations . . . . . . . . . . . . . . . . . . . . 171
Voice Recognition
Voice Recognition . . . . . . . . . . . . . . . . 171
Performance Data
Recorder (PDR)
Performance DataRecorder (PDR) . . . . . . . . . . . . . . . . . 177
Phone
Bluetooth (Overview) . . . . . . . . . . . . . 182
Bluetooth (Pairing and Using aPhone) . . . . . . . . . . . . . . . . . . . . . . . . . . . 183
Apple CarPlay and Android Auto . . . . . . . . . . . . . . . . . . . 187
Settings
Settings . . . . . . . . . . . . . . . . . . . . . . . . . . . 189
Teen Driver . . . . . . . . . . . . . . . . . . . . . . . 196
Trademarks and License
Agreements
Trademarks and LicenseAgreements . . . . . . . . . . . . . . . . . . . . . 199
Introduction
Read the following pages to become
familiar with the features.
{Warning
Taking your eyes off the road for
too long or too often while using
any infotainment feature can cause
a crash. You or others could be
injured or killed. Do not give
extended attention to infotainment
tasks while driving. Limit your
glances at the vehicle displays and
focus your attention on driving. Use
voice commands whenever possible.
The infotainment system has built-in
features intended to help avoid
distraction by disabling some features
when driving. These features may gray
out when they are unavailable. Many
infotainment features are also
available through the instrument
cluster and steering wheel controls.
Before driving:
.Become familiar with the operation,
center stack controls, steering wheel
controls, and infotainment display.
Page 145 of 466
Cadillac CT5 Owner Manual (GMNA-Localizing-U.S./Canada-15268585) -
2022 - CRC - 10/11/21
144 INFOTAINMENT SYSTEM
.Set up the audio by presetting
favorite stations, setting the tone,
and adjusting the speakers.
.Set up phone numbers in advance
so they can be called easily by
pressing a single control or by using
a single voice command.
See Distracted Driving 0217.
Active Noise Cancellation (ANC)
If equipped, ANC reduces engine noise
in the vehicle’s interior. ANC requires
the factory-installed audio system,
radio, speakers, amplifier (if
equipped), induction system, and
exhaust system to work properly.
Deactivation is required by your dealer
if related aftermarket equipment is
installed.
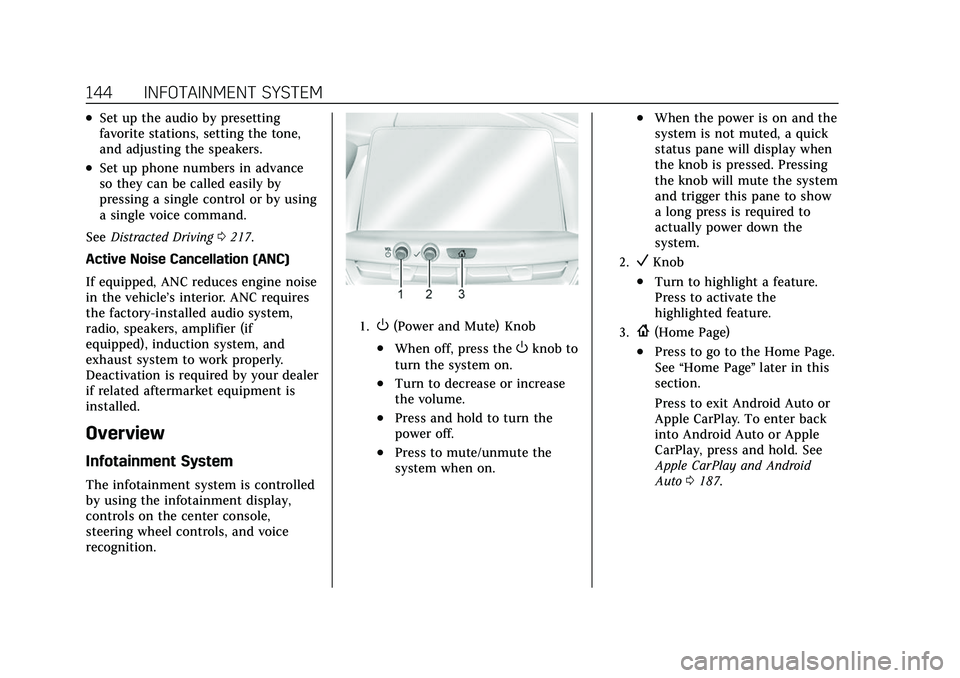
Overview
Infotainment System
The infotainment system is controlled
by using the infotainment display,
controls on the center console,
steering wheel controls, and voice
recognition.
1.O(Power and Mute) Knob
.When off, press theOknob to
turn the system on.
.Turn to decrease or increase
the volume.
.Press and hold to turn the
power off.
.Press to mute/unmute the
system when on.
.When the power is on and the
system is not muted, a quick
status pane will display when
the knob is pressed. Pressing
the knob will mute the system
and trigger this pane to show
a long press is required to
actually power down the
system.
2.VKnob
.Turn to highlight a feature.
Press to activate the
highlighted feature.
3.{(Home Page)
.Press to go to the Home Page.
See “Home Page ”later in this
section.
Press to exit Android Auto or
Apple CarPlay. To enter back
into Android Auto or Apple
CarPlay, press and hold. See
Apple CarPlay and Android
Auto 0187.