buttons CADILLAC CT6 2017 1.G Owners Manual
[x] Cancel search | Manufacturer: CADILLAC, Model Year: 2017, Model line: CT6, Model: CADILLAC CT6 2017 1.GPages: 337, PDF Size: 3.89 MB
Page 13 of 337

Cadillac CT6 Owner Manual (GMNA-Localizing-MidEast-10293390) - 2017 -
CRC - 6/21/16
12 IN BRIEF
Massage
Platinum Driver Seat Shown,Passenger Seat Similar
If equipped, the ignition must be on
to use the massage feature.
To activate and adjust the massage
feature: 1. Toggle the center selection control (2) to view available
seating adjustment options on
the infotainment display.
2. Select massage feature.
3. Press the control up (3) or down (5) to select the
massage type. 4. Press the control forward (4) or
rearward (6) to change the
intensity.
5. Press the massage control button (1) to recall the last
massage type and intensity.
See Massage 064.
Memory Features
Platinum Driver Seat Shown,
Passenger Seat Similar
If equipped, the SET, 1, 2, and
B
(Exit) buttons on the driver door and
front passenger door are used to
manually store and recall memory
settings for the driver and passenger seats. The driver memory buttons also
store outside mirror positions, power
tilt and telescoping steering column
positions, and massage settings (if
equipped).
When Auto Memory Recall is enabled
in the personalization menu, positions
previously stored to the driver
memory buttons 1 or 2 are recalled
when the ignition is changed from
OFF to ON/RUN/START or ACC/
ACCESSORY.
When Easy Exit Options is enabled in
the personalization menu, the
positions previously stored to the
driver memory
B(Exit) button are
recalled when the ignition is changed
to OFF and the driver door is opened
within a short time.
See Memory Seats 061 and Vehicle
Personalization 0152.
Page 14 of 337
Cadillac CT6 Owner Manual (GMNA-Localizing-MidEast-10293390) - 2017 -
CRC - 6/21/16
IN BRIEF 13
Second Row Seats
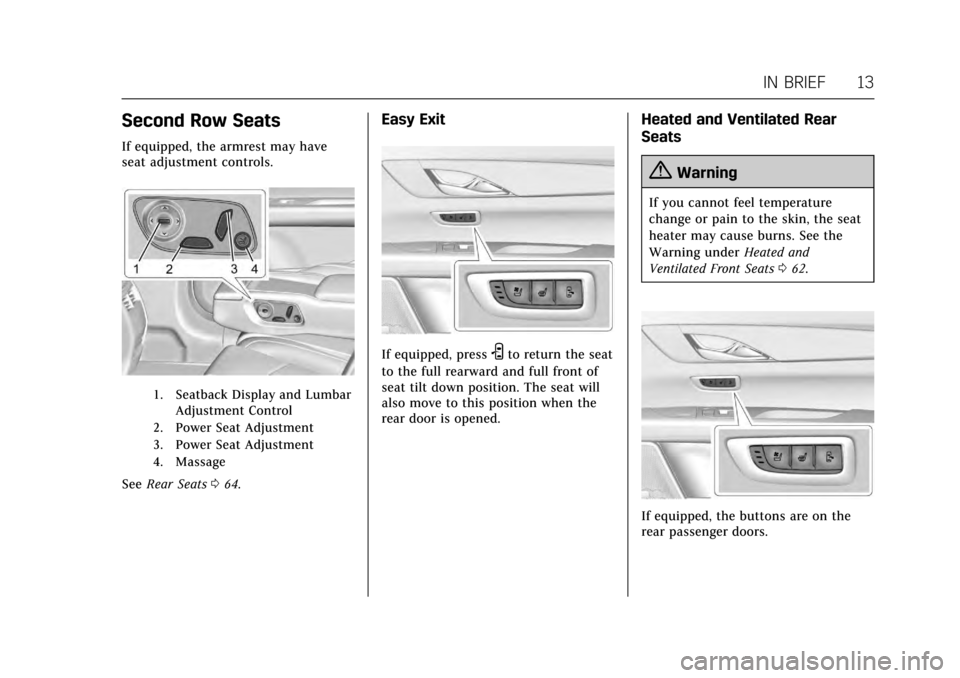
If equipped, the armrest may have
seat adjustment controls.
1. Seatback Display and LumbarAdjustment Control
2. Power Seat Adjustment
3. Power Seat Adjustment
4. Massage
See Rear Seats 064.
Easy Exit
If equipped, pressSto return the seat
to the full rearward and full front of
seat tilt down position. The seat will
also move to this position when the
rear door is opened.
Heated and Ventilated Rear
Seats
{Warning
If you cannot feel temperature
change or pain to the skin, the seat
heater may cause burns. See the
Warning under Heated and
Ventilated Front Seats 062.
If equipped, the buttons are on the
rear passenger doors.
Page 15 of 337
Cadillac CT6 Owner Manual (GMNA-Localizing-MidEast-10293390) - 2017 -
CRC - 6/21/16
14 IN BRIEF
With the ignition in ON/RUN, pressM
orLto heat the left or right outboard
seat cushion.
With the ignition in ON/RUN, press
C
or{to ventilate the left or right
outboard seat.
See Heated and Ventilated Rear
Seats 066.
Heated and Ventilated
Seats
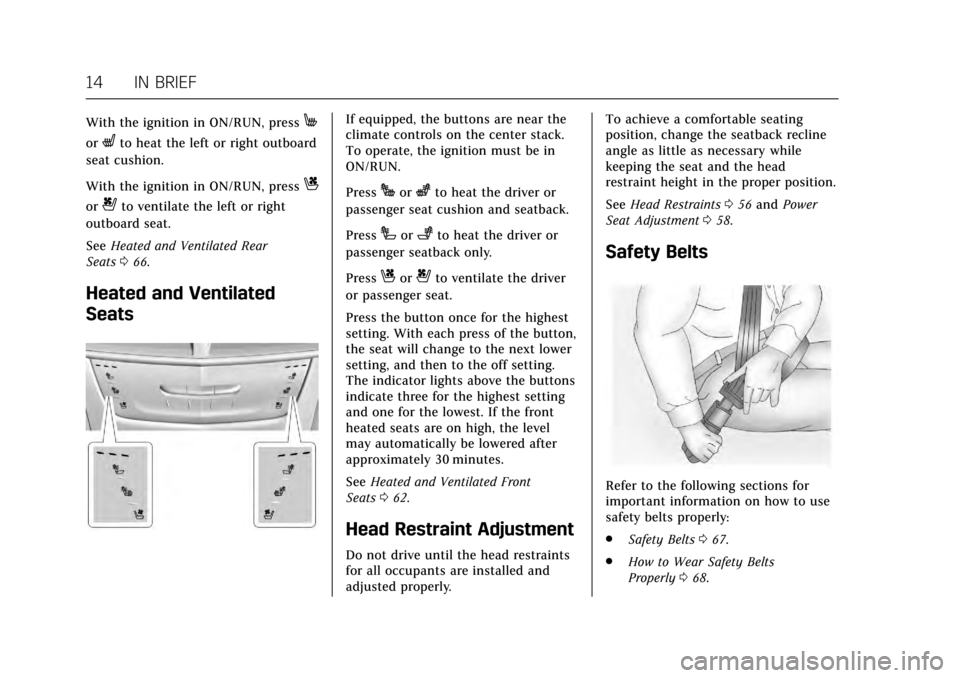
If equipped, the buttons are near the
climate controls on the center stack.
To operate, the ignition must be in
ON/RUN.
Press
Jorzto heat the driver or
passenger seat cushion and seatback.
Press
Ior+to heat the driver or
passenger seatback only.
Press
Cor{to ventilate the driver
or passenger seat.
Press the button once for the highest
setting. With each press of the button,
the seat will change to the next lower
setting, and then to the off setting.
The indicator lights above the buttons
indicate three for the highest setting
and one for the lowest. If the front
heated seats are on high, the level
may automatically be lowered after
approximately 30 minutes.
See Heated and Ventilated Front
Seats 062.
Head Restraint Adjustment
Do not drive until the head restraints
for all occupants are installed and
adjusted properly. To achieve a comfortable seating
position, change the seatback recline
angle as little as necessary while
keeping the seat and the head
restraint height in the proper position.
See
Head Restraints 056 and Power
Seat Adjustment 058.
Safety Belts
Refer to the following sections for
important information on how to use
safety belts properly:
.
Safety Belts 067.
. How to Wear Safety Belts
Properly 068.
Page 19 of 337

Cadillac CT6 Owner Manual (GMNA-Localizing-MidEast-10293390) - 2017 -
CRC - 6/21/16
18 IN BRIEF
.Move the windshield wiper lever
out of the AUTO position to
deactivate Rainsense.
To enable or disable this feature, see
“Rainsense Wipers” underVehicle
Personalization 0152.
OFF : Use to turn the wipers off.
1X : For a single wipe, briefly move
the lever down. For several wipes, hold
the lever down.
f: Pull the lever toward you to
spray windshield washer fluid and
activate the wipers.
See Windshield Wiper/Washer 0109.
Climate Controls
The climate control buttons and the touch screen are used to adjust the heating,
cooling, and ventilation.
Dual and Quad Zone Climate Control Buttons
1. Driver and Passenger Temperature Controls
2. Fan Control
3. Driver and Passenger Heated and Ventilated Seats (If Equipped)
4. Rear Window Defogger 5. Defrost
6. OFF (Fan)
7. Recirculation
8. AUTO (Automatic Operation)
Page 41 of 337
Cadillac CT6 Owner Manual (GMNA-Localizing-MidEast-10293390) - 2017 -
CRC - 6/21/16
40 KEYS, DOORS, AND WINDOWS
If equipped, to open the power trunk:
.Press and release
|on the
driver door. The driver door must
be unlocked or the vehicle must
be in ON/RUN or Retained
Accessory Power (RAP).
. Press
Xtwice quickly on the RKE
transmitter.
. Press the touch pad on the rear of
the trunk after unlocking all doors
or with the RKE transmitter in
range for Keyless Access.
Monitor the trunk area to make sure
nothing will come in contact or move
into the path of the trunk lid when
power closing.
To close the power trunk:
. Press and hold
|on the driver
door until the trunk latches.
A chime will sound and a Driver
Information Center (DIC) message
will display when the operation is
complete.
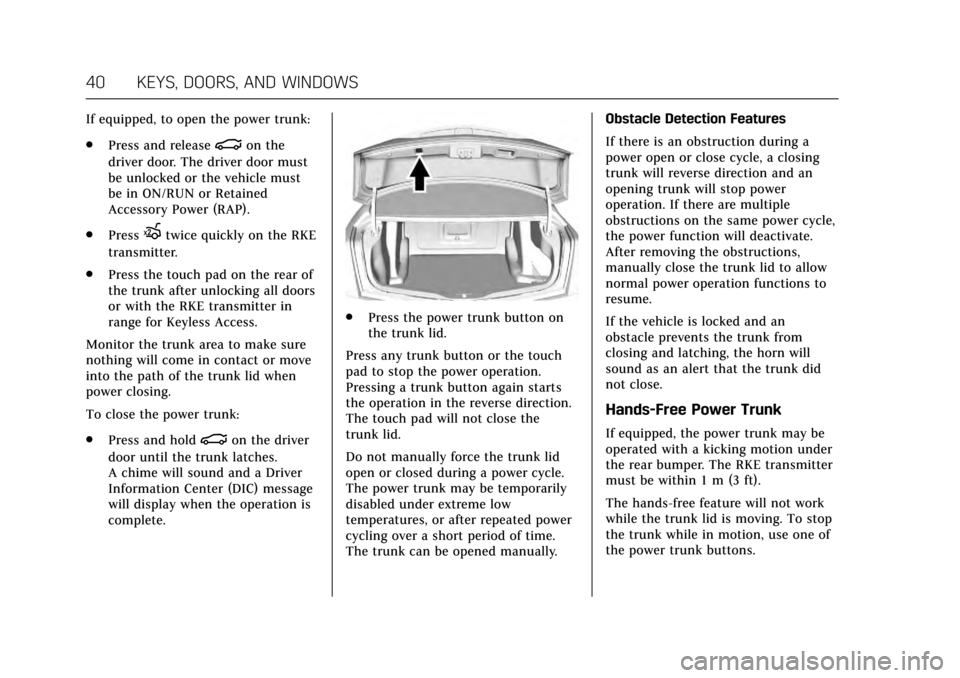
. Press the power trunk button on
the trunk lid.
Press any trunk button or the touch
pad to stop the power operation.
Pressing a trunk button again starts
the operation in the reverse direction.
The touch pad will not close the
trunk lid.
Do not manually force the trunk lid
open or closed during a power cycle.
The power trunk may be temporarily
disabled under extreme low
temperatures, or after repeated power
cycling over a short period of time.
The trunk can be opened manually. Obstacle Detection Features
If there is an obstruction during a
power open or close cycle, a closing
trunk will reverse direction and an
opening trunk will stop power
operation. If there are multiple
obstructions on the same power cycle,
the power function will deactivate.
After removing the obstructions,
manually close the trunk lid to allow
normal power operation functions to
resume.
If the vehicle is locked and an
obstacle prevents the trunk from
closing and latching, the horn will
sound as an alert that the trunk did
not close.
Hands-Free Power Trunk
If equipped, the power trunk may be
operated with a kicking motion under
the rear bumper. The RKE transmitter
must be within 1 m (3 ft).
The hands-free feature will not work
while the trunk lid is moving. To stop
the trunk while in motion, use one of
the power trunk buttons.
Page 62 of 337

Cadillac CT6 Owner Manual (GMNA-Localizing-MidEast-10293390) - 2017 -
CRC - 6/21/16
SEATS AND RESTRAINTS 61
Memory Seats
Platinum Driver Seat Buttons Shown,Passenger Buttons Similar
If equipped, the SET, 1, 2, and
B
(Exit) buttons on the driver door and
front passenger door are used to
manually store and recall memory
settings for the driver and passenger
seats. The driver memory buttons also
store outside mirror positions, power
tilt and telescoping steering column
positions, and massage settings,
if equipped. Storing Memory Positions
To store positions to the 1 and 2
buttons:
1. The ignition must be in ON/RUN or ACC/ACCESSORY.
2. Adjust the driver seat, power tilt and telescoping steering column,
if equipped, massage type and
intensity, if equipped, and the
outside mirrors on some vehicles.
3. Press and release SET. A beep will sound.
4. Immediately press and hold 1 until two beeps sound.
5. Repeat Steps 1–4 for a second driver using 2.
To store exit positions for easy exit
and the
B(Exit) button, repeat
Steps 1–4 using
Bto store your
positions for getting out of the
driver seat. Manually Recalling Memory
Positions
Press and hold 1, 2, or
Bto
manually recall the previously stored
memory positions. Releasing 1, 2,
or
Bbefore the stored positions are
reached stops the recall.
If the massage feature is off when the
memory recall is performed, the
previously stored type and intensity
will be recalled, but it will remain off
until activated with the massage
control button or through the
infotainment display with the
platinum seat controls.
Automatically Recalling Memory
Positions (Auto Memory Recall)
(Driver Only)
If programmed on in the vehicle
personalization menu, the Auto
(Automatic) Memory Recall feature
automatically recalls the current
driver’s previously stored 1 or 2
position when the ignition is changed
from OFF to ON/RUN or ACC/
ACCESSORY.
Page 64 of 337
Cadillac CT6 Owner Manual (GMNA-Localizing-MidEast-10293390) - 2017 -
CRC - 6/21/16
SEATS AND RESTRAINTS 63
Warning (Continued)
overheat. An overheated seat heater
may cause a burn or may damage
the seat.
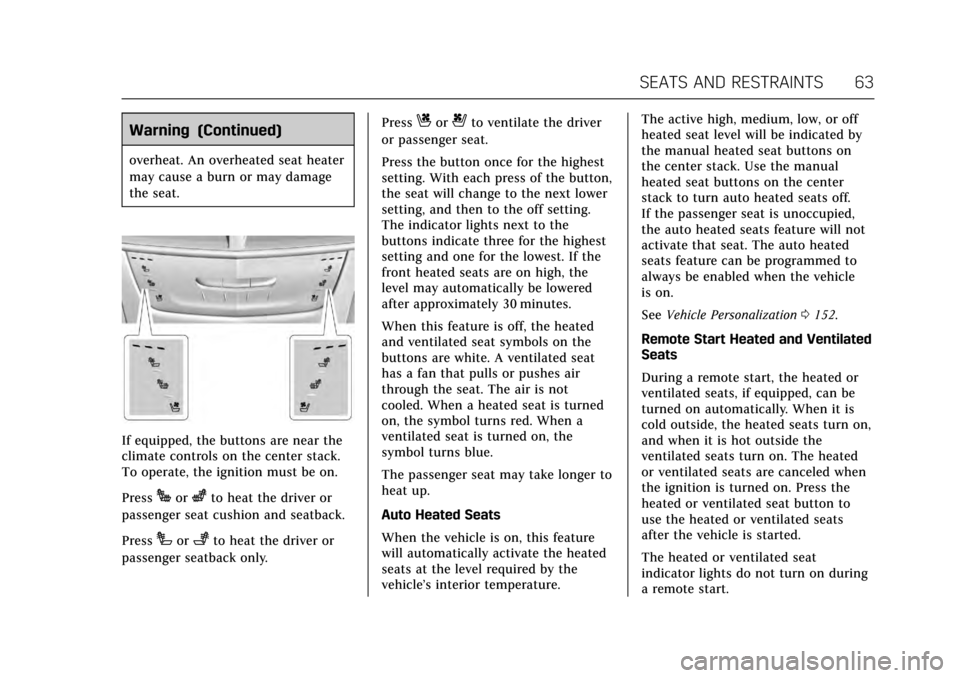
If equipped, the buttons are near the
climate controls on the center stack.
To operate, the ignition must be on.
Press
Jorzto heat the driver or
passenger seat cushion and seatback.
Press
Ior+to heat the driver or
passenger seatback only. Press
Cor{to ventilate the driver
or passenger seat.
Press the button once for the highest
setting. With each press of the button,
the seat will change to the next lower
setting, and then to the off setting.
The indicator lights next to the
buttons indicate three for the highest
setting and one for the lowest. If the
front heated seats are on high, the
level may automatically be lowered
after approximately 30 minutes.
When this feature is off, the heated
and ventilated seat symbols on the
buttons are white. A ventilated seat
has a fan that pulls or pushes air
through the seat. The air is not
cooled. When a heated seat is turned
on, the symbol turns red. When a
ventilated seat is turned on, the
symbol turns blue.
The passenger seat may take longer to
heat up.
Auto Heated Seats
When the vehicle is on, this feature
will automatically activate the heated
seats at the level required by the
vehicle’s interior temperature. The active high, medium, low, or off
heated seat level will be indicated by
the manual heated seat buttons on
the center stack. Use the manual
heated seat buttons on the center
stack to turn auto heated seats off.
If the passenger seat is unoccupied,
the auto heated seats feature will not
activate that seat. The auto heated
seats feature can be programmed to
always be enabled when the vehicle
is on.
See
Vehicle Personalization 0152.
Remote Start Heated and Ventilated
Seats
During a remote start, the heated or
ventilated seats, if equipped, can be
turned on automatically. When it is
cold outside, the heated seats turn on,
and when it is hot outside the
ventilated seats turn on. The heated
or ventilated seats are canceled when
the ignition is turned on. Press the
heated or ventilated seat button to
use the heated or ventilated seats
after the vehicle is started.
The heated or ventilated seat
indicator lights do not turn on during
a remote start.
Page 67 of 337
Cadillac CT6 Owner Manual (GMNA-Localizing-MidEast-10293390) - 2017 -
CRC - 6/21/16
66 SEATS AND RESTRAINTS
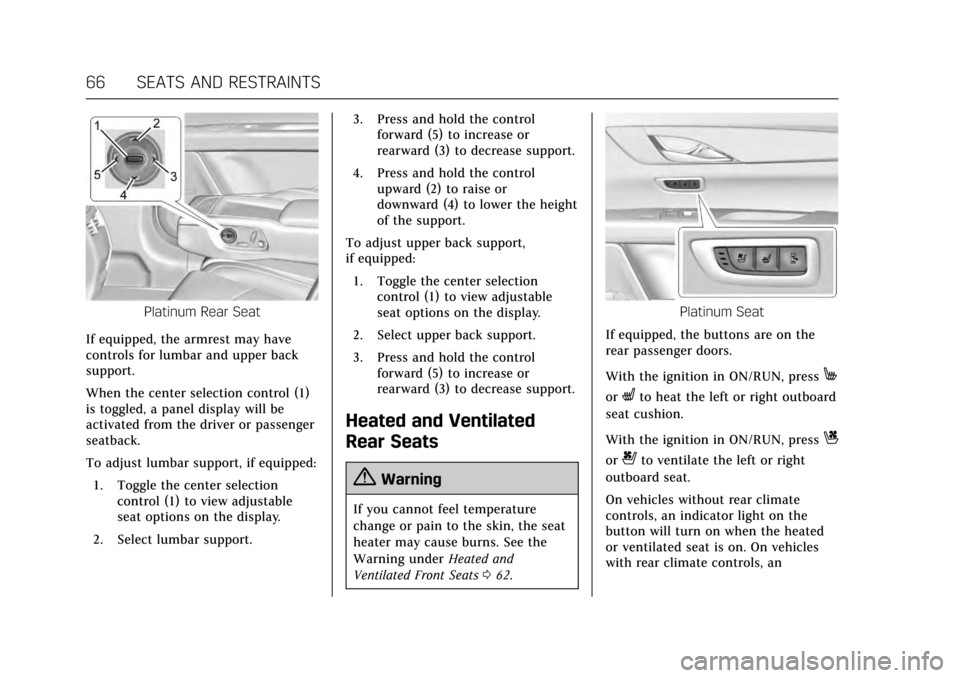
Platinum Rear Seat
If equipped, the armrest may have
controls for lumbar and upper back
support.
When the center selection control (1)
is toggled, a panel display will be
activated from the driver or passenger
seatback.
To adjust lumbar support, if equipped: 1. Toggle the center selection control (1) to view adjustable
seat options on the display.
2. Select lumbar support. 3. Press and hold the control
forward (5) to increase or
rearward (3) to decrease support.
4. Press and hold the control upward (2) to raise or
downward (4) to lower the height
of the support.
To adjust upper back support,
if equipped: 1. Toggle the center selection control (1) to view adjustable
seat options on the display.
2. Select upper back support.
3. Press and hold the control forward (5) to increase or
rearward (3) to decrease support.
Heated and Ventilated
Rear Seats
{Warning
If you cannot feel temperature
change or pain to the skin, the seat
heater may cause burns. See the
Warning under Heated and
Ventilated Front Seats 062.
Platinum Seat
If equipped, the buttons are on the
rear passenger doors.
With the ignition in ON/RUN, press
M
orLto heat the left or right outboard
seat cushion.
With the ignition in ON/RUN, press
C
or{to ventilate the left or right
outboard seat.
On vehicles without rear climate
controls, an indicator light on the
button will turn on when the heated
or ventilated seat is on. On vehicles
with rear climate controls, an
Page 160 of 337

Cadillac CT6 Owner Manual (GMNA-Localizing-MidEast-10293390) - 2017 -
CRC - 6/21/16
INSTRUMENTS AND CONTROLS 159
Inversion
Select and the following may display:
.Up/Down
. Left/Right
. Information
Up/Down
This feature allows the finger gesture
to be changed.
Touch to select Default or Inverted.
Left/Right
This feature allows the finger gesture
to be changed.
Touch to select Default or Inverted.
Information
Touch to read more about the
inversion feature.
Cursor Tracking Speed
This feature changes the speed of the
cursor tracking.
Select Faster, Normal, or Slower.Display
Select and the following may display:
. Proximity Sensing
. Calibrate Touchscreen
. Turn Display Off
Proximity Sensing
When on, certain screen buttons and
features will become visible when a
hand approaches the screen.
Select Off, On, or On-Map Only.
Calibrate Touchscreen
Select to calibrate the touchscreen,
then follow the prompts.
Turn Display Off
Select to turn the display off. Touch
anywhere on the display area or any
faceplate button to turn the
display on.
Rear Camera
This allows for Rear Park Assist
Symbols and Guidance Lines to be
turned off or on.
Select Off or On for the desired
feature. See
Assistance Systems for Parking or
Backing 0222.
Return to Factory Settings
Select and the following may display:
.
Restore Vehicle Settings
. Clear All Private Data
. Restore Radio Settings
Restore Vehicle Settings
This allows selection of restoring
vehicle settings.
Select Restore or Cancel.
Clear All Private Data
This allows selection to clear all
private information from the vehicle.
Select Delete or Cancel.
Restore Radio Settings
This allows selection to restore radio
settings.
Select Restore or Cancel.
Software Information
Touch to view the version of the
infotainment system software.
Page 161 of 337

Cadillac CT6 Owner Manual (GMNA-Localizing-MidEast-10293390) - 2017 -
CRC - 6/21/16
160 INSTRUMENTS AND CONTROLS
Universal Remote
System
Universal Remote System
Programming
If equipped, these buttons are in the
overhead console.
This system can replace up to three
remote control transmitters used to
activate devices such as garage door
openers, security systems, and home
automation devices. These
instructions refer to a garage door
opener, but can be used for other
devices.Do not use the Universal Remote
system with any garage door opener
that does not have the stop and
reverse feature. This includes any
garage door opener model
manufactured before April 1, 1982.
Read these instructions completely
before programming the Universal
Remote system. It may help to have
another person assist with the
programming process.
Keep the original hand-held
transmitter for use in other vehicles
as well as for future programming.
Erase the programming when vehicle
ownership is terminated. See
“Erasing
Universal Remote System Buttons”
later in this section.
To program a garage door opener,
park outside directly in line with and
facing the garage door opener receiver.
Clear all people and objects near the
garage door.
Make sure the hand-held transmitter
has a new battery for quick and
accurate transmission of the
radio-frequency signal.
Programming the Universal
Remote System
The Universal Remote system is
compatible with radio-frequency
devices operating between 433–
434 MHz.
Programming involves time-sensitive
actions, and may time out causing the
procedure to be repeated.
To program up to three devices:
1. Hold the end of the hand-held transmitter about 3 to 8 cm (1 to
3 in) away from the Universal
Remote system buttons with the
indicator light in view. The
hand-held transmitter was
supplied by the manufacturer of
the garage door opener receiver.
2. At the same time, press and hold both the hand-held transmitter
button and one of the three
Universal Remote system
buttons to be used to operate the
garage door. Do not release either
button until the indicator light
changes from a slow to a rapid
flash. Then release both buttons.