engine CADILLAC CT6 2018 1.G User Guide
[x] Cancel search | Manufacturer: CADILLAC, Model Year: 2018, Model line: CT6, Model: CADILLAC CT6 2018 1.GPages: 445, PDF Size: 7.7 MB
Page 40 of 445
Cadillac CT6 Owner Manual (GMNA-Localizing-U.S./Canada-11292458) -
2018 - crc - 2/14/17
KEYS, DOORS, AND WINDOWS 39
vehicle key into the key lock
cylinder on the driver door
handle, then turn the key
counterclockwise to the unlock
position five times within
10 seconds.
The Driver Information Center
(DIC) displays READY FOR
REMOTE #2, 3, 4, ETC.
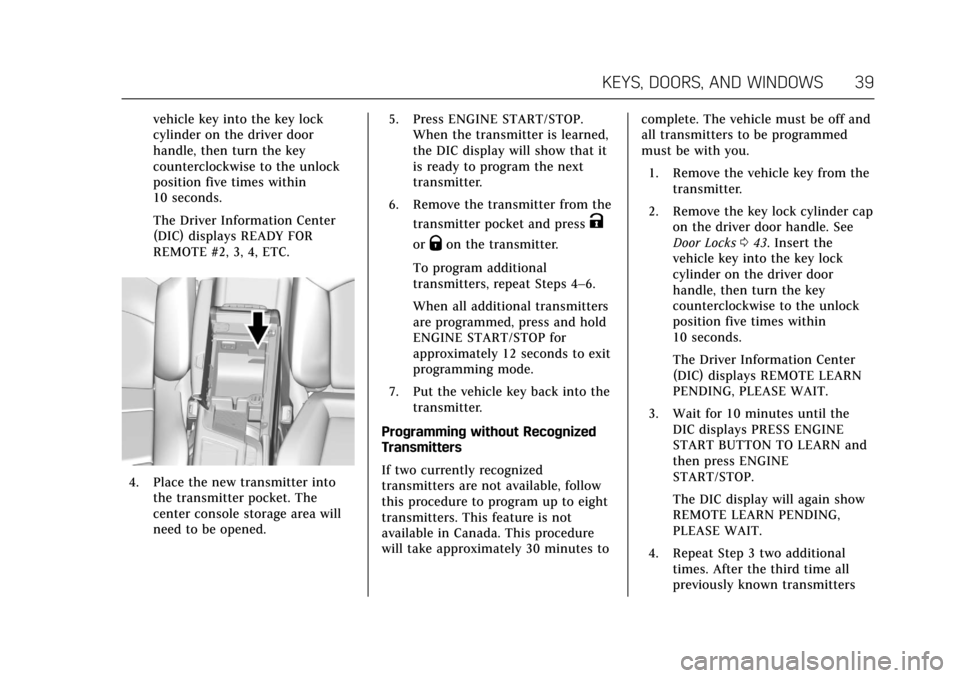
4. Place the new transmitter intothe transmitter pocket. The
center console storage area will
need to be opened. 5. Press ENGINE START/STOP.
When the transmitter is learned,
the DIC display will show that it
is ready to program the next
transmitter.
6. Remove the transmitter from the transmitter pocket and press
K
orQon the transmitter.
To program additional
transmitters, repeat Steps 4–6.
When all additional transmitters
are programmed, press and hold
ENGINE START/STOP for
approximately 12 seconds to exit
programming mode.
7. Put the vehicle key back into the transmitter.
Programming without Recognized
Transmitters
If two currently recognized
transmitters are not available, follow
this procedure to program up to eight
transmitters. This feature is not
available in Canada. This procedure
will take approximately 30 minutes to complete. The vehicle must be off and
all transmitters to be programmed
must be with you.
1. Remove the vehicle key from the transmitter.
2. Remove the key lock cylinder cap on the driver door handle. See
Door Locks 043. Insert the
vehicle key into the key lock
cylinder on the driver door
handle, then turn the key
counterclockwise to the unlock
position five times within
10 seconds.
The Driver Information Center
(DIC) displays REMOTE LEARN
PENDING, PLEASE WAIT.
3. Wait for 10 minutes until the DIC displays PRESS ENGINE
START BUTTON TO LEARN and
then press ENGINE
START/STOP.
The DIC display will again show
REMOTE LEARN PENDING,
PLEASE WAIT.
4. Repeat Step 3 two additional times. After the third time all
previously known transmitters
Page 41 of 445
Cadillac CT6 Owner Manual (GMNA-Localizing-U.S./Canada-11292458) -
2018 - crc - 2/14/17
40 KEYS, DOORS, AND WINDOWS
will no longer work with the
vehicle. Remaining transmitters
can be relearned during the next
steps.
The DIC display should now
show READY FOR REMOTE # 1.
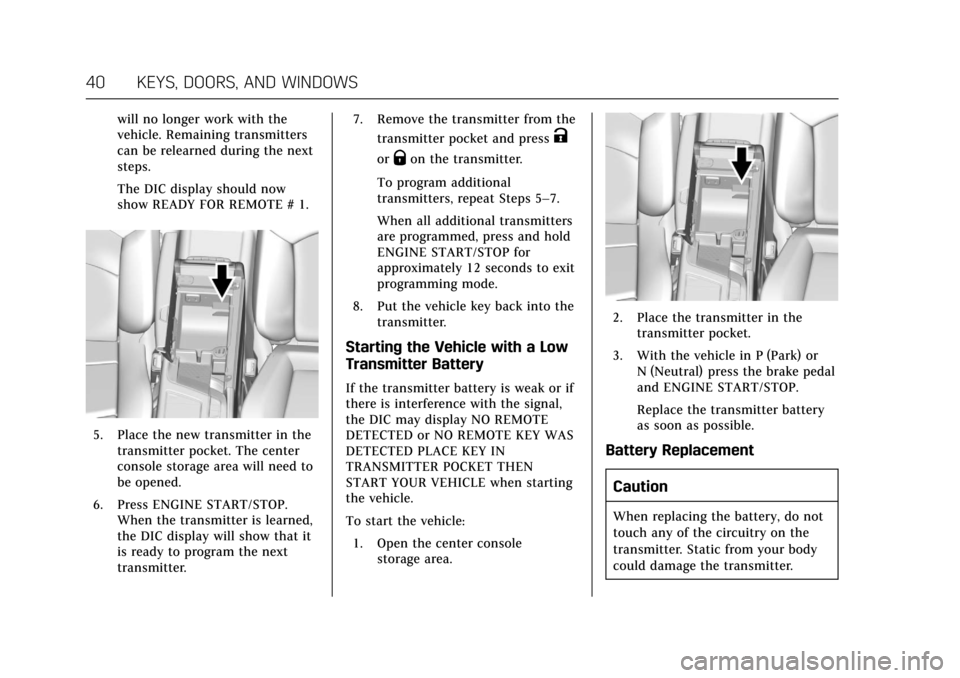
5. Place the new transmitter in thetransmitter pocket. The center
console storage area will need to
be opened.
6. Press ENGINE START/STOP. When the transmitter is learned,
the DIC display will show that it
is ready to program the next
transmitter. 7. Remove the transmitter from the
transmitter pocket and press
K
orQon the transmitter.
To program additional
transmitters, repeat Steps 5–7.
When all additional transmitters
are programmed, press and hold
ENGINE START/STOP for
approximately 12 seconds to exit
programming mode.
8. Put the vehicle key back into the transmitter.
Starting the Vehicle with a Low
Transmitter Battery
If the transmitter battery is weak or if
there is interference with the signal,
the DIC may display NO REMOTE
DETECTED or NO REMOTE KEY WAS
DETECTED PLACE KEY IN
TRANSMITTER POCKET THEN
START YOUR VEHICLE when starting
the vehicle.
To start the vehicle:
1. Open the center console storage area.
2. Place the transmitter in thetransmitter pocket.
3. With the vehicle in P (Park) or N (Neutral) press the brake pedal
and ENGINE START/STOP.
Replace the transmitter battery
as soon as possible.
Battery Replacement
Caution
When replacing the battery, do not
touch any of the circuitry on the
transmitter. Static from your body
could damage the transmitter.
Page 43 of 445
Cadillac CT6 Owner Manual (GMNA-Localizing-U.S./Canada-11292458) -
2018 - crc - 2/14/17
42 KEYS, DOORS, AND WINDOWS
Remote Vehicle Start
If equipped, this feature allows the
engine to be started from outside the
vehicle.
For the PLUG-IN vehicle, the engine
will only start if needed for warming
functions or high voltage battery
charging.
/:This button will be on the RKE
transmitter if the vehicle has remote
start.
The climate control system will use
the previous settings during a remote
start. The rear window defogger may
come on during remote start based on
cold ambient conditions. The rear
defog indicator light does not come on
during remote start.
If equipped, the heated seats and
heated steering wheel or ventilated
seats may come on when enabled in
vehicle personalization. See Vehicle
Personalization 0170.
If equipped, the heated and ventilated
front seats may also come on when
the vehicle personalization setting is
enabled. See Heated and Ventilated
Front Seats 072. Laws in some local communities may
restrict the use of remote starters. For
example, some laws may require a
person using remote start to have the
vehicle in view. Check local
regulations for any requirements.
If your vehicle is low on fuel, do not
use the remote start feature. The
vehicle may run out of fuel.
The RKE transmitter range may be
shorter while the vehicle is running.
Other conditions can affect the
performance of the transmitter. See
Remote Keyless Entry (RKE) System
0
35.
Starting the Engine Using Remote
Start
1. Press and release
Qon the RKE
transmitter.
2. Immediately press and hold
/
for at least four seconds or until
the turn signal lamps flash. This
confirms the request to remote
start the vehicle has been
received. During the remote start, the
doors will be locked and the
parking lamps will remain on as
long as the engine is running.
The engine will shut off after
10 minutes unless a time
extension is done or the vehicle
is started.
3. Press the brake pedal and start the vehicle to drive.
Extending Engine Run Time
The engine run time can also be
extended by another 10 minutes,
if during the first 10 minutes
Steps 1 and 2 are repeated while the
engine is still running. An extension
can be requested 30 seconds after
starting. This provides a total of
20 minutes.
The remote start can only be
extended once.
When the remote start is extended,
the second 10 minute period is added
on to the first 10 minutes for a total
of 20 minutes.
Page 44 of 445
Cadillac CT6 Owner Manual (GMNA-Localizing-U.S./Canada-11292458) -
2018 - crc - 2/14/17
KEYS, DOORS, AND WINDOWS 43
A maximum of two remote starts, or a
remote start with an extension, are
allowed between ignition cycles.
The vehicle's ignition must be turned
from on to off before the remote start
procedure can be used again.
Canceling a Remote Start
To cancel a remote start, do any of
the following:
.Press and hold
/until the
parking lamps turn off.
. Turn on the hazard warning
flashers.
. Turn the vehicle on and then off.
Conditions in Which Remote Start
Will Not Work
The remote start will not operate if
any of the following occur:
. The ignition is in any mode other
than OFF.
. A transmitter is in the vehicle.
. The hood is not closed.
. The hazard warning flashers
are on. .
There is an emission control
system malfunction.
. The engine coolant temperature is
too high.
. The oil pressure is low.
. Two remote vehicle starts have
already been used.
. The vehicle is not in P (Park).Door Locks
{Warning
Unlocked doors can be dangerous.
. Passengers, especially
children, can easily open the
doors and fall out of a moving
vehicle. The doors can be
unlocked and opened while
the vehicle is moving. The
chance of being thrown out of
the vehicle in a crash is
increased if the doors are not
locked. So, all passengers
should wear seat belts
(Continued)
Warning (Continued)
properly and the doors should
be locked whenever the
vehicle is driven.
. Young children who get into
unlocked vehicles may be
unable to get out. A child can
be overcome by extreme heat
and can suffer permanent
injuries or even death from
heat stroke. Always lock the
vehicle whenever leaving it.
. Outsiders can easily enter
through an unlocked door
when you slow down or stop
the vehicle. Locking the doors
can help prevent this from
happening.
To lock or unlock the door from
outside the vehicle:
. Press
QorKon the Remote
Keyless Entry (RKE) transmitter.
. In the case of a dead battery, use
the key in the driver door. The key
cylinder is covered with a cap.
Page 48 of 445
Cadillac CT6 Owner Manual (GMNA-Localizing-U.S./Canada-11292458) -
2018 - crc - 2/14/17
KEYS, DOORS, AND WINDOWS 47
Doors
Trunk
{Warning
Exhaust gases can enter the vehicle
if it is driven with the liftgate or
trunk/hatch open, or with any
objects that pass through the seal
between the body and the trunk/
hatch or liftgate. Engine exhaust
contains carbon monoxide (CO)
which cannot be seen or smelled.
It can cause unconsciousness and
even death.
If the vehicle must be driven with
the liftgate or trunk/hatch open:. Close all of the windows.
. Fully open the air outlets on
or under the instrument
panel.
. Adjust the climate control
system to a setting that
brings in only outside air and
(Continued)
Warning (Continued)
set the fan speed to the
highest setting. See “Climate
Control Systems” in the Index.
See Engine Exhaust 0230.
To open the trunk, the vehicle must
be off or the shift lever must be in
P (Park).
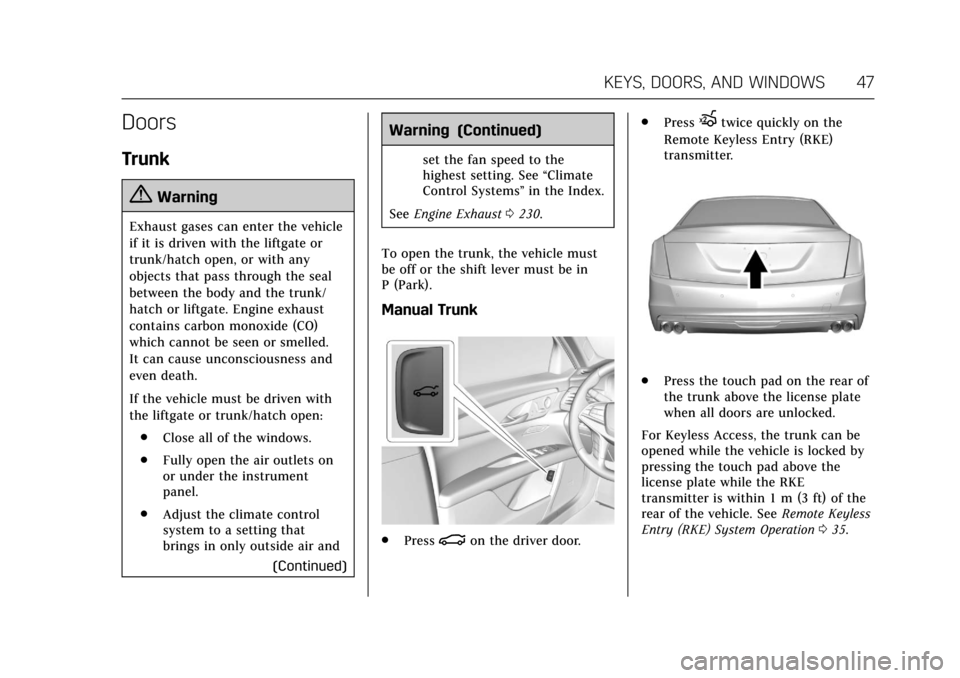
Manual Trunk
. Press|on the driver door. .
Press
Xtwice quickly on the
Remote Keyless Entry (RKE)
transmitter.
. Press the touch pad on the rear of
the trunk above the license plate
when all doors are unlocked.
For Keyless Access, the trunk can be
opened while the vehicle is locked by
pressing the touch pad above the
license plate while the RKE
transmitter is within 1 m (3 ft) of the
rear of the vehicle. See Remote Keyless
Entry (RKE) System Operation 035.
Page 55 of 445
Cadillac CT6 Owner Manual (GMNA-Localizing-U.S./Canada-11292458) -
2018 - crc - 2/14/17
54 KEYS, DOORS, AND WINDOWS
transmitter will start the vehicle.
If the transmitter is ever damaged,
you may not be able to start your
vehicle.
When trying to start the vehicle, the
security light may come on briefly
when the ignition is turned on.
If the engine does not start and the
security light stays on, there is a
problem with the system. Turn the
ignition off and try again.
If the vehicle will not change ignition
modes (ACC/ACCESSORY, ON, OFF),
and the RKE transmitter appears to be
undamaged, try another transmitter.
Or, you may try placing the
transmitter in the transmitter pocket
located in the center console.If the ignition modes will not change
with the other transmitter, your
vehicle needs service. If the ignition
does change modes, the first
transmitter may be faulty. See your
dealer.
It is possible for the immobilizer
system to learn new or replacement
RKE transmitters. Up to eight
transmitters can be programmed for
the vehicle. To program additional
transmitters, see
“Programming
Transmitters to the Vehicle ”under
Remote Keyless Entry (RKE) System
Operation 035.
Do not leave the key or device that
disarms or deactivates the
theft-deterrent system in the vehicle.Exterior Mirrors
Convex Mirrors
{Warning
A convex mirror can make things,
like other vehicles, look farther
away than they really are. If you cut
too sharply into the right lane, you
could hit a vehicle on the right.
Check the inside mirror or glance
over your shoulder before changing
lanes.
The passenger side mirror is convex
shaped. A convex mirror's surface is
curved so more can be seen from the
driver seat.
Page 61 of 445

Cadillac CT6 Owner Manual (GMNA-Localizing-U.S./Canada-11292458) -
2018 - crc - 2/14/17
60 KEYS, DOORS, AND WINDOWS
Warning (Continued)
override, make sure that all people
and obstructions are clear of the
window path.
When the engine is on, override the
automatic reversal system by pulling
and holding the window switch if
conditions prevent it from closing.
Programming the Power
Windows
Programming may be necessary if the
vehicle battery has been disconnected
or discharged. If the window is unable
to express-up, program each
express-close window: 1. Close all doors.
2. Turn the ignition on or to ACC/ ACCESSORY.
3. Partially open the window to be programmed. Then close it and
continue to pull the switch
briefly after the window has fully
closed. 4. Open the window and continue
to press the switch briefly after
the window has fully opened.
Remote Window Operation
If equipped, this feature allows all the
windows to be opened remotely.
If enabled in vehicle personalization,
press and hold
Kon the RKE
transmitter. See Vehicle Personalization
0 170.
Sun Visors
Pull the sun visor down to block glare.
Detach the sun visor from the center
mount to pivot to the side window,
or to extend along the rod.
Rear Window Sunshade
If equipped, press and release the
switch. The rear window sunshade
will fully extend. To close the
sunshade, press and release the switch
again. The sunshade will fully close.
When shifting the vehicle into
R (Reverse), the rear window
sunshade will automatically retract if
Page 91 of 445
Cadillac CT6 Owner Manual (GMNA-Localizing-U.S./Canada-11292458) -
2018 - crc - 2/21/17
90 SEATS AND RESTRAINTS
{Warning
When an airbag inflates, there may
be dust in the air. This dust could
cause breathing problems for
people with a history of asthma or
other breathing trouble. To avoid
this, everyone in the vehicle should
get out as soon as it is safe to do
so. If you have breathing problems
but cannot get out of the vehicle
after an airbag inflates, then get
fresh air by opening a window or a
door. If you experience breathing
problems following an airbag
deployment, you should seek
medical attention.
The vehicle has a feature that may
automatically unlock the doors, turn
on the interior lamps and hazard
warning flashers, and shut off the fuel
system after the airbags inflate. The
feature may also activate, without
airbag inflation, after an event that
exceeds a predetermined threshold.
You can lock the doors, turn off the interior lamps, and turn off the hazard
warning flashers by using the controls
for those features.
{Warning
A crash severe enough to inflate the
airbags may have also damaged
important functions in the vehicle,
such as the fuel system, brake and
steering systems, etc. Even if the
vehicle appears to be drivable after
a moderate crash, there may be
concealed damage that could make
it difficult to safely operate the
vehicle.
Use caution if you should attempt
to restart the engine after a crash
has occurred.
PLUG-IN vehicles have a high voltage
battery and a standard 12-volt battery.
If an airbag inflates or the vehicle has
been in a crash, the vehicle's sensing
system may shut down the high
voltage system. When this occurs, the
high voltage battery is disconnected
and the vehicle is not charging the
12-volt battery or the electrical system. The vehicle may start but it
shuts down once the 12-volt battery is
depleted. The airbag readiness light
and/or the 12-volt battery warning
light are displayed. Before the vehicle
can be operated again, it must be
serviced at your dealer.
In many crashes severe enough to
inflate the airbag, windshields are
broken by vehicle deformation.
Additional windshield breakage may
also occur from the front outboard
passenger airbag.
.
Airbags are designed to inflate
only once. After an airbag inflates,
you will need some new parts for
the airbag system. If you do not
get them, the airbag system will
not be there to help protect you in
another crash. A new system will
include airbag modules and
possibly other parts. The service
manual for the vehicle covers the
need to replace other parts.
Page 119 of 445
Cadillac CT6 Owner Manual (GMNA-Localizing-U.S./Canada-11292458) -
2018 - crc - 2/14/17
118 INSTRUMENTS AND CONTROLS
Instruments and
Controls
Controls
Steering Wheel Adjustment . . . . . 119
Steering Wheel Controls . . . . . . . . . 119
Heated Steering Wheel . . . . . . . . . . 119
Horn . . . . . . . . . . . . . . . . . . . . . . . . . . . . . . . 120
Windshield Wiper/Washer . . . . . . . 120
Compass . . . . . . . . . . . . . . . . . . . . . . . . . . 122
Clock . . . . . . . . . . . . . . . . . . . . . . . . . . . . . . 122
Power Outlets . . . . . . . . . . . . . . . . . . . . . 123
Wireless Charging . . . . . . . . . . . . . . . . 124
Cigarette Lighter . . . . . . . . . . . . . . . . . . 125
Ashtrays . . . . . . . . . . . . . . . . . . . . . . . . . . 126
Warning Lights, Gauges, and
Indicators
Warning Lights, Gauges, andIndicators . . . . . . . . . . . . . . . . . . . . . . . 126
Instrument Cluster (Base
Level) . . . . . . . . . . . . . . . . . . . . . . . . . . . . 127
Instrument Cluster (Uplevel) . . . . 130
Speedometer . . . . . . . . . . . . . . . . . . . . . . 134
Odometer . . . . . . . . . . . . . . . . . . . . . . . . . 134
Trip Odometer . . . . . . . . . . . . . . . . . . . . 134
Tachometer . . . . . . . . . . . . . . . . . . . . . . . 134
Battery Gauge (High Voltage) . . . 135
Fuel Gauge . . . . . . . . . . . . . . . . . . . . . . . . 135 Power Indicator Gauge
(PLUG-IN Only) . . . . . . . . . . . . . . . . . 136
Boost Gauge (Performance Configuration Only) . . . . . . . . . . . . 136
Engine Oil Pressure Gauge (Base
Level Cluster Only) . . . . . . . . . . . . . 137
Engine Oil Temperature Gauge (Performance
Configuration Only) . . . . . . . . . . . . 138
Engine Coolant Temperature Gauge . . . . . . . . . . . . . . . . . . . . . . . . . . . . 139
Voltmeter Gauge (Base Level Cluster Only) . . . . . . . . . . . . . . . . . . . . 140
Seat Belt Reminders . . . . . . . . . . . . . . 140
Airbag Readiness Light . . . . . . . . . . 141
Passenger Airbag Status Indicator . . . . . . . . . . . . . . . . . . . . . . . . . 141
Charging System Light . . . . . . . . . . . 142
Malfunction Indicator Lamp (Check Engine Light) . . . . . . . . . . . 143
Service Vehicle Soon Light (PLUG-IN Only) . . . . . . . . . . . . . . . . . 145
Brake System Warning Light . . . . 145
Electric Parking Brake Light . . . . . 145
Service Electric Parking Brake Light . . . . . . . . . . . . . . . . . . . . . . . . . . . . . 146
Antilock Brake System (ABS) Warning Light . . . . . . . . . . . . . . . . . . 146
Sport Mode Light . . . . . . . . . . . . . . . . . 146
Winter Driving Mode Light . . . . . . 146 Automatic Vehicle Hold (AVH)
Light . . . . . . . . . . . . . . . . . . . . . . . . . . . . . 147
Lane Keep Assist (LKA) Light . . . 147
Vehicle Ahead Indicator . . . . . . . . . 147
Pedestrian Ahead Indicator . . . . . . 147
Traction Off Light . . . . . . . . . . . . . . . . 148
StabiliTrak OFF Light . . . . . . . . . . . . 148
Traction Control System (TCS)/ StabiliTrak Light . . . . . . . . . . . . . . . . 148
Engine Coolant Temperature Warning Light . . . . . . . . . . . . . . . . . . 149
Tire Pressure Light . . . . . . . . . . . . . . . 149
Engine Oil Pressure Light . . . . . . . . 149
Low Fuel Warning Light . . . . . . . . . 150
Auto Stop Mode (Uplevel Cluster) . . . . . . . . . . . . . . . . . . . . . . . . . . 150
Security Light . . . . . . . . . . . . . . . . . . . . . 150
Vehicle Ready Light (PLUG-IN Only) . . . . . . . . . . . . . . . . . 151
High-Beam On Light . . . . . . . . . . . . . 151
Lamps On Reminder . . . . . . . . . . . . . 151
Cruise Control Light . . . . . . . . . . . . . . 151
Door Ajar Light . . . . . . . . . . . . . . . . . . . 152
Information Displays
Power Flows (PLUG-IN Only) . . . . 152
Programmable Charging (PLUG-IN Only) . . . . . . . . . . . . . . . . . 152
Energy Information (PLUG-IN Only) . . . . . . . . . . . . . . . . . 161
Page 120 of 445
Cadillac CT6 Owner Manual (GMNA-Localizing-U.S./Canada-11292458) -
2018 - crc - 2/14/17
INSTRUMENTS AND CONTROLS 119
Driver InformationCenter (DIC) . . . . . . . . . . . . . . . . . . . . . 162
Head-Up Display (HUD) . . . . . . . . . 165
Vehicle Messages
Vehicle Messages . . . . . . . . . . . . . . . . . 169
Engine Power Messages . . . . . . . . . . 169
Vehicle Speed Messages . . . . . . . . . 169
Vehicle Personalization
Vehicle Personalization . . . . . . . . . . 170
Universal Remote System
Universal Remote System . . . . . . . . 179
Universal Remote System Programming . . . . . . . . . . . . . . . . . . . 179
Universal Remote System Operation . . . . . . . . . . . . . . . . . . . . . . . . 181
Controls
Steering Wheel Adjustment
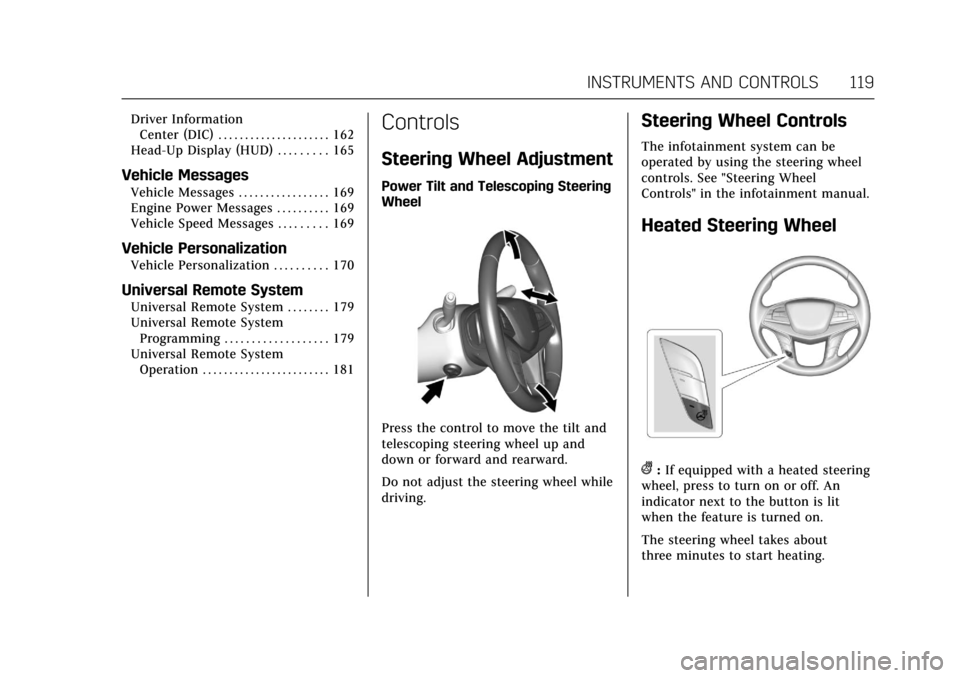
Power Tilt and Telescoping Steering
Wheel
Press the control to move the tilt and
telescoping steering wheel up and
down or forward and rearward.
Do not adjust the steering wheel while
driving.
Steering Wheel Controls
The infotainment system can be
operated by using the steering wheel
controls. See "Steering Wheel
Controls" in the infotainment manual.
Heated Steering Wheel
(:If equipped with a heated steering
wheel, press to turn on or off. An
indicator next to the button is lit
when the feature is turned on.
The steering wheel takes about
three minutes to start heating.