light CADILLAC CT6 2018 1.G Personalization Guide
[x] Cancel search | Manufacturer: CADILLAC, Model Year: 2018, Model line: CT6, Model: CADILLAC CT6 2018 1.GPages: 20, PDF Size: 2.46 MB
Page 5 of 20
5
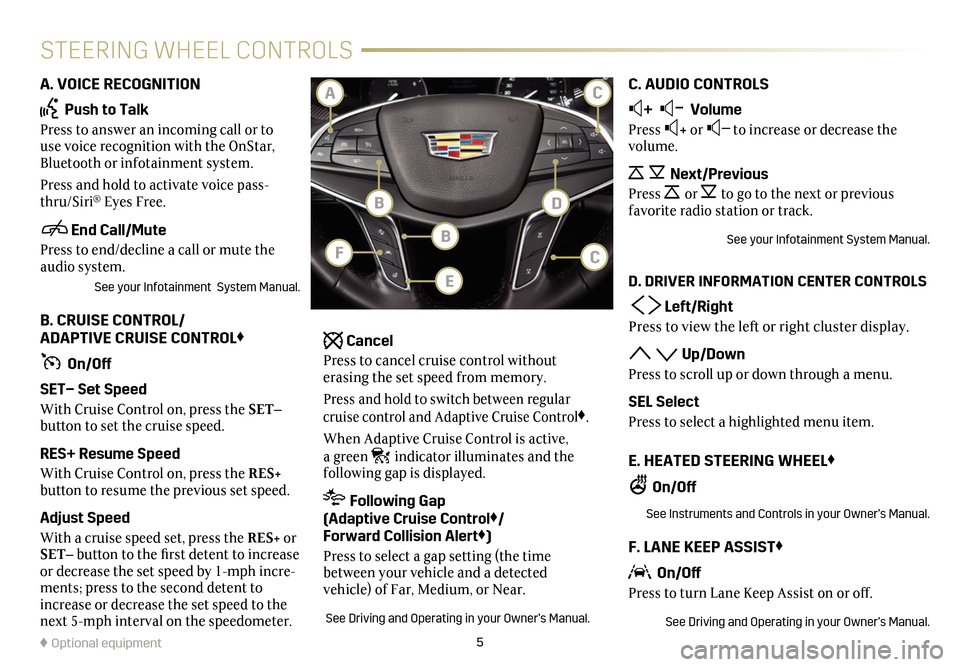
STEERING WHEEL CONTROLS
A. VOICE RECOGNITION
Push to Talk
Press to answer an incoming call or to use voice recognition with the OnStar, Bluetooth or infotainment system.
Press and hold to activate voice pass-thru/Siri® Eyes Free.
End Call/Mute
Press to end/decline a call or mute the audio system.
See your Infotainment System Manual.
B. CRUISE CONTROL/ ADAPTIVE CRUISE CONTROL♦
On/Off
SET– Set Speed
With Cruise Control on, press the SET–
button to set the cruise speed.
RES+ Resume Speed
With Cruise Control on, press the RES+
button to resume the previous set speed.
Adjust Speed
With a cruise speed set, press the RES+ or SET– button to the first detent to increase or decrease the set speed by 1-mph incre-ments; press to the second detent to increase or decrease the set speed to the next 5-mph interval on the speedometer.
Cancel
Press to cancel cruise control without erasing the set speed from memory.
Press and hold to switch between regular cruise control and Adaptive Cruise Control♦.
When Adaptive Cruise Control is active, a green indicator illuminates and the
following gap is displayed.
Following Gap (Adaptive Cruise Control♦/ Forward Collision Alert♦)
Press to select a gap setting (the time between your vehicle and a detected
vehicle) of Far, Medium, or Near.
See Driving and Operating in your Owner’s Manual.
C. AUDIO CONTROLS
+ – Volume
Press + or – to increase or decrease the volume.
Next/Previous
Press or to go to the next or previous favorite radio station or track.
See your Infotainment System Manual.
D. DRIVER INFORMATION CENTER CONTROLS
Left/Right
Press to view the left or right cluster display.
Up/Down
Press to scroll up or down through a menu.
SEL Select
Press to select a highlighted menu item.
E. HEATED STEERING WHEEL♦
On/Off
See Instruments and Controls in your Owner’s Manual.
F. LANE KEEP ASSIST♦
On/Off
Press to turn Lane Keep Assist on or off.
See Driving and Operating in your Owner’s Manual.
♦ Optional equipment
BF
BD
CA
E
C
Page 6 of 20
6
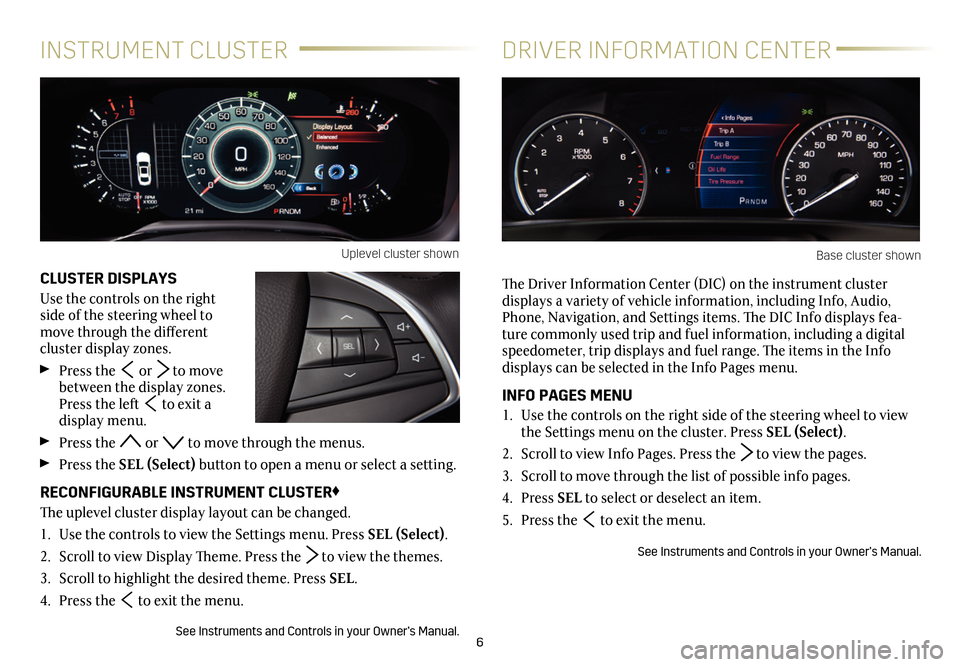
CLUSTER DISPLAYS
Use the controls on the right side of the steering wheel to move through the different
cluster display zones.
Press the or to move between the display zones. Press the left to exit a display menu.
Press the or to move through the menus.
Press the SEL (Select) button to open a menu or select a
setting.
RECONFIGURABLE INSTRUMENT CLUSTER♦
The uplevel cluster display layout can be changed.
1. Use the controls to view the Settings menu. Press SEL (Select).
2. Scroll to view Display Theme. Press the to view the themes.
3. Scroll to highlight the desired theme. Press SEL.
4. Press the to exit the menu.
See Instruments and Controls in your Owner’s Manual.
INSTRUMENT CLUSTERDRIVER INFORMATION CENTER
The Driver Information Center (DIC) on the instrument cluster
displays a variety of vehicle information, including Info, Audio, Phone, Navigation, and Settings items. The DIC Info displays fea-ture commonly used trip and fuel information, including a digital speedometer, trip displays and fuel range. The items in the Info displays can be selected in the Info Pages menu.
INFO PAGES MENU
1. Use the controls on the right side of the steering wheel to view the Settings menu on the cluster. Press SEL (Select).
2. Scroll to view Info Pages. Press the to view the pages.
3. Scroll to move through the list of possible info pages.
4. Press SEL to select or deselect an item.
5. Press the to exit the menu.
See Instruments and Controls in your Owner’s Manual.
Uplevel cluster shownBase cluster shown
Page 7 of 20
7
HEAD-UP DISPLAY♦
The Head-Up Display (HUD) projects some operating information on the windshield. Temporary information, such as audio changes and navigation maneuvers, also may be displayed.
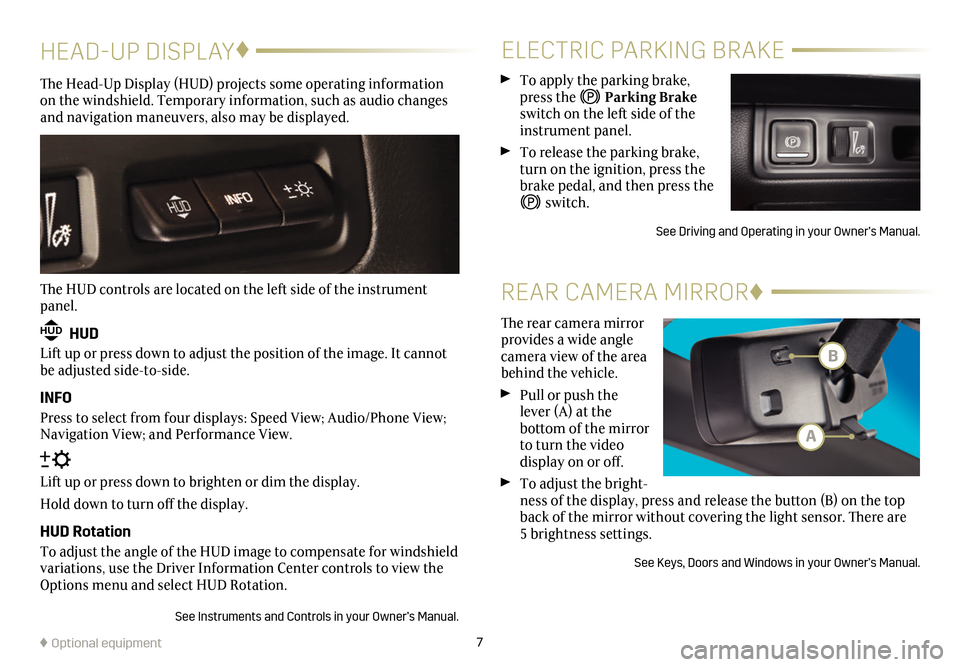
The HUD controls are located on the left side of the instrument panel.
HUD HUD
Lift up or press down to adjust the position of the image. It cannot be adjusted side-to-side.
INFO
Press to select from four displays: Speed View; Audio/Phone View; Navigation View; and Performance View.
Lift up or press down to brighten or dim the display.
Hold down to turn off the display.
HUD Rotation
To adjust the angle of the HUD image to compensate for windshield variations, use the Driver Information Center controls to view the Options menu and select HUD Rotation.
See Instruments and Controls in your Owner’s Manual.
♦ Optional equipment
ELECTRIC PARKING BRAKE
To apply the parking brake, press the Parking Brake switch on the left side of the instrument panel.
To release the parking brake, turn on the ignition, press the brake pedal, and then press the
switch.
See Driving and Operating in your Owner’s Manual.
The rear camera mirror provides a wide angle camera view of the area behind the vehicle.
Pull or push the lever (A) at the
bottom of the
mirror to turn the video
display on or off.
To adjust the bright-ness of the display, press and release the button (B) on the top back of the mirror without covering the light sensor. There are 5 brightness
settings.
See Keys, Doors and Windows in your Owner’s Manual.
REAR CAMERA MIRROR♦
B
A
Page 8 of 20
8
INFOTAINMENT TOUCH SCREEN AND TOUCH PAD
Refer to your Owner’s Manual for important safety information about using the infotainment system while driving.
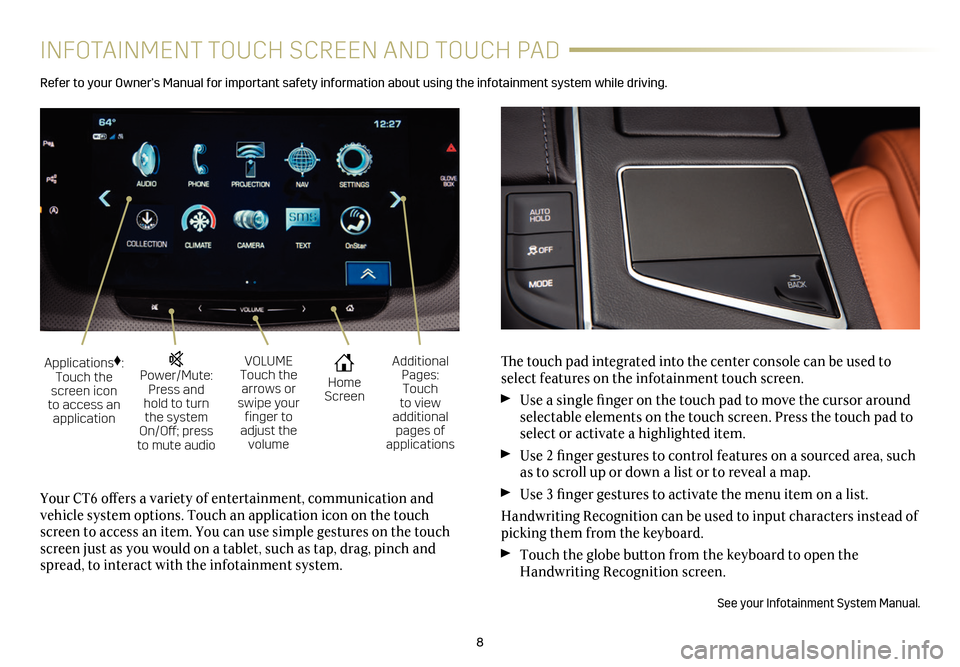
The touch pad integrated into the center console can be used to select features on the infotainment touch screen.
Use a single finger on the touch pad to move the cursor around selectable elements on the touch screen. Press the touch pad to select or activate a highlighted item.
Use 2 finger gestures to control features on a sourced area, such as to scroll up or down a list or to reveal a map.
Use 3 finger gestures to activate the menu item on a list.
Handwriting Recognition can be used to input characters instead of picking them from the keyboard.
Touch the globe button from the keyboard to open the Handwriting Recognition screen.
See your Infotainment System Manual.
Your CT6 offers a variety of entertainment, communication and vehicle system options. Touch an application icon on the touch screen to access an item. You can use simple gestures on the touch screen just as you would on a tablet, such as tap, drag, pinch and spread, to interact with the infotainment system.
Power/Mute: Press and hold to turn the system On/Off; press to mute audio
Applications♦: Touch the screen icon to access an application
VOLUME Touch the arrows or swipe your finger to adjust the volume
Home Screen
Additional Pages: Touch to view additional pages of applications
Page 15 of 20
15
EXTERIOR LIGHTINGWINDSHIELD WIPERS
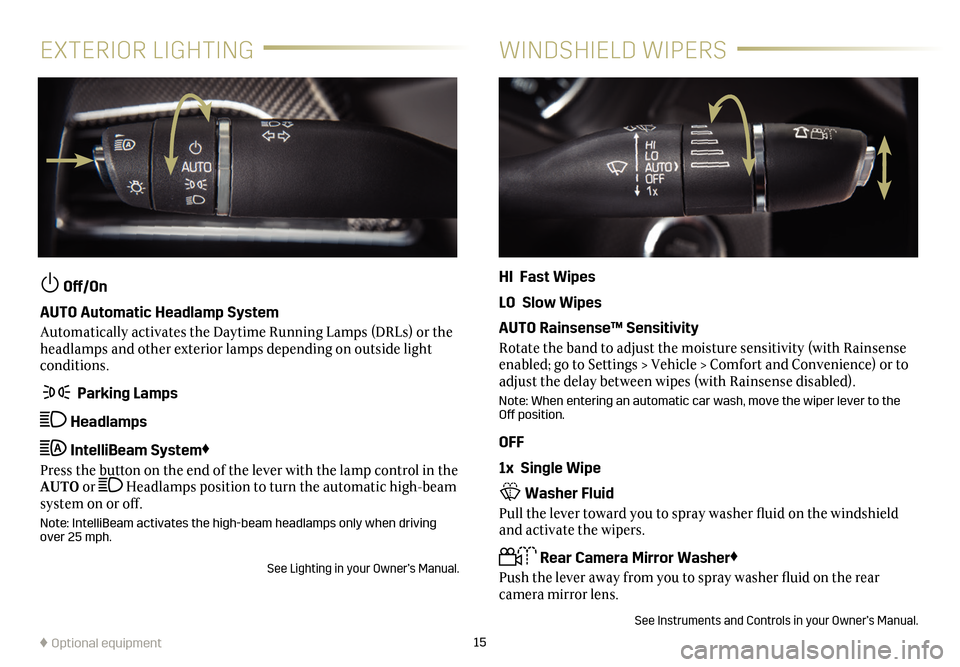
Off/On
AUTO Automatic Headlamp System
Automatically activates the Daytime Running Lamps (DRLs) or the headlamps and other exterior lamps depending on outside light conditions.
Parking Lamps
Headlamps
IntelliBeam System♦
Press the button on the end of the lever with the lamp control in the AUTO or Headlamps position to turn the automatic high-beam system on or off.
Note: IntelliBeam activates the high-beam headlamps only when driving over 25 mph.
See Lighting in your Owner’s Manual.
HI Fast Wipes
LO Slow Wipes
AUTO Rainsense™ Sensitivity
Rotate the band to adjust the moisture sensitivity (with Rainsense enabled; go to Settings > Vehicle > Comfort and Convenience) or to adjust the delay between wipes (with Rainsense disabled).
Note: When entering an automatic car wash, move the wiper lever to the Off position.
OFF
1x Single Wipe
Washer Fluid
Pull the lever toward you to spray washer fluid on the windshield and activate the wipers.
Rear Camera Mirror Washer♦
Push the lever away from you to spray washer fluid on the rear
camera mirror lens.
See Instruments and Controls in your Owner’s Manual.
♦ Optional equipment
Page 18 of 20
18
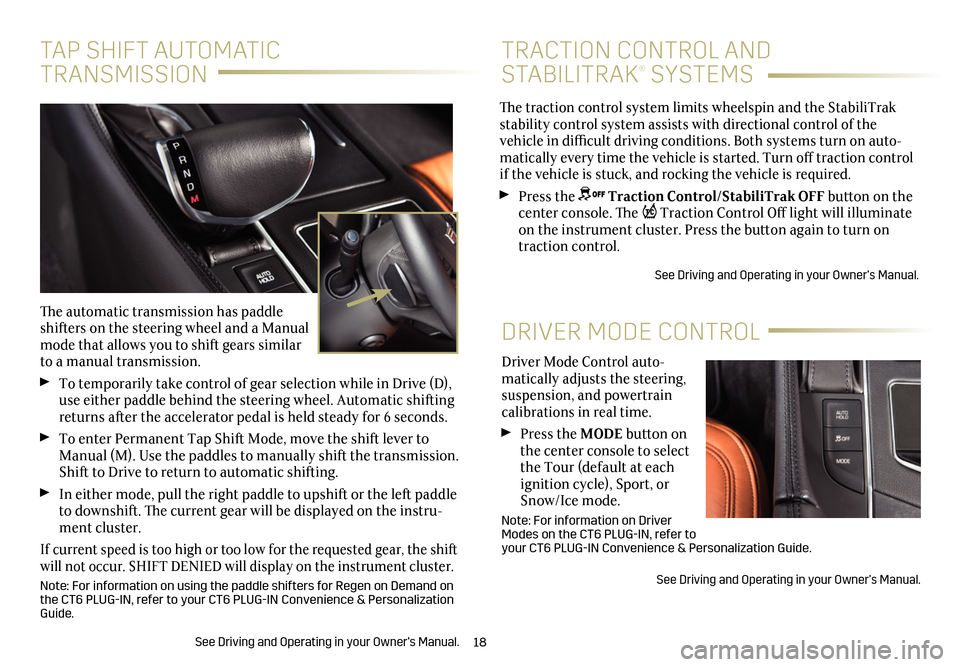
Driver Mode Control auto-matically adjusts the steering, suspension, and powertrain calibrations in real time.
Press the MODE button on the center console to select the Tour (default at each ignition cycle), Sport, or Snow/Ice mode.
Note: For information on Driver Modes on the CT6 PLUG-IN, refer to your CT6 PLUG-IN Convenience & Personalization Guide.
See Driving and Operating in your Owner’s Manual.
DRIVER MODE CONTROL
The traction control system limits wheelspin and the StabiliTrak stability control system assists with directional control of the vehicle in difficult driving conditions. Both systems turn on auto-matically every time the vehicle is started. Turn off traction control if the vehicle is stuck, and rocking the vehicle is required.
Press the Traction Control/StabiliTrak OFF button on the center console. The Traction Control Off light will illuminate on the instrument cluster. Press the button again to turn on traction control.
See Driving and Operating in your Owner’s Manual.
TRACTION CONTROL AND
STABILITRAK® SYSTEMS
TAP SHIFT AUTOMATIC
TRANSMISSION
The automatic transmission has paddle shifters on the steering wheel and a Manual mode that allows you to shift gears similar to a manual transmission.
To temporarily take control of gear selection while in Drive (D), use either paddle behind the steering wheel. Automatic shifting returns after the accelerator pedal is held steady for 6 seconds.
To enter Permanent Tap Shift Mode, move the shift lever to Manual (M). Use the paddles to manually shift the transmission. Shift to Drive to return to automatic shifting.
In either mode, pull the right paddle to upshift or the left paddle to downshift. The current gear will be displayed on the instru-ment cluster.
If current speed is too high or too low for the requested gear, the shift will not occur. SHIFT DENIED will display on the instrument cluster.
Note: For information on using the paddle shifters for Regen on Demand on the CT6 PLUG-IN, refer to your CT6 PLUG-IN Convenience & Personalization Guide.
See Driving and Operating in your Owner’s Manual.
Page 19 of 20
19
HOOD RELEASE
TIRE PRESSURE MONITOR
To open the hood, pull and release the hood release handle on the lower-left side of the instrument panel. Pull and release the handle again to fully open the hood. There is not a secondary latch under the hood.
See Vehicle Care in your Owner’s Manual.
The Low Tire Pressure warning light on the instrument cluster illuminates when one or more of the vehicle’s tires is
significantly underinflated. Fill the tires to the proper tire
pressures. The proper tire pressures for the vehicle are listed on the Tire and Loading Information label, located below the driver’s door latch. Current tire pressures can be viewed in the Driver Information Center.
Refer to your Owner’s Manual for additional information about normal
monthly tire maintenance.
See Vehicle Care in your Owner’s Manual.
Automatic Vehicle Hold will hold the vehicle stationary after the brake pedal has been released and until the accelerator pedal is pressed. The indicator illuminates in green on the instrument
cluster when the system is holding the vehicle.
To turn the system on or off, press the AUTO HOLD button on the center console with the driver’s safety belt fastened, the driver’s door closed and the engine on.
See Driving and Operating in your Owner’s Manual.
AUTOMATIC VEHICLE HOLD♦
♦ Optional equipment
ULTRAVIEW SUNROOF♦
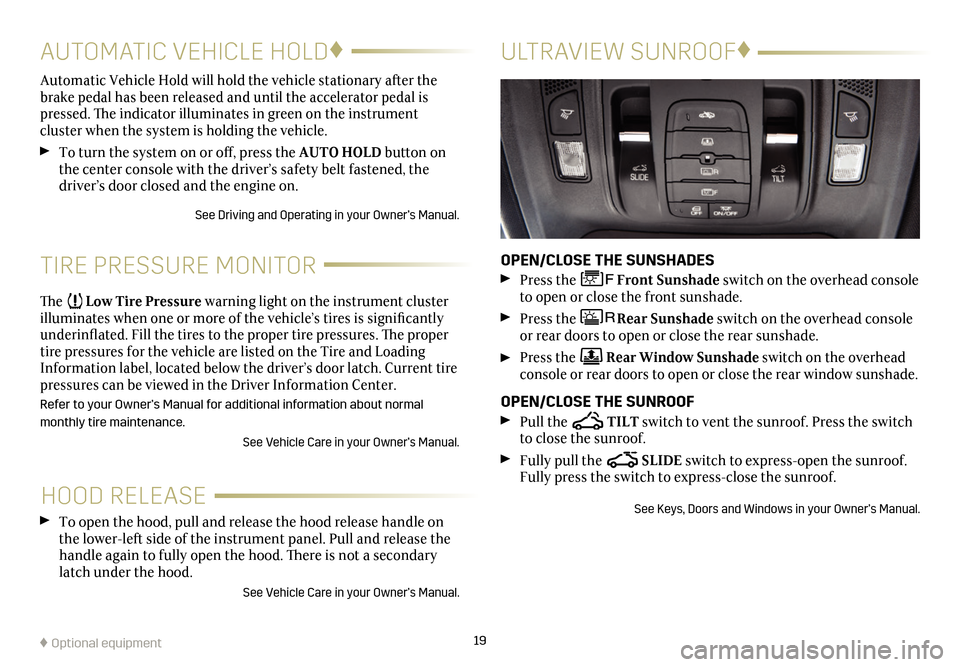
OPEN/CLOSE THE SUNSHADES
Press the Front Sunshade switch on the overhead console to open or close the front sunshade.
Press the Rear Sunshade switch on the overhead console or rear doors to open or close the rear sunshade.
Press the Rear Window Sunshade switch on the overhead console or rear doors to open or close the rear window sunshade.
OPEN/CLOSE THE SUNROOF
Pull the TILT switch to vent the sunroof. Press the switch to close the sunroof.
Fully pull the SLIDE switch to express-open the sunroof. Fully press the switch to express-close the sunroof.
See Keys, Doors and Windows in your Owner’s Manual.