ECO mode CADILLAC CT6 2019 Owner's Manual
[x] Cancel search | Manufacturer: CADILLAC, Model Year: 2019, Model line: CT6, Model: CADILLAC CT6 2019Pages: 438, PDF Size: 7.6 MB
Page 3 of 438
Cadillac CT6 Owner Manual (GMNA-Localizing-U.S./Canada-12533370) -
2019 - crc - 1/23/19
2 INTRODUCTION
Introduction
The names, logos, emblems, slogans,
vehicle model names, and vehicle
body designs appearing in this manual
including, but not limited to, GM, the
GM logo, CADILLAC, the CADILLAC
Emblem, and CT6are trademarks and/
or service marks of General Motors
LLC, its subsidiaries, affiliates,
or licensors.
For vehicles first sold in Canada,
substitute the name “General Motors
of Canada Company ”for Cadillac
Motor Car Division wherever it
appears in this manual. This manual describes features that
may or may not be on the vehicle
because of optional equipment that
was not purchased on the vehicle,
model variants, country specifications,
features/applications that may not be
available in your region, or changes
subsequent to the printing of this
owner’s manual.
Refer to the purchase documentation
relating to your specific vehicle to
confirm the features.
Keep this manual in the vehicle for
quick reference.
Canadian Vehicle Owners
A French language manual can be
obtained from your dealer, at
www.helminc.com, or from:
Propriétaires Canadiens
On peut obtenir un exemplaire de ce
guide en français auprès du
concessionnaire ou à l'adresse
suivante:Helm, Incorporated
Attention: Customer Service
47911 Halyard Drive
Plymouth, MI 48170
USA
Using this Manual
To quickly locate information about
the vehicle, use the Index in the back
of the manual. It is an alphabetical
list of what is in the manual and the
page number where it can be found.
Danger, Warning, and
Caution
Warning messages found on vehicle
labels and in this manual describe
hazards and what to do to avoid or
reduce them.
{Danger
Danger indicates a hazard with a
high level of risk which will result
in serious injury or death.
Litho in U.S.A.
Part No. 84714566 B Second Printing©2019 General Motors LLC. All Rights Reserved.
Page 20 of 438
Cadillac CT6 Owner Manual (GMNA-Localizing-U.S./Canada-12533370) -
2019 - crc - 1/23/19
IN BRIEF 19
SeeAutomatic Climate Control System
(Dual Zone) 0175 or
Automatic Climate Control System
(Quad Zone) 0180.
Transmission
Tap Shift
If equipped, Tap Shift allows you to
shift an automatic transmission
similar to a manual transmission. To
use the Tap Shift feature:
1. When in D (Drive), pull back on the shift lever to enter
M (Manual Mode).
2. Use Tap Shift to manually shift the automatic transmission.
3. To exit, pull back on the shift lever a second time.
See Manual Mode 0215.
Vehicle Features
Infotainment System
See the infotainment manual for
information on the radio, audio
players, phone, and voice or speech
recognition. It also includes
information on settings.
Steering Wheel Controls
The infotainment system can be
operated by using the steering wheel
controls. See “Steering Wheel
Controls ”in the infotainment manual.
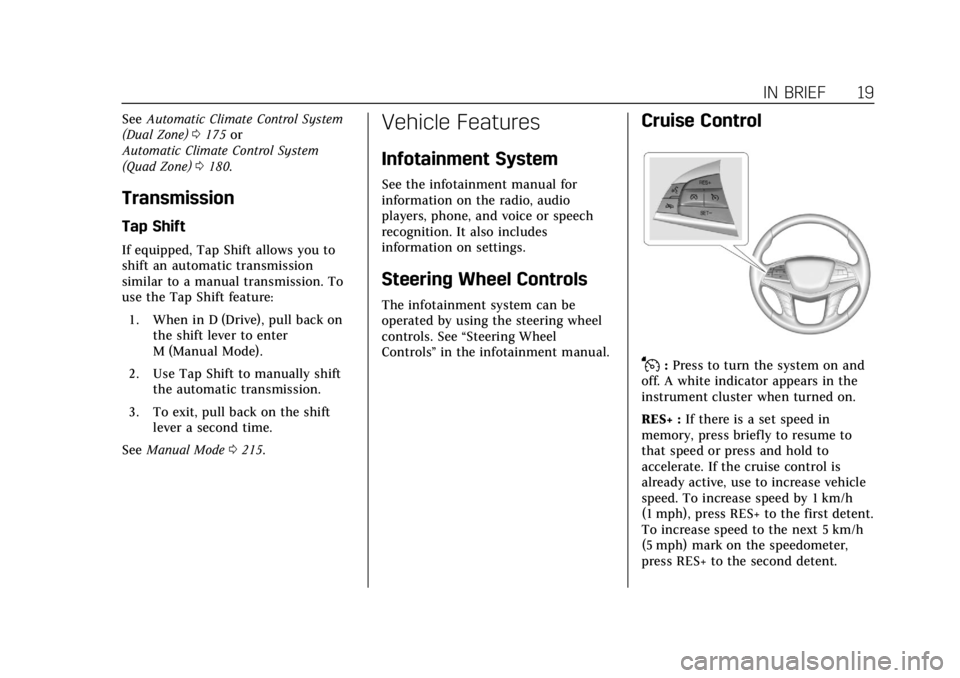
Cruise Control
J:Press to turn the system on and
off. A white indicator appears in the
instrument cluster when turned on.
RES+ : If there is a set speed in
memory, press briefly to resume to
that speed or press and hold to
accelerate. If the cruise control is
already active, use to increase vehicle
speed. To increase speed by 1 km/h
(1 mph), press RES+ to the first detent.
To increase speed to the next 5 km/h
(5 mph) mark on the speedometer,
press RES+ to the second detent.
Page 25 of 438
Cadillac CT6 Owner Manual (GMNA-Localizing-U.S./Canada-12533370) -
2019 - crc - 1/23/19
24 IN BRIEF
Sunroof
If equipped with a sunroof, the
ignition must be on or in ACC/
ACCESSORY, or Retained Accessory
Power (RAP) must be active, to
operate the sunroof. SeeIgnition
Positions 0201 and
Retained Accessory Power (RAP) 0206.
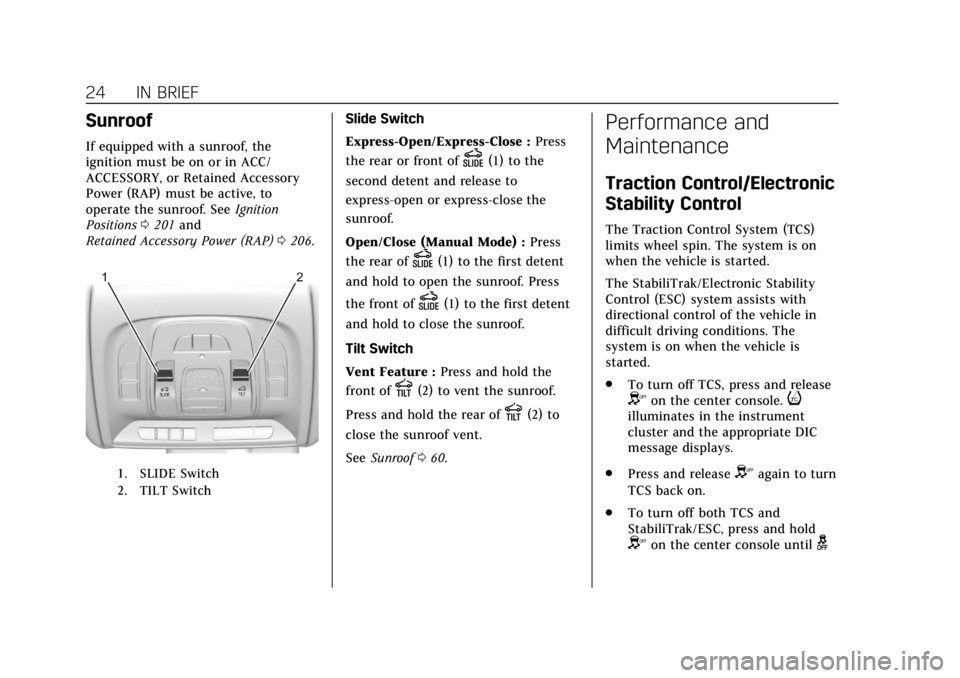
1. SLIDE Switch
2. TILT Switch
Slide Switch
Express-Open/Express-Close : Press
the rear or front of
D(1) to the
second detent and release to
express-open or express-close the
sunroof.
Open/Close (Manual Mode) : Press
the rear of
D(1) to the first detent
and hold to open the sunroof. Press
the front of
D(1) to the first detent
and hold to close the sunroof.
Tilt Switch
Vent Feature : Press and hold the
front of
E(2) to vent the sunroof.
Press and hold the rear of
E(2) to
close the sunroof vent.
See Sunroof 060.
Performance and
Maintenance
Traction Control/Electronic
Stability Control
The Traction Control System (TCS)
limits wheel spin. The system is on
when the vehicle is started.
The StabiliTrak/Electronic Stability
Control (ESC) system assists with
directional control of the vehicle in
difficult driving conditions. The
system is on when the vehicle is
started.
.
To turn off TCS, press and release
Yon the center console.iilluminates in the instrument
cluster and the appropriate DIC
message displays.
. Press and release
Yagain to turn
TCS back on.
. To turn off both TCS and
StabiliTrak/ESC, press and hold
Yon the center console untilg
Page 26 of 438

Cadillac CT6 Owner Manual (GMNA-Localizing-U.S./Canada-12533370) -
2019 - crc - 1/23/19
IN BRIEF 25
andiilluminate in the
instrument cluster. The
appropriate DIC message displays.
. Press and release
Yagain to turn
on both systems.
See Traction Control/Electronic Stability
Control 0220.
The vehicle has Driver Mode Control.
See Driver Mode Control 0222.
Tire Pressure Monitor
This vehicle may have a Tire Pressure
Monitor System (TPMS).
The low tire pressure warning light
alerts to a significant loss in pressure
of one of the vehicle's tires. If the
warning light comes on, stop as soon
as possible and inflate the tires to the
recommended pressure shown on the
Tire and Loading Information label. See
Vehicle Load Limits 0197. The
warning light will remain on until the
tire pressure is corrected.
The low tire pressure warning light
may come on in cool weather when
the vehicle is first started, and then
turn off as the vehicle is driven. This
may be an early indicator that the tire
pressures are getting low and the tires
need to be inflated to the proper
pressure.
The TPMS does not replace normal
monthly tire maintenance. Maintain
the correct tire pressures.
See Tire Pressure Monitor System
0 348.
Tire Fill Alert (If Equipped)
This feature provides visual and
audible alerts outside the vehicle to
help when inflating an underinflated
tire to the recommended cold tire
pressure. See “Tire Fill Alert (If
Equipped)” underTire Pressure Monitor
Operation 0349.
Fuel (2.0L L4 Turbo Engine)
Premium Recommended
Use premium 93 octane —(R+M)/2 —
unleaded gasoline in your vehicle. TOP
TIER Detergent Gasoline is
recommended. Unleaded gasoline with
an octane rating as low as 87 may be
used, but it will reduce performance
and fuel economy. See Recommended
Fuel (2.0L L4 Turbo Engine) 0277 or
Recommended Fuel (3.0L Twin Turbo
V6 and 4.2L Twin Turbo V8 Engines)
0 277 or
Recommended Fuel (3.6L V6 Engine)
0 277.
Page 34 of 438

Cadillac CT6 Owner Manual (GMNA-Localizing-U.S./Canada-12533370) -
2019 - crc - 1/23/19
KEYS, DOORS, AND WINDOWS 33
Key Access
To access a vehicle with a weak
transmitter battery, seeDoor Locks
0 38.
Programming Transmitters to
the Vehicle
Only RKE transmitters programmed to
the vehicle will work. If a transmitter
is lost or stolen, a replacement can be
purchased and programmed through
your dealer. The vehicle can be
reprogrammed so that lost or stolen
transmitters no longer work. Each
vehicle can have up to eight
transmitters matched to it.
Programming with Recognized
Transmitters
A new transmitter can be programmed
to the vehicle when there are two
recognized transmitters.
To program, the vehicle must be off
and all transmitters, both currently
recognized and new, must be
with you.
1. Remove the vehicle key from the recognized transmitter. 2. Place the two recognized
transmitters in the cupholder.
3. Remove the key lock cylinder cap on the driver door handle. See
Door Locks 038. Insert the
vehicle key into the key lock
cylinder on the driver door
handle, then turn the key
counterclockwise to the unlock
position five times within
10 seconds.
The DIC displays READY FOR
REMOTE #2, 3, 4, ETC.
4. Place the new transmitter into the transmitter pocket. The
center console storage area will
need to be opened.
5. Press ENGINE START/STOP. When the transmitter is learned,
the DIC display will show that it
is ready to program the next
transmitter.
6. Remove the transmitter from the transmitter pocket and press
K
orQon the transmitter.
To program additional
transmitters, repeat Steps 4–6.
When all additional transmitters
are programmed, press and hold
ENGINE START/STOP for
approximately 12 seconds to exit
programming mode.
7. Put the vehicle key back into the transmitter.
8. Replace the key lock cylinder cap. See Door Locks 038.
Page 36 of 438

Cadillac CT6 Owner Manual (GMNA-Localizing-U.S./Canada-12533370) -
2019 - crc - 1/23/19
KEYS, DOORS, AND WINDOWS 35
When all additional transmitters
are programmed, press and hold
ENGINE START/STOP for
approximately 12 seconds to exit
programming mode.
8. Put the vehicle key back into the transmitter.
9. Replace the key lock cylinder cap. See Door Locks 038.
Starting the Vehicle with a Low
Transmitter Battery
If the transmitter battery is weak or if
there is interference with the signal,
the DIC may display NO REMOTE
DETECTED or NO REMOTE KEY WAS
DETECTED PLACE KEY IN
TRANSMITTER POCKET THEN
START YOUR VEHICLE when starting
the vehicle.
To start the vehicle:
1. Open the center console storage area.2. Place the transmitter in thetransmitter pocket.
3. With the vehicle in P (Park) or N (Neutral) press the brake pedal
and ENGINE START/STOP.
Replace the transmitter battery
as soon as possible.
Battery Replacement
Caution
When replacing the battery, do not
touch any of the circuitry on the
transmitter. Static from your body
could damage the transmitter. Replace the battery if the DIC displays
REPLACE BATTERY IN REMOTE KEY.
1. Press the button on the side of
the RKE transmitter near the
bottom and pull the key out.
Never pull the key out without
pressing the button.
Page 38 of 438
Cadillac CT6 Owner Manual (GMNA-Localizing-U.S./Canada-12533370) -
2019 - crc - 1/23/19
KEYS, DOORS, AND WINDOWS 37
The RKE transmitter range may be
shorter while the vehicle is running.
Other conditions can affect the
performance of the transmitter. See
Remote Keyless Entry (RKE) System
029.
Starting the Engine Using Remote
Start
1. Press and release
Qon the RKE
transmitter.
2. Immediately press and hold
/
for at least four seconds or until
the turn signal lamps flash. This
confirms the request to remote
start the vehicle has been
received.
During the remote start, the
doors will be locked and the
parking lamps will remain on as
long as the engine is running.
The engine will shut off after
15 minutes unless a time
extension is done or the vehicle
is started.
3. Press the brake pedal and start the vehicle to drive. Extending Engine Run Time
The engine run time can also be
extended by another 15 minutes,
if during the first 15 minutes
Steps 1 and 2 are repeated while the
engine is still running. An extension
can be requested 30 seconds after
starting. This provides a total of
30 minutes.
The remote start can only be
extended once.
When the remote start is extended,
the second 15-minute period is added
on to the first 15 minutes for a total
of 30 minutes.
A maximum of two remote starts, or a
remote start with an extension, are
allowed between ignition cycles.
The vehicle's ignition must be turned
from on to off before the remote start
procedure can be used again.
Canceling a Remote Start
To cancel a remote start, do any of
the following:
.
Press and hold
/until the
parking lamps turn off. .
Turn on the hazard warning
flashers.
. Turn the vehicle on and then off.
Conditions in Which Remote Start
Will Not Work
The remote start will not operate if
any of the following occur:
. The ignition is in any mode other
than off.
. A transmitter is in the vehicle.
. The hood is not closed.
. The hazard warning flashers
are on.
. There is an emission control
system malfunction.
. The engine coolant temperature is
too high.
. The oil pressure is low.
. Two remote vehicle starts or a
start with an extension have
already been used.
. The vehicle is not in P (Park).
Page 57 of 438
Cadillac CT6 Owner Manual (GMNA-Localizing-U.S./Canada-12533370) -
2019 - crc - 1/23/19
56 KEYS, DOORS, AND WINDOWS
Troubleshooting
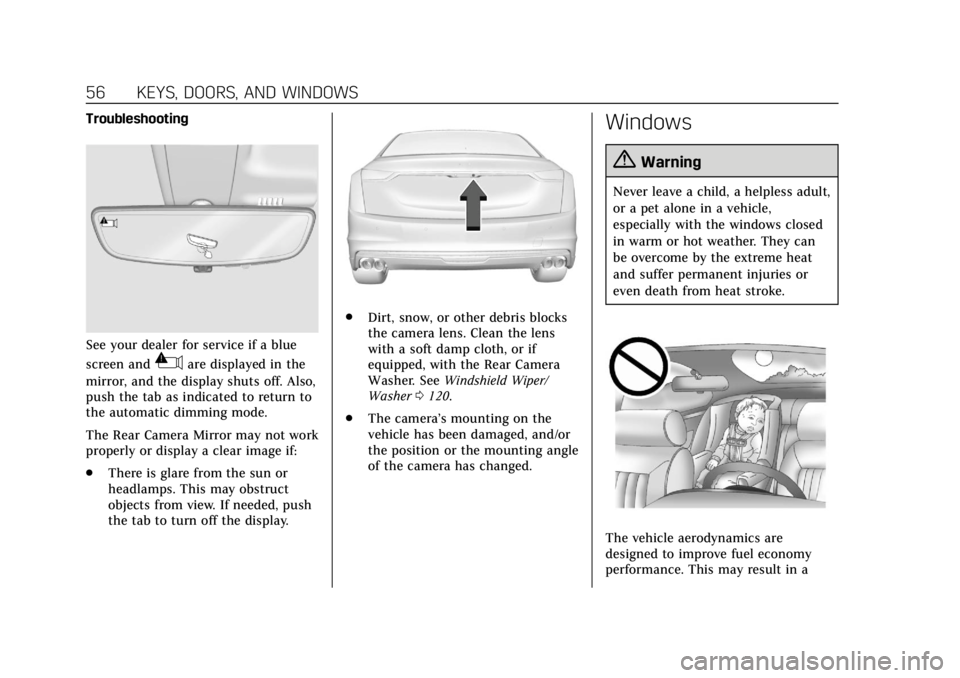
See your dealer for service if a blue
screen and
3are displayed in the
mirror, and the display shuts off. Also,
push the tab as indicated to return to
the automatic dimming mode.
The Rear Camera Mirror may not work
properly or display a clear image if:
. There is glare from the sun or
headlamps. This may obstruct
objects from view. If needed, push
the tab to turn off the display.
.
Dirt, snow, or other debris blocks
the camera lens. Clean the lens
with a soft damp cloth, or if
equipped, with the Rear Camera
Washer. See Windshield Wiper/
Washer 0120.
. The camera’s mounting on the
vehicle has been damaged, and/or
the position or the mounting angle
of the camera has changed.
Windows
{Warning
Never leave a child, a helpless adult,
or a pet alone in a vehicle,
especially with the windows closed
in warm or hot weather. They can
be overcome by the extreme heat
and suffer permanent injuries or
even death from heat stroke.
The vehicle aerodynamics are
designed to improve fuel economy
performance. This may result in a
Page 61 of 438
Cadillac CT6 Owner Manual (GMNA-Localizing-U.S./Canada-12533370) -
2019 - crc - 1/23/19
60 KEYS, DOORS, AND WINDOWS
Roof
Sunroof
If equipped with a sunroof, the
ignition must be on or in ACC/
ACCESSORY, or Retained Accessory
Power (RAP) must be active, to
operate the sunroof. SeeIgnition
Positions 0201 and
Retained Accessory Power (RAP) 0206.
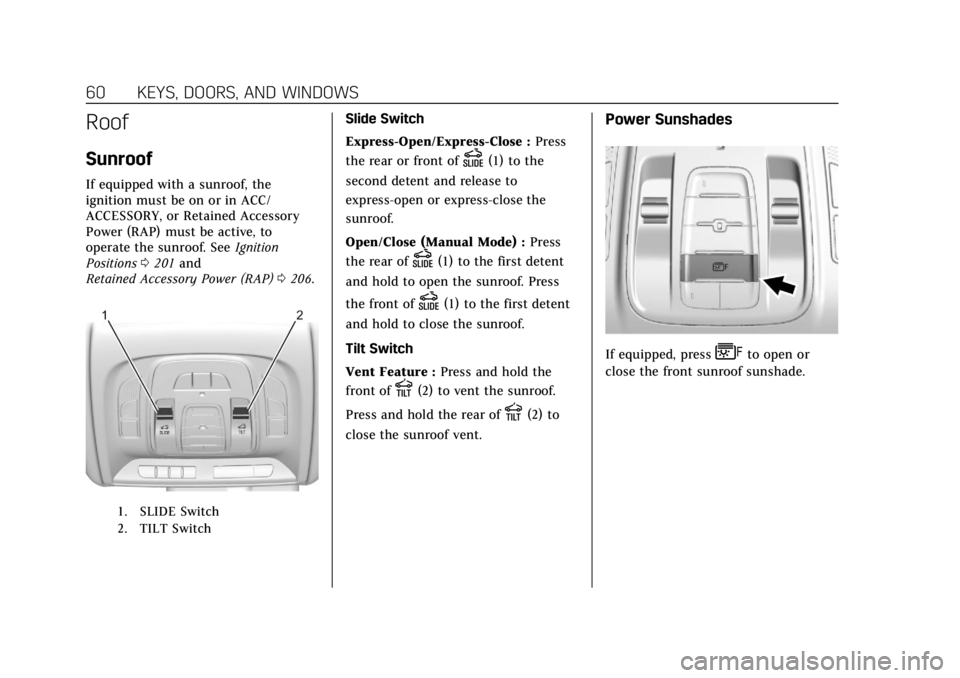
1. SLIDE Switch
2. TILT Switch
Slide Switch
Express-Open/Express-Close : Press
the rear or front of
D(1) to the
second detent and release to
express-open or express-close the
sunroof.
Open/Close (Manual Mode) : Press
the rear of
D(1) to the first detent
and hold to open the sunroof. Press
the front of
D(1) to the first detent
and hold to close the sunroof.
Tilt Switch
Vent Feature : Press and hold the
front of
E(2) to vent the sunroof.
Press and hold the rear of
E(2) to
close the sunroof vent.
Power Sunshades
If equipped, pressFto open or
close the front sunroof sunshade.
Page 89 of 438

Cadillac CT6 Owner Manual (GMNA-Localizing-U.S./Canada-12533370) -
2019 - crc - 1/23/19
88 SEATS AND RESTRAINTS
Both roof-rail airbags will inflate when
either side of the vehicle is struck,
if the sensing system predicts that the
vehicle is about to roll over on its
side, or in a severe frontal impact.
In any particular crash, no one can
say whether an airbag should have
inflated simply because of the vehicle
damage or repair costs.
What Makes an Airbag
Inflate?
In a deployment event, the sensing
system sends an electrical signal
triggering a release of gas from the
inflator. Gas from the inflator fills the
airbag causing the bag to break out of
the cover. The inflator, the airbag, and
related hardware are all part of the
airbag module.
For airbag locations, seeWhere Are the
Airbags? 085.
How Does an Airbag
Restrain?
In moderate to severe frontal or near
frontal collisions, even belted
occupants can contact the steering
wheel or the instrument panel. In
moderate to severe side collisions,
even belted occupants can contact the
inside of the vehicle.
Airbags supplement the protection
provided by seat belts by distributing
the force of the impact more evenly
over the occupant's body.
Rollover capable roof-rail airbags are
designed to help contain the head and
chest of occupants in the outboard
seating positions in the first and
second rows. The rollover capable
roof-rail airbags are designed to help
reduce the risk of full or partial
ejection in rollover events, although
no system can prevent all such
ejections.
But airbags would not help in many
types of collisions, primarily because
the occupant's motion is not toward
those airbags. See When Should an
Airbag Inflate? 087. Airbags should never be regarded as
anything more than a supplement to
seat belts.
What Will You See after an
Airbag Inflates?
After frontal, knee, and seat-mounted
side impact airbags inflate, they
quickly deflate, so quickly that some
people may not even realize the
airbags inflated. Roof-rail airbags may
still be at least partially inflated for
some time after they inflate. Some
components of the airbag module may
be hot for several minutes. For
location of the airbags, see
Where Are
the Airbags? 085.
The parts of the airbag that come into
contact with you may be warm, but
not too hot to touch. There may be
some smoke and dust coming from
the vents in the deflated airbags.
Airbag inflation does not prevent the
driver from seeing out of the
windshield or being able to steer the
vehicle, nor does it prevent people
from leaving the vehicle.