display CADILLAC CT6 2020 User Guide
[x] Cancel search | Manufacturer: CADILLAC, Model Year: 2020, Model line: CT6, Model: CADILLAC CT6 2020Pages: 412, PDF Size: 7.13 MB
Page 50 of 412
Cadillac CT6 Owner Manual (GMNA-Localizing-U.S./Canada-13566829) -
2020 - CRC - 6/11/19
SEATS AND RESTRAINTS 49
If equipped, memory seats allow two
drivers to save and recall their unique
seat positions for driving the vehicle,
and a shared exit position for getting
out of the vehicle. Other feature
positions may also be saved, such as
power mirrors and power steering
wheel, if equipped. Memory positions
are linked to RKE transmitter 1 or 2
for automatic memory recalls.
Before saving, adjust all available
memory feature positions. Turn the
vehicle on and then press and release
SET; a beep will sound. Then
immediately press and hold 1, 2,
or
B(Exit) until two beeps sound.
To manually recall these positions,
press and hold 1, 2, or
Buntil the
saved position is reached. Follow the
instructions under “Saving Memory
Positions.”
The vehicle identifies the current
driver’s RKE transmitter number
(1–8). See Remote Keyless Entry (RKE)
System Operation 010. Only RKE
transmitters 1 and 2 can be used for
automatic memory recalls. A Driver
Information Center (DIC) welcome
message indicating the transmitter number may display for the first few
ignition cycles following a transmitter
change. For Seat Entry Memory to
work properly, save the positions to
the memory button (1 or 2) matching
the RKE transmitter number displayed
in the DIC welcome message. Carry
the linked RKE transmitter when
entering the vehicle.
Vehicle Personalization Settings
.
To have the Seat Entry Memory
movement begin when the vehicle
is started, select the Settings
menu, then Vehicle, then Seating
Position, and then Seat Entry
Memory. Select On or Off. See
“Seat Entry Memory” later in this
section.
. To begin Seat Exit Memory
movement when the vehicle is
turned off and the driver door is
opened, or when the vehicle is
turned off with the driver door
already opened, select the Settings
menu, then Vehicle, then Seating
Position, and then Seat Exit
Memory. Select On or Off. See
“Seat Exit Memory” later in this
section. .
See Vehicle Personalization 0140
for additional setting information.
Identifying Driver Number
To identify the driver number: 1. Move your RKE transmitter away from the vehicle.
2. Start the vehicle with another key or RKE transmitter. The DIC
should display the driver number
for the other RKE transmitter.
Turn the vehicle off and remove
the key or RKE transmitter from
the vehicle.
3. Start the vehicle with the initial key or RKE transmitter. The DIC
should display the driver number
of your RKE transmitter.
Saving Memory Positions
Read these instructions completely
before saving memory positions.
To save preferred driving positions
1 and 2: 1. Turn the vehicle on or to ACC/ ACCESSORY.
Page 54 of 412
Cadillac CT6 Owner Manual (GMNA-Localizing-U.S./Canada-13566829) -
2020 - CRC - 6/11/19
SEATS AND RESTRAINTS 53
and heated steering wheel indicator
may not come on during this
operation.
The heated and ventilated seats and
heated steering wheel may cancel
when the vehicle is started. These
features can be manually selected
after the ignition is turned on.
The temperature performance of an
unoccupied seat may be reduced. This
is normal.
The heated or ventilated seats will not
turn on during a remote start unless
they are enabled in the vehicle
personalization menu. SeeRemote
Vehicle Start 017 and
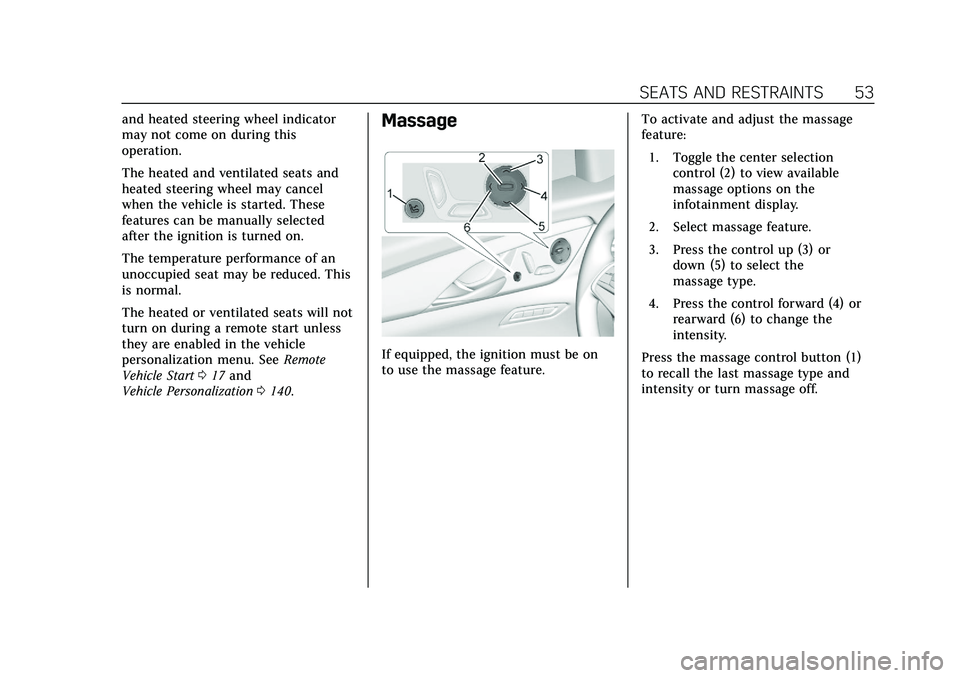
Vehicle Personalization 0140.Massage
If equipped, the ignition must be on
to use the massage feature. To activate and adjust the massage
feature:
1. Toggle the center selection control (2) to view available
massage options on the
infotainment display.
2. Select massage feature.
3. Press the control up (3) or down (5) to select the
massage type.
4. Press the control forward (4) or rearward (6) to change the
intensity.
Press the massage control button (1)
to recall the last massage type and
intensity or turn massage off.
Page 55 of 412

Cadillac CT6 Owner Manual (GMNA-Localizing-U.S./Canada-13566829) -
2020 - CRC - 6/11/19
54 SEATS AND RESTRAINTS
Rear Seats
Rear Seat Reminder
If equipped, the message REAR SEAT
REMINDER LOOK IN REAR SEAT
displays under certain conditions
indicating there may be an item or
passenger in the rear seat. Check
before exiting the vehicle.
This feature will activate when a
second row door is opened while the
vehicle is on or up to 10 minutes
before the vehicle is turned on. There
will be an alert when the vehicle is
turned off. The alert does not directly
detect objects in the rear seat; instead,
under certain conditions, it detects
when a rear door is opened and
closed, indicating that there may be
something in the rear seat.
The feature is active only once each
time the vehicle is turned on and off,
and will require reactivation by
opening and closing the second row
doors. There may be an alert even
when there is nothing in the rear seat;
for example, if a child entered thevehicle through the rear door and left
the vehicle without the vehicle being
shut off.
The feature can be turned on or off.
See
Vehicle Personalization 0140.
Rear Seat Adjustment
Caution
Do not adjust the power seat when
a child restraint is installed.
Adjusting the seat may cause
damage to the installed child
restraint. Use the window lockout
button on the driver door to
prevent adjustment of the seat
whenever a child restraint is
installed.
If equipped, the armrest may have
seat adjustment controls. The rear
seat adjustment controls are locked
when the window lockout switch is
engaged. See Armrest Storage 099.
1. Seatback Display and Lumbar
Adjustment Control
2. Up
3. Rearward
4. Down
5. Forward
6. Power Seat Adjustment
7. Power Seat Adjustment
8. Massage
When the seatback display control (1)
is toggled, a panel display will be
activated from the driver or passenger
seatback. The rear seatback will
automatically recline when the rear
seat is moved forward.
Page 56 of 412
Cadillac CT6 Owner Manual (GMNA-Localizing-U.S./Canada-13566829) -
2020 - CRC - 6/11/19
SEATS AND RESTRAINTS 55
To adjust the seat, if equipped:
.Move the seat forward or rearward
by sliding the control (6) forward
or rearward or by tilting the
control (7) forward or rearward.
. Raise or lower the front part of the
seat cushion by moving the front
of the control (6) up or down.
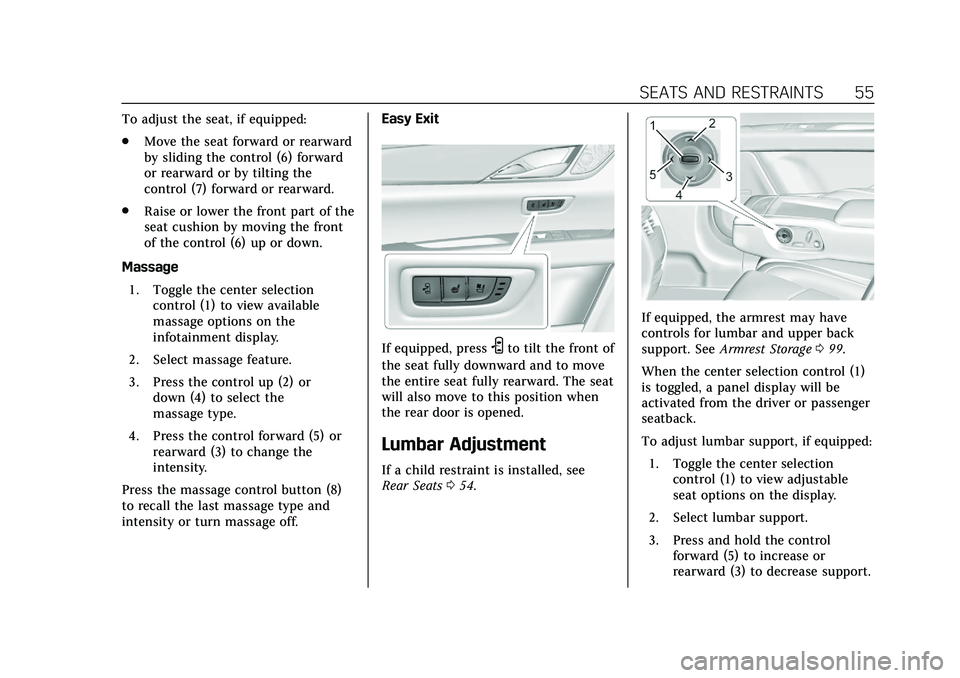
Massage 1. Toggle the center selection control (1) to view available
massage options on the
infotainment display.
2. Select massage feature.
3. Press the control up (2) or down (4) to select the
massage type.
4. Press the control forward (5) or rearward (3) to change the
intensity.
Press the massage control button (8)
to recall the last massage type and
intensity or turn massage off. Easy Exit
If equipped, pressSto tilt the front of
the seat fully downward and to move
the entire seat fully rearward. The seat
will also move to this position when
the rear door is opened.
Lumbar Adjustment
If a child restraint is installed, see
Rear Seats 054.
If equipped, the armrest may have
controls for lumbar and upper back
support. See Armrest Storage 099.
When the center selection control (1)
is toggled, a panel display will be
activated from the driver or passenger
seatback.
To adjust lumbar support, if equipped: 1. Toggle the center selection control (1) to view adjustable
seat options on the display.
2. Select lumbar support.
3. Press and hold the control forward (5) to increase or
rearward (3) to decrease support.
Page 57 of 412

Cadillac CT6 Owner Manual (GMNA-Localizing-U.S./Canada-13566829) -
2020 - CRC - 6/11/19
56 SEATS AND RESTRAINTS
4. Press and hold the controlupward (2) to raise or
downward (4) to lower the height
of the support.
To adjust upper back support,
if equipped: 1. Toggle the center selection control (1) to view adjustable
seat options on the display.
2. Select upper back support.
3. Press and hold the control forward (5) to increase or
rearward (3) to decrease support.
Heated and Ventilated
Rear Seats
{Warning
If temperature change or pain to
the skin cannot be felt, the seat
heater may cause burns. See the
Warning under Heated and
Ventilated Front Seats 051.
Platinum Seat
If equipped, the buttons are on the
rear passenger doors. To operate, the
engine must be running.
Press
Cor{to ventilate the left or
right outboard seat.
Press
MorL, if equipped, to heat the
left or right outboard seat
cushion only.
Press
Ior+, if equipped, to heat
the left or right outboard
seatback only. Press
Jorz, if equipped, to heat the
left or right outboard seat cushion and
seatback.
On vehicles without rear climate
controls, an indicator light on the
button will turn on when the heated
or ventilated seat is on. On vehicles
with rear climate controls, an
indicator on the climate control
display appears when this feature
is on.
On vehicles without rear climate
controls, press the button again to
turn this feature off. The light on the
button will turn off. On vehicles with
rear climate controls, this feature
turns on the heated seat at the
highest setting. With each press of the
button, the heated seat changes to the
next lower setting, and then the off
setting. Three lights indicate the
highest setting, and one light
indicates the lowest. If the heated
seats are on high, the level may
automatically be lowered after
approximately 30 minutes.
Page 64 of 412

Cadillac CT6 Owner Manual (GMNA-Localizing-U.S./Canada-13566829) -
2020 - CRC - 6/11/19
SEATS AND RESTRAINTS 63
Automatic Seat Belt Tightening
System, a message displays on the
Driver Information Center (DIC). If a
system unavailable message displays
repeatedly or a service message
displays, see your dealer. Other seat
belt functions are not affected by the
Automatic Seat Belt Tightening
System.
Seat Belt Pretensioners
This vehicle has seat belt
pretensioners for the front outboard
occupants. Although the seat belt
pretensioners cannot be seen, they are
part of the seat belt assembly. They
can help tighten the seat belts during
the early stages of a moderate to
severe frontal, near frontal, or rear
crash if the threshold conditions for
pretensioner activation are met. Seat
belt pretensioners can also help
tighten the seat belts in a side crash
or a rollover event.
Pretensioners work only once. If the
pretensioners activate in a crash, the
pretensioners and probably other
parts of the vehicle's seat belt systemwill need to be replaced. See
Replacing
Seat Belt System Parts after a Crash
0 65.
Do not sit on the outboard seat belt
while entering or exiting the vehicle or
at any time while sitting in the seat.
Sitting on the seat belt can damage
the webbing and hardware.
Rear Seat Belt Comfort Guides
Rear seat belt comfort guides may
provide added seat belt comfort for
older children who have outgrown
booster seats and for some adults.
When installed on a shoulder belt, the
comfort guide positions the shoulder
belt away from the neck and head.
Comfort guides are available through
your dealer for the rear outboard
seating positions. Instructions are
included with the guides.
Seat Belt Use During
Pregnancy
Seat belts work for everyone,
including pregnant women. Like all
occupants, they are more likely to be
seriously injured if they do not wear
seat belts.
A pregnant woman should wear a
lap-shoulder belt, and the lap portion
should be worn as low as possible,
below the rounding, throughout the
pregnancy.
The best way to protect the fetus is to
protect the mother. When a seat belt
is worn properly, it is more likely that
Page 103 of 412
Cadillac CT6 Owner Manual (GMNA-Localizing-U.S./Canada-13566829) -
2020 - CRC - 6/11/19
102 INSTRUMENTS AND CONTROLS
Instruments and
Controls
Controls
Steering Wheel Adjustment . . . . . 103
Steering Wheel Controls . . . . . . . . . 103
Heated Steering Wheel . . . . . . . . . . 103
Horn . . . . . . . . . . . . . . . . . . . . . . . . . . . . . . . 104
Windshield Wiper/Washer . . . . . . . 104
Compass . . . . . . . . . . . . . . . . . . . . . . . . . . 106
Clock . . . . . . . . . . . . . . . . . . . . . . . . . . . . . . 106
Power Outlets . . . . . . . . . . . . . . . . . . . . . 106
Wireless Charging . . . . . . . . . . . . . . . . 107
Warning Lights, Gauges, and
Indicators
Warning Lights, Gauges, andIndicators . . . . . . . . . . . . . . . . . . . . . . . 109
Instrument Cluster (Base Level) . . . . . . . . . . . . . . . . . . . . . . . . . . . . 110
Instrument Cluster (Uplevel) . . . . 113
Speedometer . . . . . . . . . . . . . . . . . . . . . . 115
Odometer . . . . . . . . . . . . . . . . . . . . . . . . . 116
Trip Odometer . . . . . . . . . . . . . . . . . . . . 116
Tachometer . . . . . . . . . . . . . . . . . . . . . . . 116
Fuel Gauge . . . . . . . . . . . . . . . . . . . . . . . . 116 Boost Gauge (Performance
Configuration Only) . . . . . . . . . . . . 117
Engine Oil Pressure Gauge (Base Level Cluster Only) . . . . . . . . . . . . . 117
Engine Oil Temperature Gauge
(Performance
Configuration Only) . . . . . . . . . . . . 118
Engine Coolant Temperature Gauge . . . . . . . . . . . . . . . . . . . . . . . . . . . . 119
Voltmeter Gauge (Base Level Cluster Only) . . . . . . . . . . . . . . . . . . . . 120
Seat Belt Reminders . . . . . . . . . . . . . . 120
Airbag Readiness Light . . . . . . . . . . 121
Passenger Airbag Status Indicator . . . . . . . . . . . . . . . . . . . . . . . . . 121
Charging System Light . . . . . . . . . . . 122
Malfunction Indicator Lamp (Check Engine Light) . . . . . . . . . . . 123
Brake System Warning Light . . . . 125
Electric Parking Brake Light . . . . . 125
Service Electric Parking Brake Light . . . . . . . . . . . . . . . . . . . . . . . . . . . . . 126
Antilock Brake System (ABS) Warning Light . . . . . . . . . . . . . . . . . . 126
Gear Shifting Light . . . . . . . . . . . . . . . 126
Automatic Vehicle Hold (AVH) Light . . . . . . . . . . . . . . . . . . . . . . . . . . . . . 127
Lane Keep Assist (LKA) Light . . . 127
Vehicle Ahead Indicator . . . . . . . . . 127 Pedestrian Ahead Indicator . . . . . . 127
Traction Off Light . . . . . . . . . . . . . . . . 128
StabiliTrak OFF Light . . . . . . . . . . . . 128
Traction Control System (TCS)/
StabiliTrak Light . . . . . . . . . . . . . . . . 128
Engine Coolant Temperature Warning Light . . . . . . . . . . . . . . . . . . 129
Driver Mode Control Light . . . . . . . 129
Tire Pressure Light . . . . . . . . . . . . . . . 129
Engine Oil Pressure Light . . . . . . . . 130
Low Fuel Warning Light . . . . . . . . . 130
Security Light . . . . . . . . . . . . . . . . . . . . . 131
High-Beam On Light . . . . . . . . . . . . . 131
Lamps On Reminder . . . . . . . . . . . . . 131
Cruise Control Light . . . . . . . . . . . . . . 131
Door Ajar Light . . . . . . . . . . . . . . . . . . . 132
Information Displays
Driver Information Center (DIC) . . . . . . . . . . . . . . . . . . . . . 132
Head-Up Display (HUD) . . . . . . . . . 135
Vehicle Messages
Vehicle Messages . . . . . . . . . . . . . . . . . 139
Engine Power Messages . . . . . . . . . . 139
Vehicle Speed Messages . . . . . . . . . 139
Vehicle Personalization
Vehicle Personalization . . . . . . . . . . 140
Page 105 of 412

Cadillac CT6 Owner Manual (GMNA-Localizing-U.S./Canada-13566829) -
2020 - CRC - 6/11/19
104 INSTRUMENTS AND CONTROLS
Automatic Heated Steering Wheel
If equipped with remote start, the
heated steering wheel will turn on
automatically during a remote start
along with the heated seats when it is
cold outside. The heated steering
wheel indicator light may not
come on.
If equipped with auto heated seats,
the heated steering wheel will turn on
when the auto heated seat is
activated. The heated steering wheel
indicator will display the state of the
steering wheel heat.
SeeHeated and Ventilated Front Seats
0 51 and
Vehicle Personalization 0140.
Horn
Pressaon the steering wheel pad to
sound the horn.
Windshield Wiper/Washer
With the ignition on or in ACC/
ACCESSORY, move the lever up or
down to select the wiper speed.
HI : Use for fast wipes.
LO : Use for slow wipes.
AUTO : Use this setting for
intermittent wipes when Rainsense is
disabled, or for Rainsense wipes when
it is enabled. For intermittent wipes,
move the lever up to AUTO, then turn
the band on the wiper lever up for
more frequent wipes or down for less
frequent wipes. If Rainsense is
enabled, see “Rainsense”later in this
section.
If the windshield wipers are in use
while driving, the exterior lamps come
on automatically if the exterior lamp
control is in AUTO. The transition
time for the lamps coming on varies
based on wiper speed. See “Lights On
with Wipers ”under Automatic
Headlamp System 0152.
OFF : Use to turn the wipers off.
1X : For a single wipe, briefly move
the wiper lever down. For several
wipes, hold the wiper lever down.
f: Pull the windshield wiper lever
toward you to spray windshield
washer fluid and activate the wipers.
The wipers will continue until the
lever is released or the maximum
wash time is reached. When the
Page 107 of 412
Cadillac CT6 Owner Manual (GMNA-Localizing-U.S./Canada-13566829) -
2020 - CRC - 6/11/19
106 INSTRUMENTS AND CONTROLS
.Move the windshield wiper lever
out of the AUTO position to
deactivate Rainsense.
To enable or disable this feature, see
“Rain Sense Wipers ”under Vehicle
Personalization 0140.
Wiper Arm Assembly Protection
When using an automatic car wash,
move the windshield wiper lever to
OFF. This disables the automatic
Rainsense windshield wipers.
With Rainsense, if the transmission is
in N (Neutral) and the vehicle speed is
very slow, the wipers will
automatically stop at the base of the
windshield.
The wiper operations return to normal
when the transmission is no longer in
N (Neutral) or the vehicle speed has
increased.Rear Camera Washer
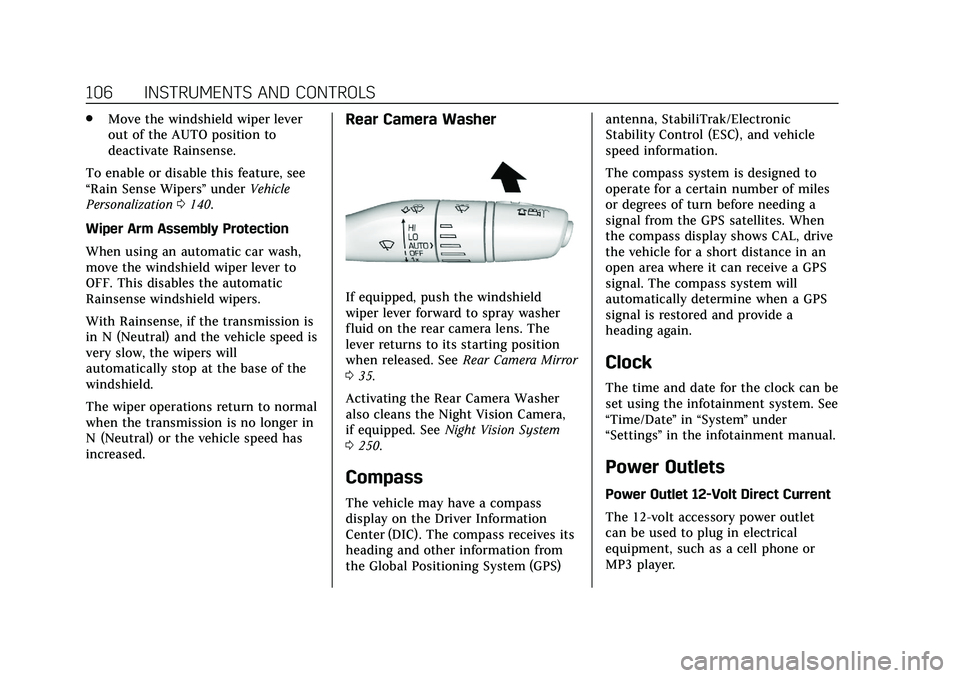
If equipped, push the windshield
wiper lever forward to spray washer
fluid on the rear camera lens. The
lever returns to its starting position
when released. See Rear Camera Mirror
0 35.
Activating the Rear Camera Washer
also cleans the Night Vision Camera,
if equipped. See Night Vision System
0 250.
Compass
The vehicle may have a compass
display on the Driver Information
Center (DIC). The compass receives its
heading and other information from
the Global Positioning System (GPS) antenna, StabiliTrak/Electronic
Stability Control (ESC), and vehicle
speed information.
The compass system is designed to
operate for a certain number of miles
or degrees of turn before needing a
signal from the GPS satellites. When
the compass display shows CAL, drive
the vehicle for a short distance in an
open area where it can receive a GPS
signal. The compass system will
automatically determine when a GPS
signal is restored and provide a
heading again.
Clock
The time and date for the clock can be
set using the infotainment system. See
“Time/Date
”in “System ”under
“Settings ”in the infotainment manual.
Power Outlets
Power Outlet 12-Volt Direct Current
The 12-volt accessory power outlet
can be used to plug in electrical
equipment, such as a cell phone or
MP3 player.
Page 109 of 412
Cadillac CT6 Owner Manual (GMNA-Localizing-U.S./Canada-13566829) -
2020 - CRC - 6/11/19
108 INSTRUMENTS AND CONTROLS
Warning (Continued)
such as coins, keys, rings, paper
clips, or cards, between the
smartphone and charging pad will
become very hot. On the rare
occasion that the charging system
does not detect an object, and the
object gets wedged between the
smartphone and charger, remove
the smartphone and allow the
object to cool before removing it
from the charging pad, to prevent
burns.
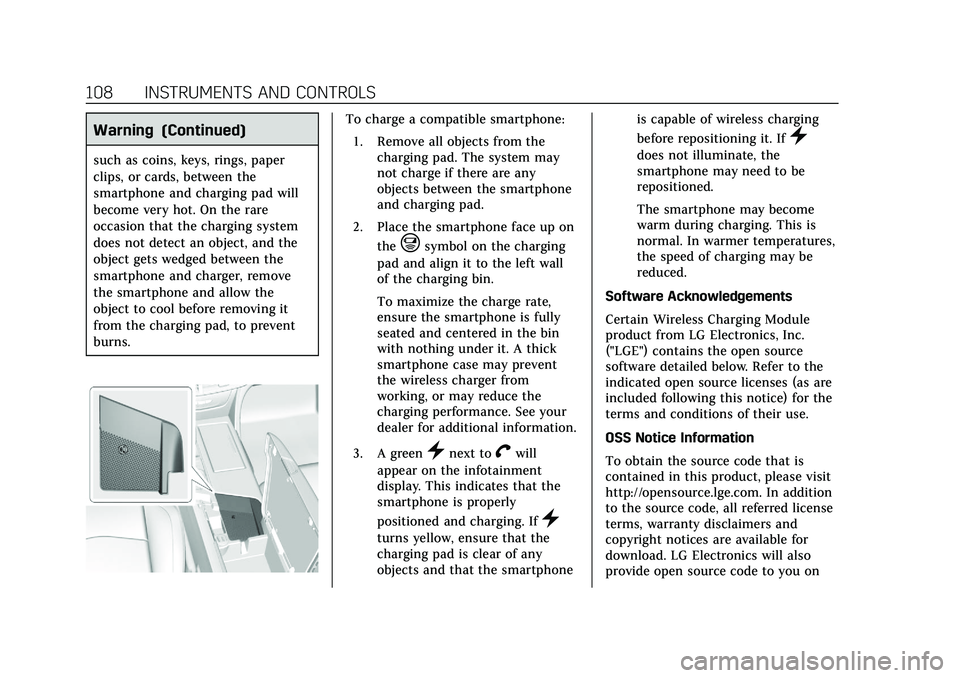
To charge a compatible smartphone:1. Remove all objects from the charging pad. The system may
not charge if there are any
objects between the smartphone
and charging pad.
2. Place the smartphone face up on the
@symbol on the charging
pad and align it to the left wall
of the charging bin.
To maximize the charge rate,
ensure the smartphone is fully
seated and centered in the bin
with nothing under it. A thick
smartphone case may prevent
the wireless charger from
working, or may reduce the
charging performance. See your
dealer for additional information.
3. A green
}next toVwill
appear on the infotainment
display. This indicates that the
smartphone is properly
positioned and charging. If
}
turns yellow, ensure that the
charging pad is clear of any
objects and that the smartphone is capable of wireless charging
before repositioning it. If
}
does not illuminate, the
smartphone may need to be
repositioned.
The smartphone may become
warm during charging. This is
normal. In warmer temperatures,
the speed of charging may be
reduced.
Software Acknowledgements
Certain Wireless Charging Module
product from LG Electronics, Inc.
("LGE") contains the open source
software detailed below. Refer to the
indicated open source licenses (as are
included following this notice) for the
terms and conditions of their use.
OSS Notice Information
To obtain the source code that is
contained in this product, please visit
http://opensource.lge.com. In addition
to the source code, all referred license
terms, warranty disclaimers and
copyright notices are available for
download. LG Electronics will also
provide open source code to you on