tire pressure reset CADILLAC CTS 2007 1.G Owners Manual
[x] Cancel search | Manufacturer: CADILLAC, Model Year: 2007, Model line: CTS, Model: CADILLAC CTS 2007 1.GPages: 518, PDF Size: 2.77 MB
Page 218 of 518
Tire Pressure
When the tire pressure is displayed you will see
a vehicle in the display. The numbers in each
corner represent the tire pressure for the
corresponding tire. The tire pressure will be
displayed in psi or kPa.
If any of the tires are blinking on the vehicle in the
display, this means that the tire pressure in that
tire is either high or low. SeeTire Pressure Monitor
System on page 405for more information.
Lateral Acceleration
Lateral acceleration is a measure of how hard you
are taking a corner. For example, when you are
turning right you will feel your body push to the left.
This force is measured in a “g”. This gage will
display from 0.00 g to 1.2 g. The lowest reading
means there is no lateral acceleration. The highest
reading means the force the driver is feeling is
1.2 times the acceleration due to gravity.
When (B) is pressed and held while the Lateral
Acceleration display is being shown, the peak hold
values — both tick marks and numbers — will
be reset to zero.
Warning Messages
The warning messages that are described in the
following text are also shown in the tachometer
display.
While any warning messages are shown,
pressing (A) or (B) will acknowledge the warning
and then display the gage relating to the message.
For instance, if a tire is below the minimum
recommended pressure, the tire pressure warning
message will blink on and off (�ve times for a
low tire warning, continuously for a �at tire
warning). The driver can go to the tire pressure
display immediately by pressing either button
on the outboard switch.
218
Page 224 of 518
Vehicle Information Menu
To access this menu, press the up or down arrow
on the INFO switch located to the right of the
display.
The following items are available when the ignition
is in ON. These items will not be available when
the ignition is in ACCESSORY. The tire pressure
menu items are only available if your vehicle
has the Tire Pressure Monitor (TPM) system:
OUTSIDE TEMP
MI TRIP A (KM TRIP A)*
MI TRIP B (KM TRIP B)*
MILES RANGE (KM RANGE)
MPG AVG (L/100 KM AVG)*
MPG INST (L/100 KM INST)
GAL FUEL USED (L FUEL USED)*
AVG MPH (AVG KM/H)*
TIMER*
BATTERY VOLTS
ENGINE OIL LIFE*
TRANS FLUID LIFE* (Automatic
Transmission Only)
PSI LF TIRE (KPA LF TIRE)
PSI RF TIRE (KPA RF TIRE)
PSI RR TIRE (KPA RR TIRE)
PSI LR TIRE (KPA LR TIRE)
BLANK LINE
*These items can be reset. Each one must be
reset individually. For a detailed description of the
menu items and how to reset them, see “Vehicle
Information Menu Item Descriptions” later in
this section.
You can view any of these items at any time, but
only one item can be displayed at a time.
224
Page 227 of 518
When the oil life is depleted, the Change Engine
Oil message will appear on the display. See
your dealer for service. In addition to the engine
oil life system monitoring the oil life, additional
maintenance is recommended in the Maintenance
Schedule in this manual. SeeScheduled
Maintenance on page 462andEngine Oil on
page 346for more information.
When you reset the Change Engine Oil message
by clearing it from the display, you still must reset
the engine oil life system separately. For more
information on resetting the engine oil life system,
see “How to Reset the Engine Oil Life System
and the Oil Life Indicator” underEngine Oil
Life System on page 349. If you clear the Change
Engine Oil message from the display, it will not
re-appear.
TRANS FLUID LIFE (Automatic Transmission):
If you select this item, the percentage of
remaining transmission �uid life is displayed.
If you see 99% TRANS FLUID LIFE on the display,
that means that 99% of the current transmission
�uid life remains.When the transmission �uid life is depleted, the
Change Trans Fluid message will appear on
the display. You should change the transmission
�uid as soon as possible. Be sure to keep a written
record of the mileage and date of the �uid
change so you will have it for future reference.
SeeScheduled Maintenance on page 462
andRecommended Fluids and Lubricants on
page 473for more information.
When you reset the Change Trans Fluid message
by clearing it from the display, you still must
reset the transmission �uid life monitor separately.
For more information on resetting the transmission
�uid life monitor, seeAutomatic Transmission
Fluid on page 353.
LF TIRE:If you select this item, the driver’s side
front tire pressure will be displayed. If the tire
pressure is low, LOW will be displayed with this
item. The pressure can be displayed in pounds per
square inch (PSI) or kilopascals (KPA). To change
the units, seeDIC Main Menu on page 228
DIC Main Menu.
227
Page 228 of 518

RF TIRE:If you select this item, the passenger’s
side front tire pressure will be displayed. If the
tire pressure is low, LOW will be displayed
with this item. The pressure can be displayed in
pounds per square inch (PSI) or kilopascals (KPA).
To change the units, seeDIC Main Menu on
page 228DIC Main Menu.
RR TIRE:If you select this item, the passenger’s
side rear tire pressure will be displayed. If the
tire pressure is low, LOW will be displayed
with this item. The pressure can be displayed in
pounds per square inch (PSI) or kilopascals (KPA).
To change the units, seeDIC Main Menu on
page 228DIC Main Menu.
LR TIRE:If you select this item, the driver’s side
rear tire pressure will be displayed. If the tire
pressure is low, LOW will be displayed with this
item. The pressure can be displayed in pounds per
square inch (PSI) or kilopascals (KPA). To change
the units, seeDIC Main Menu on page 228
DIC Main Menu.
BLANK LINE:If you select this item, nothing is
displayed at the top of the screen.DIC Main Menu
Accessing the DIC Main Menu
To access the main menu of the DIC, do the
following:
1. Press the PWR/VOL knob to turn the radio on.
2. Press the TUNE/SEL knob once.
3. Turn the TUNE/SEL knob clockwise or
counterclockwise to scroll through the
menu items.
The DIC main menu consists of the following
menu items:
eBASS - MID - TREBLE
eEQ
DSP (Bose®Audio System)
AVC (Bose®Audio System)
H/A
AUTOSTORE PRESETS
CAT
TA
MSG RECALL RDS MESSAGE
228
Page 407 of 518
Your vehicle’s TPMS can alert you about a low
tire pressure condition but it does not replace
normal tire maintenance. SeeTire Inspection and
Rotation on page 409andTires on page 392.
Notice:Do not use a tire sealant if your vehicle
has Tire Pressure Monitors. The liquid sealant
can damage the tire pressure monitor sensors.
Resetting the TPMS Identi�cation
Codes
Each TPMS sensor has a unique identi�cation
code. Any time you replace one or more of
the TPMS sensors or rotate the tires, the
identi�cation codes will need to be matched to the
new tire and wheel position. The sensors are
matched to the tire and wheel positions in
the following order: driver’s side front tire,
passenger’s side front tire, passenger’s side rear
tire, and driver’s side rear tire using a TPMS
diagnostic tool. See your GM dealer for service.
The TPMS sensors may also be matched to each
tire and wheel position by increasing or
decreasing the tire’s air pressure. When increasing
tire pressure do not exceed the maximum
in�ation pressure indicated on the tire’s sidewall.You will have two minutes to match the �rst tire
and wheel position, and �ve minutes overall
to match all four tire and wheel positions. If it takes
longer than two minutes, to match the �rst tire
and wheel, or more than �ve minutes to match all
four tire and wheel positions the matching
process stops and you will need to start over.
The TPM matching process is outlined below:
1. Set the parking brake.
2. Turn the ignition switch to ON with the
engine off.
3. Using the Remote Keyless Entry (RKE)
transmitter, lock and unlock the vehicle’s
doors.
4. Press the lock and unlock buttons, at the
same time, on the RKE transmitter. A single
horn chirp will sound, indicating that the
TPMS system is ready, and the sensor
matching process can begin.
5. Start with the driver’s side front tire.
407
Page 410 of 518
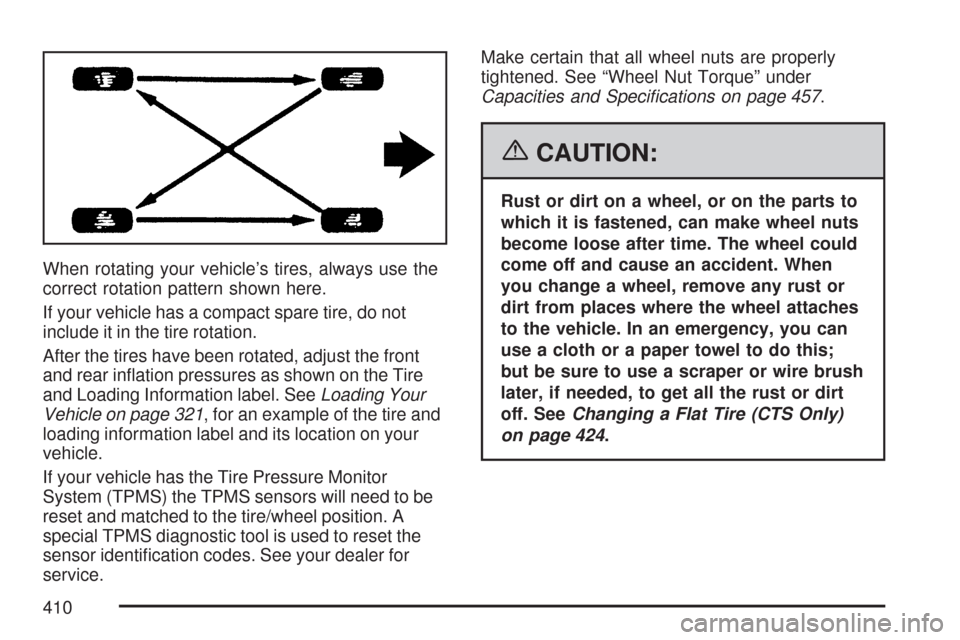
When rotating your vehicle’s tires, always use the
correct rotation pattern shown here.
If your vehicle has a compact spare tire, do not
include it in the tire rotation.
After the tires have been rotated, adjust the front
and rear in�ation pressures as shown on the Tire
and Loading Information label. SeeLoading Your
Vehicle on page 321, for an example of the tire and
loading information label and its location on your
vehicle.
If your vehicle has the Tire Pressure Monitor
System (TPMS) the TPMS sensors will need to be
reset and matched to the tire/wheel position. A
special TPMS diagnostic tool is used to reset the
sensor identi�cation codes. See your dealer for
service.Make certain that all wheel nuts are properly
tightened. See “Wheel Nut Torque” under
Capacities and Speci�cations on page 457.
{CAUTION:
Rust or dirt on a wheel, or on the parts to
which it is fastened, can make wheel nuts
become loose after time. The wheel could
come off and cause an accident. When
you change a wheel, remove any rust or
dirt from places where the wheel attaches
to the vehicle. In an emergency, you can
use a cloth or a paper towel to do this;
but be sure to use a scraper or wire brush
later, if needed, to get all the rust or dirt
off. SeeChanging a Flat Tire (CTS Only)
on page 424.
410
Page 463 of 518

When the Change Engine Oil message appears,
certain services, checks, and inspections are
required. Required services are described in the
following for “MaintenanceI” and “MaintenanceII.”
Generally, it is recommended that your �rst
service be MaintenanceI, your second service
be MaintenanceII, and that you alternate
MaintenanceIand MaintenanceIIthereafter.
However, in some cases, MaintenanceIImay be
required more often.MaintenanceI— Use MaintenanceIif the
change engine oil message comes on within
10 months since the vehicle was purchased or
MaintenanceIIwas performed.
MaintenanceII— Use MaintenanceIIif the
previous service performed was MaintenanceI.
Always use MaintenanceIIwhenever the message
comes on 10 months or more since the last
service or if the message has not come on at all
for one year.
Scheduled Maintenance
Service MaintenanceIMaintenanceII
Change engine oil and �lter. SeeEngine Oil on page 346. Reset oil life system.
SeeEngine Oil Life System on page 349.An Emission Control Service.••
Visually check for any leaks or damage.See footnote (k).••
Inspect engine air cleaner �lter. If necessary, replace �lter. SeeEngine Air
Cleaner/Filter on page 351.See footnote (n).•
Rotate tires and check in�ation pressures and wear. SeeTire Inspection and
Rotation on page 409and “Tire Wear Inspection” inAt Least Once a Month on
page 470.••
463