buttons CADILLAC CTS 2008 2.G User Guide
[x] Cancel search | Manufacturer: CADILLAC, Model Year: 2008, Model line: CTS, Model: CADILLAC CTS 2008 2.GPages: 490, PDF Size: 2.59 MB
Page 138 of 490

3. At the same time, press and hold both the Universal
Home Remote button to be used to control the
garage door and the hand-held transmitter button.
Do not release the Universal Home Remote button
or the hand-held transmitter button until Step 4 has
been completed.
Some entry gates and garage door openers
may require substitution of Step 3 with the
procedure noted in “Gate Operator and Canadian
Programming” later in this section.
4. The indicator light on the Universal Home Remote
will �ash slowly at �rst and then rapidly after
Universal Home Remote successfully receives the
frequency signal from the hand-held transmitter.
Release both buttons.
5. Press and hold the newly-trained Universal Home
Remote button and observe the indicator light.
If the indicator light stays on continuously,
the programming is complete and the garage door
should move when the Universal Home Remote
button is pressed and released. There is no need
to continue programming Steps 6 through 8.
If the Universal Home Remote indicator light
blinks rapidly for two seconds and then turns to
a constant light, continue with the programming
Steps 6 through 8.
It may be helpful to have another person assist with
the remaining steps.6. After Steps 1 through 5 have been completed,
locate inside the garage the garage door opener
receiver (motor-head unit). Locate the “Learn”
or “Smart” button. The name and color of the button
may vary by manufacturer.
7. Firmly press and release the “Learn” or “Smart”
button. After you press this button, you will have
30 seconds to complete Step 8.
2-60
Page 139 of 490

8. Immediately return to the vehicle. Firmly press and
hold the Universal Home Remote button, chosen in
Step 3 to control the garage door, for two seconds,
and then release it. If the garage door does not
move, press and hold the same button a second time
for two seconds, and then release it. Again, if the
door does not move, press and hold the same button
a third time for two seconds, and then release.
The Universal Home Remote should now activate
the garage door.
To program the remaining two Universal Home Remote
buttons, begin with Step 2 of “Programming the Universal
Home Remote System.” Do not repeat Step 1, as this will
erase all previous programming from the Universal Home
Remote buttons.
Gate Operator and Canadian
Programming
If you have questions or need help programming the
Universal Home Remote System, call 1-800-355-3515 or
go to www.homelink.com.
Canadian radio-frequency laws require transmitter
signals to time out or quit after several seconds of
transmission. This may not be long enough for UniversalHome Remote to pick up the signal during programming.
Similarly, some U.S. gate operators are manufactured
to time out in the same manner.
If you live in Canada, or you are having difficulty
programming a gate operator or garage door opener
by using the “Programming Universal Home Remote”
procedures, regardless of where you live, replace Step 3
under “Programming Universal Home Remote” with the
following:
Continue to press and hold the Universal Home Remote
button while you press and release every two seconds
(cycle) the hand-held transmitter button until the
frequency signal has been successfully accepted by the
Universal Home Remote. The Universal Home Remote
indicator light will �ash slowly at �rst and then rapidly.
Proceed with Step 4 under “Programming Universal
Home Remote” to complete.Using Universal Home Remote
Press and hold the appropriate Universal Home Remote
button for at least half of a second. The indicator light
will come on while the signal is being transmitted.
2-61
Page 140 of 490

Erasing Universal Home Remote
Buttons
The programmed buttons should be erased when the
vehicle is sold or the lease ends.
To erase all programmed buttons on the Universal
Home Remote device:
1. Press and hold down the two outside buttons until
the indicator light begins to �ash, after 20 seconds.
2. Release both buttons.
Reprogramming a Single Universal
Home Remote Button
To reprogram any of the three Universal Home Remote
buttons, repeat the programming instructions earlier
in this section, beginning with Step 2.
For help or information on the Universal Home Remote
System, call the customer assistance phone number
underCustomer Assistance Offices on page 7-6.
Storage Areas
Glove Box
To open, press the button. Use the key to lock and
unlock.
Cupholders
Your vehicle has cupholders located in front of the
center console. Push down on the lid to open.
2-62
Page 147 of 490
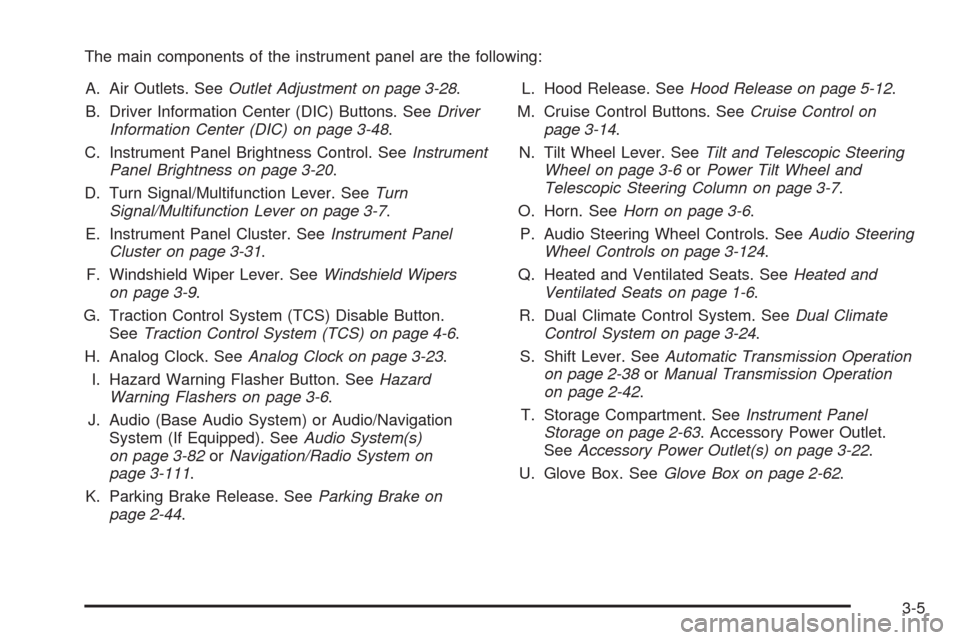
The main components of the instrument panel are the following:
A. Air Outlets. SeeOutlet Adjustment on page 3-28.
B. Driver Information Center (DIC) Buttons. SeeDriver
Information Center (DIC) on page 3-48.
C. Instrument Panel Brightness Control. SeeInstrument
Panel Brightness on page 3-20.
D. Turn Signal/Multifunction Lever. SeeTurn
Signal/Multifunction Lever on page 3-7.
E. Instrument Panel Cluster. SeeInstrument Panel
Cluster on page 3-31.
F. Windshield Wiper Lever. SeeWindshield Wipers
on page 3-9.
G. Traction Control System (TCS) Disable Button.
SeeTraction Control System (TCS) on page 4-6.
H. Analog Clock. SeeAnalog Clock on page 3-23.
I. Hazard Warning Flasher Button. SeeHazard
Warning Flashers on page 3-6.
J. Audio (Base Audio System) or Audio/Navigation
System (If Equipped). SeeAudio System(s)
on page 3-82orNavigation/Radio System on
page 3-111.
K. Parking Brake Release. SeeParking Brake on
page 2-44.L. Hood Release. SeeHood Release on page 5-12.
M. Cruise Control Buttons. SeeCruise Control on
page 3-14.
N. Tilt Wheel Lever. SeeTilt and Telescopic Steering
Wheel on page 3-6orPower Tilt Wheel and
Telescopic Steering Column on page 3-7.
O. Horn. SeeHorn on page 3-6.
P. Audio Steering Wheel Controls. SeeAudio Steering
Wheel Controls on page 3-124.
Q. Heated and Ventilated Seats. SeeHeated and
Ventilated Seats on page 1-6.
R. Dual Climate Control System. SeeDual Climate
Control System on page 3-24.
S. Shift Lever. SeeAutomatic Transmission Operation
on page 2-38orManual Transmission Operation
on page 2-42.
T. Storage Compartment. SeeInstrument Panel
Storage on page 2-63. Accessory Power Outlet.
SeeAccessory Power Outlet(s) on page 3-22.
U. Glove Box. SeeGlove Box on page 2-62.
3-5
Page 156 of 490

Cruise Control
{CAUTION:
Cruise control can be dangerous where you
cannot drive safely at a steady speed. So, do
not use your cruise control on winding roads
or in heavy traffic.
Cruise control can be dangerous on slippery
roads. On such roads, fast changes in tire
traction can cause excessive wheel slip, and
you could lose control. Do not use cruise
control on slippery roads.
With cruise control, a speed of about 25 mph (40 km/h)
or more can be maintained without keeping your foot
on the accelerator. This can really help on long trips.
Cruise control does not work at speeds below about
25 mph (40 km/h).
When the brakes are applied, the cruise control
turns off.
If your vehicle has the StabiliTrak
®system and begins
to limit wheel spin while you are using cruise control,
the cruise control will automatically disengage.SeeStabiliTrak
®System on page 4-8. When road
conditions allow you to safely use it again, the cruise
control can be turned back on.
The cruise control buttons
are located on the left side
of the steering wheel.
I(On/Off):Press button to activate and turn off the
system. The indicator light on the button turns on
when cruise control is on.
+ RES (Resume/Accelerate):Press this button to
make the vehicle accelerate or resume to a previously
set speed.
SET−(Set/Coast):Press this button to set the speed
or make the vehicle decelerate.
[(Cancel):Press this button to cancel cruise control
without erasing the set speed from memory.
3-14
Page 165 of 490
Ashtray(s) and Cigarette Lighter
Your vehicle may have two removable ashtrays and
cigarette lighters. One ashtray can be placed into
the instrument panel storage compartment and the other
into the center console rear compartment. To use the
lighter, push it in all the way and let go. When it is ready,
it will pop back out by itself.
To empty the ashtrays, grip the edges of the bin and
pull it straight out of the housing. To reinstall, push the
tray back into place.
Notice:Holding a cigarette lighter in while it is
heating does not let the lighter back away from the
heating element when it is hot. Damage from
overheating can occur to the lighter or heating
element, or a fuse could be blown. Do not hold a
cigarette lighter in while it is heating.
Notice:If papers, pins, or other �ammable items
are put in the ashtray, hot cigarettes or other
smoking materials could ignite them and possibly
damage your vehicle. Never put �ammable items in
the ashtray.
Analog Clock
The analog clock is located on the instrument panel
above the radio. The clock is not connected with
any other vehicle system and runs by itself. To adjust
the clock:
1. Locate the adjustment buttons directly below the
clock face.
2. Push and hold the right adjustment button to move
the clock hands forward or the left adjustment
button to make the clock hands go backward.
Holding either button down will cause the clock to
advance faster. Release the button before the
desired time is reached.
3. Push and release either button to adjust the time by
one minute increments until the desired time is
reached.
3-23
Page 167 of 490
The air-conditioning system removes moisture from the
air, so a small amount of water might drip underneath
the vehicle while it is idling or after the engine is turned
off is normal.
Do not cover the solar sensor located in the center of
the instrument panel, near the windshield. For more
information on the solar sensor, see “Sensors” later in
this section.
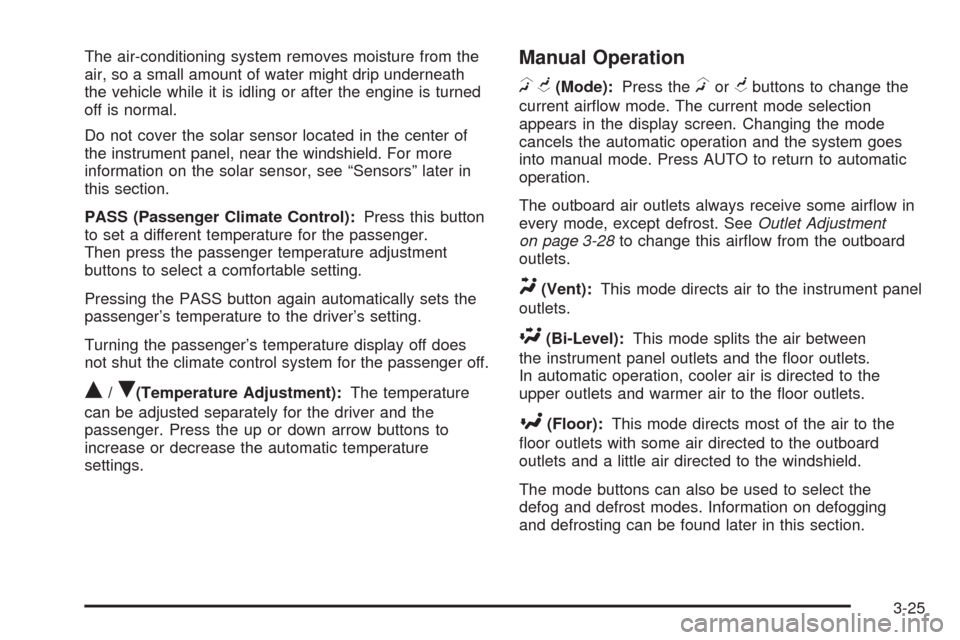
PASS (Passenger Climate Control):Press this button
to set a different temperature for the passenger.
Then press the passenger temperature adjustment
buttons to select a comfortable setting.
Pressing the PASS button again automatically sets the
passenger’s temperature to the driver’s setting.
Turning the passenger’s temperature display off does
not shut the climate control system for the passenger off.
Q/R(Temperature Adjustment):The temperature
can be adjusted separately for the driver and the
passenger. Press the up or down arrow buttons to
increase or decrease the automatic temperature
settings.
Manual Operation
HG(Mode):Press theHorGbuttons to change the
current air�ow mode. The current mode selection
appears in the display screen. Changing the mode
cancels the automatic operation and the system goes
into manual mode. Press AUTO to return to automatic
operation.
The outboard air outlets always receive some air�ow in
every mode, except defrost. SeeOutlet Adjustment
on page 3-28to change this air�ow from the outboard
outlets.
Y(Vent):This mode directs air to the instrument panel
outlets.
\(Bi-Level):This mode splits the air between
the instrument panel outlets and the �oor outlets.
In automatic operation, cooler air is directed to the
upper outlets and warmer air to the �oor outlets.
[(Floor):This mode directs most of the air to the
�oor outlets with some air directed to the outboard
outlets and a little air directed to the windshield.
The mode buttons can also be used to select the
defog and defrost modes. Information on defogging
and defrosting can be found later in this section.
3-25
Page 168 of 490
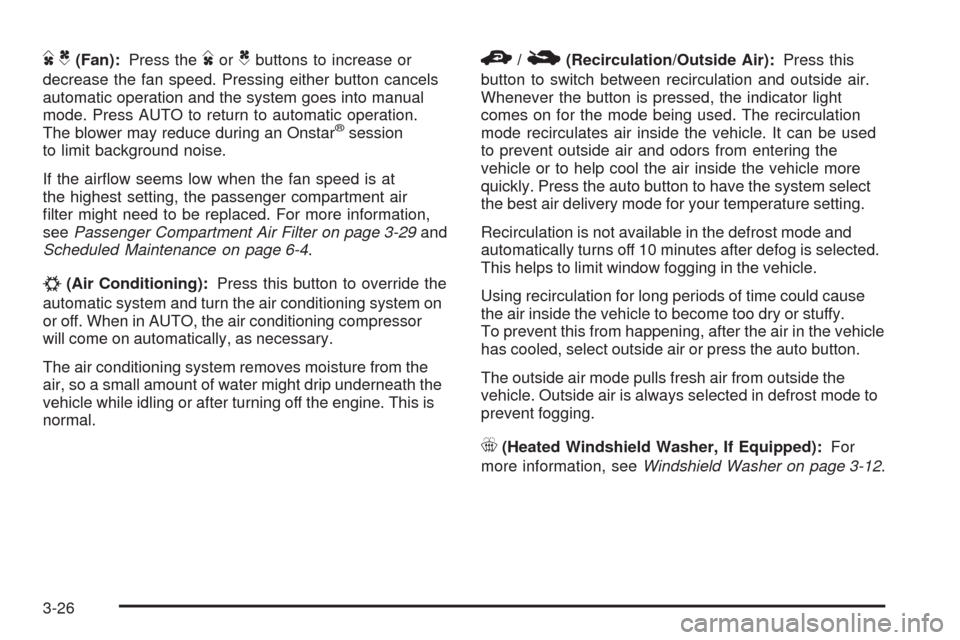
DC(Fan):Press theDorCbuttons to increase or
decrease the fan speed. Pressing either button cancels
automatic operation and the system goes into manual
mode. Press AUTO to return to automatic operation.
The blower may reduce during an Onstar
®session
to limit background noise.
If the air�ow seems low when the fan speed is at
the highest setting, the passenger compartment air
�lter might need to be replaced. For more information,
seePassenger Compartment Air Filter on page 3-29and
Scheduled Maintenance on page 6-4.
#(Air Conditioning):Press this button to override the
automatic system and turn the air conditioning system on
or off. When in AUTO, the air conditioning compressor
will come on automatically, as necessary.
The air conditioning system removes moisture from the
air, so a small amount of water might drip underneath the
vehicle while idling or after turning off the engine. This is
normal.
M/F(Recirculation/Outside Air):Press this
button to switch between recirculation and outside air.
Whenever the button is pressed, the indicator light
comes on for the mode being used. The recirculation
mode recirculates air inside the vehicle. It can be used
to prevent outside air and odors from entering the
vehicle or to help cool the air inside the vehicle more
quickly. Press the auto button to have the system select
the best air delivery mode for your temperature setting.
Recirculation is not available in the defrost mode and
automatically turns off 10 minutes after defog is selected.
This helps to limit window fogging in the vehicle.
Using recirculation for long periods of time could cause
the air inside the vehicle to become too dry or stuffy.
To prevent this from happening, after the air in the vehicle
has cooled, select outside air or press the auto button.
The outside air mode pulls fresh air from outside the
vehicle. Outside air is always selected in defrost mode to
prevent fogging.
_(Heated Windshield Washer, If Equipped):For
more information, seeWindshield Washer on page 3-12.
3-26
Page 169 of 490
Defogging and Defrosting
Fog on the inside of windows is a result of high humidity
(moisture) condensing on the cool window glass.
This can be minimized if the climate control system
is used properly. There are two modes to clear fog
from the windshield. Use the defog mode to clear the
windows of fog or moisture and warm the passengers.
Use the defrost mode to remove fog or frost from
the windshield more quickly.
HG(Mode):Press the mode buttons until defog
appears on the display.
-(Defog):This mode directs the air between the
windshield, �oor outlets and side windows. When this
mode is selected, the system turns off recirculation and
runs the air-conditioning compressor unless the outside
temperature is at or below freezing. If recirculation mode
is selected while in defog mode, it will be cancelled after
10 minutes.
0(Defrost):Pressing defrost directs most of the air
to the windshield, with some air directed to the side
windows. In this mode, the system automatically turns off
recirculation and runs the air-conditioning compressor,
unless the outside temperature is at or below freezing.
This mode may also cause the fan speed and air
temperature to increase.
Rear Window Defogger
The rear window defogger uses a warming grid to
remove fog or frost from the rear window.
The rear window defogger will only work when the
ignition is in ON/RUN.
=(Rear Window Defogger):Press this button to turn
the rear window defogger on or off. Be sure to clear
as much snow from the rear window as possible.
The rear window defogger turns off about 15 minutes
after the button is �rst pressed if the vehicle is moving
at slower speeds. At higher speeds, the rear window
defogger may stay on continuously. With each additional
press, the defogger runs for about 10 minutes.
The defogger can also be turned off by pressing the
button again or by turning off the engine.
The heated outside rearview mirrors will heat to help
clear fog or frost from the surface of the mirror when
the rear window defogger button is on. SeeOutside
Heated Mirrors on page 2-51.
Notice:Do not try to clear frost or other material
from the inside of the front windshield and rear
window with a razor blade or anything else that is
sharp. This may damage the rear window defogger
grid and affect your radio’s ability to pick up
stations clearly. The repairs wouldn’t be covered by
your warranty.
3-27
Page 190 of 490
Driver Information Center (DIC)
The Driver Information Center (DIC) gives you the
status of many of your vehicle’s systems. The DIC is
also used to display warning/status messages.
All messages appear in the DIC display located at the
bottom of the instrument panel cluster. The DIC buttons
are located on the instrument panel, next to the
steering wheel.
The DIC comes on when the ignition is on. After a short
delay, the DIC displays the information that was last
displayed before the engine was turned off.
The top line of the DIC display shows the DIC
information. The bottom line of the DIC display shows
the compass. The compass displays in the trip/fuel
menus and in some vehicle information menus.
If a problem is detected, a warning message appears
on the display. Take any message that appears on
the display seriously and remember that clearing
the message only makes the message disappear,
and does not correct the problem.
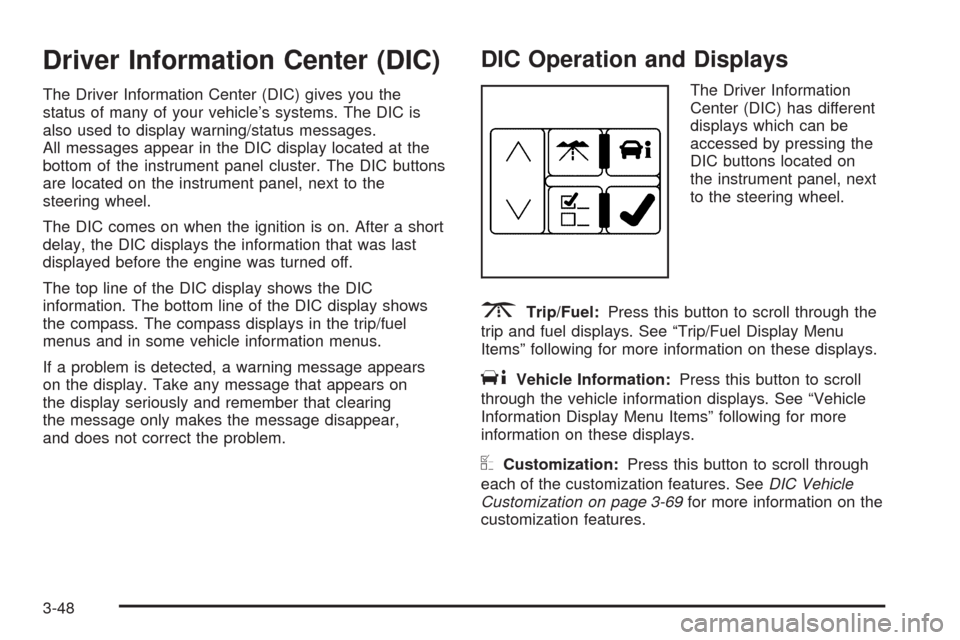
DIC Operation and Displays
The Driver Information
Center (DIC) has different
displays which can be
accessed by pressing the
DIC buttons located on
the instrument panel, next
to the steering wheel.
3Trip/Fuel:Press this button to scroll through the
trip and fuel displays. See “Trip/Fuel Display Menu
Items” following for more information on these displays.
TVehicle Information:Press this button to scroll
through the vehicle information displays. See “Vehicle
Information Display Menu Items” following for more
information on these displays.
UCustomization:Press this button to scroll through
each of the customization features. SeeDIC Vehicle
Customization on page 3-69for more information on the
customization features.
3-48