remote start CADILLAC CTS 2008 2.G User Guide
[x] Cancel search | Manufacturer: CADILLAC, Model Year: 2008, Model line: CTS, Model: CADILLAC CTS 2008 2.GPages: 490, PDF Size: 2.59 MB
Page 137 of 490

Keep the original hand-held transmitter for use in other
vehicles as well as for future Universal Home Remote
programming. It is also recommended that upon the
sale of the vehicle, the programmed Universal Home
Remote buttons should be erased for security purposes.
See “Erasing Universal Home Remote Buttons” later
in this section.
When programming a garage door, park outside of the
garage. Park directly in line with and facing the garage
door opener motor-head or gate motor-head. Be sure that
people and objects are clear of the garage door or gate
that is being programmed.
It is recommended that a new battery be installed
in your hand-held transmitter for quicker and more
accurate transmission of the radio-frequency signal.
Programming the Universal Home
Remote System
For questions or help programming the Universal
Home Remote System, call 1-800-355-3515 or go to
www.homelink.com.
Programming a garage door opener involves
time-sensitive actions, so read the entire procedure
before starting. Otherwise, the device will time out and
the procedure will have to be repeated.To program up to three devices:
1. From inside the vehicle, press and hold down the
two outside buttons at the same time, releasing
only when the Universal Home Remote indicator
light begins to �ash, after 20 seconds. This step
will erase the factory settings or all previously
programmed buttons.
Do not hold down the buttons for longer than
30 seconds and do not repeat this step to program
the remaining two Universal Home Remote buttons.
2. Hold the end of your hand-held transmitter about
1 to 3 inches (3 to 8 cm) away from the Universal
Home Remote buttons while keeping the indicator
light in view. The hand-held transmitter was supplied
by the manufacturer of your garage door opener
receiver (motor head unit).
2-59
Page 177 of 490

Passenger Airbag Status Indicator
Your vehicle has the passenger sensing system.
Your instrument panel has a passenger airbag status
indicator.
When you start the vehicle, the passenger airbag status
indicator will light ON and OFF, or the symbol for on
and off, for several seconds as a system check. If you
use remote start to start your vehicle from a distance,
if equipped, you may not see the system check.
Then, after several more seconds, the status indicator
will light either ON or OFF, or either the on or off symbol
to let you know the status of the right front passenger’s
frontal and seat-mounted side impact airbags.If the word ON or the on symbol is lit on the passenger
airbag status indicator, it means that the right front
passenger’s frontal airbag and seat-mounted side impact
airbag are enabled (may in�ate).
{CAUTION:
If the on indicator comes on when you have
a rear-facing child restraint installed in the
right front passenger’s seat, it means that
the passenger sensing system has not
turned off the passenger’s frontal airbag and
seat-mounted side impact airbag (if equipped).
A child in a rear-facing child restraint can be
seriously injured or killed if the right front
passenger’s airbag in�ates. This is because the
back of the rear-facing child restraint would be
very close to the in�ating airbag. Do not use a
rear-facing child restraint in the right front
passenger’s seat if the airbag is turned on. United States
Canada
3-35
Page 201 of 490

Electronic Key Already Known
If your vehicle has the keyless access system, this
message displays if you try to match a transmitter that
has already been learned. SeeKeyless Access
System Operation on page 2-10for more information.
Electronic Key Not Detected
If your vehicle has the keyless access system, this
message displays if the vehicle does not detect
the presence of a transmitter when you have attempted
to start the vehicle or a vehicle door has just closed.
The following conditions may cause this message
to appear:
Driver-added equipment plugged into the accessory
power outlet on the center console is causing
interference. Examples of these devices are cell
phones and cell phone chargers, two-way radios,
power inverters, or similar items. Try moving
the keyless access transmitter away from these
devices when starting the vehicle. In addition,
PDA devices and remote garage and gate openers
may also generate Electromagnetic Interference
(EMI) that may interfere with the keyless access
transmitter. Do not carry the keyless access
transmitter in the same pocket or bag as these
devices.
The vehicle is experiencing Electromagnetic
Interference (EMI). Some locations, such as
airports, automatic toll booths, and some gas
stations have EMI �elds which may interfere with
the keyless access transmitter.
If moving the transmitter to
different locations within
the vehicle does not
help, place the transmitter
in the center console
transmitter pocket with
the buttons facing the
front of the vehicle
and then press the
START button.
The vehicle’s battery voltage is low. The battery
voltage must be above 10 volts for the keyless
access transmitter to be detected properly.
3-59
Page 205 of 490

Press Brake To Start Engine
(Automatic Transmission Only)
If your vehicle has the keyless access system, this
message displays if you try to start the engine without
having the brake pressed. The brake needs to be
pressed when starting the engine. SeeIgnition Positions
(Key Access) on page 2-32orIgnition Positions
(Keyless Access) on page 2-34for more information.
Press Start Control To Learn Keys
If your vehicle has the keyless access system, this
message displays when matching new transmitters to
the vehicle. SeeKeyless Access System Operation
on page 2-10for more information.
Rainsense Wipers Active
If your vehicle has this feature, this message
displays while the Rainsense™ wipers are active.
SeeRainsense™ Wipers on page 3-10for
more information.
Ready To Learn Electronic Key # X
If your vehicle has the keyless access system, this
message displays while matching new transmitters to
the vehicle. SeeKeyless Access System Operation
on page 2-10for more information.
Remote Key Learning Active
If your vehicle has the Remote Keyless Entry (RKE)
system, this message displays while matching new
transmitters to the vehicle. See “Matching Transmitter(s)
to Your Vehicle” underRemote Keyless Entry (RKE)
System Operation on page 2-7andDIC Operation and
Displays on page 3-48for more information.
Replace Battery In Remote Key
This message displays when the battery in the Remote
Keyless Entry (RKE) or keyless access transmitter
needs to be replaced. To replace the battery, see
“Battery Replacement” underRemote Keyless Entry
(RKE) System Operation on page 2-7orKeyless Access
System Operation on page 2-10.
Right Rear Door Open
This message displays when the passenger side rear
door is not closed completely. Make sure that the door is
closed completely.
3-63
Page 218 of 490

Advanced Features Menu Items
Keyless Locking
If your vehicle has the keyless access system,
this feature allows you to select whether the doors
automatically lock during normal vehicle exit. When the
ignition is turned off and all doors become closed,
the vehicle will determine how many keyless access
transmitters remain in the vehicle interior. If at least
one keyless access transmitter has been removed from
the interior of the vehicle, the doors will lock after
several seconds.
For example, if there are two keyless access
transmitters in the vehicle and one is removed, the
other will be locked in. The keyless access transmitter
locked in the vehicle can still be used to start the vehicle
or unlock the doors, if needed. A person approaching
the outside of the locked vehicle without an authorized
keyless access transmitter, however, will not be able
to open the door, even with a transmitter in the vehicle.
SeeKeyless Access System Operation on page 2-10
for more information.
You may temporarily disable the keyless locking feature
by pressing the door unlock switch for three seconds
on an open door. Keyless locking will then remain
disabled until a door lock switch is pressed or until the
power mode transitions from the off power mode.To select whether the horn sounds or the lights �ash
when the vehicle is locked, see “Remote Door
Lock” earlier in this section.
Press the customization button until Keyless Locking
appears on the DIC display. Press the set/reset button
once to access the settings for this feature. Then press
the menu up/down button to scroll through the following
settings:
Off (default):The keyless locking feature will be
disabled.
On:The keyless locking feature will be enabled.
The doors will automatically lock several seconds after
you turn the ignition off, remove a keyless access
transmitter from the interior of the vehicle, and close all
of the doors.
No Change:No change will be made to this feature.
The current setting will remain.
To select a setting, press the set/reset button while the
desired setting is displayed on the DIC.
3-76
Page 223 of 490

See “Relearn Remote Key” underDIC Operation and
Displays on page 3-48for more information on matching
transmitters to driver ID numbers.
No Change:No change will be made to this feature.
The current setting will remain.
To select a setting, press the set/reset button while the
desired setting is displayed on the DIC.
Remote Start
If the vehicle has this feature, it allows you to turn the
remote start feature off or on. The remote start feature
allows you to start the engine from outside of the vehicle
using the Remote Keyless Entry (RKE) or keyless access
transmitter. SeeRemote Vehicle Start on page 2-16for
more information.
Press the customization button until Remote Start
appears in the DIC display. Press the set/reset button
once to access the settings for this feature. Then press
the menu up/down button to scroll through the following
settings:
Off:The remote start feature will be disabled.
On (default):The remote start feature will be enabled.
No Change:No change will be made to this feature.
The current setting will remain.
To select a setting, press the set/reset button while the
desired setting is displayed on the DIC.
Advanced Features Exit
This feature allows you to exit the advanced
features menu.
Press the customization button until Advanced Features
Press
VTo Exit appears in the DIC display. Press the
set/reset button once to exit the menu. Feature Settings
Press
VTo Exit will appear. Press the set/reset button to
exit the menu.
If you do not exit, pressing the customization button
again will return you to the beginning of the menu.
Exiting the Feature Settings/Advanced
Features Menu
The feature settings/advanced features menus will be
exited when any of the following occurs:
The vehicle is no longer in ON/RUN.
The trip/fuel or vehicle information DIC buttons
are pressed.
The end of the feature settings menu is reached
and exited.
A 40 second time period has elapsed with no
selection made.
3-81
Page 321 of 490

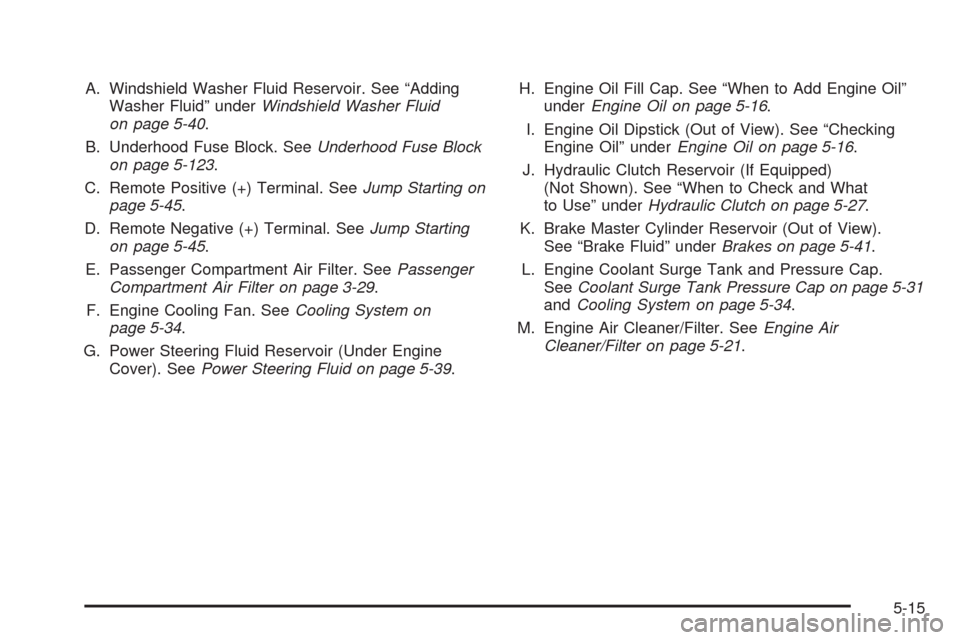
A. Windshield Washer Fluid Reservoir. See “Adding
Washer Fluid” underWindshield Washer Fluid
on page 5-40.
B. Underhood Fuse Block. SeeUnderhood Fuse Block
on page 5-123.
C. Remote Positive (+) Terminal. SeeJump Starting on
page 5-45.
D. Remote Negative (+) Terminal. SeeJump Starting
on page 5-45.
E. Passenger Compartment Air Filter. SeePassenger
Compartment Air Filter on page 3-29.
F. Engine Cooling Fan. SeeCooling System on
page 5-34.
G. Power Steering Fluid Reservoir (Under Engine
Cover). SeePower Steering Fluid on page 5-39.H. Engine Oil Fill Cap. See “When to Add Engine Oil”
underEngine Oil on page 5-16.
I. Engine Oil Dipstick (Out of View). See “Checking
Engine Oil” underEngine Oil on page 5-16.
J. Hydraulic Clutch Reservoir (If Equipped)
(Not Shown). See “When to Check and What
to Use” underHydraulic Clutch on page 5-27.
K. Brake Master Cylinder Reservoir (Out of View).
See “Brake Fluid” underBrakes on page 5-41.
L. Engine Coolant Surge Tank and Pressure Cap.
SeeCoolant Surge Tank Pressure Cap on page 5-31
andCooling System on page 5-34.
M. Engine Air Cleaner/Filter. SeeEngine Air
Cleaner/Filter on page 5-21.
5-15
Page 352 of 490

Notice:If you leave your radio or other accessories
on during the jump starting procedure, they could
be damaged. The repairs would not be covered
by your warranty. Always turn off your radio and
other accessories when jump starting your vehicle.
3. Turn off the ignition on both vehicles. Unplug
unnecessary accessories plugged into the cigarette
lighter or the accessory power outlets. Turn off
the radio and all lamps that are not needed. This
will avoid sparks and help save both batteries. And
it could save the radio!
4. Open the hoods and locate the positive (+) and
negative (−) terminal locations or the remote
positive (+) and remote negative (−) terminals of the
other vehicle. Then locate the remote positive (+)
location on your vehicle. SeeEngine Compartment
Overview on page 5-14for more information on
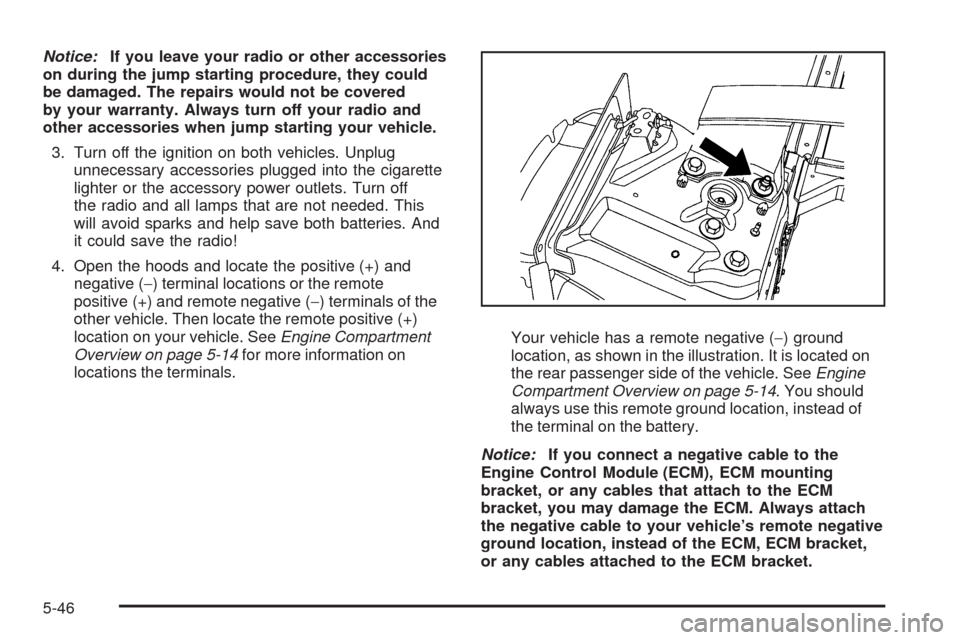
locations the terminals.Your vehicle has a remote negative (−) ground
location, as shown in the illustration. It is located on
the rear passenger side of the vehicle. SeeEngine
Compartment Overview on page 5-14. You should
always use this remote ground location, instead of
the terminal on the battery.
Notice:If you connect a negative cable to the
Engine Control Module (ECM), ECM mounting
bracket, or any cables that attach to the ECM
bracket, you may damage the ECM. Always attach
the negative cable to your vehicle’s remote negative
ground location, instead of the ECM, ECM bracket,
or any cables attached to the ECM bracket.
5-46
Page 353 of 490

{CAUTION:
An electric fan can start up even when the
engine is not running and can injure you.
Keep hands, clothing and tools away from
any underhood electric fan.
{CAUTION:
Using a match near a battery can cause battery
gas to explode. People have been hurt doing
this, and some have been blinded. Use a
�ashlight if you need more light.
Be sure the battery has enough water. You do
not need to add water to the battery installed
in your new vehicle. But if a battery has �ller
caps, be sure the right amount of �uid is there.
If it is low, add water to take care of that �rst.
If you do not, explosive gas could be present.
CAUTION: (Continued)
CAUTION: (Continued)
Battery �uid contains acid that can burn you.
Do not get it on you. If you accidentally get it
in your eyes or on your skin, �ush the place
with water and get medical help immediately.
{CAUTION:
Fans or other moving engine parts can injure
you badly. Keep your hands away from moving
parts once the engine is running.
5. Check that the jumper cables do not have loose
or missing insulation. If they do, you could get a
shock. The vehicles could be damaged too.
Before you connect the cables, here are some
basic things you should know. Positive (+) will go
to positive (+) or to a remote positive (+) terminal if
the vehicle has one. Negative (−) will go to a heavy,
unpainted metal engine part or to a remote
negative (−) terminal if the vehicle has one.
5-47
Page 354 of 490

Do not connect positive (+) to negative (−)oryou
will get a short that would damage the battery
and maybe other parts too. And do not connect the
negative (−) cable to the negative (−) terminal on
the dead battery because this can cause sparks.
6. Connect the red positive (+) cable to the positive (+)
terminal of the dead battery. Use a remote
positive (+) terminal if the vehicle has one.
7. Do not let the other end touch metal. Connect it to
the positive (+) terminal of the good battery. Use a
remote positive (+) terminal if the vehicle has one.8. Now connect the black negative (−) cable to the
negative terminal of the good battery. Use a remote
negative (−) terminal if the vehicle has one.
Do not let the other end touch anything until the
next step. The other end of the negative (−) cable
does not go to the dead battery. It goes to a heavy,
unpainted metal engine part or to a remote
negative (−) terminal on the vehicle with the
dead battery.
9. Connect the other end of the negative (−) cable at
least 18 inches (45 cm) away from the dead battery,
but not near engine parts that move. The electrical
connection is just as good there, and the chance
of sparks getting back to the battery is much less.
Use a remote negative (−) terminal if the vehicle
has one. Your vehicle’s remote negative (−) ground
location is for this purpose.
10. Now start the vehicle with the good battery and run
the engine for a while.
11. Try to start the vehicle that had the dead battery.
If it will not start after a few tries, it probably needs
service.
5-48