display CADILLAC CTS 2011 2.G User Guide
[x] Cancel search | Manufacturer: CADILLAC, Model Year: 2011, Model line: CTS, Model: CADILLAC CTS 2011 2.GPages: 496, PDF Size: 7.71 MB
Page 41 of 496
Black plate (9,1)Cadillac CTS/CTS-V Owner Manual - 2011
Keys, Doors and Windows 2-9
Programming with a Recognized
Transmitter
A new transmitter can be
programmed to the vehicle when
there is one recognized transmitter.
For vehicles sold in Canada, two
recognized transmitters are required
to program a new transmitter.
1. The vehicle must be off.
2. Place the recognizedtransmitter(s) in the cupholder.
Have the new transmitter
available with you.
3. Insert the vehicle key into the key lock cylinder located on the
outside of the driver door.
4. Turn the key to the unlock position five times within
five seconds.
5. The Driver Information Center (DIC) displays Ready To Learn
Electronic Key #2, 3 or 4.
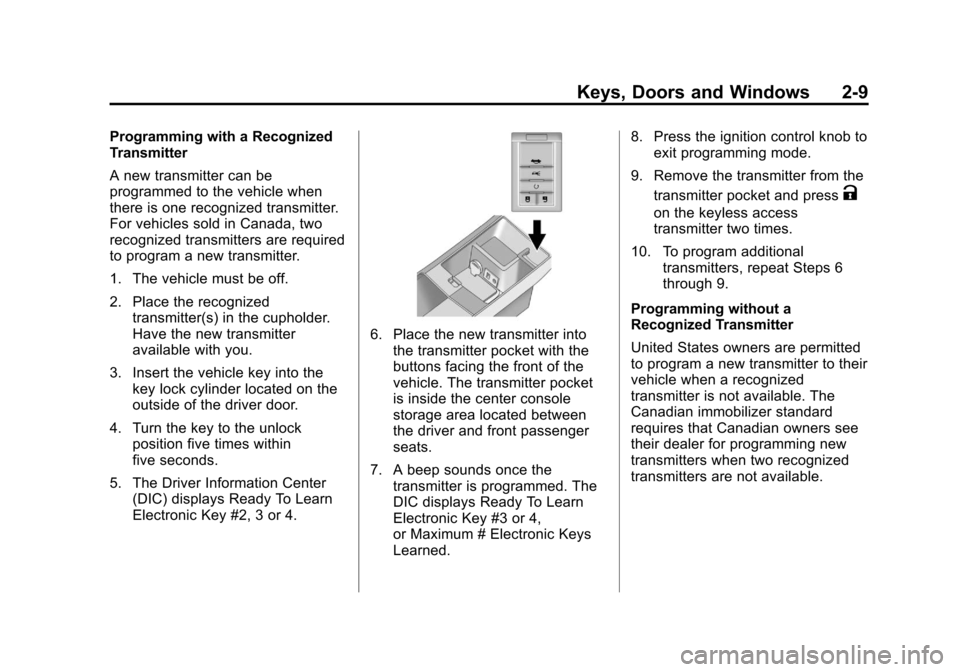
6. Place the new transmitter intothe transmitter pocket with the
buttons facing the front of the
vehicle. The transmitter pocket
is inside the center console
storage area located between
the driver and front passenger
seats.
7. A beep sounds once the transmitter is programmed. The
DIC displays Ready To Learn
Electronic Key #3 or 4,
or Maximum # Electronic Keys
Learned. 8. Press the ignition control knob to
exit programming mode.
9. Remove the transmitter from the transmitter pocket and press
K
on the keyless access
transmitter two times.
10. To program additional transmitters, repeat Steps 6
through 9.
Programming without a
Recognized Transmitter
United States owners are permitted
to program a new transmitter to their
vehicle when a recognized
transmitter is not available. The
Canadian immobilizer standard
requires that Canadian owners see
their dealer for programming new
transmitters when two recognized
transmitters are not available.
Page 42 of 496
Black plate (10,1)Cadillac CTS/CTS-V Owner Manual - 2011
2-10 Keys, Doors and Windows
The procedure requires three,
ten minute cycles to complete the
matching process.
1. The vehicle must be off.
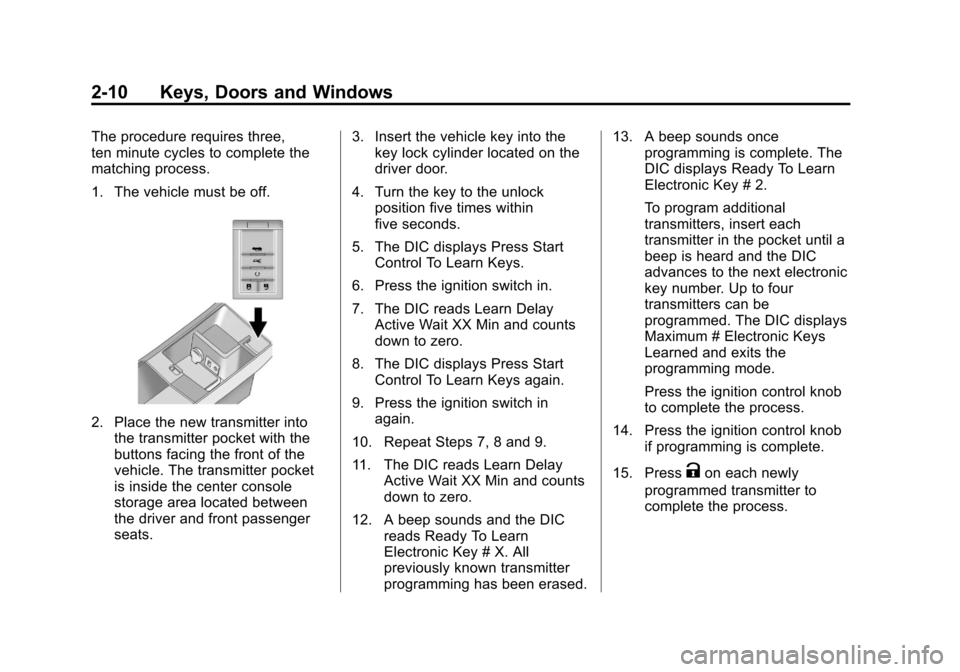
2. Place the new transmitter intothe transmitter pocket with the
buttons facing the front of the
vehicle. The transmitter pocket
is inside the center console
storage area located between
the driver and front passenger
seats. 3. Insert the vehicle key into the
key lock cylinder located on the
driver door.
4. Turn the key to the unlock position five times within
five seconds.
5. The DIC displays Press Start Control To Learn Keys.
6. Press the ignition switch in.
7. The DIC reads Learn Delay Active Wait XX Min and counts
down to zero.
8. The DIC displays Press Start Control To Learn Keys again.
9. Press the ignition switch in again.
10. Repeat Steps 7, 8 and 9.
11. The DIC reads Learn Delay Active Wait XX Min and counts
down to zero.
12. A beep sounds and the DIC reads Ready To Learn
Electronic Key # X. All
previously known transmitter
programming has been erased. 13. A beep sounds once
programming is complete. The
DIC displays Ready To Learn
Electronic Key # 2.
To program additional
transmitters, insert each
transmitter in the pocket until a
beep is heard and the DIC
advances to the next electronic
key number. Up to four
transmitters can be
programmed. The DIC displays
Maximum # Electronic Keys
Learned and exits the
programming mode.
Press the ignition control knob
to complete the process.
14. Press the ignition control knob if programming is complete.
15. Press
Kon each newly
programmed transmitter to
complete the process.
Page 43 of 496
Black plate (11,1)Cadillac CTS/CTS-V Owner Manual - 2011
Keys, Doors and Windows 2-11
Starting the Vehicle with a Low
Transmitter Battery
Replace the battery if the Replace
Battery In Remote Key message
displays in the DIC. See“Replace
Battery In Remote Key” underKey
and Lock Messages
on page 5‑36for additional information.
If the transmitter battery is weak, the
DIC may display Electronic Key Not
Detected when you try to start the
vehicle. To start the vehicle, place
the transmitter in the center console
storage area transmitter pocket with
the buttons facing to the front of the
vehicle. Then, with the vehicle in
P (Park) or Neutral, press the brake
pedal and the ignition control knob.
See Starting the Engine
on
page 9‑19, for additional
information about the vehicle's
electronic keyless ignition with push
start. Replace the transmitter battery
as soon as possible.
Battery Replacement
Notice: When replacing the
battery, do not touch any of the
circuitry on the transmitter. Static
from your body could damage the
transmitter.
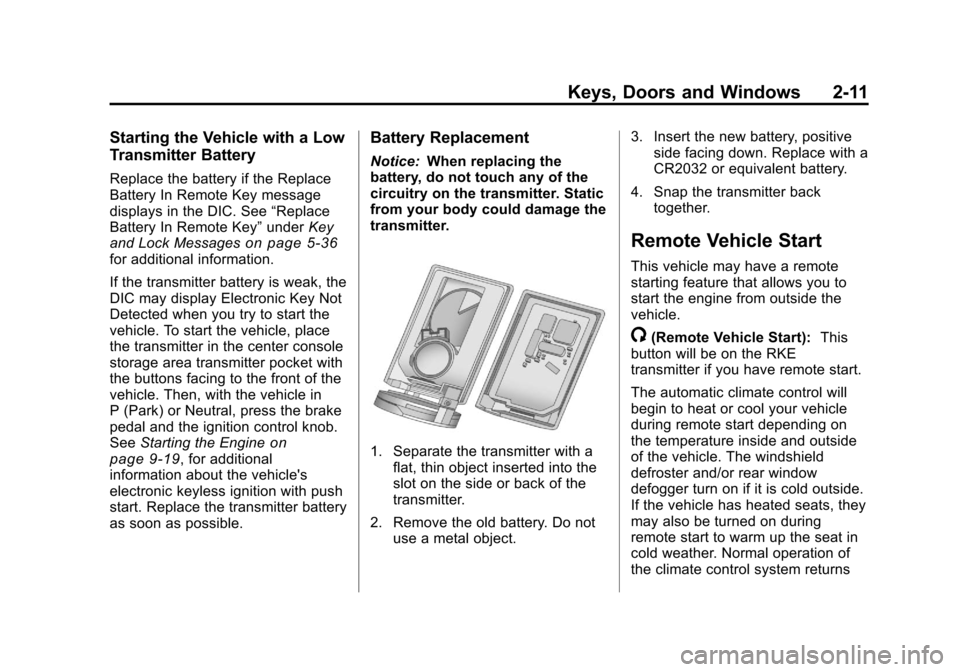
1. Separate the transmitter with a flat, thin object inserted into the
slot on the side or back of the
transmitter.
2. Remove the old battery. Do not use a metal object. 3. Insert the new battery, positive
side facing down. Replace with a
CR2032 or equivalent battery.
4. Snap the transmitter back together.
Remote Vehicle Start
This vehicle may have a remote
starting feature that allows you to
start the engine from outside the
vehicle.
/(Remote Vehicle Start): This
button will be on the RKE
transmitter if you have remote start.
The automatic climate control will
begin to heat or cool your vehicle
during remote start depending on
the temperature inside and outside
of the vehicle. The windshield
defroster and/or rear window
defogger turn on if it is cold outside.
If the vehicle has heated seats, they
may also be turned on during
remote start to warm up the seat in
cold weather. Normal operation of
the climate control system returns
Page 79 of 496
Black plate (11,1)Cadillac CTS/CTS-V Owner Manual - 2011
Seats and Restraints 3-11
Heated Front Seats
{WARNING
If you cannot feel temperature
change or pain to the skin, the
seat heater may cause burns
even at low temperatures. To
reduce the risk of burns, people
with such a condition should use
care when using the seat heater,
especially for long periods of
time. Do not place anything on
the seat that insulates against
heat, such as a blanket, cushion,
cover or similar item. This may
cause the seat heater to
overheat. An overheated seat
heater may cause a burn or may
damage the seat.
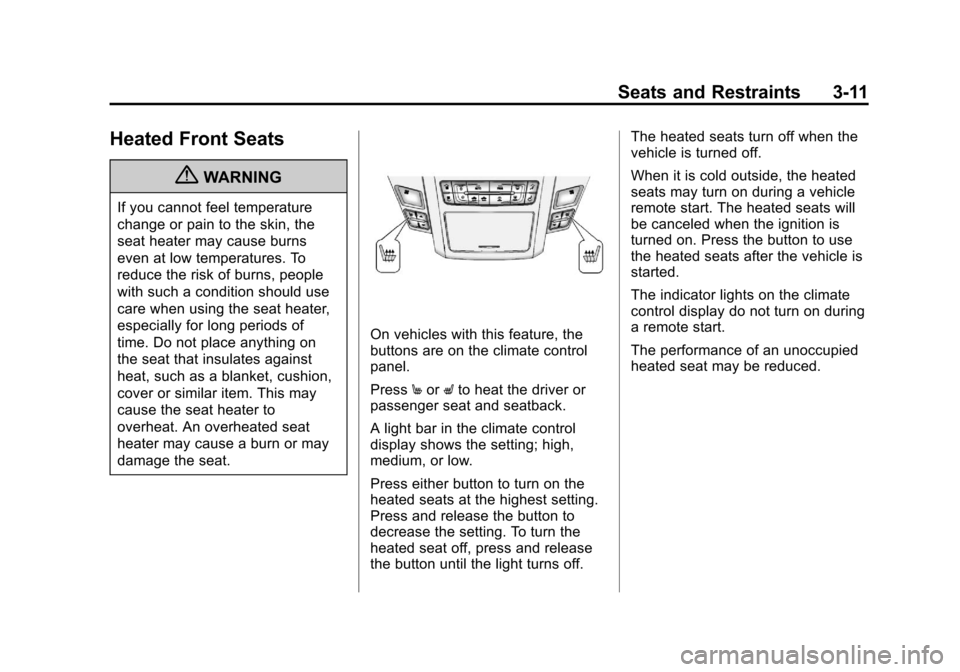
On vehicles with this feature, the
buttons are on the climate control
panel.
PressMor Lto heat the driver or
passenger seat and seatback.
A light bar in the climate control
display shows the setting; high,
medium, or low.
Press either button to turn on the
heated seats at the highest setting.
Press and release the button to
decrease the setting. To turn the
heated seat off, press and release
the button until the light turns off. The heated seats turn off when the
vehicle is turned off.
When it is cold outside, the heated
seats may turn on during a vehicle
remote start. The heated seats will
be canceled when the ignition is
turned on. Press the button to use
the heated seats after the vehicle is
started.
The indicator lights on the climate
control display do not turn on during
a remote start.
The performance of an unoccupied
heated seat may be reduced.
Page 80 of 496

Black plate (12,1)Cadillac CTS/CTS-V Owner Manual - 2011
3-12 Seats and Restraints
Heated and Ventilated
Front Seats
{WARNING
If you cannot feel temperature
change or pain to the skin, the
seat heater may cause burns
even at low temperatures. See
the Warning underHeated Front
Seats on page 3‑11.
On vehicles with this feature, the
buttons are on the climate control
panel.
z(Heated Seat and Seatback):
Press to heat the seat and
seatback.
{(Ventilated Seat): Press to
ventilate the seat.
A light bar in the climate control
display shows the setting: high,
medium, or low. Press either button to turn on the
feature at the highest setting. Press
and release the button to decrease
the setting. To turn the feature off,
press and release the button until
the light turns off.
The heated or ventilated seats turn
off when the vehicle is turned off.
During a remote start, the heated or
ventilated seats may turn on,
depending upon the outside
temperature. They are canceled
when the ignition is turned on. Press
the button to use the heated or
ventilated seats after the vehicle is
started.
The indicator lights on the climate
control display do not turn on during
a remote start.
The performance of an unoccupied
heated seat may be reduced.
Page 141 of 496
Black plate (1,1)Cadillac CTS/CTS-V Owner Manual - 2011
Instruments and Controls 5-1
Instruments and
Controls
Controls
Steering Wheel Adjustment . . . 5-2
Steering Wheel Controls(Audio) . . . . . . . . . . . . . . . . . . . . . . 5-3
Heated Steering Wheel . . . . . . . 5-4
Horn . . . . . . . . . . . . . . . . . . . . . . . . . . 5-4
Windshield Wiper/Washer . . . . . 5-4
Rear Window Wiper/ Washer . . . . . . . . . . . . . . . . . . . . . . 5-6
Headlamp Washer . . . . . . . . . . . . 5-7
Compass . . . . . . . . . . . . . . . . . . . . . 5-7
Clock . . . . . . . . . . . . . . . . . . . . . . . . . 5-8
Power Outlets . . . . . . . . . . . . . . . . . 5-9
Cigarette Lighter . . . . . . . . . . . . . . 5-9
Ashtrays . . . . . . . . . . . . . . . . . . . . . 5-10
Warning Lights, Gauges, and
Indicators
Warning Lights, Gauges, and Indicators . . . . . . . . . . . . . . . . . . 5-10
Instrument Cluster . . . . . . . . . . . 5-11
Speedometer . . . . . . . . . . . . . . . . 5-13
Odometer . . . . . . . . . . . . . . . . . . . . 5-13
Trip Odometer . . . . . . . . . . . . . . . 5-13 Tachometer . . . . . . . . . . . . . . . . . . 5-13
Fuel Gauge . . . . . . . . . . . . . . . . . . 5-13
Boost Gauge . . . . . . . . . . . . . . . . 5-14
Engine Speed Limiter . . . . . . . . 5-15
Engine Oil Pressure
Gauge . . . . . . . . . . . . . . . . . . . . . . 5-15
Engine Coolant Temperature Gauge . . . . . . . . . . . . . . . . . . . . . . 5-16
Safety Belt Reminders . . . . . . . 5-17
Airbag Readiness Light . . . . . . 5-17
Passenger Airbag Status Indicator . . . . . . . . . . . . . . . . . . . . 5-18
Charging System Light . . . . . . 5-19
Malfunction Indicator Lamp . . . . . . . . . . . . . 5-19
Brake System Warning Light . . . . . . . . . . . . . . . . . . . . . . . 5-22
Antilock Brake System (ABS) Warning Light . . . . . . . . . . . . . . 5-23
Up-Shift Light . . . . . . . . . . . . . . . . 5-24
Traction Control System (TCS)/StabiliTrak
®Light . . . . 5-24
Engine Coolant Temperature Warning Light . . . . . . . . . . . . . . 5-25
Tire Pressure Light . . . . . . . . . . 5-25
Engine Oil Pressure Light . . . . 5-26
Security Light . . . . . . . . . . . . . . . . 5-26
High-Beam on Light . . . . . . . . . 5-26 Fog Lamp Light . . . . . . . . . . . . . . 5-27
Lamps on Reminder . . . . . . . . . 5-27
Cruise Control Light . . . . . . . . . 5-27
Information Displays
Driver Information
Center (DIC) . . . . . . . . . . . . . . . 5-27
Vehicle Messages
Vehicle Messages . . . . . . . . . . . 5-31
Battery Voltage and ChargingMessages . . . . . . . . . . . . . . . . . . 5-31
Brake System Messages . . . . 5-32
Compass Messages . . . . . . . . . 5-34
Cruise Control Messages . . . . 5-34
Door Ajar Messages . . . . . . . . . 5-34
Engine Cooling System Messages . . . . . . . . . . . . . . . . . . 5-35
Engine Oil Messages . . . . . . . . 5-35
Engine Power Messages . . . . 5-36
Fuel System Messages . . . . . . 5-36
Key and Lock Messages . . . . . 5-36
Lamp Messages . . . . . . . . . . . . . 5-39
Object Detection System Messages . . . . . . . . . . . . . . . . . . 5-39
Ride Control System Messages . . . . . . . . . . . . . . . . . . 5-40
Airbag System Messages . . . . 5-42
Page 144 of 496
Black plate (4,1)Cadillac CTS/CTS-V Owner Manual - 2011
5-4 Instruments and Controls
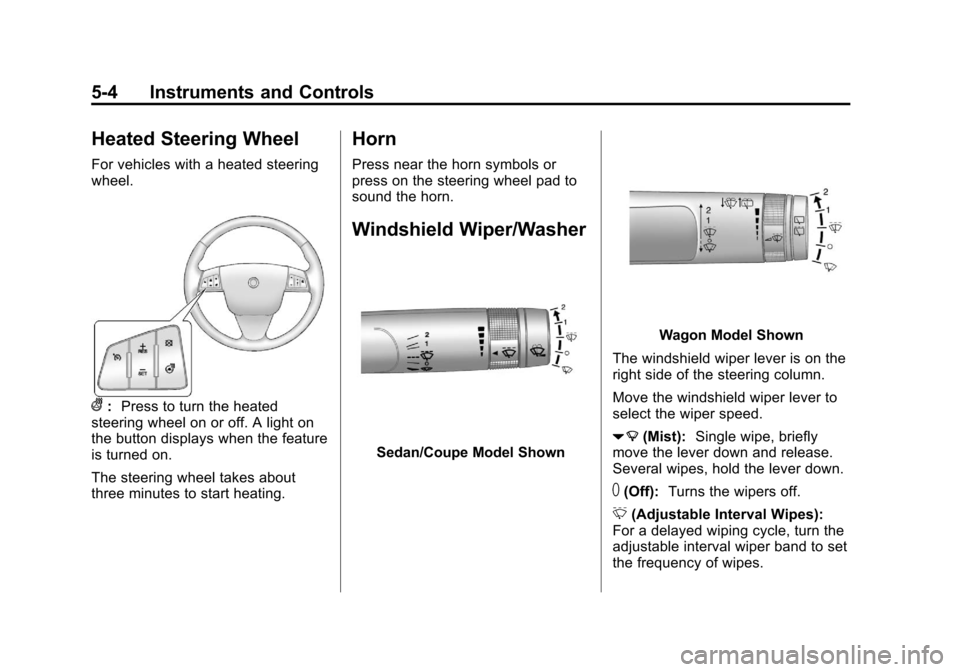
Heated Steering Wheel
For vehicles with a heated steering
wheel.
(:Press to turn the heated
steering wheel on or off. A light on
the button displays when the feature
is turned on.
The steering wheel takes about
three minutes to start heating.
Horn
Press near the horn symbols or
press on the steering wheel pad to
sound the horn.
Windshield Wiper/Washer
Sedan/Coupe Model Shown
Wagon Model Shown
The windshield wiper lever is on the
right side of the steering column.
Move the windshield wiper lever to
select the wiper speed.
7 (Mist): Single wipe, briefly
move the lever down and release.
Several wipes, hold the lever down.
T(Off): Turns the wipers off.
& (Adjustable Interval Wipes):
For a delayed wiping cycle, turn the
adjustable interval wiper band to set
the frequency of wipes.
Page 145 of 496
Black plate (5,1)Cadillac CTS/CTS-V Owner Manual - 2011
Instruments and Controls 5-5
6(Adjustable Interval Wiper
Band): Turn the band up for more
frequent wipes or down for less
frequent wipes.
1 : Slow wipes.
2 : Fast wipes.
If the windshield wipers are in use
for about six seconds while you are
driving, the exterior lamps come on
automatically if the exterior lamp
control is in AUTO. See “Wiper
Activated Headlamps” for more
information.
Clear snow and ice from the wiper
blades before using them. If frozen
to the windshield, carefully loosen or
thaw them. Damaged wiper blades
should be replaced. For more
information, see Wiper Blade
Replacement on page 10‑34.
Heavy snow or ice can overload the
wiper motor. A circuit breaker will
stop the motor until it cools down. Wiper Arm Assembly Protection
When using an automatic car wash,
move the windshield wiper lever to
the OFF position. This disables the
windshield wipers and/or rear
wipers, if equipped.
Windshield Washer
{WARNING
In freezing weather, do not use
your washer until the windshield
is warmed. Otherwise the washer
fluid can form ice on the
windshield, blocking your vision.
Sedan/Coupe Model
K(Washer Fluid): Press the
button with this symbol, on the end
of the windshield washer lever, to
wash the windshield. The washer
fluid sprays onto the windshield and
the wipers run for a few cycles to
clear the windshield. Press and hold
Kfor more wash cycles. Wagon Model
Pull the lever to spray washer fluid
on the windshield. The spray
continues until the lever is released.
The wipers will run a few times.
Washer Fluid Low Add Fluid
displays on the Driver Information
Center (DIC) when the washer fluid
is low. See
Driver Information
Center (DIC) on page 5‑27.
See Washer Fluid
on page 10‑26for
information on filling the windshield
washer fluid reservoir.
If the headlamps are on while the
windshield is being washed, the
headlamp washers, if the vehicle
has them, will also turn on. See
“Headlamp Washer” following for
more information.
Page 147 of 496
Black plate (7,1)Cadillac CTS/CTS-V Owner Manual - 2011
Instruments and Controls 5-7
Headlamp Washer
For vehicles with headlamp washers
they clear debris from the headlamp
lenses.
The headlamp washers are beneath
the headlamps.
Press the washer button at the end
of the windshield wiper lever, to
wash the headlamps. Both the
headlamps and the windshield will
be washed. After the first wash, the
headlamps will not be washed until
the fifth press of the windshield
washer button.The headlamps must be on to be
washed. If the headlamps are off,
only the windshield will be washed
when the washer button is pressed.
If the washer fluid is low, the
headlamp washers will not work.
See
Windshield Wiper/Washer
on
page 5‑4for more information.
Compass
The vehicle may have a compass in
the Driver Information Center (DIC).
Compass Zone
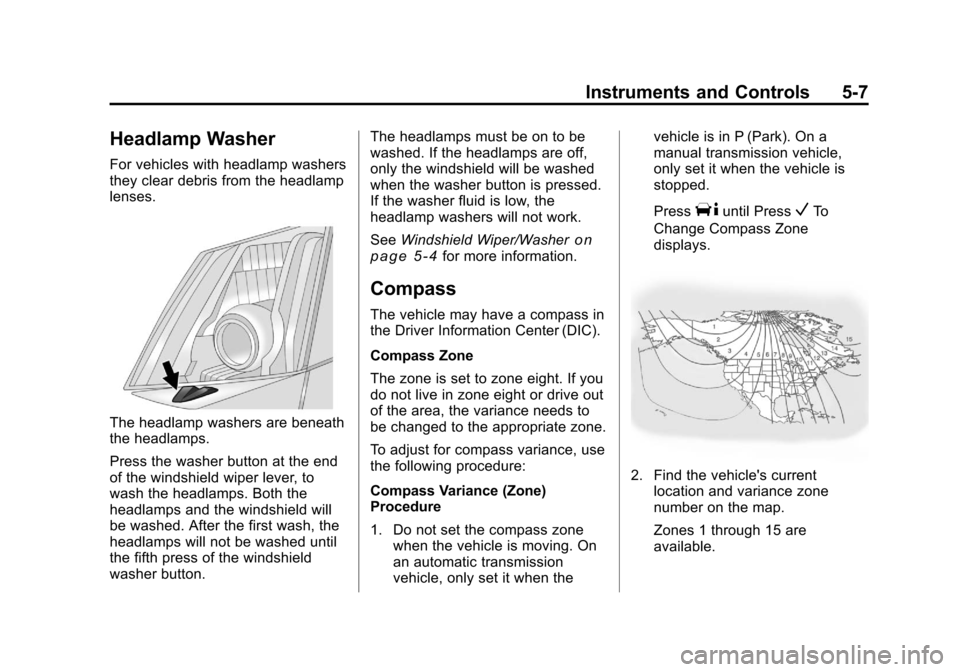
The zone is set to zone eight. If you
do not live in zone eight or drive out
of the area, the variance needs to
be changed to the appropriate zone.
To adjust for compass variance, use
the following procedure:
Compass Variance (Zone)
Procedure
1. Do not set the compass zone when the vehicle is moving. On
an automatic transmission
vehicle, only set it when the vehicle is in P (Park). On a
manual transmission vehicle,
only set it when the vehicle is
stopped.
Press
Tuntil PressVTo
Change Compass Zone
displays.
2. Find the vehicle's current location and variance zone
number on the map.
Zones 1 through 15 are
available.
Page 148 of 496
Black plate (8,1)Cadillac CTS/CTS-V Owner Manual - 2011
5-8 Instruments and Controls
3. PressVto scroll through and
select the appropriate
variance zone.
4. Press
3until the vehicle
heading, for example, N for
North, is displayed in the DIC.
5. Calibrate the compass. See “Compass Calibration
Procedure” following.
Compass Calibration
The compass can be manually
calibrated. Only calibrate the
compass in a magnetically clean
and safe location, such as an open
parking lot, where driving the
vehicle in circles is not a danger.
Also, away from tall buildings, utility
wires, manhole covers, or other
industrial structures, if possible.
If the DIC display does not show a
heading, for example, N for North,
or the heading does not change
after making turns, there may be a
strong magnetic field interfering with
the compass. Interference may be
caused by a magnetic antenna mount, magnetic note pad holder,
or any other magnetic item. Turn off
the vehicle, move the magnetic
item, then turn on the vehicle and
calibrate the compass.
Compass Calibration Procedure
1. Before calibrating the compass,
check that the compass is set to
the correct variance zone. See
“Compass Variance (Zone)
Procedure” earlier in this
section.
Do not operate any switches
such as window, sunroof,
climate controls, seats, etc.
during the calibration procedure.
2. Press
Tuntil PressVTo
Calibrate Compass displays.
3. Press
Vto start the compass
calibration.
4. The DIC will display Calibrating Drive In Circles. Drive the
vehicle in tight circles at less
than 8 km/h (5 mph) to complete
the calibration. The DIC will display Calibration Complete for
a few seconds then returns to
the Press
VTo Calibrate
Compass display.
Clock
The analog clock is located on the
instrument panel above the radio.
The clock is not connected with any
other vehicle system and runs by
itself. To adjust the clock:
1. Locate the adjustment buttons directly below the clock.
2. Push and release the right adjustment button to move the
clock hands forward or the left
adjustment button to make the
clock hands go backward.
Holding either button down will
cause the clock to advance
faster. Release the button before
the desired time is reached.
3. Push and release either button to adjust the time by one minute
increments.