display CADILLAC CTS 2012 2.G Infotainment Manual
[x] Cancel search | Manufacturer: CADILLAC, Model Year: 2012, Model line: CTS, Model: CADILLAC CTS 2012 2.GPages: 76, PDF Size: 0.61 MB
Page 38 of 76
Black plate (38,1)Cadillac CTS/CTS-V Navigation System (Includes Mex) - 2012
38 Infotainment System
If using the scroll feature, touch-tap
the map and the vehicle icon
becomes lost, press NAV
(Navigation) to return to the current
vehicle location on the map.
When scrolling on the map, the
system displays the address of the
scroll symbol location.
You can use the scroll feature on
the map to set a destination. See
“From Map”under Destination for
more information.
When scrolling on the map without a
planned route, press Go to calculate
the route from your current position
to the destination mark.Navigation Symbols
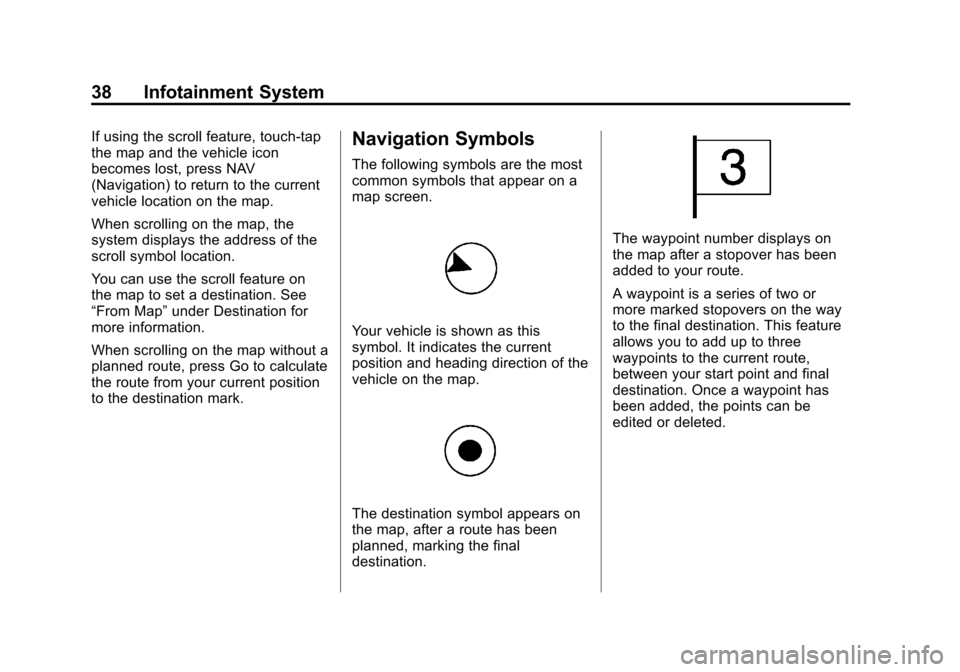
The following symbols are the most
common symbols that appear on a
map screen.
Your vehicle is shown as this
symbol. It indicates the current
position and heading direction of the
vehicle on the map.
The destination symbol appears on
the map, after a route has been
planned, marking the final
destination.
The waypoint number displays on
the map after a stopover has been
added to your route.
A waypoint is a series of two or
more marked stopovers on the way
to the final destination. This feature
allows you to add up to three
waypoints to the current route,
between your start point and final
destination. Once a waypoint has
been added, the points can be
edited or deleted.
Page 39 of 76
Black plate (39,1)Cadillac CTS/CTS-V Navigation System (Includes Mex) - 2012
Infotainment System 39
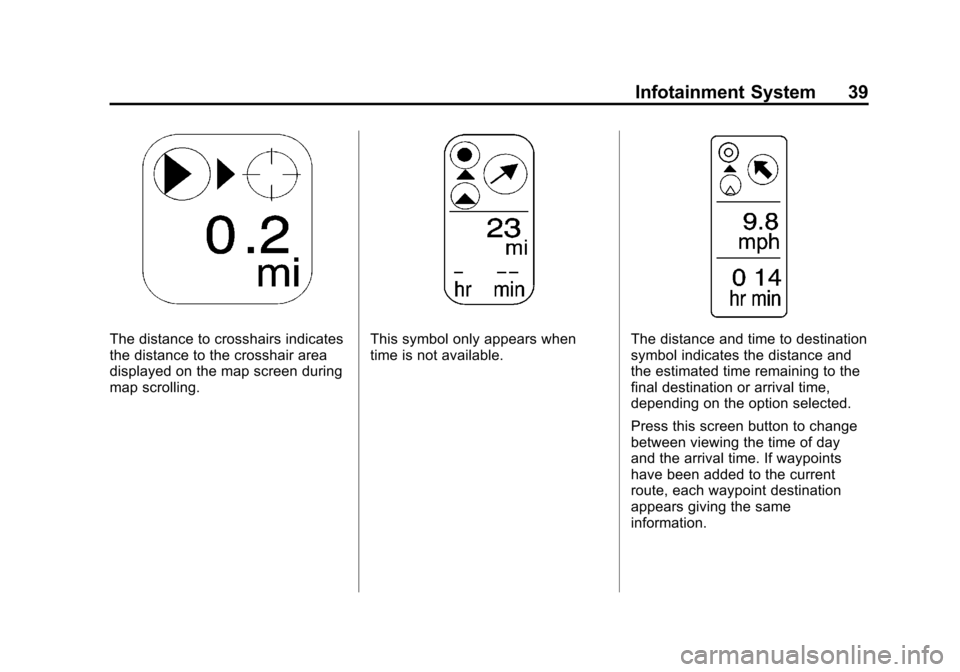
The distance to crosshairs indicates
the distance to the crosshair area
displayed on the map screen during
map scrolling.This symbol only appears when
time is not available.The distance and time to destination
symbol indicates the distance and
the estimated time remaining to the
final destination or arrival time,
depending on the option selected.
Press this screen button to change
between viewing the time of day
and the arrival time. If waypoints
have been added to the current
route, each waypoint destination
appears giving the same
information.
Page 41 of 76
Black plate (41,1)Cadillac CTS/CTS-V Navigation System (Includes Mex) - 2012
Infotainment System 41
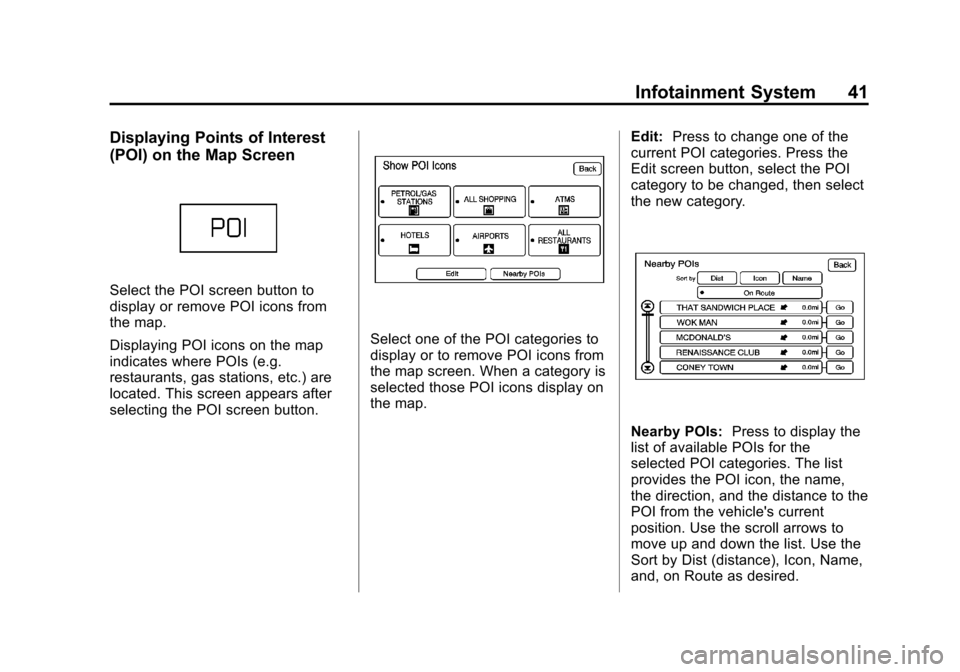
Displaying Points of Interest
(POI) on the Map Screen
Select the POI screen button to
display or remove POI icons from
the map.
Displaying POI icons on the map
indicates where POIs (e.g.
restaurants, gas stations, etc.) are
located. This screen appears after
selecting the POI screen button.
Select one of the POI categories to
display or to remove POI icons from
the map screen. When a category is
selected those POI icons display on
the map.Edit:
Press to change one of the
current POI categories. Press the
Edit screen button, select the POI
category to be changed, then select
the new category.
Nearby POIs: Press to display the
list of available POIs for the
selected POI categories. The list
provides the POI icon, the name,
the direction, and the distance to the
POI from the vehicle's current
position. Use the scroll arrows to
move up and down the list. Use the
Sort by Dist (distance), Icon, Name,
and, on Route as desired.
Page 42 of 76
Black plate (42,1)Cadillac CTS/CTS-V Navigation System (Includes Mex) - 2012
42 Infotainment System
Go:Press this screen button, next
to the desired POI, to make this POI
a destination or a waypoint.
Select a POI name to receive
information about the POI. From this
screen you can select: Add, to add
this POI to the address book, Go,
or Map.
Add: Press to add this POI to the
address book. See “Address Book”
under Destination on page 42 for
information on address book entries.
Go: Press to make this POI a
destination or a waypoint.
Map: Press to display the map
showing the location of the POI.
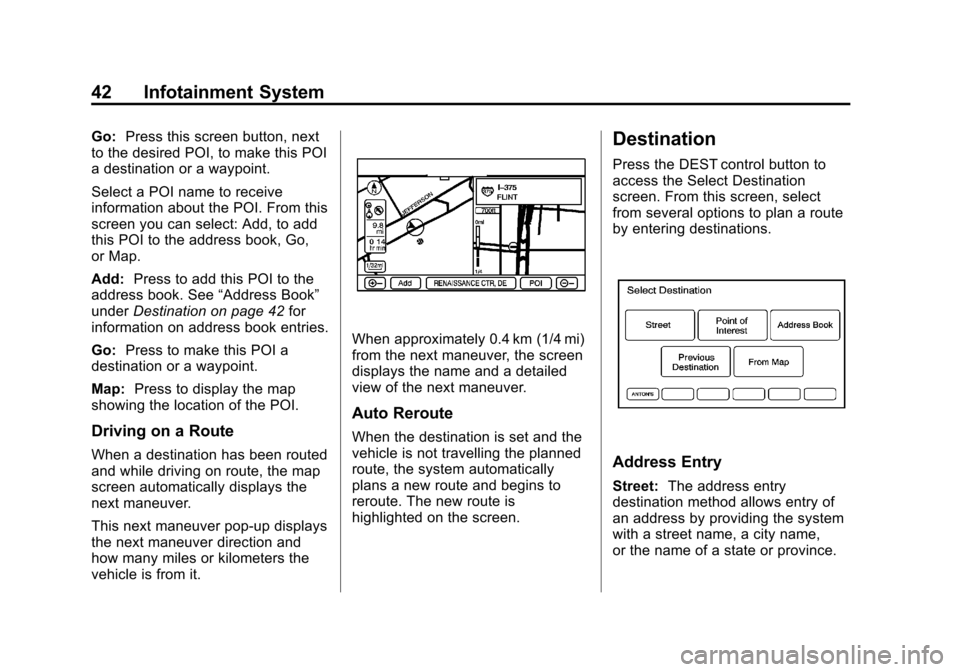
Driving on a Route
When a destination has been routed
and while driving on route, the map
screen automatically displays the
next maneuver.
This next maneuver pop-up displays
the next maneuver direction and
how many miles or kilometers the
vehicle is from it.
When approximately 0.4 km (1/4 mi)
from the next maneuver, the screen
displays the name and a detailed
view of the next maneuver.
Auto Reroute
When the destination is set and the
vehicle is not travelling the planned
route, the system automatically
plans a new route and begins to
reroute. The new route is
highlighted on the screen.
Destination
Press the DEST control button to
access the Select Destination
screen. From this screen, select
from several options to plan a route
by entering destinations.
Address Entry
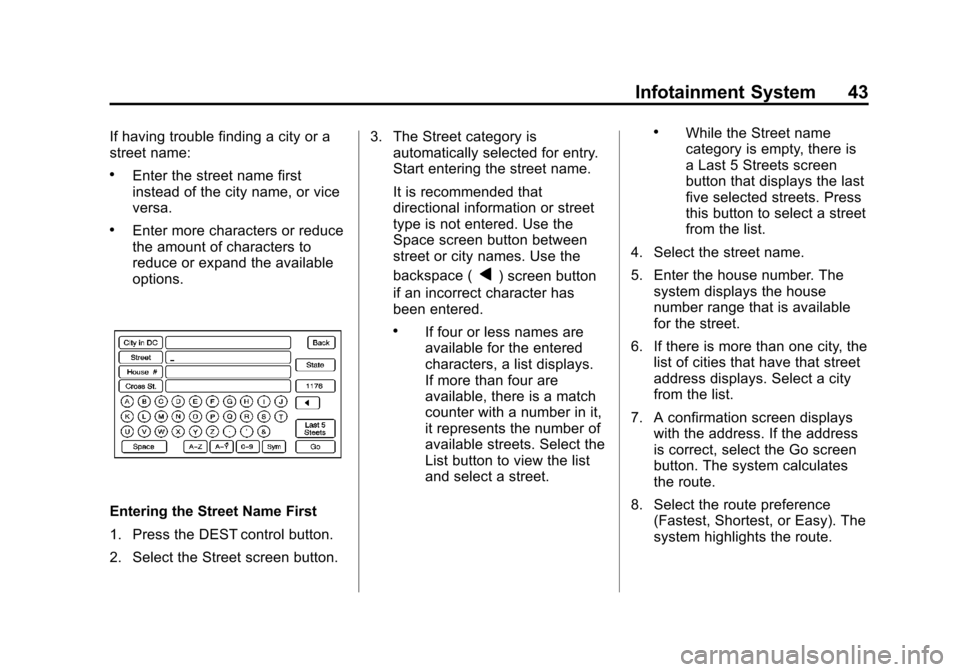
Street: The address entry
destination method allows entry of
an address by providing the system
with a street name, a city name,
or the name of a state or province.
Page 43 of 76
Black plate (43,1)Cadillac CTS/CTS-V Navigation System (Includes Mex) - 2012
Infotainment System 43
If having trouble finding a city or a
street name:
.Enter the street name first
instead of the city name, or vice
versa.
.Enter more characters or reduce
the amount of characters to
reduce or expand the available
options.
Entering the Street Name First
1. Press the DEST control button.
2. Select the Street screen button.3. The Street category is
automatically selected for entry.
Start entering the street name.
It is recommended that
directional information or street
type is not entered. Use the
Space screen button between
street or city names. Use the
backspace (
q) screen button
if an incorrect character has
been entered.
.If four or less names are
available for the entered
characters, a list displays.
If more than four are
available, there is a match
counter with a number in it,
it represents the number of
available streets. Select the
List button to view the list
and select a street.
.While the Street name
category is empty, there is
a Last 5 Streets screen
button that displays the last
five selected streets. Press
this button to select a street
from the list.
4. Select the street name.
5. Enter the house number. The system displays the house
number range that is available
for the street.
6. If there is more than one city, the list of cities that have that street
address displays. Select a city
from the list.
7. A confirmation screen displays with the address. If the address
is correct, select the Go screen
button. The system calculates
the route.
8. Select the route preference (Fastest, Shortest, or Easy). The
system highlights the route.
Page 44 of 76

Black plate (44,1)Cadillac CTS/CTS-V Navigation System (Includes Mex) - 2012
44 Infotainment System
9. Press the Start Guidance screenbutton. The route is now ready
to be started.
See “Getting Started on Your
Route” in this section.
Entering the City Name First
1. Press the DEST control button.
2. Press the Street screen button.
3. Press the City screen button and start entering the city name.
If four or less names are
available for the entered
characters, a list displays.
If more than four are available,
there is a match counter with a
number in it, it represents the
number of available cities. Press
the List button to view the list
and select a city. 4. Start entering the street name.
It is recommended that
directional information or street
type is not entered. Use the
Space screen button between
street or city names. Use the
backspace (
q) screen button
if an incorrect character has
been entered.
.If four or less names are
available for the entered
characters, a list displays.
If more than four are
available, there is a match
counter with a number in it,
it represents the number of
available streets. Select the
List button to view the list
and select a street.
.While the Street name
category is empty, there is
a Last 5 Streets screen
button that displays the last
five selected streets. Press
this button to select a street
from the list. 5. Select the street name.
6. Once a street has been
selected, the numeric keyboard
displays, allowing entry of the
house number. The system
displays the house number
range that is available for the
street.
7. A confirmation screen displays with the address. If the address
is correct, select Go. The system
calculates the route.
8. Select the route preference (Fastest, Shortest, or Easy). The
system highlights the route.
9. Press the Start Guidance screen button. The route is now ready
to be started.
See “Getting Started on Your
Route” in this section.
Page 45 of 76

Black plate (45,1)Cadillac CTS/CTS-V Navigation System (Includes Mex) - 2012
Infotainment System 45
Entering the State or Province
First
1. Press the DEST control button.
2. Press the Street screen button.
3. Press the State screen buttonand select the state or province
from the list.
4. Press the City screen button and start entering the city name.
5. Start entering the street name. Do not enter directional
information or street type, and
use the Space screen button
between street or city names. Use the backspace screen
button if an incorrect character
has been entered.
.If four or less names are
available for the entered
characters, a list displays.
If more than four are
available, there is a match
counter with a number in it,
it represents the number of
available cities. Press the
List button to view the list
and select a city.
.While the Street name
category is empty, there is
a Last 5 Streets screen
button that displays the last
five selected streets. Press
this button to select a street
from the list.
6. Select the street name. 7. Once a street has been
selected, the numeric keyboard
displays, allowing entry of the
house number. The system
displays the house number
range that is available for the
street.
8. A confirmation screen displays with the address. If the address
is correct, select the Go screen
button. The system calculates
the route.
9. Select the route preference (Fastest, Shortest, or Easy). The
system highlights the route.
10. Press the Start Guidance screen button. The route is
now ready to be started.
See“Getting Started on Your
Route” in this section.
Page 46 of 76
Black plate (46,1)Cadillac CTS/CTS-V Navigation System (Includes Mex) - 2012
46 Infotainment System
Point of Interest (POI)
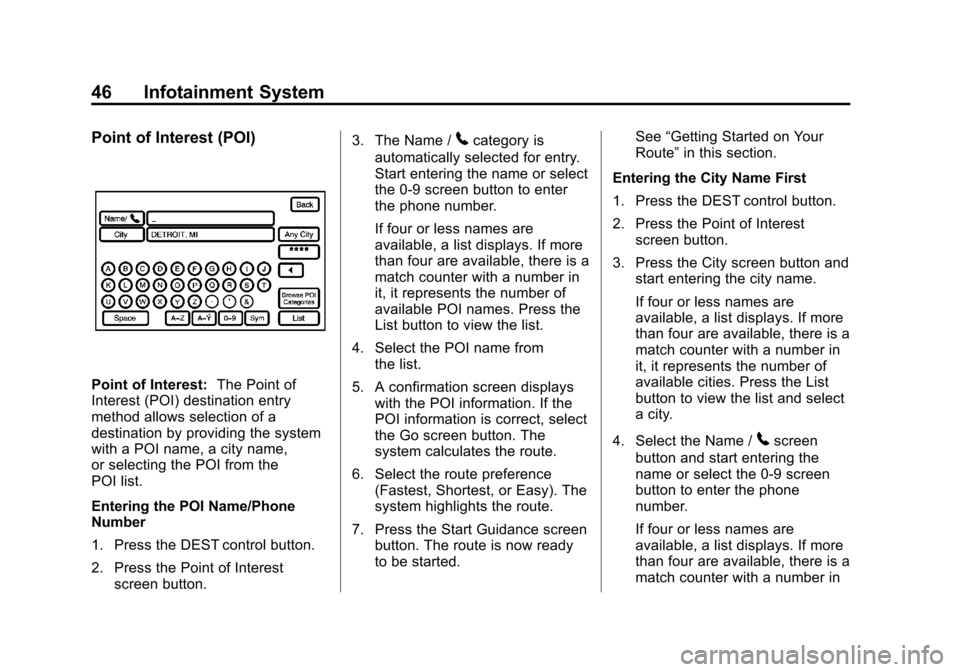
Point of Interest:The Point of
Interest (POI) destination entry
method allows selection of a
destination by providing the system
with a POI name, a city name,
or selecting the POI from the
POI list.
Entering the POI Name/Phone
Number
1. Press the DEST control button.
2. Press the Point of Interest
screen button. 3. The Name /
5category is
automatically selected for entry.
Start entering the name or select
the 0‐9 screen button to enter
the phone number.
If four or less names are
available, a list displays. If more
than four are available, there is a
match counter with a number in
it, it represents the number of
available POI names. Press the
List button to view the list.
4. Select the POI name from the list.
5. A confirmation screen displays with the POI information. If the
POI information is correct, select
the Go screen button. The
system calculates the route.
6. Select the route preference (Fastest, Shortest, or Easy). The
system highlights the route.
7. Press the Start Guidance screen button. The route is now ready
to be started. See
“Getting Started on Your
Route” in this section.
Entering the City Name First
1. Press the DEST control button.
2. Press the Point of Interest screen button.
3. Press the City screen button and start entering the city name.
If four or less names are
available, a list displays. If more
than four are available, there is a
match counter with a number in
it, it represents the number of
available cities. Press the List
button to view the list and select
a city.
4. Select the Name /
5screen
button and start entering the
name or select the 0‐9 screen
button to enter the phone
number.
If four or less names are
available, a list displays. If more
than four are available, there is a
match counter with a number in
Page 47 of 76
Black plate (47,1)Cadillac CTS/CTS-V Navigation System (Includes Mex) - 2012
Infotainment System 47
it, it represents the number of
available POI names. Select the
List button to view the list.
5. Select the POI name from the list.
6. A confirmation screen displays with the POI information. If the
POI information is correct, press
the Go screen button. The
system calculates the route.
7. Select the route preference (Fastest, Shortest, or Easy). The
system highlights the route.
8. Press the Start Guidance screen button. The route is now ready
to be started.
See “Getting Started on Your
Route” in this section.
Selecting a POI Category
1. Press the DEST control button.
2. Press the Point of Interest screen button. 3. Press the Browse POI
Categories screen button.
4. Select a category, and then a sub-category.
The system will display available
POI names in the selected
sub-category.
5. Select the POI name from the list.
6. A confirmation screen displays with the POI information. If the
POI information is correct, select
the Go screen button. The
system calculates the route.
7. Select the route preference (Fastest, Shortest, or Easy). The
system highlights the route.
8. Press the Start Guidance screen button. The route is now ready
to be started.
See “Getting Started on Your
Route” in this section. Address Book
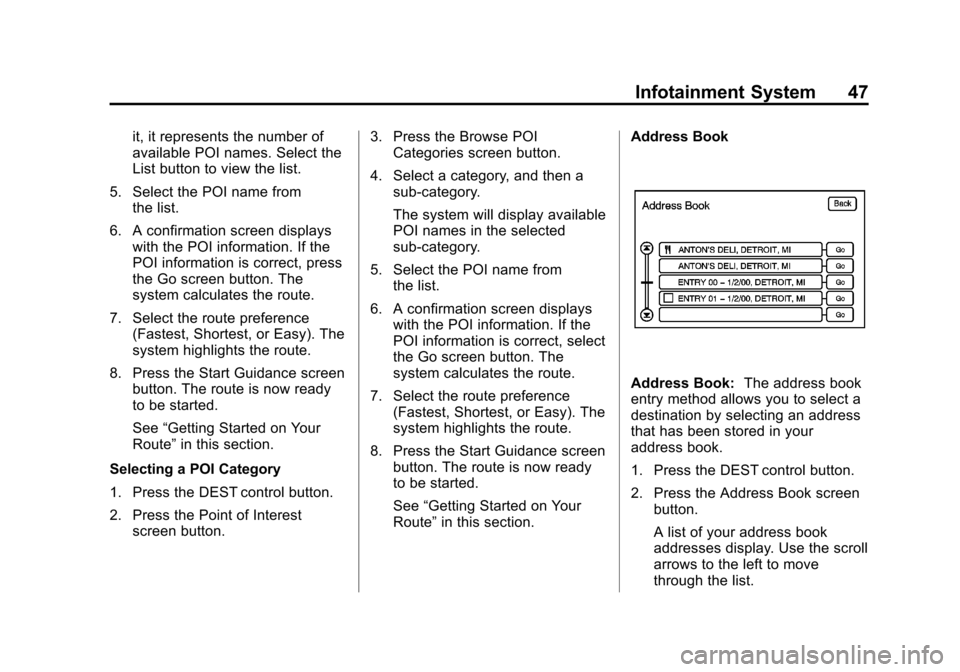
Address Book:
The address book
entry method allows you to select a
destination by selecting an address
that has been stored in your
address book.
1. Press the DEST control button.
2. Press the Address Book screen
button.
A list of your address book
addresses display. Use the scroll
arrows to the left to move
through the list.
Page 48 of 76
Black plate (48,1)Cadillac CTS/CTS-V Navigation System (Includes Mex) - 2012
48 Infotainment System
3. Press the Go screen button,located next to the destination.
The system calculates the route.
4. Select the route preference (Fastest, Shortest, or Easy). The
system highlights the route.
5. Press the Start Guidance screen button. The route is now ready
to be started.
See “Getting Started on Your
Route” later in this section for
more information.
See “Adding Destinations to the
Address Book” in this section.OnStar®Destination Download
(If Equipped)
OnStar®Destination Download
(if equipped) is a service available
for OnStar* subscribers that makes
operating your navigation system
much simpler. It allows subscribers
to request and receive navigation
assistance on-the-go.
Using OnStar®Destination
Download (If Equipped)
Press the blue OnStar button
and an Advisor can locate a
point-of-interest or an address and
download the necessary information
or coordinates to your navigation
system. Once the destination is
downloaded, the navigation system
will search for the address in the
mapping disc's database. When the
address is found, it will be shown on
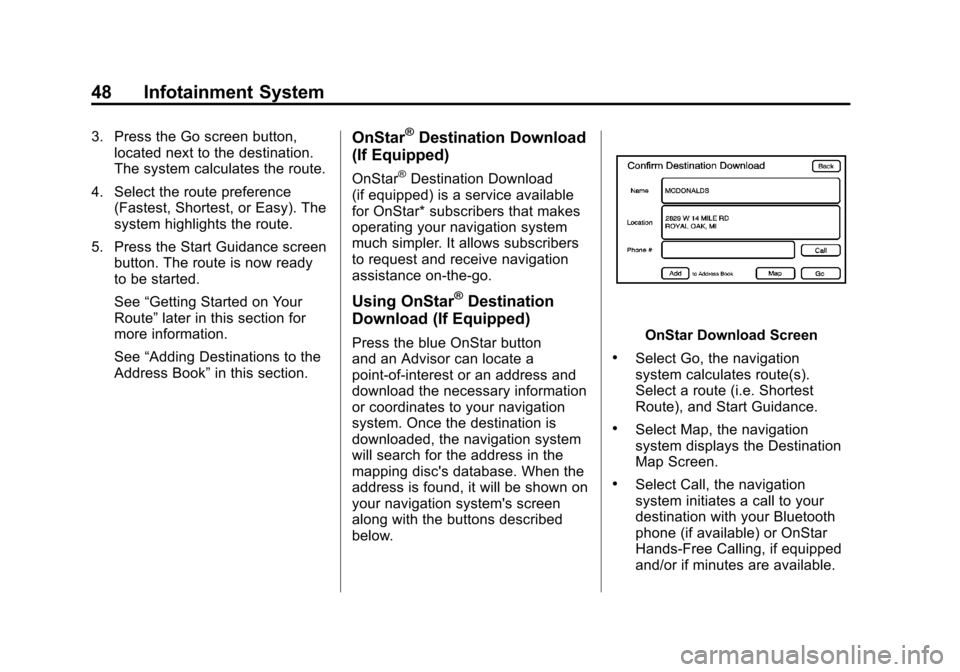
your navigation system's screen
along with the buttons described
below.OnStar Download Screen
.Select Go, the navigation
system calculates route(s).
Select a route (i.e. Shortest
Route), and Start Guidance.
.Select Map, the navigation
system displays the Destination
Map Screen.
.Select Call, the navigation
system initiates a call to your
destination with your Bluetooth
phone (if available) or OnStar
Hands-Free Calling, if equipped
and/or if minutes are available.