phone CADILLAC CTS 2012 2.G Infotainment Manual
[x] Cancel search | Manufacturer: CADILLAC, Model Year: 2012, Model line: CTS, Model: CADILLAC CTS 2012 2.GPages: 76, PDF Size: 0.61 MB
Page 4 of 76
Black plate (4,1)Cadillac CTS/CTS-V Navigation System (Includes Mex) - 2012
4 Infotainment System
Overview
Read this manual thoroughly to
become familiar with how the
navigation system operates.
The navigation system includes
navigation and audio functions.
Keeping your eyes on the road and
your mind on the drive is important
for safe driving. The navigation
system has built-in features
intended to help with this by
disabling some features when
driving. A grayed-out function is not
available when the vehicle is
moving.All functions are available when the
vehicle is parked. Do the following
before driving:
.Become familiar with the
navigation system operation,
buttons on the faceplate, and
touch-sensitive screen buttons.
.Set up the audio by presetting
favorite stations, setting the
tone, and adjusting the
speakers.
.Set up the navigation features,
such as entering an address or a
preset destination.
.Set up phone numbers in
advance so they can be called
easily by pressing a single
button or a single voice
command for navigation systems
equipped with phone capability.
{WARNING
Taking your eyes off the road too
long or too often while using the
navigation system could cause a
crash and you or others could be
injured or killed. Focus your
attention on driving and limit
glances at the moving map on the
navigation screen. Use voice
guidance whenever possible.
Page 31 of 76
Black plate (31,1)Cadillac CTS/CTS-V Navigation System (Includes Mex) - 2012
Infotainment System 31
Power Mode
If the system is turned off during a
CD or USB recording process, it will
stop. When the radio is turned back
on, the recording process needs to
be started again.
Saving HDD Favorites
During HDD playback, select one of
the lower buttons to save songs in
its category. Each category has six
presets.
To add a song from a category, you
must be listening to the song. Press
and hold the lower button until
“Favorite saved...”displays on the
screen.
Audio Book
The system is able to play back
audio book content downloaded
from www.audible.com. This content
can be transferred into the system
by either burning it to a CD or
recording it to a USB storage
device. The audio book playback requires
activation of the vehicle as a player
for downloaded content. The radio
system activates the audio-book
system when information is found
on either a CD inserted into the CD
player or if a USB storage device is
connected. Make sure the activation
file is copied onto a CD or a USB
storage device so that the
downloaded media is supported.
In the process of activation, the
Vehicle Identification Number (VIN)
number is required in order to
activate your vehicle.
Auxiliary Devices
The navigation system has an
auxiliary input jack located in the
center console. This is not an audio
output; do not plug the headphone
set into the front auxiliary input jack.
You can however, connect an
external audio device such as an
iPod, laptop computer, MP3 player,
CD changer, or cassette tape
player, etc. to the auxiliary input jack
for use as another source for audio
listening.
Drivers are encouraged to set up
any auxiliary device while the
vehicle is in P (Park). See
“Defensive Driving”
in the Index of
the vehicle owner manual for more
information on driver distraction.
To use a portable audio player,
connect a 3.5 mm (1/8 in) cable to
the auxiliary input jack. When a
device is connected, the system
detects and automatically begins
playing audio from the device over
the vehicle's speakers.
If a device is connected and you are
listening to another source (FM, XM
(if equipped), CD, MP3, etc.), press
the AUDIO control button then press
AUDIO repeatedly until AUX is
selected or press the AUX screen
button. An auxiliary device must be
connected for the AUX screen
button to appear as an option to
select.
Page 34 of 76
Black plate (34,1)Cadillac CTS/CTS-V Navigation System (Includes Mex) - 2012
34 Infotainment System
Updating the Gracenote Database
1. Turn the ignition on.
2. Press
Oto turn the system on.
3. Insert the update disc part way into the slot, label side up. The
player pulls it in.
4. Update Confirmation screen displays along with the version
information. Press the Update
screen button.
5. The system reboots and starts updating the database.
A progress bar displays.
6. The disc automatically ejects after the update is completed.
The system reboots.
Navigation
Using the Navigation
System
This section presents basic
information needed to operate the
navigation system.
Use the navigation control buttons
located on the infotainment system
along with the available
touch-screen buttons on the
navigation screen to operate the
system. See Overview on page 4 for
more information.
Once the vehicle is moving, various
functions are disabled to reduce
driver distractions.
Navigation Control Buttons
The following control buttons are
located on the navigation system:
VOL/
O(Volume/Power):
1. Press to turn the system on and off.
2. Turn this knob to increase or decrease the volume. The
volume works for the features
that are currently being used;
audio, OnStar
®(if equipped)
changes the volume for the
phone, voice guidance, and
speech recognition changes the
volume of voice prompts.
NAV
n m(Navigation Screen Up/
Down): Press to make the screen
go up and down. In the up position,
all touch-screen buttons can be
viewed or used. In the down
position, a portion of the screen will
be shown that displays the current
audio source and temperature.
Page 46 of 76
Black plate (46,1)Cadillac CTS/CTS-V Navigation System (Includes Mex) - 2012
46 Infotainment System
Point of Interest (POI)
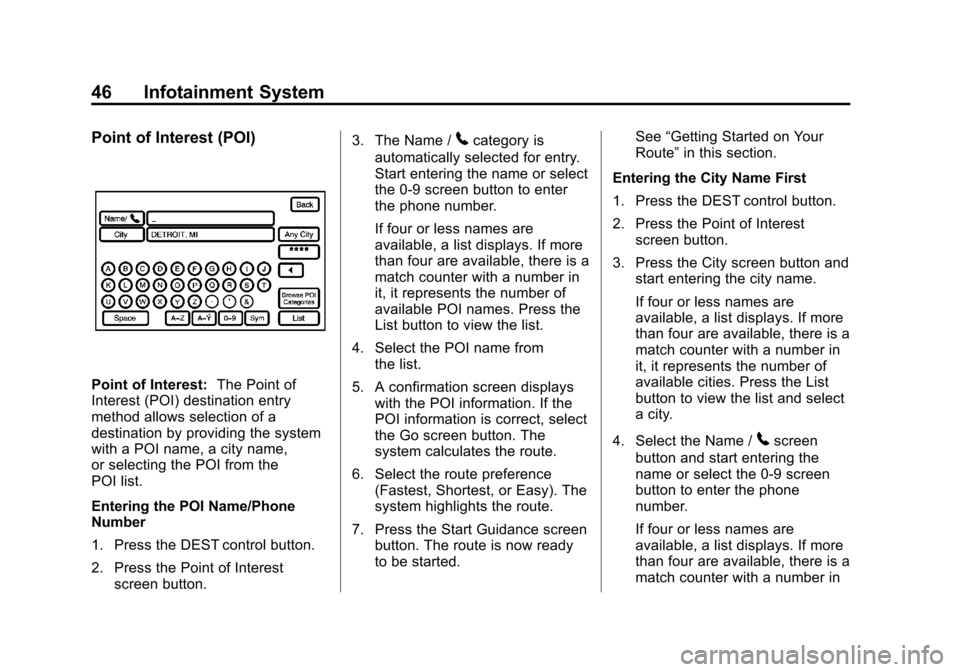
Point of Interest:The Point of
Interest (POI) destination entry
method allows selection of a
destination by providing the system
with a POI name, a city name,
or selecting the POI from the
POI list.
Entering the POI Name/Phone
Number
1. Press the DEST control button.
2. Press the Point of Interest
screen button. 3. The Name /
5category is
automatically selected for entry.
Start entering the name or select
the 0‐9 screen button to enter
the phone number.
If four or less names are
available, a list displays. If more
than four are available, there is a
match counter with a number in
it, it represents the number of
available POI names. Press the
List button to view the list.
4. Select the POI name from the list.
5. A confirmation screen displays with the POI information. If the
POI information is correct, select
the Go screen button. The
system calculates the route.
6. Select the route preference (Fastest, Shortest, or Easy). The
system highlights the route.
7. Press the Start Guidance screen button. The route is now ready
to be started. See
“Getting Started on Your
Route” in this section.
Entering the City Name First
1. Press the DEST control button.
2. Press the Point of Interest screen button.
3. Press the City screen button and start entering the city name.
If four or less names are
available, a list displays. If more
than four are available, there is a
match counter with a number in
it, it represents the number of
available cities. Press the List
button to view the list and select
a city.
4. Select the Name /
5screen
button and start entering the
name or select the 0‐9 screen
button to enter the phone
number.
If four or less names are
available, a list displays. If more
than four are available, there is a
match counter with a number in
Page 48 of 76
Black plate (48,1)Cadillac CTS/CTS-V Navigation System (Includes Mex) - 2012
48 Infotainment System
3. Press the Go screen button,located next to the destination.
The system calculates the route.
4. Select the route preference (Fastest, Shortest, or Easy). The
system highlights the route.
5. Press the Start Guidance screen button. The route is now ready
to be started.
See “Getting Started on Your
Route” later in this section for
more information.
See “Adding Destinations to the
Address Book” in this section.OnStar®Destination Download
(If Equipped)
OnStar®Destination Download
(if equipped) is a service available
for OnStar* subscribers that makes
operating your navigation system
much simpler. It allows subscribers
to request and receive navigation
assistance on-the-go.
Using OnStar®Destination
Download (If Equipped)
Press the blue OnStar button
and an Advisor can locate a
point-of-interest or an address and
download the necessary information
or coordinates to your navigation
system. Once the destination is
downloaded, the navigation system
will search for the address in the
mapping disc's database. When the
address is found, it will be shown on
your navigation system's screen
along with the buttons described
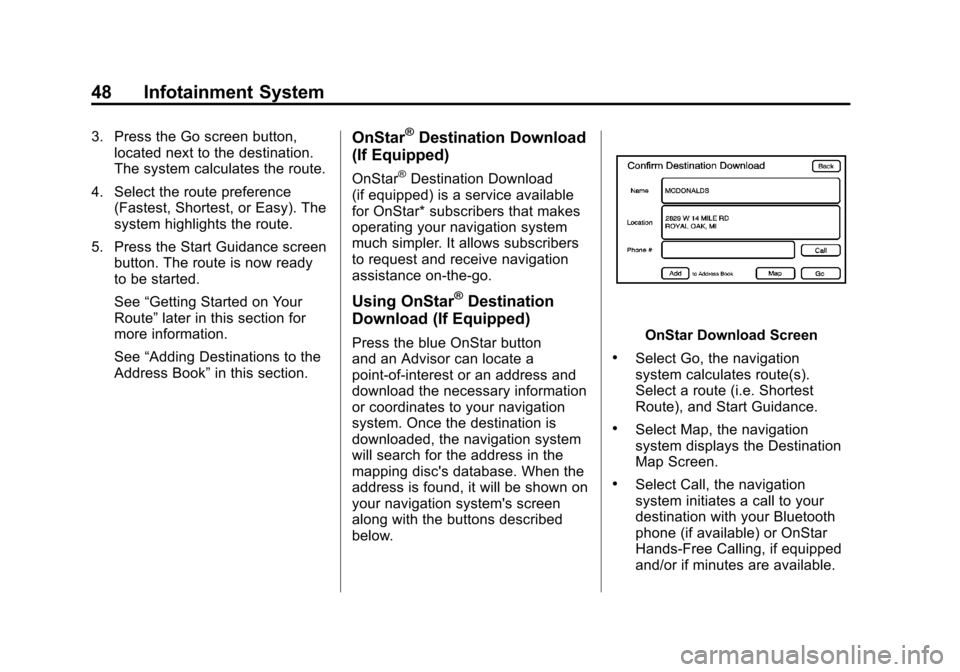
below.OnStar Download Screen
.Select Go, the navigation
system calculates route(s).
Select a route (i.e. Shortest
Route), and Start Guidance.
.Select Map, the navigation
system displays the Destination
Map Screen.
.Select Call, the navigation
system initiates a call to your
destination with your Bluetooth
phone (if available) or OnStar
Hands-Free Calling, if equipped
and/or if minutes are available.
Page 49 of 76
Black plate (49,1)Cadillac CTS/CTS-V Navigation System (Includes Mex) - 2012
Infotainment System 49
.Select Add to Address Book, the
navigation system copies the
downloaded destination to the
address book and displays the
new address book entry.
.Select Back, the navigation
system cancels your OnStar
Destination Download and
returns to the previous screen.
The downloaded address will not
be added to the previous
destinations
Route Guidance Not Active
If an OnStar destination is
downloaded while route guidance is
not active, the navigation system
displays an OnStar Destination
Download Screen and operations
will continue as outlined in the
Using OnStar Destination Download
section:
Route Guidance Active
If OnStar downloads a destination
while route guidance is already
active, the navigation system adds
the downloaded destination as the next waypoint in the existing route.
All features such as Call and Add to
Address Book will be available for
the waypoint. Refer to the section
on Waypoints for more information.
Previous Destinations
Previous OnStar Destination
Downloads are saved under
Previous Destinations in the
navigation system where they can
be accessed or saved to the
address book.
Important Notes regarding OnStar
Destination Download:
.If the navigation system is
turned off when the destination
download is attempted, the
navigation system will
automatically turn on and
display the OnStar Destination
Download Screen. The radio will
remain on after the download
occurs.
.If OnStar downloads a
destination and the address is
not found in the mapping disc’s
database and routing by
coordinates is not available, the
Go and Map buttons gray out
and routing will not be available.
Press the blue OnStar button for
further assistance.
.The Call button grays out when
there is no phone number
available for your destination
and while connected to OnStar.
Map Destination Screen Functions
If the map screen is used to show
destination, it will have map screen
capabilities such as Go, Mark,
Zoom, Scroll, etc. The address is
shown at the top of the screen.
Page 53 of 76
Black plate (53,1)Cadillac CTS/CTS-V Navigation System (Includes Mex) - 2012
Infotainment System 53
3. Press and hold one of the sixscreen buttons at the bottom of
the screen until the text within
the button changes.
The name appears in that preset
destination screen button and is
now available to select from the
Select Destination screen.
Adding or Changing Destinations
1. Press the DEST control button.
2. Press the Address Book screen button.
3. Select the address book entry to add or change.
4. Press and hold one of the six screen buttons at the bottom of
the screen until the text within
the button changes.
The name appears in that preset
destination screen button and is
now available to select from the
Select Destination screen.Address Book —Storing
Destinations
To store the current final destination
to the address book, press the Add
screen button from the map screen
while touch-tapping to the final
destination. The system
automatically saves the final
destination information in the
address book.
Address Book —Editing and
Deleting Entries
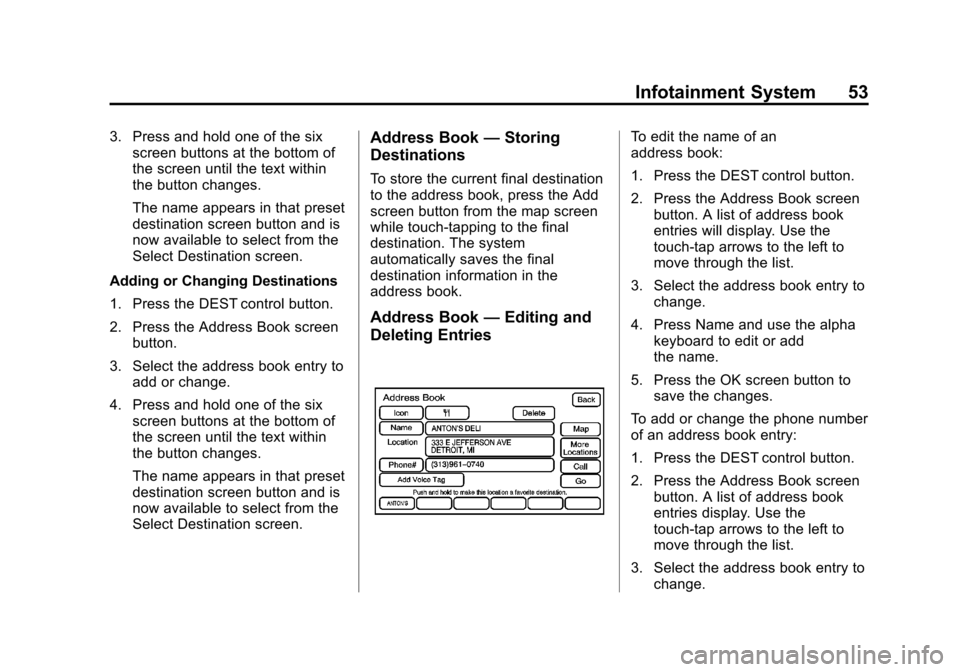
To edit the name of an
address book:
1. Press the DEST control button.
2. Press the Address Book screen
button. A list of address book
entries will display. Use the
touch-tap arrows to the left to
move through the list.
3. Select the address book entry to change.
4. Press Name and use the alpha keyboard to edit or add
the name.
5. Press the OK screen button to save the changes.
To add or change the phone number
of an address book entry:
1. Press the DEST control button.
2. Press the Address Book screen button. A list of address book
entries display. Use the
touch-tap arrows to the left to
move through the list.
3. Select the address book entry to change.
Page 54 of 76
Black plate (54,1)Cadillac CTS/CTS-V Navigation System (Includes Mex) - 2012
54 Infotainment System
4. Press the Phone # screen buttonand use the numeric keyboard to
enter or change the phone
number.
5. Press the OK screen button to save your changes.
To change the map icon of an
address book entry:
1. Press the DEST control button.
2. Press the Address Book screen button. A list of address book
entries display. Use the
touch-tap arrows to the left to
move through the list.
3. Select the address book entry to change.
4. Press the Icon screen button.
5. Select an icon from the list. To add a voice tag to an address
book entry:
1. Press the DEST control button.
2. Press Address Book screen
button. A list of address book
entries display. Use the
touch-tap arrows to the left to
move through the list.
3. Select the address book entry to change.
4. Press Add Voice Tag screen button.
5. The system asks that you state the name. You will have
two seconds to state the name.
The system responds back with
the name.
To delete an address book entry:
1. Press the DEST control button.
2. Press the Address Book screen button. A list of address book
entries display. Use the
touch-tap arrows to the left to
move through the list. 3. Select the address book entry to
delete.
4. Press the Delete screen button to delete the address book entry.
A confirmation displays.
Previous
Destinations —Deleting
To delete all previous destinations.
1. Press the DEST control button.
2. Press the Previous Destination
screen button.
3. Press the Delete All screen button. A confirmation window
displays. Select Yes to cancel;
No to cancel this operation.
Page 65 of 76
Black plate (65,1)Cadillac CTS/CTS-V Navigation System (Includes Mex) - 2012
Infotainment System 65
.Automatic rerouting may display
a route returning to the set
waypoint if heading for a
destination without passing
through a set waypoint.
.The route prohibits the entry of a
vehicle due to a regulation by
time or season or any other
regulation which may be given.
.Some routes may not be
searched.
.The route to the destination may
not be shown if there are new
roads, if roads have recently
changed or if certain roads are
not listed in the map data. See
Ordering Map DVDs.
To recalibrate the vehicle's position
on the map, see “Compass”in the
vehicle's owner manual.
If the System Needs
Service
If the navigation system needs
service and the steps listed here
have been followed but there are
still problems, see your dealer for
assistance.
Ordering Map DVDs
The map data in the vehicle is the
most up-to-date information
available when the vehicle was
produced. The map data is updated
periodically, provided that the map
information has changed. U.S. and Canada
If you have any questions about the
operation of the navigation system
or the update process, contact the
GM Nav Disc Center toll‐free
phone number, 1‐877‐NAV‐DISC
(1‐877‐628‐3472) or go
to the center's website,
www.gmnavdisc.com. If you need
any updates, call the GM Nav Disc
Center or order a new disc online.
To order a disc, have your Vehicle
Identification Number (VIN)
available. This helps the center
make sure you receive the correct
and most up-to-date DVD map disc
for your vehicle. See
“Vehicle
Identification Number (VIN)” in the
Index of your vehicle owner manual
for more information.
Page 66 of 76
Black plate (66,1)Cadillac CTS/CTS-V Navigation System (Includes Mex) - 2012
66 Infotainment System
Mexico
For any questions about the
operation of the navigation system
or the update process, contact
General Motors of Mexico,
Customer Care Center Cadillac
toll-free phone number,
01-800-466-0805 or write to,
[email protected]. Have the
Vehicle Identification Number (VIN)
available when ordering to ensure
the correct and most up-to-date
DVD map disc for the vehicle is
sent. See“Vehicle Identification
Number (VIN)” in the Index of the
vehicle owner manual for more
information.
After receiving the updated disc,
see “Installing the DVD Map Disc”
and “Ejecting the DVD Map Disc”
under Ordering Map DVDs.Database Coverage
Explanations
Coverage areas vary with respect to
the level of map detail available for
any given area. Some areas feature
greater levels of detail than others.
If this happens, it does not mean
there is a problem with the system.
As the map data is updated, more
detail may become available for
areas which previously had limited
detail. See Ordering Map DVDs on
page 65.
Voice Recognition
Speech Recognition
The navigation system's speech
recognition allows for hands-free
operation of navigation and audio
system features.
Speech recognition can be used
when the ignition is on or when
Retained Accessory Power (RAP) is
active. See “Retained Accessory
Power (RAP)” in the Index of the
vehicle's owner manual for more
information.