key CADILLAC CTS 2012 2.G Owners Manual
[x] Cancel search | Manufacturer: CADILLAC, Model Year: 2012, Model line: CTS, Model: CADILLAC CTS 2012 2.GPages: 496, PDF Size: 6.36 MB
Page 343 of 496

Black plate (31,1)Cadillac CTS/CTS-V Owner Manual (Include Mex) - 2012
Vehicle Care 10-31
Do not use the accelerator
pedal, and be ready to turn off
the engine immediately if it
starts.
3. For automatic transmission vehicles, try to start the engine
in each gear. The vehicle
should start only in P (Park) or
N (Neutral). If the vehicle starts
in any other position, contact
your dealer for service.
For manual transmission
vehicles, put the shift lever in
Neutral, push the clutch pedal
down halfway, and try to start
the engine. The vehicle should
start only when the clutch pedal
is pushed down all the way to
the floor. If the vehicle starts
when the clutch pedal is not
pushed all the way down,
contact your dealer for service.Automatic Transmission
Shift Lock Control
Function Check
{WARNING
When you are doing this
inspection, the vehicle could
move suddenly. If the vehicle
moves, you or others could be
injured.
1. Before starting this check, be sure there is enough room
around the vehicle. It should be
parked on a level surface.
2. Firmly apply the parking brake. See Parking Brake (Manual) on
page 9‑34 orParking Brake
(Electric) on page 9‑35.
Be ready to apply the regular
brake immediately if the vehicle
begins to move.
3. With the engine off, turn the ignition on, but do not start the
engine. Without applying the regular brake, try to move the
shift lever out of P (Park) with
normal effort. If the shift lever
moves out of P (Park), contact
your dealer for service.Ignition Transmission
Lock Check
While parked, and with the parking
brake set, try to turn the ignition to
LOCK/OFF in each shift lever
position.
.The ignition should turn to
LOCK/OFF only when the shift
lever is in P (Park).
.With the key access ignition
system, the ignition key should
come out only in LOCK/OFF.
See
Ignition Positions (Key
Access) on page 9‑16 orIgnition
Positions (Keyless Access) on
page 9‑18.
Contact your dealer if service is
required.
Page 368 of 496
Black plate (56,1)Cadillac CTS/CTS-V Owner Manual (Include Mex) - 2012
10-56 Vehicle Care
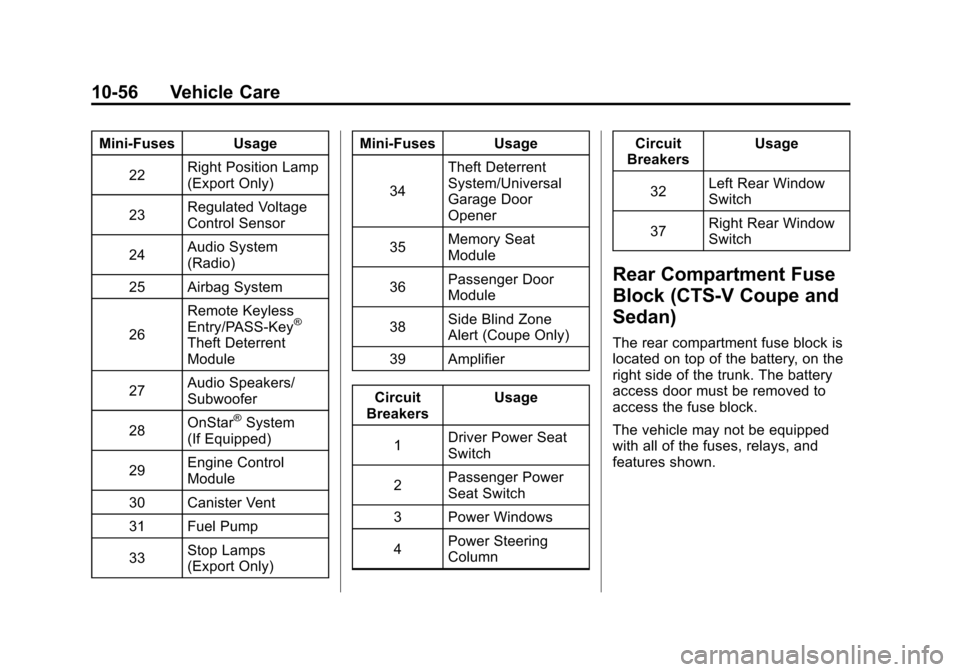
Mini‐Fuses Usage22 Right Position Lamp
(Export Only)
23 Regulated Voltage
Control Sensor
24 Audio System
(Radio)
25 Airbag System
26 Remote Keyless
Entry/PASS‐Key
®
Theft Deterrent
Module
27 Audio Speakers/
Subwoofer
28 OnStar
®System
(If Equipped)
29 Engine Control
Module
30 Canister Vent
31 Fuel Pump
33 Stop Lamps
(Export Only) Mini‐Fuses Usage
34 Theft Deterrent
System/Universal
Garage Door
Opener
35 Memory Seat
Module
36 Passenger Door
Module
38 Side Blind Zone
Alert (Coupe Only)
39 Amplifier
Circuit
Breakers Usage
1 Driver Power Seat
Switch
2 Passenger Power
Seat Switch
3 Power Windows
4 Power Steering
Column Circuit
Breakers Usage
32 Left Rear Window
Switch
37 Right Rear Window
Switch
Rear Compartment Fuse
Block (CTS-V Coupe and
Sedan)
The rear compartment fuse block is
located on top of the battery, on the
right side of the trunk. The battery
access door must be removed to
access the fuse block.
The vehicle may not be equipped
with all of the fuses, relays, and
features shown.
Page 370 of 496

Black plate (58,1)Cadillac CTS/CTS-V Owner Manual (Include Mex) - 2012
10-58 Vehicle Care
Mini‐Fuses Usage22 Right Position Lamp
(Export Only)
23 Regulated Voltage
Control Sensor
24 Audio System
(Radio)
25 Airbag System
26 Remote Keyless
Entry/PASS‐Key
®
Theft Deterrent
Module
27 Audio Speakers/
Subwoofer
28 OnStar
®System
(If Equipped)
29 Engine Control
Module
30 Canister Vent
31 Rear Differential
Cooling Pump
33 Stop Lamps
(Export Only) Mini‐Fuses Usage
34 Theft Deterrent
System/Universal
Garage Door
Opener
35 Memory Seat
Module
36 Passenger Door
Module
38 Side Blind Zone
Alert (Coupe Only)
39 Amplifier
Circuit
Breakers Usage
1 Driver Power Seat
Switch
2 Passenger Power
Seat Switch
3 Power Windows
4 Power Steering
Column Circuit
Breakers Usage
32 Left Rear Window
Switch
37 Right Rear Window
Switch
Rear Compartment Fuse
Block (CTS Wagon)
This fuse block is on the right side
of the vehicle, behind the trim panel
in the rear compartment.
The vehicle may not be equipped
with all of the fuses, relays, and
features shown.
Page 372 of 496

Black plate (60,1)Cadillac CTS/CTS-V Owner Manual (Include Mex) - 2012
10-60 Vehicle Care
Mini‐Fuses Usage23 Regulated Voltage
Control Sensor
24 Audio System
(Radio)
25 Airbag System
26 Remote Keyless
Entry/PASS‐Key
®
Theft Deterrent
Module
27 Audio Speakers/
Subwoofer
28 OnStar
®System
(If Equipped)
29 Engine Control
Module
30 Canister Vent
31 Fuel Pump
33 Stop Lamps
(Export Only) Mini‐Fuses Usage
34 Theft Deterrent
System/Universal
Garage Door
Opener
35 Memory Seat
Module
36 Passenger Door
Module
38 Rear Auxiliary
Power Outlet
39 Amplifier
Circuit
Breakers Usage
1 Driver Power Seat
Switch
2 Passenger Power
Seat Switch
3 Power Windows Circuit
Breakers Usage
4 Power Steering
Column
32 Left Rear Window
Switch
37 Right Rear Window
Switch
Rear Compartment Fuse
Block (CTS-V Wagon)
The rear compartment fuse block is
located on the passenger side of the
vehicle, behind the trim panel in the
rear compartment.
The vehicle may not be equipped
with all of the fuses and relays
shown.
Page 374 of 496

Black plate (62,1)Cadillac CTS/CTS-V Owner Manual (Include Mex) - 2012
10-62 Vehicle Care
Mini‐Fuses Usage22 Right Position Lamp
(Export Only)
23 Regulated Voltage
Control Sensor
24 Audio System
(Radio)
25 Airbag System
26 Remote Keyless
Entry/PASS‐Key
®
Theft Deterrent
Module
27 Audio Speakers/
Subwoofer
28 OnStar
®System
29 Engine Control
Module Mini‐Fuses Usage
30 Canister Vent
31 Rear Differential
Cooling Pump
33 Stop Lamps
(Export Only)
34 Theft Deterrent
System/Universal
Garage Door
Opener
35 Memory Seat
Module
36 Passenger Door
Module
38 Rear Auxiliary
Power Outlet
39 Amplifier Circuit
Breakers Usage
1 Driver Power Seat
Switch
2 Passenger Power
Seat Switch
3 Power Windows
4 Power Steering
Column
32 Left Rear Window
Switch
37 Right Rear Window
Switch
Page 388 of 496
Black plate (76,1)Cadillac CTS/CTS-V Owner Manual (Include Mex) - 2012
10-76 Vehicle Care
using a TPMS relearn tool, in the
following order: driver side front tire,
passenger side front tire, passenger
side rear tire, and driver side rear.
See your dealer for service or to
purchase a relearn tool.
There are two minutes to match
the first tire/wheel position, and
five minutes overall to match all
four tire/wheel positions. If it takes
longer, the matching process stops
and must be restarted.
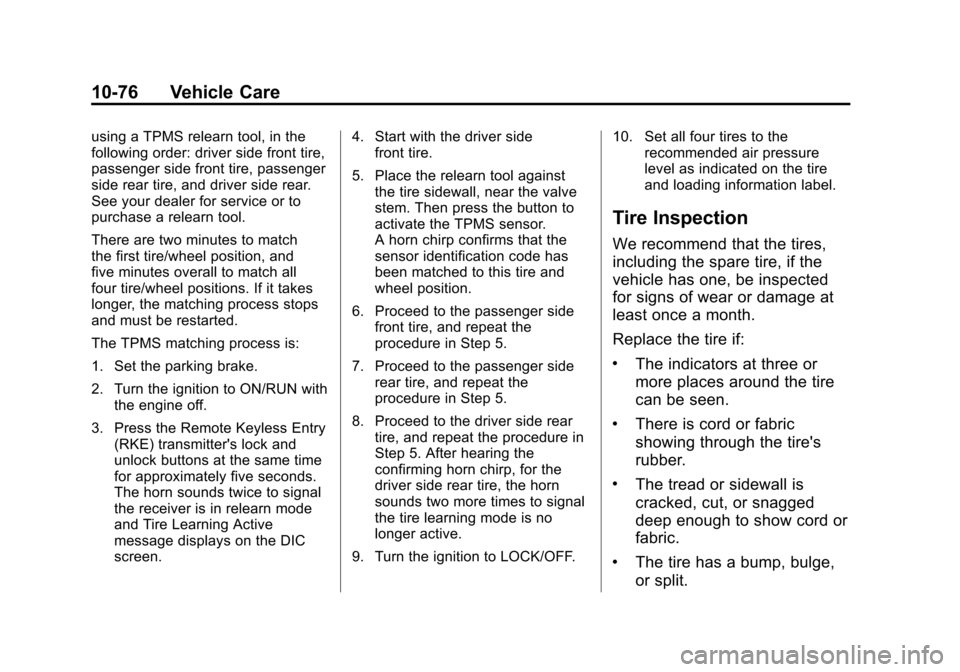
The TPMS matching process is:
1. Set the parking brake.
2. Turn the ignition to ON/RUN withthe engine off.
3. Press the Remote Keyless Entry (RKE) transmitter's lock and
unlock buttons at the same time
for approximately five seconds.
The horn sounds twice to signal
the receiver is in relearn mode
and Tire Learning Active
message displays on the DIC
screen. 4. Start with the driver side
front tire.
5. Place the relearn tool against the tire sidewall, near the valve
stem. Then press the button to
activate the TPMS sensor.
A horn chirp confirms that the
sensor identification code has
been matched to this tire and
wheel position.
6. Proceed to the passenger side front tire, and repeat the
procedure in Step 5.
7. Proceed to the passenger side rear tire, and repeat the
procedure in Step 5.
8. Proceed to the driver side rear tire, and repeat the procedure in
Step 5. After hearing the
confirming horn chirp, for the
driver side rear tire, the horn
sounds two more times to signal
the tire learning mode is no
longer active.
9. Turn the ignition to LOCK/OFF. 10. Set all four tires to the
recommended air pressure
level as indicated on the tire
and loading information label.
Tire Inspection
We recommend that the tires,
including the spare tire, if the
vehicle has one, be inspected
for signs of wear or damage at
least once a month.
Replace the tire if:
.The indicators at three or
more places around the tire
can be seen.
.There is cord or fabric
showing through the tire's
rubber.
.The tread or sidewall is
cracked, cut, or snagged
deep enough to show cord or
fabric.
.The tire has a bump, bulge,
or split.
Page 425 of 496
Black plate (113,1)Cadillac CTS/CTS-V Owner Manual (Include Mex) - 2012
Vehicle Care 10-113
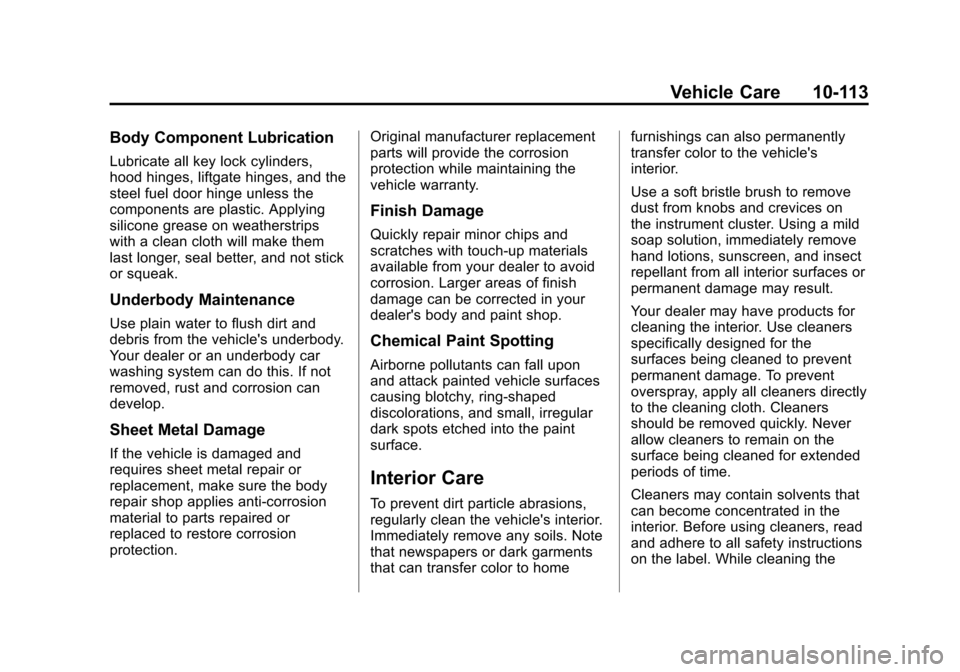
Body Component Lubrication
Lubricate all key lock cylinders,
hood hinges, liftgate hinges, and the
steel fuel door hinge unless the
components are plastic. Applying
silicone grease on weatherstrips
with a clean cloth will make them
last longer, seal better, and not stick
or squeak.
Underbody Maintenance
Use plain water to flush dirt and
debris from the vehicle's underbody.
Your dealer or an underbody car
washing system can do this. If not
removed, rust and corrosion can
develop.
Sheet Metal Damage
If the vehicle is damaged and
requires sheet metal repair or
replacement, make sure the body
repair shop applies anti-corrosion
material to parts repaired or
replaced to restore corrosion
protection.Original manufacturer replacement
parts will provide the corrosion
protection while maintaining the
vehicle warranty.
Finish Damage
Quickly repair minor chips and
scratches with touch-up materials
available from your dealer to avoid
corrosion. Larger areas of finish
damage can be corrected in your
dealer's body and paint shop.
Chemical Paint Spotting
Airborne pollutants can fall upon
and attack painted vehicle surfaces
causing blotchy, ring-shaped
discolorations, and small, irregular
dark spots etched into the paint
surface.
Interior Care
To prevent dirt particle abrasions,
regularly clean the vehicle's interior.
Immediately remove any soils. Note
that newspapers or dark garments
that can transfer color to homefurnishings can also permanently
transfer color to the vehicle's
interior.
Use a soft bristle brush to remove
dust from knobs and crevices on
the instrument cluster. Using a mild
soap solution, immediately remove
hand lotions, sunscreen, and insect
repellant from all interior surfaces or
permanent damage may result.
Your dealer may have products for
cleaning the interior. Use cleaners
specifically designed for the
surfaces being cleaned to prevent
permanent damage. To prevent
overspray, apply all cleaners directly
to the cleaning cloth. Cleaners
should be removed quickly. Never
allow cleaners to remain on the
surface being cleaned for extended
periods of time.
Cleaners may contain solvents that
can become concentrated in the
interior. Before using cleaners, read
and adhere to all safety instructions
on the label. While cleaning the
Page 442 of 496
Black plate (14,1)Cadillac CTS/CTS-V Owner Manual (Include Mex) - 2012
11-14 Service and Maintenance
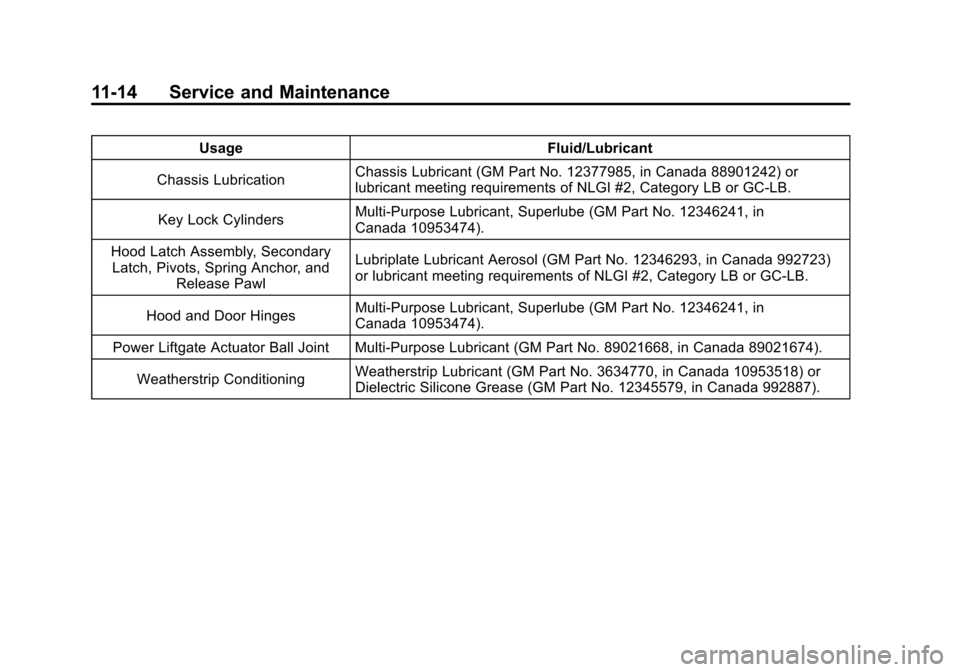
UsageFluid/Lubricant
Chassis Lubrication Chassis Lubricant (GM Part No. 12377985, in Canada 88901242) or
lubricant meeting requirements of NLGI #2, Category LB or GC-LB.
Key Lock Cylinders Multi-Purpose Lubricant, Superlube (GM Part No. 12346241, in
Canada 10953474).
Hood Latch Assembly, Secondary Latch, Pivots, Spring Anchor, and Release Pawl Lubriplate Lubricant Aerosol (GM Part No. 12346293, in Canada 992723)
or lubricant meeting requirements of NLGI #2, Category LB or GC-LB.
Hood and Door Hinges Multi-Purpose Lubricant, Superlube (GM Part No. 12346241, in
Canada 10953474).
Power Liftgate Actuator Ball Joint Multi-Purpose Lubricant (GM Part No. 89021668, in Canada 89021674).
Weatherstrip Conditioning Weatherstrip Lubricant (GM Part No. 3634770, in Canada 10953518) or
Dielectric Silicone Grease (GM Part No. 12345579, in Canada 992887).
Page 473 of 496
Black plate (21,1)Cadillac CTS/CTS-V Owner Manual (Include Mex) - 2012
Customer Information 13-21
Radio Frequency
Identification (RFID)
RFID technology is used in some
vehicles for functions such as tire
pressure monitoring and ignition
system security, as well as in
connection with conveniences such
as key fobs for remote door locking/
unlocking and starting, and
in-vehicle transmitters for garage
door openers. RFID technology in
GM vehicles does not use or record
personal information or link with any
other GM system containing
personal information.
Radio Frequency
Statement
This vehicle has systems that
operate on a radio frequency that
comply with Part 15 of the Federal
Communications Commission (FCC)
rules and with Industry Canada
Standards RSS‐GEN/210/220/310.
Operation is subject to the following
two conditions:
1. The device may not causeharmful interference.
2. The device must accept any interference received, including
interference that may cause
undesired operation of the
device.
Changes or modifications to any of
these systems by other than an
authorized service facility could void
authorization to use this equipment.
Page 475 of 496

Black plate (1,1)Cadillac CTS/CTS-V Owner Manual (Include Mex) - 2012
OnStar 14-1
OnStar
OnStar Overview
OnStar Overview . . . . . . . . . . . . 14-1
OnStar Services
Emergency . . . . . . . . . . . . . . . . . . 14-2
Security . . . . . . . . . . . . . . . . . . . . . . 14-2
Navigation . . . . . . . . . . . . . . . . . . . 14-2
Connections . . . . . . . . . . . . . . . . . 14-4
Diagnostics . . . . . . . . . . . . . . . . . . 14-5
OnStar Additional Information
OnStar AdditionalInformation . . . . . . . . . . . . . . . . . 14-5
OnStar Overview
If equipped, this vehicle has a
comprehensive, in-vehicle system
that can connect to a live Advisor
for Emergency, Security, Navigation,
Connection, and Diagnostic
Services.
The OnStar system status light is
next to the OnStar buttons. If the
status light is:
.Solid Green: System is ready.
.Flashing Green: On a call.
.Red: Indicates a problem.
Push
Qor call 1‐888‐4‐ONSTAR
(1‐888‐466‐7827) to speak to an
Advisor. Push
Xto:
.Make a call, end a call,
or answer an incoming call.
.Give OnStar Hands-Free Calling
voice commands.
.Give OnStar Turn-by-Turn
Navigation voice commands.
Requires the available Directions
and Connections service plan.
Push
Qto connect to a live
Advisor to:
.Verify account information or
update contact information.
.Get driving directions. Requires
the available Directions and
Connections service plan.
.Receive On-Demand
Diagnostics for a check on the
vehicle’s key operating systems.
.Receive Roadside Assistance.