clock CADILLAC CTS 2012 2.G User Guide
[x] Cancel search | Manufacturer: CADILLAC, Model Year: 2012, Model line: CTS, Model: CADILLAC CTS 2012 2.GPages: 496, PDF Size: 6.36 MB
Page 207 of 496

Black plate (11,1)Cadillac CTS/CTS-V Owner Manual (Include Mex) - 2012
Infotainment System 7-11
Satellite Radio
Vehicles with an XM™Satellite
Radio tuner and a valid XM Satellite
Radio subscription can receive XM
programming.
XM Satellite Radio Service
XM is a satellite radio service based
in the 48 contiguous United States
and 10 Canadian provinces. XM
Satellite Radio has a wide variety of
programming and commercial-free
music, coast to coast, and in
digital-quality sound. A service fee
is required to receive the XM
service. Renew on channel XM1.”
For more information, contact XM
at www.xmradio.com or
1-800-929-2100 in the U.S., and
www.xmradio.ca or
1-877-438-9677 in Canada.
Control Buttons
The knobs and buttons used to
control the radio are:
m(XM): Press to choose the XM
band (if equipped).
TUNE/TONE: Turn to search for
stations. Press to enter the
Tone menu.
MENU/SELECT: Turn clockwise or
counterclockwise to scroll through
the category list. Press to select the
desired category.
INFO: Press to display additional
information that may be available for
the current song. When information
is not available, No Information
displays.
¨SEEK or©SEEK: Press to go to
the next or to the previous radio
station.
FAV: Press to change the
favorites page.
Softkeys: Press to select preset
stations.
XM Categories
XM stations are organized in
categories.
Removing or Adding Categories
(Radio with CD and Radio with
Six-Disc CD Only)
1. Press the CONFIG button.
2. Press the softkey below the XM tab.
3. Turn the TUNE/TONE knob or the MENU/SELECT knob to
scroll through the available
categories.
4. Press any softkey below the Remove or Add tab to add or
remove the displayed category.
5. Press any softkey below the Restore All tab to restore all
removed categories.
Page 230 of 496

Black plate (34,1)Cadillac CTS/CTS-V Owner Manual (Include Mex) - 2012
7-34 Infotainment System
3.5 mm Jack
Connect a 3.5 mm (1/8 in) cable to
the auxiliary input jack to use a
portable audio player.
Playback of an audio device that is
connected to the 3.5 mm (1/8 in)
jack can only be controlled using
the controls on the device.
VOL/
O(Volume/Power):Turn
clockwise or counterclockwise to
increase or decrease the volume of
the portable player. Use the portable
device to make additional volume
adjustments.
CD or CD/AUX (CD/Auxiliary):
Press to play a CD when a portable
audio device is playing. Press again
to start playing audio from the
connected portable audio player.
If a portable audio player is not
connected, “No Aux Device”
displays.
USB Port
The USB connector uses the USB
standards, 1.1 and 2.0.
USB Supported Devices
.USB Flash Drives
.Portable USB Hard Drives
.Fifth generation or later iPods*
.First, Second, or Third
generation iPod nanos*
.iPod classics*
*For proper operation, make sure
the iPod has the latest firmware
from Apple
®. The iPod firmware can
be updated using the latest iTunes
application. See www.apple.com/
itunes.
Connecting a USB Storage Device
Connect the USB storage device to
the USB port located in the center
console. Some USB devices may
not be supported. Playing an MP3/WMA from a USB
Storage Device
See
MP3 on page 7‑24 for more
information.
Connecting an iPod
To connect the iPod, connect one
end of the special iPod connection
cable to the iPod’s dock connector.
Connect the other end to both the
USB port and the auxiliary input jack
located in the center console. The
USB port and the auxiliary input jack
are located in the center console
bin. If the vehicle is on and the USB
connection works, a GM logo may
appear on the iPod. The iPod's
music information will be shown on
the radio’s display and the music
begins playing through the vehicle's
audio system.
The iPod's battery charges while it
is connected to the vehicle and if
the ignition is turned to ACC/
ACCESSORY or ON/RUN. It can
also be left connected to the vehicle
after the vehicle is turned off. With
the vehicle turned off, the iPod will
Page 303 of 496

Black plate (53,1)Cadillac CTS/CTS-V Owner Manual (Include Mex) - 2012
Driving and Operating 9-53
Some gasolines that are
not reformulated for low
emissions can contain an
octane-enhancing additive called
methylcyclopentadienyl manganese
tricarbonyl (MMT); ask the attendant
where you buy gasoline whether the
fuel contains MMT. We recommend
against the use of such gasolines.
Fuels containing MMT can reduce
spark plug life and affect emission
control system performance. The
malfunction indicator lamp might
turn on. If this occurs, return to your
dealer for service.Filling the Tank
{WARNING
Fuel vapor burns violently and a
fuel fire can cause bad injuries.
To help avoid injuries to you and
others, read and follow all the
instructions on the fuel pump
island. Turn off the engine when
refueling. Do not smoke near fuel
or when refueling the vehicle. Do
not use cellular phones. Keep
sparks, flames, and smoking
materials away from fuel. Do not
leave the fuel pump unattended
when refueling the vehicle. This is
against the law in some places.
Do not re-enter the vehicle while
pumping fuel. Keep children away
from the fuel pump; never let
children pump fuel.
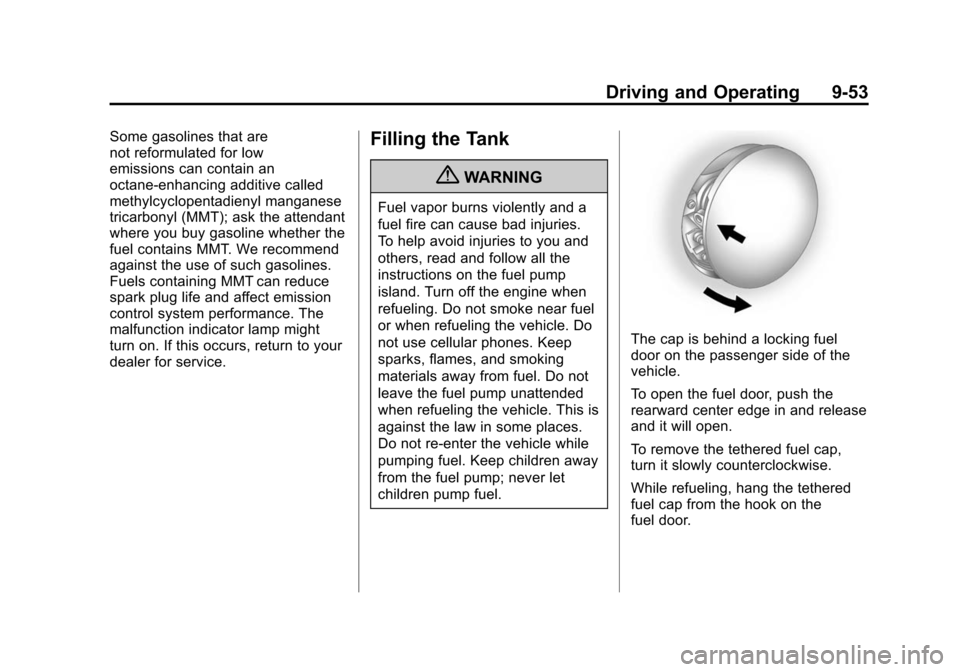
The cap is behind a locking fuel
door on the passenger side of the
vehicle.
To open the fuel door, push the
rearward center edge in and release
and it will open.
To remove the tethered fuel cap,
turn it slowly counterclockwise.
While refueling, hang the tethered
fuel cap from the hook on the
fuel door.
Page 304 of 496

Black plate (54,1)Cadillac CTS/CTS-V Owner Manual (Include Mex) - 2012
9-54 Driving and Operating
If the fuel cap is not installed
properly, the TIGHTEN GAS CAP
message will appear on the Driver
Information Center display. SeeFuel
System Messages on page 5‑36.
When reinstalling the cap, turn it
clockwise until it clicks once,
otherwise the Malfunction Indicator
Lamp could turn on. See
Malfunction Indicator Lamp on
page 5‑19.
{WARNING
Fuel can spray out on you if you
open the fuel cap too quickly.
If you spill fuel and then
something ignites it, you could be
badly burned. This spray can
happen if the tank is nearly full,
and is more likely in hot weather.
Open the fuel cap slowly and wait
for any hiss noise to stop. Then
unscrew the cap all the way. Be careful not to spill fuel. Do not
top off or overfill the tank and wait a
few seconds after you have finished
pumping before removing the
nozzle. Clean fuel from painted
surfaces as soon as possible. See
Exterior Care on page 10‑110.
When replacing the fuel cap, turn it
clockwise until it clicks once. Make
sure the cap is fully installed. The
diagnostic system can determine if
the fuel cap has been left off or
improperly installed. This would
allow fuel to evaporate into the
atmosphere. See
Malfunction
Indicator Lamp on page 5‑19.
{WARNING
If a fire starts while you are
refueling, do not remove the
nozzle. Shut off the flow of fuel by
shutting off the pump or by
notifying the station attendant.
Leave the area immediately.
Notice: If a new fuel cap is
needed, be sure to get the right
type of cap from your dealer. The
wrong type of fuel cap might not
fit properly, might cause the
malfunction indicator lamp to
light, and could damage the fuel
tank and emissions system. See
Malfunction Indicator Lamp on
page 5‑19.
Page 332 of 496

Black plate (20,1)Cadillac CTS/CTS-V Owner Manual (Include Mex) - 2012
10-20 Vehicle Care
If the engine is warm or hot, the
coolant level should be at or above
the FROID/FULL COLD line on the
side of the coolant surge tank. If the
engine is cold, the coolant level
should be near the FROID/FULL
COLD line on the side of the coolant
surge tank. If it is not, there could
be a leak in the cooling system.
How to Add Coolant to the
Surge Tank
{WARNING
You can be burned if you spill
coolant on hot engine parts.
Coolant contains ethylene glycol
and it will burn if the engine parts
are hot enough. Do not spill
coolant on a hot engine.
Notice: This vehicle has a
specific coolant fill procedure.
Failure to follow this procedure
could cause the engine to
overheat and be severely
damaged.
{WARNING
An electric engine cooling fan
under the hood can start up even
when the engine is not running
and can cause injury. Keep
hands, clothing, and tools away
from any underhood electric fan.
{WARNING
Steam and scalding liquids from a
hot cooling system can blow out
and burn you badly. They are
under pressure, and if you turn
the surge tank pressure
cap —even a little —they can
come out at high speed. Never
turn the cap when the cooling
system, including the surge tank
pressure cap, is hot. Wait for the
cooling system and surge tank
pressure cap to cool if you ever
have to turn the pressure cap. If coolant is needed, add the proper
DEX-COOL coolant mixture at the
coolant surge tank.
If no coolant is visible in the surge
tank, add coolant as follows:
1. Remove the coolant surge tank
pressure cap when the cooling
system, including the coolant
surge tank pressure cap and
upper radiator hose, is no longer
hot. Turn the pressure cap
slowly counterclockwise about
one-quarter turn and then stop.
If you hear a hiss, wait for that to
stop. A hiss means there is still
some pressure left.
Page 334 of 496

Black plate (22,1)Cadillac CTS/CTS-V Owner Manual (Include Mex) - 2012
10-22 Vehicle Care
Checking Coolant in the
Intercooler System (CTS-V)
The vehicle must be on a level
surface when checking the coolant
level.
The super charged engine
intercooler coolant fill neck is
located in the engine compartment
on the passenger side of the
vehicle. SeeEngine Compartment
Overview on page 10‑6.
On the coolant fill neck, there is a
cold fill region between the two
horizontal lines shown.
Check to see if coolant is visible in
the coolant fill neck. If the coolant
is not visible or below the cold
fill region in the fill neck, add a
50/50 mixture of clean, drinkable
water and DEX-COOL coolant at the
coolant fill bottle, but be sure the
cooling system is cool before this
is done.
Adding Coolant to the
Intercooler System
Coolant (CTS-V)
1. Remove the intercooler system pressure cap when the
intercooler system hoses are no
longer hot. Turn the pressure
cap slowly counterclockwise
about one-quarter of a turn.
If you hear a hiss, wait for that to
stop. This allows any pressure
still left to be vented.
2. Then keep turning the pressure cap slowly and remove it. 3. Add the proper DEX-COOL
coolant mixture to the fill neck
until the coolant is within the
cold fill region.
With the intercooler system
pressure cap off, start the
engine and let it run for a couple
of minutes. Then turn the engine
off. By this time, the coolant
level inside the fill neck may be
lower. If the level drops where
coolant is no longer within the
cold fill region of the fill neck
with the engine off, add more of
the DEX-COOL coolant mixture
to the fill neck until the level is
again visible in the cold fill
region.
4. Then replace the pressure cap. Be sure the pressure cap is
hand-tight and fully seated.
Notice: If the pressure cap is not
tightly installed, coolant loss and
possible engine damage may
occur. Be sure the cap is properly
and tightly secured.
Page 348 of 496

Black plate (36,1)Cadillac CTS/CTS-V Owner Manual (Include Mex) - 2012
10-36 Vehicle Care
4. At a wall, measure from theground upward (A) to the
recorded distance from
Step 3 and mark it.
5. Draw or tape a horizontal line (B) the width of the vehicle at the
wall where it was marked in
Step 4.
Notice: Do not cover a headlamp
to improve beam cut-off when
aiming. Covering a headlamp may
cause excessive heat build-up
which may cause damage to the
headlamp.
6. Turn on the low-beam
headlamps and place a piece of
cardboard or equivalent in front
of the headlamp not being aimed. This should allow only
the beam of light from the
headlamp being aimed to be
seen on the flat surface.
Driver Side Shown
7. Locate the vertical headlamp aiming screws, which are under
the hood near each headlamp
assembly. They are covered by
rubber caps.
The adjustment screw can be
turned with a 6 mm hex driver.
8. Turn the vertical aiming screw until the headlamp beam is
aimed to the horizontal tape line. Turn it clockwise or
counterclockwise to raise or
lower the angle of the beam.
The top edge of the cut-off
should be positioned at the
bottom edge of the horizontal
tape line.9. Make sure that the light from the
headlamp is positioned at the
bottom edge of the horizontal
tape line. The lamp on the
left (A) shows the correct
headlamp aim. The lamp on the
right (B) shows the incorrect
headlamp aim.
10. Repeat Steps 7 through 9 for the opposite headlamp.
Page 349 of 496

Black plate (37,1)Cadillac CTS/CTS-V Owner Manual (Include Mex) - 2012
Vehicle Care 10-37
Bulb Replacement
For the proper type of replacement
bulbs, seeReplacement Bulbs on
page 10‑39.
For any bulb‐changing procedure
not listed in this section, contact
your dealer.
Halogen Bulbs
{WARNING
Halogen bulbs have pressurized
gas inside and can burst if you
drop or scratch the bulb. You or
others could be injured. Be sure
to read and follow the instructions
on the bulb package.
High Intensity Discharge
(HID) Lighting
{WARNING
The low beam high intensity
discharge lighting system
operates at a very high voltage.
If you try to service any of the
system components, you could be
seriously injured. Have your
dealer or a qualified technician
service them.
After an HID headlamp bulb has
been replaced, the beam might be a
slightly different shade than it was
originally. This is normal.
Fog Lamps
To replace a front fog lamp bulb:
1. Pull out the push-pins located on the underside of the protection
shield to remove the shield.
2. Reach up behind the front bumper area from under the
vehicle to access the lamp
housing.
3. Remove the electrical connector from the bulb by lifting the two
plastic clips.
4. Remove the bulb socket from the lamp housing by turning the
bulb socket one-quarter turn
counterclockwise.
Page 350 of 496

Black plate (38,1)Cadillac CTS/CTS-V Owner Manual (Include Mex) - 2012
10-38 Vehicle Care
5. Pull the old bulb from the lamphousing keeping the bulb
straight as you pull it out.
6. Install a new bulb.
7. Reinstall the electrical connector by pushing in the two plastic
clips.
8. Push the bulb socket into the lamp housing and turn the
socket one‐quarter turn
clockwise.License Plate Lamp
(Coupe and Sedan)
To replace one of these bulbs:
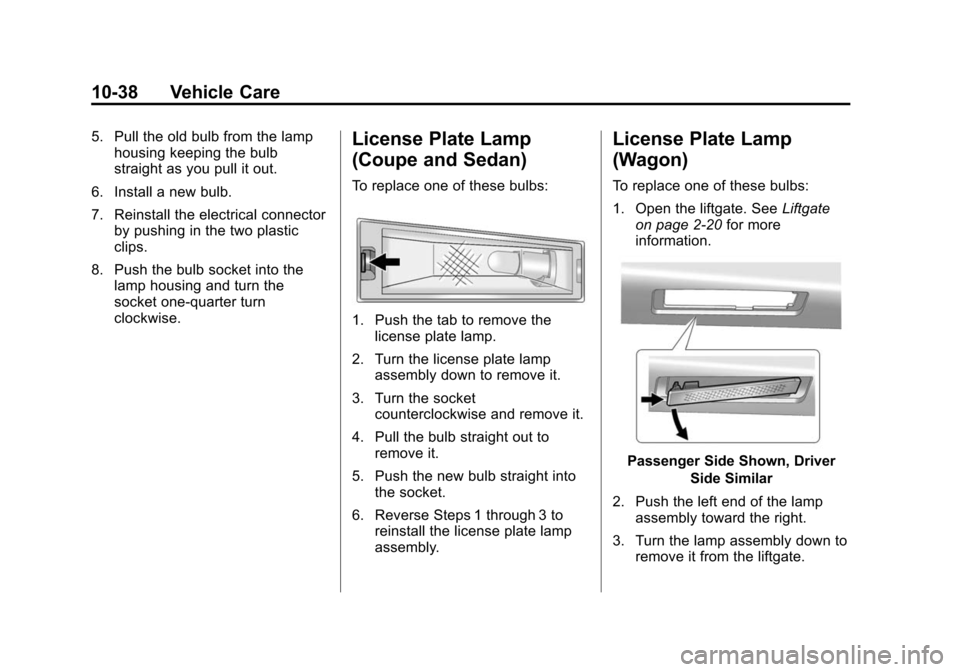
1. Push the tab to remove the
license plate lamp.
2. Turn the license plate lamp assembly down to remove it.
3. Turn the socket counterclockwise and remove it.
4. Pull the bulb straight out to remove it.
5. Push the new bulb straight into the socket.
6. Reverse Steps 1 through 3 to reinstall the license plate lamp
assembly.
License Plate Lamp
(Wagon)
To replace one of these bulbs:
1. Open the liftgate. See Liftgate
on page 2‑20 for more
information.
Passenger Side Shown, Driver
Side Similar
2. Push the left end of the lamp assembly toward the right.
3. Turn the lamp assembly down to remove it from the liftgate.
Page 351 of 496

Black plate (39,1)Cadillac CTS/CTS-V Owner Manual (Include Mex) - 2012
Vehicle Care 10-39
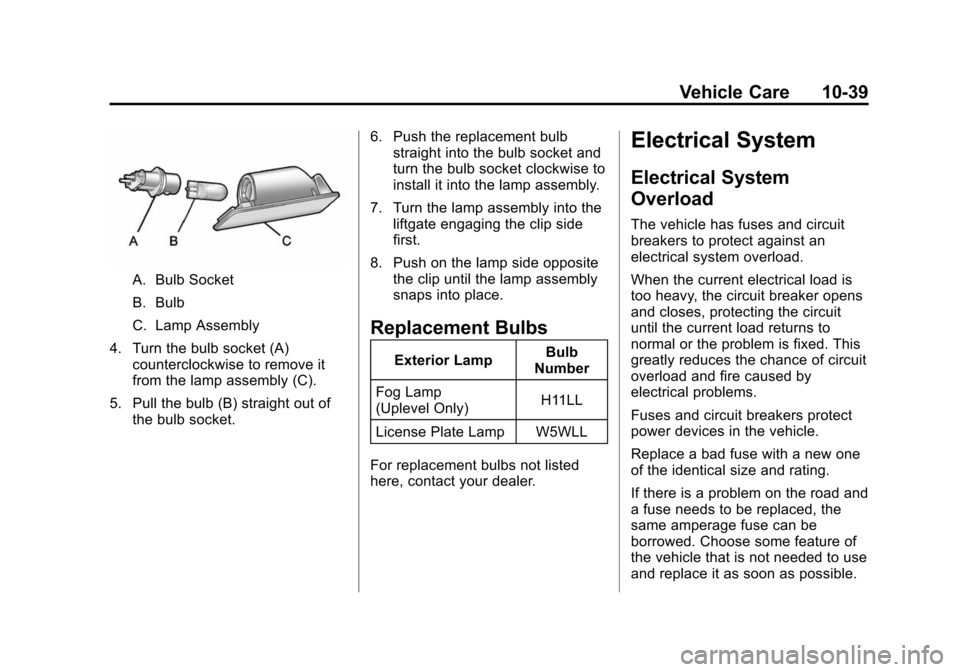
A. Bulb Socket
B. Bulb
C. Lamp Assembly
4. Turn the bulb socket (A) counterclockwise to remove it
from the lamp assembly (C).
5. Pull the bulb (B) straight out of the bulb socket. 6. Push the replacement bulb
straight into the bulb socket and
turn the bulb socket clockwise to
install it into the lamp assembly.
7. Turn the lamp assembly into the liftgate engaging the clip side
first.
8. Push on the lamp side opposite the clip until the lamp assembly
snaps into place.
Replacement Bulbs
Exterior Lamp Bulb
Number
Fog Lamp
(Uplevel Only) H11LL
License Plate Lamp W5WLL
For replacement bulbs not listed
here, contact your dealer.
Electrical System
Electrical System
Overload
The vehicle has fuses and circuit
breakers to protect against an
electrical system overload.
When the current electrical load is
too heavy, the circuit breaker opens
and closes, protecting the circuit
until the current load returns to
normal or the problem is fixed. This
greatly reduces the chance of circuit
overload and fire caused by
electrical problems.
Fuses and circuit breakers protect
power devices in the vehicle.
Replace a bad fuse with a new one
of the identical size and rating.
If there is a problem on the road and
a fuse needs to be replaced, the
same amperage fuse can be
borrowed. Choose some feature of
the vehicle that is not needed to use
and replace it as soon as possible.