oil CADILLAC CTS 2012 2.G Owner's Guide
[x] Cancel search | Manufacturer: CADILLAC, Model Year: 2012, Model line: CTS, Model: CADILLAC CTS 2012 2.GPages: 496, PDF Size: 6.36 MB
Page 327 of 496

Black plate (15,1)Cadillac CTS/CTS-V Owner Manual (Include Mex) - 2012
Vehicle Care 10-15
How to Check and Add Fluid
Visually check the clutch fluid
reservoir to make sure the fluid level
is at the MIN (minimum) line on the
side of the reservoir. The hydraulic
clutch fluid system should be closed
and sealed.
Do not remove the cap to check the
fluid level or to top‐off the fluid level.
Remove the cap only when
necessary to add the proper fluid
until the level reaches the MIN line.
Engine Air Cleaner/Filter
The engine air cleaner/filter is in the
engine compartment on the driver
side of the vehicle, near the front.
SeeEngine Compartment Overview
on page 10‑6 for more information
on location.
When to Inspect the Engine Air
Cleaner/Filter
Inspect the air cleaner/filter at the
scheduled maintenance intervals
and replace it at the first oil change
after each 80 000 km (50,000 mile)
interval. See Maintenance Schedule
on page 11‑3, for more information.
If you are driving in dusty/dirty
conditions, inspect the filter at each
engine oil change.
How to Inspect the Engine Air
Cleaner/Filter
To inspect the air cleaner/filter,
remove the filter from the vehicle
and lightly shake the filter to release
loose dust and dirt. If the filter
remains covered with dirt, a new
filter is required. To inspect or replace the engine air
cleaner/filter:
1. Turn the ignition off.
2. Remove the side cover by
pulling up on the front of the
cover.
Page 331 of 496

Black plate (19,1)Cadillac CTS/CTS-V Owner Manual (Include Mex) - 2012
Vehicle Care 10-19
What to Use
{WARNING
Adding only plain water or some
other liquid to the cooling system
can be dangerous. Plain water
and other liquids, can boil before
the proper coolant mixture will.
The coolant warning system is set
for the proper coolant mixture.
With plain water or the wrong
mixture, the engine could get too
hot but you would not get the
overheat warning. The engine
could catch fire and you or
others could be burned. Use a
50/50 mixture of clean, drinkable
water and DEX-COOL coolant.
Use a 50/50 mixture of clean,
drinkable water and DEX-COOL
coolant. If using this mixture,
nothing else needs to be added. This mixture:
.Gives freezing protection down
to
−37°C (−34°F), outside
temperature.
.Gives boiling protection up to
129°C (265°F), engine
temperature.
.Protects against rust and
corrosion.
.Will not damage aluminum parts.
.Helps keep the proper engine
temperature.
Notice: If an improper coolant
mixture is used, the engine could
overheat and be badly damaged.
The repair cost would not be
covered by the vehicle warranty.
Too much water in the mixture
can freeze and crack the engine,
radiator, heater core, and other
parts.
Never dispose of engine coolant by
putting it in the trash, pouring it on
the ground, or into sewers, streams,
or bodies of water. Have the coolant changed by an authorized service
center, familiar with legal
requirements regarding used
coolant disposal. This will help
protect the environment and your
health.
Checking Coolant
The vehicle must be on a level
surface when checking the coolant
level.
The engine coolant reservoir is
located in the engine compartment
on the driver side of the vehicle.
See
Engine Compartment Overview
on page 10‑6.
Check to see if coolant is visible in
the surge tank. If the coolant inside
the surge tank is boiling, do not do
anything else until it cools down.
If coolant is visible but the coolant
level is not at or above the FULL
COLD mark, add a 50/50 mixture
of clean, drinkable water and
DEX-COOL coolant at the coolant
surge tank, but be sure the cooling
system is cool before this is done.
Page 340 of 496
Black plate (28,1)Cadillac CTS/CTS-V Owner Manual (Include Mex) - 2012
10-28 Vehicle Care
hydraulic system fixed, since a
leak means that sooner or later
the brakes will not work well.
Do not top off the brake fluid.
Adding fluid does not correct a leak.
If fluid is added when the linings are
worn, there will be too much fluid
when new brake linings are
installed. Add or remove brake fluid,
as necessary, only when work is
done on the brake hydraulic system.
{WARNING
If too much brake fluid is added, it
can spill on the engine and burn,
if the engine is hot enough. You
or others could be burned, and
the vehicle could be damaged.
Add brake fluid only when work is
done on the brake hydraulic
system.
When the brake fluid falls to a low
level, the brake warning light comes
on. See Brake System Warning
Light on page 5‑22. What to Add
Use only new DOT 3 brake fluid
from a sealed container. See
Recommended Fluids and
Lubricants on page 11‑13.
Always clean the brake fluid
reservoir cap and the area around
the cap before removing it. This
helps keep dirt from entering the
reservoir.
{WARNING
With the wrong kind of fluid in the
brake hydraulic system, the
brakes might not work well. This
could cause a crash. Always use
the proper brake fluid.
Notice
.Using the wrong fluid can
badly damage brake
hydraulic system parts. For
example, just a few drops of
mineral-based oil, such as
engine oil, in the brake
hydraulic system can
damage brake hydraulic
system parts so badly that
they will have to be replaced.
Do not let someone put in
the wrong kind of fluid.
.If brake fluid is spilled on the
vehicle's painted surfaces,
the paint finish can be
damaged. Be careful not to
spill brake fluid on the
vehicle. If you do, wash it off
immediately.
Page 355 of 496

Black plate (43,1)Cadillac CTS/CTS-V Owner Manual (Include Mex) - 2012
Vehicle Care 10-43
Mini‐Fuses Usage60 Instrument Panel
Auxiliary Power
Outlet
61 Air Quality Sensor,
Inside Rear View
Mirror, Rear
Camera
62 Ignition
64 Steering Wheel
Illumination
65 Front Fog Lamps
(HID Only)
69 Body Control
Module 6, Body
Control Module 7
70 Emissions 1
71 Even Ignition Coils
72 Engine Control
Module
73 Emissions 2
74 Odd Ignition Coils Mini‐Fuses Usage
75 Transmission
Output Speed
Sensor, Brake
Vacuum Relay
76 Spare
77 Spare
78 Spare
79 Spare
80 Spare
81 Spare
J-Case Fuses Usage
6 Cooling Fan 2
7 Cooling Fan 1
8 Starter
9 Brake
Vacuum Pump
10 Antilock Brake
System Motor J-Case
Fuses Usage
13 Not Used
14 Electric Parking
Brake
15 Not Used
16 Not Used
17 Blower Motor
18 Rear Window
Defogger
37 Not Used
Relays Usage 1 Cooling Fan 2
2 Cooling Fan 1
3 Starter
4 Rear Window
Defogger
5 Instrument Panel
Auxiliary Power
Outlet
Page 358 of 496

Black plate (46,1)Cadillac CTS/CTS-V Owner Manual (Include Mex) - 2012
10-46 Vehicle Care
Mini‐Fuses Usage43 Left Daytime
Running
Lamps (HID)
46 Left High‐Beam
Headlamp
47 Right High‐Beam
Headlamp
50 Right Daytime
Running Lamp,
Windshield
Washer Pump
51 Airbag System
Ignition Switch
52 Engine Control
Module Ignition,
Transmission
Control Module
Ignition
54 Power Moding
(Immobilizer
Module, Ignition
Switch) Mini‐Fuses Usage
55 Intercooler Pump
56 Windshield Wipers
57 Right Low‐Beam
(HID Only)
58 Left Low‐Beam
(HID Only)
59 Right Daytime
Running Lamp
(HID Only)
60 Instrument Panel
Auxiliary Power
Outlet
61 Air Quality Sensor,
Inside Rear View
Mirror, Rear
Camera
62 Ignition
64 Steering Wheel
Illumination
65 Front Fog Lamps
(HID Only) Mini‐Fuses Usage
69 Body Control
Module 6, Body
Control Module 7
70 Emissions 1
71 Even Ignition Coils
72 Odd Ignition Coils
73 Emissions 2
74 Engine Control
Module
75 Not Used
76 Spare
77 Spare
78 Spare
79 Spare
80 Spare
81 Spare
Page 362 of 496

Black plate (50,1)Cadillac CTS/CTS-V Owner Manual (Include Mex) - 2012
10-50 Vehicle Care
Mini‐Fuses Usage60 Instrument Panel
Auxiliary Power
Outlet
61 Air Quality Sensor,
Inside Rear View
Mirror, Rear
Camera
62 Ignition
64 Steering Wheel
Illumination
65 Front Fog Lamps
(HID Only)
69 Body Control
Module 6, Body
Control Module 7
70 Emissions 1
71 Even Ignition Coils
72 Engine Control
Module
73 Emissions 2
74 Odd Ignition Coils Mini‐Fuses Usage
75 Transmission
Output Speed
Sensor, Brake
Vacuum Relay
76 Spare
77 Spare
78 Spare
79 Spare
80 Spare
81 Spare
J-Case Fuses Usage
6 Cooling Fan 2
7 Cooling Fan 1
8 Starter
9 Brake
Vacuum Pump
10 Antilock Brake
System Motor J-Case
Fuses Usage
13 Not Used
14 Electric Parking
Brake
15 Not Used
16 Not Used
17 Blower Motor
18 Transmission
Control Module
Battery
37 Trailer (Export Only)
Relays Usage 1 Cooling Fan 2
2 Cooling Fan 1
3 Starter
4 Rear Window
Defogger
5 Instrument Panel
Auxiliary Power
Outlet
Page 365 of 496
Black plate (53,1)Cadillac CTS/CTS-V Owner Manual (Include Mex) - 2012
Vehicle Care 10-53
Mini‐Fuses Usage43 Left Daytime
Running
Lamp (HID)
46 Left High‐Beam
Headlamp
47 Right High‐Beam
Headlamp
50 Right Daytime
Running Lamp
51 Airbag System
Ignition Switch
52 Engine Control
Module Ignition,
Transmission
Control Module
Ignition
54 Power Moding
(Immobilizer
Module, Ignition
Switch)
55 Intercooler Pump
56 Windshield Wipers Mini‐Fuses Usage
57 Right Low‐Beam
(HID Only)
58 Left Low‐Beam
(HID Only)
59 Right Daytime
Running Lamp
(HID Only)
60 Instrument Panel
Auxiliary Power
Outlet
61 Air Quality Sensor,
Inside Rear View
Mirror, Rear
Camera
62 Ignition
64 Steering Wheel
Illumination
65 Front Fog Lamps
(HID Only)
69 Body Control
Module 6, Body
Control Module 7 Mini‐Fuses Usage
70 Emissions 1
71 Even Ignition Coils
72 Odd Ignition Coils
73 Emissions 2
74 Engine Control
Module
75 Not Used
76 Spare
77 Spare
78 Spare
79 Spare
80 Spare
81 Spare
J-Case Fuses Usage
6 Cooling Fan 2
7 Cooling Fan 1
8 Starter
Page 380 of 496

Black plate (68,1)Cadillac CTS/CTS-V Owner Manual (Include Mex) - 2012
10-68 Vehicle Care
is certified to carry. The speed
rating is the maximum speed a
tire is certified to carry a load.
Tire Terminology and
Definitions
Air Pressure:The amount of
air inside the tire pressing
outward on each square inch
of the tire. Air pressure is
expressed in kPa (kilopascal)
or psi (pounds per square inch).
Accessory Weight
:The
combined weight of optional
accessories. Some examples
of optional accessories are
automatic transmission, power
steering, power brakes, power
windows, power seats, and air
conditioning.
Aspect Ratio
:The relationship
of a tire's height to its width. Belt
:A rubber coated layer of
cords that is located between
the plies and the tread. Cords
may be made from steel or other
reinforcing materials.
Bead
:The tire bead contains
steel wires wrapped by steel
cords that hold the tire onto
the rim.
Bias Ply Tire
:A pneumatic
tire in which the plies are laid
at alternate angles less than
90 degrees to the centerline of
the tread.
Cold Tire Pressure
:The
amount of air pressure in a tire,
measured in kPa (kilopascal)
or psi (pounds per square inch)
before a tire has built up heat
from driving. See Tire Pressure
on page 10‑70.
Curb Weight
:The weight of a
motor vehicle with standard and
optional equipment including the maximum capacity of fuel, oil,
and coolant, but without
passengers and cargo.
DOT Markings
:A code molded
into the sidewall of a tire
signifying that the tire is in
compliance with the U.S.
Department of Transportation
(DOT) Motor Vehicle Safety
Standards. The DOT code
includes the Tire Identification
Number (TIN), an alphanumeric
designator which can also
identify the tire manufacturer,
production plant, brand, and
date of production.
GVWR
:Gross Vehicle Weight
Rating. See Vehicle Load Limits
on page 9‑11.
GAWR FRT
:Gross Axle Weight
Rating for the front axle. See
Vehicle Load Limits on
page 9‑11.
Page 412 of 496
Black plate (100,1)Cadillac CTS/CTS-V Owner Manual (Include Mex) - 2012
10-100 Vehicle Care
{WARNING
Rust or dirt on a wheel, or on the
parts to which it is fastened, can
make wheel nuts become loose
after time. The wheel could come
off and cause an accident. When
changing a wheel, remove any
rust or dirt from places where the
wheel attaches to the vehicle. In
an emergency, a cloth or a paper
towel can be used; however, use
a scraper or wire brush later to
remove all rust or dirt.
{WARNING
Never use oil or grease on bolts
or nuts because the nuts might
come loose. The vehicle's wheel
could fall off, causing a crash.
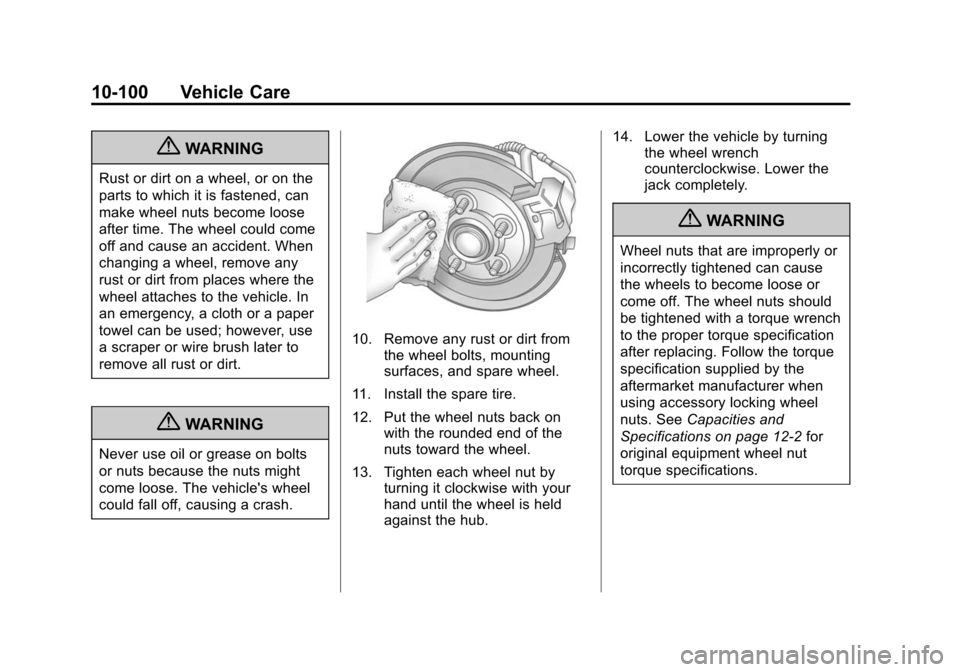
10. Remove any rust or dirt fromthe wheel bolts, mounting
surfaces, and spare wheel.
11. Install the spare tire.
12. Put the wheel nuts back on with the rounded end of the
nuts toward the wheel.
13. Tighten each wheel nut by turning it clockwise with your
hand until the wheel is held
against the hub. 14. Lower the vehicle by turning
the wheel wrench
counterclockwise. Lower the
jack completely.
{WARNING
Wheel nuts that are improperly or
incorrectly tightened can cause
the wheels to become loose or
come off. The wheel nuts should
be tightened with a torque wrench
to the proper torque specification
after replacing. Follow the torque
specification supplied by the
aftermarket manufacturer when
using accessory locking wheel
nuts. See Capacities and
Specifications on page 12‑2 for
original equipment wheel nut
torque specifications.
Page 423 of 496
Black plate (111,1)Cadillac CTS/CTS-V Owner Manual (Include Mex) - 2012
Vehicle Care 10-111
exceeding 8,274 kPa (1,200 psi)
can result in damage or removal
of paint and decals.
Rinse the vehicle well, before
washing and after, to remove all
cleaning agents completely. If they
are allowed to dry on the surface,
they could stain.
Dry the finish with a soft, clean
chamois or an all-cotton towel to
avoid surface scratches and water
spotting.
Finish Care
Application of aftermarket clearcoat
sealant/wax materials is not
recommended. If painted surfaces
are damaged, see your dealer to
have the damage assessed and
repaired. Foreign materials such as
calcium chloride and other salts, ice
melting agents, road oil and tar, tree
sap, bird droppings, chemicals from
industrial chimneys, etc., can
damage the vehicle's finish if they
remain on painted surfaces. Wash
the vehicle as soon as possible.If necessary, use non-abrasive
cleaners that are marked safe for
painted surfaces to remove foreign
matter.
Occasional hand waxing or mild
polishing should be done to remove
residue from the paint finish. See
your dealer for approved cleaning
products.
Notice:
Machine compounding
or aggressive polishing on a
basecoat/clearcoat paint finish
may damage it. Use only
non-abrasive waxes and polishes
that are made for a basecoat/
clearcoat paint finish on the
vehicle.
To keep the paint finish looking new,
keep the vehicle garaged or
covered whenever possible.
Protecting Exterior Bright Metal
Parts
Regularly clean bright metal parts
with water or chrome polish on
chrome or stainless steel trim,
if necessary. For aluminum, never use auto or
chrome polish, steam, or caustic
soap to clean. A coating of wax,
rubbed to a high polish, is
recommended for all bright metal
parts.
Cleaning Exterior Lamps/
Lenses and Emblems
Use only lukewarm or cold water, a
soft cloth, and a car washing soap
to clean exterior lamps and lenses.
Follow instructions under "Washing
the Vehicle" later in this section.
Windshield and Wiper Blades
Clean the outside of the windshield
with glass cleaner.
Clean rubber blades using a lint-free
cloth or paper towel soaked with
windshield washer fluid or a mild
detergent. Wash the windshield
thoroughly when cleaning the
blades. Bugs, road grime, sap, and
a buildup of vehicle wash/wax
treatments may cause wiper
streaking.