radio CADILLAC CTS 2013 2.G Infotainment Manual
[x] Cancel search | Manufacturer: CADILLAC, Model Year: 2013, Model line: CTS, Model: CADILLAC CTS 2013 2.GPages: 70, PDF Size: 0.65 MB
Page 1 of 70

Black plate (1,1)Cadillac CTS/CTS-V Navigation System - 2013 - crc - 8/21/12
2013 Cadillac CTS/CTS-V Navigation SystemM
Infotainment System. . . . . .3
Introduction. . . . . . . . . . . . . . . . .3
Overview . . . . . . . . . . . . . . . . . . . . . . . 4
Radio . . . . . . . . . . . . . . . . . . . . . . .10
AM-FM Radio . . . . . . . . . . . . . . . . . 10
Satellite Radio . . . . . . . . . . . . . . . . 15
Audio Players . . . . . . . . . . . . .15
CD/DVD Player . . . . . . . . . . . . . . . 15
MP3 . . . . . . . . . . . . . . . . . . . . . . . . . . 21
Hard Drive Device (HDD) . . . . . 24
Auxiliary Devices . . . . . . . . . . . . . . 29
Navigation . . . . . . . . . . . . . . . . .32
Using the Navigation System . . . . . . . . . . . . . . . . . . . . . . 32
Maps . . . . . . . . . . . . . . . . . . . . . . . . . . 34
Navigation Symbols . . . . . . . . . . . 36 Destination . . . . . . . . . . . . . . . . . . . . 40
Configure Menu . . . . . . . . . . . . . . . 51
Global Positioning
System (GPS) . . . . . . . . . . . . . . . 58
Vehicle Positioning . . . . . . . . . . . . 59
Problems with Route
Guidance . . . . . . . . . . . . . . . . . . . . 60
If the System Needs Service . . . . . . . . . . . . . . . . . . . . . . 60
Ordering Map DVDs . . . . . . . . . . 61
Database Coverage Explanations . . . . . . . . . . . . . . . . . 61
Voice Recognition . . . . . . . .62
Speech Recognition . . . . . . . . . . . 62
Trademarks and License Agreements . . . . . . . . . . . . . .
63
Index . . . . . . . . . . . . . . . . . . . . . i-1
Page 6 of 70
Black plate (6,1)Cadillac CTS/CTS-V Navigation System - 2013 - crc - 8/21/12
6 Infotainment System
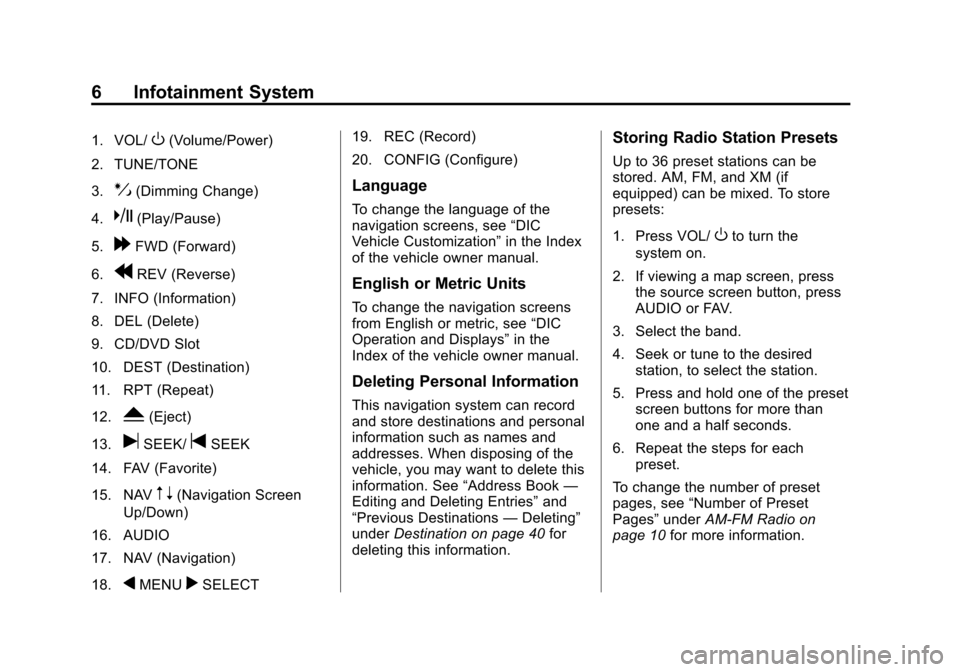
1. VOL/O(Volume/Power)
2. TUNE/TONE
3.
!(Dimming Change)
4.
k(Play/Pause)
5.
[FWD (Forward)
6.
rREV (Reverse)
7. INFO (Information)
8. DEL (Delete)
9. CD/DVD Slot
10. DEST (Destination)
11. RPT (Repeat)
12.
Y(Eject)
13.
uSEEK/tSEEK
14. FAV (Favorite)
15. NAV
m n(Navigation Screen
Up/Down)
16. AUDIO
17. NAV (Navigation)
18.
qMENUrSELECT 19. REC (Record)
20. CONFIG (Configure)
Language
To change the language of the
navigation screens, see
“DIC
Vehicle Customization” in the Index
of the vehicle owner manual.
English or Metric Units
To change the navigation screens
from English or metric, see “DIC
Operation and Displays” in the
Index of the vehicle owner manual.
Deleting Personal Information
This navigation system can record
and store destinations and personal
information such as names and
addresses. When disposing of the
vehicle, you may want to delete this
information. See “Address Book—
Editing and Deleting Entries” and
“Previous Destinations —Deleting”
under Destination on page 40 for
deleting this information.
Storing Radio Station Presets
Up to 36 preset stations can be
stored. AM, FM, and XM (if
equipped) can be mixed. To store
presets:
1. Press VOL/
Oto turn the
system on.
2. If viewing a map screen, press the source screen button, press
AUDIO or FAV.
3. Select the band.
4. Seek or tune to the desired station, to select the station.
5. Press and hold one of the preset screen buttons for more than
one and a half seconds.
6. Repeat the steps for each preset.
To change the number of preset
pages, see “Number of Preset
Pages” underAM-FM Radio on
page 10 for more information.
Page 10 of 70
Black plate (10,1)Cadillac CTS/CTS-V Navigation System - 2013 - crc - 8/21/12
10 Infotainment System
Radio
AM-FM Radio
Playing the Radio
O(Power/Volume):
1. Press to turn the audio system on and off.
2. Turn to increase or decrease the volume.
TUNE/TONE:
1. Turn to go to the next or previous frequency.
2. Press to display the Sound menu. See “Sound Menu” later
in this section. AUDIO:
1. Press to display the full audio
screen.
2. Press to switch between AM, FM, XM™ (if equipped), CD,
DVD, HDD, and AUX (auxiliary
input), or press the screen
button. See Satellite Radio on
page 15 (if equipped), CD/DVD
Player on page 15, Hard Drive
Device (HDD) on page 24, and
Auxiliary Devices on page 29 for
more information.
Finding a Station
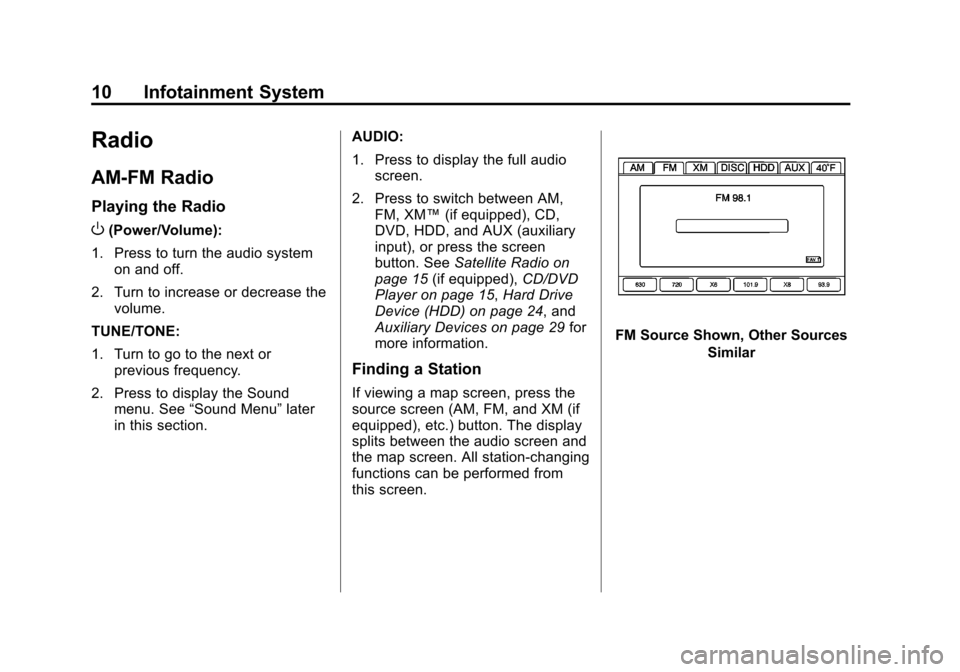
If viewing a map screen, press the
source screen (AM, FM, and XM (if
equipped), etc.) button. The display
splits between the audio screen and
the map screen. All station-changing
functions can be performed from
this screen.
FM Source Shown, Other Sources
Similar
Page 11 of 70
Black plate (11,1)Cadillac CTS/CTS-V Navigation System - 2013 - crc - 8/21/12
Infotainment System 11
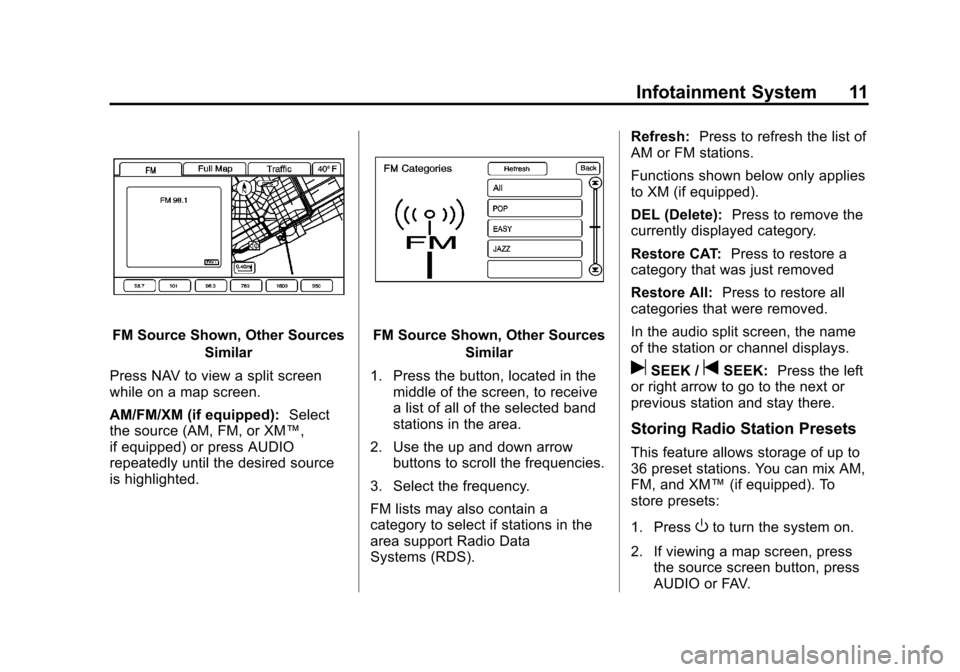
FM Source Shown, Other SourcesSimilar
Press NAV to view a split screen
while on a map screen.
AM/FM/XM (if equipped): Select
the source (AM, FM, or XM™,
if equipped) or press AUDIO
repeatedly until the desired source
is highlighted.FM Source Shown, Other Sources
Similar
1. Press the button, located in the middle of the screen, to receive
a list of all of the selected band
stations in the area.
2. Use the up and down arrow buttons to scroll the frequencies.
3. Select the frequency.
FM lists may also contain a
category to select if stations in the
area support Radio Data
Systems (RDS). Refresh:
Press to refresh the list of
AM or FM stations.
Functions shown below only applies
to XM (if equipped).
DEL (Delete): Press to remove the
currently displayed category.
Restore CAT: Press to restore a
category that was just removed
Restore All: Press to restore all
categories that were removed.
In the audio split screen, the name
of the station or channel displays.
uSEEK /tSEEK: Press the left
or right arrow to go to the next or
previous station and stay there.
Storing Radio Station Presets
This feature allows storage of up to
36 preset stations. You can mix AM,
FM, and XM™ (if equipped). To
store presets:
1. Press
Oto turn the system on.
2. If viewing a map screen, press the source screen button, press
AUDIO or FAV.
Page 13 of 70
Black plate (13,1)Cadillac CTS/CTS-V Navigation System - 2013 - crc - 8/21/12
Infotainment System 13
source and delivers five
independent audio channels from
the conventional two channel stereo
recordings. This is not available for
AM or FM.
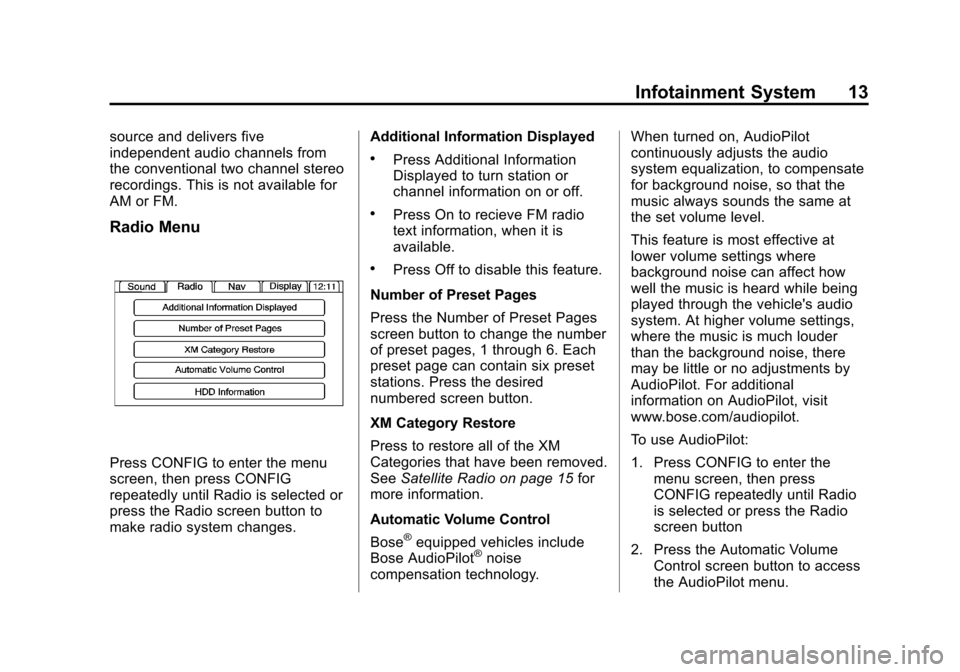
Radio Menu
Press CONFIG to enter the menu
screen, then press CONFIG
repeatedly until Radio is selected or
press the Radio screen button to
make radio system changes.Additional Information Displayed
.Press Additional Information
Displayed to turn station or
channel information on or off.
.Press On to recieve FM radio
text information, when it is
available.
.Press Off to disable this feature.
Number of Preset Pages
Press the Number of Preset Pages
screen button to change the number
of preset pages, 1 through 6. Each
preset page can contain six preset
stations. Press the desired
numbered screen button.
XM Category Restore
Press to restore all of the XM
Categories that have been removed.
See Satellite Radio on page 15 for
more information.
Automatic Volume Control
Bose
®equipped vehicles include
Bose AudioPilot®noise
compensation technology. When turned on, AudioPilot
continuously adjusts the audio
system equalization, to compensate
for background noise, so that the
music always sounds the same at
the set volume level.
This feature is most effective at
lower volume settings where
background noise can affect how
well the music is heard while being
played through the vehicle's audio
system. At higher volume settings,
where the music is much louder
than the background noise, there
may be little or no adjustments by
AudioPilot. For additional
information on AudioPilot, visit
www.bose.com/audiopilot.
To use AudioPilot:
1. Press CONFIG to enter the
menu screen, then press
CONFIG repeatedly until Radio
is selected or press the Radio
screen button
2. Press the Automatic Volume Control screen button to access
the AudioPilot menu.
Page 14 of 70
Black plate (14,1)Cadillac CTS/CTS-V Navigation System - 2013 - crc - 8/21/12
14 Infotainment System
3. Press the ON screen button.
To turn off, press the OFF screen
button.
Timeshift
Timeshift records all information
from AM, FM, XM™(if equipped),
etc. for up to an hour. Timeshift
allows you to listen to information
that was missed. Once starting to
listen to one of the bands, timeshift
automatically starts. Once timeshift
has recorded for an hour, it will keep
recording and start removing the
information from the beginning.
Press
k(pause) to stop hearing
the information through the
speakers. During this pause time,
timeshift keeps recording. Press
k
(play) to continue listening where
you left off. During pause, a
progress bar displays, to show how
much time the system has been
buffering. Press
kbefore turning the vehicle
off so that Timeshift keeps recording
for up to one hour. If the vehicle is
still off after an hour of recording,
the vehicle stops recording and all
information is lost.
If stations are switched, during this
hour period, timeshift erases all
information that was recorded and
starts recording from the current
band. If you switch to listening to
any other source, timeshift will not
record.
Radio Data System (RDS)
The audio system has a Radio Data
System (RDS). RDS features are
available for use only on FM
stations that broadcast RDS
information. With RDS, the
radio can:
.Seek to stations broadcasting
the selected type of
programming
.Receive announcements
concerning local and national
emergencies
.Display messages from radio
stations
This system relies on receiving
specific information from these
stations and only works when the
information is available. In rare
cases, a radio station may
broadcast incorrect information that
causes the radio features to work
improperly. If this happens, contact
the radio station.
The RDS system is always on.
When information is broadcast from
the current FM station, the station
name or call letters display on the
audio screen. RDS may provide a
program type (PTY) for current
programming and the name of the
program being broadcasted.
Page 15 of 70
Black plate (15,1)Cadillac CTS/CTS-V Navigation System - 2013 - crc - 8/21/12
Infotainment System 15
Satellite Radio
XM™Category Restore (If
Equipped)
Press the “Yes”button of Restore
All Categories screen to add all
categories that have been removed.
Press the “No”button of Restore All
Categories screen to cancel.
XM™ Satellite Radio Service (If
Equipped)
XM™ is a satellite radio service that
is based in the 48 contiguous United
States and 10 Canadian provinces.
XM™ Satellite Radio has a wide
variety of programming and
commercial-free music,
coast-to-coast, and in digital-quality
sound. During your trial or when you
subscribe, you will get unlimited
access to XM™ Radio Online for
when you are not in your vehicle. A service fee is required to receive
the XM service. For more
information, contact XM™
at
www.xmradio.com or call
1-800-929-2100 in the U.S. and
www.xmradio.ca or call
1-877-438-9677 in Canada.
When XM™ is active, the channel
name and number, category name,
song title, and artist will display on
the screen.
XM™ Radio Messages
See “XM™ Radio Messages” in the
vehicle's owner manual for a list of
possible XM messages.
Audio Players
CD/DVD Player
Playing a CD
The player can be used for CD,
MP3, and DVD audio and DVD
video.
Things to know about playing a CD:
.With the ignition on, insert a CD
or DVD partway into the slot,
label side up. The player pulls it
in and the CD or DVD should
begin playing. While playing a
CD or DVD, the navigation
system is available. If you insert
a CD or DVD with the system off
and the ignition on, it starts
to play.
.When a CD or DVD is inserted,
Gracenote logo display starts
with the Gracenote database
access and the CD/DVD tab
activates.
Page 21 of 70
Black plate (21,1)Cadillac CTS/CTS-V Navigation System - 2013 - crc - 8/21/12
Infotainment System 21
If the CD/DVD is not playing
correctly, for any other reason, try a
known good disc.
If any error occurs repeatedly or if
an error cannot be corrected,
contact your dealer.
MP3
Using an MP3 CD and DVD
MP3 Format
There are guidelines that must be
met, when creating an MP3 disc.
If the guidelines are not met when
recording a CD-R(W), the CD may
not play. The guidelines are:
.Sampling rate: 8 kHz, 16 kHz,
22.05 kHz, 24 kHz, 32 kHz,
44.1 kHz, and 48 kHz.
.Bit rates supported: 8, 16, 24,
32, 40, 48, 56, 64, 80, 96, 112,
128, 144, 160, 192, 224, 256,
and 320 kbps.
.ID3 tag information is displayed
by the radio if it is available. The
radio will display a filename,
song name, artist name, album
name, and directory name.
.Maximum number of folders is
255 with a maximum hierarchy
of eight folders.
.Create a folder structure that
makes it easy to find songs
while driving. Each folder or
album should contain 18 songs
or less.
.It is recommended that there is a
maximum of 1024 files on a disc.
.The files can be recorded on a
CD-R or CD-RW with a
maximum capacity of 700 MB.
Root Directory
The root directory is treated as a
folder. If the root directory has
compressed audio files, the
directory displays as DISC. All files
contained directly under the root
directory are accessed prior to any root directory folders. However,
playlists can always be accessed
before root folders or files.
Empty Directory or Folder
If a root directory or a folder exists
somewhere in the file structure that
contains only folders/subfolders and
no compressed files directly
beneath them, the player advances
to the next folder in the file structure
that contains compressed audio
files and the empty folder will not be
displayed or numbered.
No Folder
When the CD contains only
compressed files, the files are
located under the root folder. The
next and previous folder functions
have no function on a CD that was
recorded without folders or playlists.
When displaying the name of the
folder the radio displays Disc.
When the CD contains only playlists
and compressed audio files, but no
folders, all files are located under
the root folder. The left and right
Page 22 of 70
Black plate (22,1)Cadillac CTS/CTS-V Navigation System - 2013 - crc - 8/21/12
22 Infotainment System
arrow buttons search playlists (Px)
first and then goes to the root folder.
When the radio displays the name
of the folder the radio
displays DISC.
Order of Play
Tracks are played in the following
order:
.Play begins from the first track in
the first playlist and continues
sequentially through all tracks in
each playlist. When the last
track of the last playlist has been
played, play continues from the
first track of the first playlist.
.If the CD does not contain any
playlists, then play begins from
the first track under the root
directory. When all tracks from
the root directory have been
played, play continues from files
according to their numerical
listing. After playing the last
track from the last folder, play
begins again at the first track of
the first folder or root directory.When play enters a new folder, the
display automatically shows the new
folder name. The new track name
displays.
File System and Naming
The song name that displays is the
song name contained in the file.
If the song name is not present in
the file, then the radio displays the
file name with the extension (such
as .mp3) as the track name.
Preprogrammed Playlists
Preprogrammed playlists which
were created by WinAmp™,
MusicMatch™, or Real Jukebox™
software can be accessed, however,
there is not editing capability. These
playlists are treated as special
folders containing compressed
audio song files.
Playing an MP3
With the ignition on, insert a MP3
CD partway into the slot, label side
up. The player pulls it in and the
MP3 should begin playing. While
playing a MP3, the navigation system is available. If a MP3 is
inserted with the system off and the
ignition on, it starts to play.
When a MP3 CD is inserted, the
MP3 tab activates.
If the ignition or radio is turned off
with a MP3 CD in the player, it stays
in the player. When the ignition or
radio is turned on, the MP3 CD
starts playing where it stopped, if it
was the last selected audio source.
As each new track starts to play, the
track number displays.
If an error displays, see
“CD/DVD
Messages” later in this section.
If viewing a map screen, press the
MP3 screen button. The display
splits between the audio screen and
the map screen. If no split screen is
wanted or if not on a map screen,
press the AUDIO control button,
then press AUDIO until MP3 is
selected or press the MP3 screen
button.
Page 25 of 70
Black plate (25,1)Cadillac CTS/CTS-V Navigation System - 2013 - crc - 8/21/12
Infotainment System 25
To record an audio book from a
CD or a USB, you must register
with www.audible.com to receive
an ID number. The ID number
must be entered into the system.
See Audio Book later in this
section for information on
www.audible.com. See“Radio”
under Configure Menu on
page 51 for information on
entering your ID number.
2. Press REC.
3. A confirmation window displays. Press Yes to record all tracks;
press No to cancel the
operation.
A progress bar displays if Yes
was selected.
To record selected tracks:
1. Load a CD.
2. Press the Track List screen button, located in the middle of
the screen.
3. Highlight the songs from the Music Navigator screen using
the TUNE knob. To record an audio book from a
CD or a USB, you must register
with www.audible.com to receive
an ID number. The ID number
must be entered into the system.
See Audio Book later in this
section for information on
www.audible.com. See
“Radio”
under Configure Menu on
page 51 for information on
entering your ID number.
4. Press REC.
5. A confirmation window displays. Press Yes to record this track;
press No to cancel the
operation.
A progress bar displays if Yes
was selected.
While recording a CD to the HDD,
if the system is turned off, the
recording process stops. When the
system is turned back on, the
recording process will not continue.Recording from a USB Device
To record all tracks:
1. Connect a USB device. To record an audio book from a
CD or a USB, you must register
with www.audible.com to receive
an ID number. The ID number
must be entered into the system.
See Audio Book later in this
section for information on
www.audible.com. See “Radio”
under Configure Menu on
page 51 for information on
entering your ID number.
2. Press REC.
3. A confirmation window displays. Press Yes to record all tracks;
press No to cancel the
operation.
A progress bar displays if Yes
was selected.