radio controls CADILLAC CTS 2013 2.G User Guide
[x] Cancel search | Manufacturer: CADILLAC, Model Year: 2013, Model line: CTS, Model: CADILLAC CTS 2013 2.GPages: 478, PDF Size: 7.7 MB
Page 176 of 478

Black plate (54,1)Cadillac CTS/CTS-V Owner Manual - 2013 - crc2 - 8/22/12
5-54 Instruments and Controls
When programming a garage door,
park outside of the garage. Park
directly in line with and facing the
garage door opener motor-head or
gate motor-head. Be sure that
people and objects are clear of the
garage door or gate being
programmed.
It is recommended that a new
battery be installed in the hand-held
transmitter for quicker and more
accurate transmission of the
radio-frequency signal.
Programming the Universal
Remote System
For questions or help programming
the Universal Remote system, call
1-800-355-3515 or go to
www.homelink.com.
Programming a garage door opener
involves time-sensitive actions, so
read the entire procedure before
starting. Otherwise, the device will
time out and the procedure will have
to be repeated.To program up to three devices:
1. Hold the end of the hand-held
transmitter about 3 to 8 cm (1 to
3 in) away from the Universal
Remote system buttons while
keeping the indicator light in
view. The hand-held transmitter
was supplied by the
manufacturer of the garage door
opener receiver
(motor-head unit).
2. At the same time, press and hold both the hand-held
transmitter button and one of the
three Universal Remote system
buttons to be used to operate
the garage door. Do not release
the Universal Remote system
button or the hand-held
transmitter button until the
indicator light changes from a
slowly to a rapidly flashing light.
You now may release both
buttons.
Some entry gates and garage
door openers may require
substitution of Step 2 with the procedure noted in
“Gate
Operator and Canadian
Programming” later in this
section.
3. Press and hold for five seconds the newly trained Universal
Remote system button (the
button selected in Step 2) while
observing the indicator light and
garage door activation.
.If the indicator light stays on
continuously or the garage
door starts to move when
the Universal Remote
system button is pressed
and released, then the
programming is complete.
There is no need to
continue programming
Steps 4–6.
Page 177 of 478
Black plate (55,1)Cadillac CTS/CTS-V Owner Manual - 2013 - crc2 - 8/22/12
Instruments and Controls 5-55
.If the Universal Remote
system indicator light blinks
rapidly for two seconds,
then turns to a constant
light and the garage door
does not move, continue
with programming
Steps 4–6.
It may be helpful to have
another person assist with
the remaining Steps 4–6.
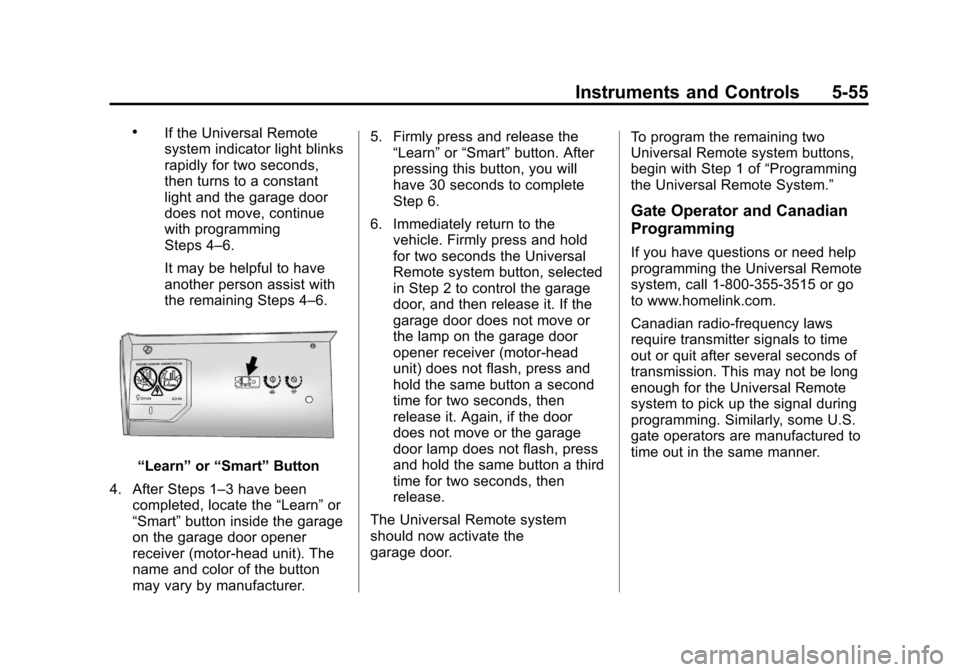
“Learn”or“Smart” Button
4. After Steps 1–3 have been completed, locate the “Learn”or
“Smart” button inside the garage
on the garage door opener
receiver (motor-head unit). The
name and color of the button
may vary by manufacturer. 5. Firmly press and release the
“Learn” or“Smart” button. After
pressing this button, you will
have 30 seconds to complete
Step 6.
6. Immediately return to the vehicle. Firmly press and hold
for two seconds the Universal
Remote system button, selected
in Step 2 to control the garage
door, and then release it. If the
garage door does not move or
the lamp on the garage door
opener receiver (motor-head
unit) does not flash, press and
hold the same button a second
time for two seconds, then
release it. Again, if the door
does not move or the garage
door lamp does not flash, press
and hold the same button a third
time for two seconds, then
release.
The Universal Remote system
should now activate the
garage door. To program the remaining two
Universal Remote system buttons,
begin with Step 1 of
“Programming
the Universal Remote System.”
Gate Operator and Canadian
Programming
If you have questions or need help
programming the Universal Remote
system, call 1-800-355-3515 or go
to www.homelink.com.
Canadian radio-frequency laws
require transmitter signals to time
out or quit after several seconds of
transmission. This may not be long
enough for the Universal Remote
system to pick up the signal during
programming. Similarly, some U.S.
gate operators are manufactured to
time out in the same manner.
Page 189 of 478
Black plate (1,1)Cadillac CTS/CTS-V Owner Manual - 2013 - crc2 - 8/22/12
Infotainment System 7-1
Infotainment
System
Introduction
Infotainment . . . . . . . . . . . . . . . . . . . 7-1
Theft-Deterrent Feature . . . . . . . 7-2
Operation . . . . . . . . . . . . . . . . . . . . . 7-3
Radio
AM-FM Radio . . . . . . . . . . . . . . . . . 7-8
Satellite Radio . . . . . . . . . . . . . . . 7-11
Radio Reception . . . . . . . . . . . . . 7-15
Backglass Antenna . . . . . . . . . . 7-15
Multi-Band Antenna . . . . . . . . . . 7-16
Audio Players
CD Player . . . . . . . . . . . . . . . . . . . 7-16
CD/DVD Player . . . . . . . . . . . . . . 7-19
MP3 . . . . . . . . . . . . . . . . . . . . . . . . . 7-23
Hard Drive Device (HDD) . . . . 7-27
Auxiliary Devices . . . . . . . . . . . . 7-34
Phone
Bluetooth . . . . . . . . . . . . . . . . . . . . 7-36
Trademarks and License
Agreements
Trademarks and LicenseAgreements . . . . . . . . . . . . . . . . 7-44
Introduction
Infotainment
Read the following pages to
become familiar with the audio
system's features.
{WARNING
Taking your eyes off the road for
extended periods could cause a
crash resulting in injury or death
to you or others. Do not give
extended attention to infotainment
tasks while driving.
This system provides access to
many audio and non‐audio listings.
To minimize taking your eyes off the
road while driving, do the following
while the vehicle is parked:
.Become familiar with the
operation and controls of the
audio system.
Page 193 of 478

Black plate (5,1)Cadillac CTS/CTS-V Owner Manual - 2013 - crc2 - 8/22/12
Infotainment System 7-5
4. To decrease the highlightedsetting, do one of the following:
.Turn the TUNE/TONE knob
counterclockwise.
.Turn the MENU/SELECT
knob counterclockwise.
.Press thesREV button.
.Press the©SEEK button.
To quickly adjust bass, midrange,
or treble to the middle position,
press the softkey under the BASS,
MID, or TREB tab for more than
two seconds.
To quickly adjust all tone and
speaker controls to the middle
position, press the TUNE/TONE
knob for more than two seconds.
Adjusting the Speakers
(Balance/Fade)
BAL/FADE (Balance/Fade): To
adjust balance or fade:
1. Press the TUNE/TONE knob until the speaker control tabs
display. 2. Continue pressing the TUNE/
TONE knob, or press the softkey
under the desired tab to highlight
the desired tone setting.
3. To increase the highlighted setting, do one of the following:
.Turn the TUNE/TONE knob
clockwise.
.Turn the MENU/SELECT
knob clockwise.
.Press the\FWD button.
.Press the¨SEEK button.
4. To decrease the highlighted setting, do one of the following:
.Turn the TUNE/TONE knob
counterclockwise.
.Turn the MENU/SELECT
knob counterclockwise.
.Press thesREV button.
.Press the©SEEK button. To quickly adjust balance or fade to
the middle position, press the
softkey under the BAL or FADE tab
for more than two seconds.
To quickly adjust all speaker and
tone controls to the middle position,
press the TUNE/TONE knob for
more than two seconds.
Adjusting the Equalizer (EQ)
If the radio has this feature, the EQ
can be adjusted between talk and
manual.
To choose an EQ setting:
1. Press the TUNE/TONE knob.
2. Select EQ.
3. Select Talk or Manual.
4. Press the Back button to go
back to the Tone Settings menu.
Page 197 of 478

Black plate (9,1)Cadillac CTS/CTS-V Owner Manual - 2013 - crc2 - 8/22/12
Infotainment System 7-9
Selecting a Station
Seek Tuning
If the radio station is not known:
Briefly press
¨SEEK or©SEEK.
The radio will search for the next
receivable station. If the radio does
not find a station, it switches
automatically to a more sensitive
search level. If it still does not find a
station, the frequency that was last
active begins to play and “None
Found” displays.
If the radio station is known:
Press and hold
¨SEEK or©SEEK
until the desired station on the
pop-up frequency display is almost
reached, then release the button.
Manual Tuning
Turn the TUNE/TONE knob to
select the frequency on the pop-up
display. Station List
Turn the MENU/SELECT knob to
display the station list. To create a
list of available stations, select
“Refresh AM Station List”
or
“Refresh FM Station List,”
depending on which band is
being used.
In FM, RDS information may be
utilized to categorize the stations by
genre.
In both AM and FM, the stations are
arranged in frequency order.Storing a Radio Station as a
Favorite
Drivers are encouraged to set up
their radio station favorites while the
vehicle is stopped. Tune to favorite
stations using the presets, favorites
button, and steering wheel controls,
if the vehicle has this feature.
FAV (Favorites): A maximum of
36 stations can be programmed as
favorites using the six softkeys
below the radio station frequency
tabs on the display and by using the radio favorites page button (FAV
button). Press the FAV button to go
through up to six pages of favorites,
each having six favorite stations
available per page. Each page of
favorites can contain any
combination of AM, FM,
or SiriusXM
®stations.
To store a station as a favorite:
1. Tune to the desired radio station.
2. Press the FAV button to display the page where the station is to
be stored.
3. Press and hold one of the six softkeys until a beep sounds
and “Favorite Saved” displays.
When that softkey is pressed
and released, the radio recalls
the station that was set.
4. Repeat the steps for each radio station to be stored as a favorite.
The number of favorites pages can
be set up using the CONFIG button.
Page 200 of 478
Black plate (12,1)Cadillac CTS/CTS-V Owner Manual - 2013 - crc2 - 8/22/12
7-12 Infotainment System
Selecting a Station by Station List
The infotainment system can list all
SiriusXM stations.
To select a station from the
station list:
1. Turn the TUNE/TONE knob andhighlight the desired station.
2. Press the TUNE/TONE knob to select the station.
The highlighted station will also
automatically be selected if TUNE/
TONE is released and no longer
turned.
Selecting a Station by Category
The infotainment system can list
SiriusXM stations by genre.
To select a station from the
category list:
1. Turn the MENU/SELECT knob and highlight the desired genre,
then press the MENU/SELECT
knob to select the genre. 2. Turn the MENU/SELECT knob
and highlight the desired station,
then press the MENU/SELECT
knob to select the station.
Storing a SiriusXM Station as a
Favorite
Drivers are encouraged to set up
their radio station favorites while the
vehicle is stopped. Tune to favorite
stations using the presets, favorites
button, and steering wheel controls,
if the vehicle has this feature.
FAV (Favorites): A maximum of
36 stations can be programmed as
favorites using the six softkeys
below the radio station frequency
tabs on the display and by using the
radio favorites page button (FAV
button). Press the FAV button to go
through up to six pages of favorites,
each having six favorite stations
available per page. Each page of
favorites can contain any
combination of AM, FM, or SiriusXM
stations. To store a station as a favorite:
1. Tune to the desired radio station.
2. Press the FAV button to display
the page where the station is to
be stored.
3. Press and hold one of the six softkeys until a beep sounds.
When that softkey is pressed
and released, the radio recalls
the station that was set.
4. Repeat the steps for each radio station to be stored as a favorite.
The number of favorites pages can
be set up using the CONFIG button.
To set up the number of favorites
pages:
1. Press the CONFIG button to display the radio setup menu.
2. Press the softkey below the FAV label.
3. Select the desired number of favorites pages by pressing the
softkey below the displayed
page numbers.
Page 223 of 478
Black plate (35,1)Cadillac CTS/CTS-V Owner Manual - 2013 - crc2 - 8/22/12
Infotainment System 7-35
When a device is first connected to
the 3.5 mm (1/8 in) input jack or the
USB port (if equipped) the
infotainment system automatically
switches to that device. If an
auxiliary device has already been
connected, press the AUX or CD/
AUX button.
3.5 mm Jack
Connect a 3.5 mm (1/8 in) cable to
the auxiliary input jack to use a
portable audio player.
Playback of an audio device that is
connected to the 3.5 mm (1/8 in)
jack can only be controlled using
the controls on the device.
VOL/
O(Volume/Power):Turn
clockwise or counterclockwise to
increase or decrease the volume of
the portable player. Use the portable
device to make additional volume
adjustments.
CD or CD/AUX (CD/Auxiliary):
Press to play a CD when a portable
audio device is playing. Press again
to start playing audio from the connected portable audio player. If a
portable audio player is not
connected,
“No Aux Device”
displays.
USB Port
The USB connector uses the USB
standards, 1.1 and 2.0.
USB Supported Devices
.USB Flash Drives
.Portable USB Hard Drives
.Fifth generation or later iPods*
.First, Second, or Third
generation iPod nanos*
.iPod classics*
*For proper operation, make sure
the iPod has the latest firmware
from Apple
®. The iPod firmware can
be updated using the latest iTunes
application. See www.apple.com/
itunes. Connecting a USB Storage Device
Connect the USB storage device to
the USB port in the center console.
Some USB devices may not be
supported.
Playing an MP3/WMA from a USB
Storage Device
See
MP3 on page 7‑23 for more
information.
Connecting an iPod
To connect the iPod, connect one
end of the special iPod connection
cable to the iPod’s dock connector.
Connect the other end to both the
USB port and the auxiliary input jack
in the center console. The USB port
and the auxiliary input jack are in
the center console bin. If the vehicle
is on and the USB connection
works, a GM logo may appear on
the iPod. The iPod's music
information will be shown on the
radio’s display and the music begins
playing through the vehicle's audio
system.
Page 224 of 478
Black plate (36,1)Cadillac CTS/CTS-V Owner Manual - 2013 - crc2 - 8/22/12
7-36 Infotainment System
The iPod's battery charges while it
is connected to the vehicle and if
the ignition is turned to ACC/
ACCESSORY or ON/RUN. It can
also be left connected to the vehicle
after the vehicle is turned off. With
the vehicle turned off, the iPod will
automatically be powered off and
will not charge or draw power from
the vehicle's battery.
A standard iPod USB cable, like the
one that came with the iPod, cannot
be used to connect an iPod to the
vehicle. The special iPod
connection cable that came
equipped with the vehicle or that
was made available from your
dealer must be used to command
and control an iPod.
Use a standard 3.5 mm (1/8 in)
stereo cable to connect an older
iPod model that is not supported,
or if the special iPod connection
cable is missing. Command and
control of the iPod using the
infotainment control buttons and
knobs is not supported when only a
3.5 mm (1/8 in) stereo cable is used.Commanding and Controlling
an iPod
An iPod can be controlled by using
the radio buttons and knobs; the
song information shows on the
infotainment system's display. To
connect and control the iPod using
the radio controls, use the special
iPod connection cable that came as
standard equipment with the vehicle
as part of the USB option. The
special iPod connection cable can
also be purchased or made
available from your dealer. See your
dealer for more information.
Use the MENU/SELECT knob to
bring up the iPod Menu and select
Songs, Artists, Albums, Playlists,
and Audio Books to play from
the iPod.
Disconnecting an iPod
To properly dismount the iPod USB
device before disconnecting from
the vehicle, press the softkey under
the EJECT tab on the infotainment
display screen during iPod
playback.Phone
Bluetooth
For vehicles equipped with
Bluetooth capability, the system can
interact with many cell phones,
allowing:
.Placement and receipt of calls in
a hands-free mode.
.Sharing of the cell phone’s
address book or contact list with
the vehicle.
To minimize driver distraction,
before driving, and with the vehicle
parked:
.Become familiar with the
features of the cell phone.
Organize the phone book and
contact lists clearly and delete
duplicate or rarely used entries.
If possible, program speed dial
or other shortcuts.
.Review the controls and
operation of the infotainment
system.
Page 238 of 478

Black plate (4,1)Cadillac CTS/CTS-V Owner Manual - 2013 - crc2 - 8/22/12
8-4 Climate Controls
Recirculation is not available in the
defrost mode and automatically
turns off 10 minutes after defog is
selected. This helps to limit window
fogging in the vehicle.
Using recirculation for long periods
of time could cause the air inside
the vehicle to become too dry or
stuffy. To prevent this from
happening, after the air in the
vehicle has cooled, select outside
air or press the auto button.
F(Outside Air):Press to turn
on the outside air. An indicator light
turns on. The outside air mode pulls
fresh air from outside the vehicle.
Outside air is always selected in
defrost mode to prevent fogging.
Rear Window Defogger
The rear window defogger uses a
warming grid to remove fog or frost
from the rear window. It only works
when the ignition is in ON/RUN.
=(Rear Window Defogger):
Press to turn the rear window
defogger on or off. The rear window defogger stays on
for about 15 minutes, before turning
off if the vehicle is moving at a
slower speed. At higher speeds, the
rear window defogger may stay on
continuously. With each additional
press, the defogger runs for about
10 minutes. The defogger can also
be turned off by turning off the
engine.
The heated outside rearview mirrors
turn on when the rear window
defogger button is on and helps to
clear fog or frost from the surface of
the mirrors. See
Heated Mirrors on
page 2‑27.
Notice: Do not try to clear frost
or other material from the inside
of the front windshield and rear
window with a razor blade or
anything else that is sharp. This
may damage the rear window
defogger grid and affect the
radio's ability to pick up stations
clearly. The repairs would not be
covered by the vehicle warranty.
z/{(Heated and Ventilated
Seats, If Equipped): Press to heat
or ventilate the seat. See Heated
and Ventilated Front Seats on
page 3‑9.
Remote Start Climate Control
Operation: For vehicles with
remote vehicle start, the climate
control system automatically heats
and cools the vehicle based on the
temperature inside and outside of
the vehicle. The climate control
displays will be blank. See Remote
Vehicle Start on page 2‑10.
In cold weather the windshield
defroster and/or rear window
defogger automatically turn on.
If the vehicle has heated seats, they
will also turn on.
When the ignition is turned to ON/
RUN, the climate control system
returns to the settings used before
the vehicle was last turned off. The
heated seats will turn off,
if equipped.