tow CADILLAC CTS 2013 2.G Owner's Manual
[x] Cancel search | Manufacturer: CADILLAC, Model Year: 2013, Model line: CTS, Model: CADILLAC CTS 2013 2.GPages: 478, PDF Size: 7.7 MB
Page 128 of 478

Black plate (6,1)Cadillac CTS/CTS-V Owner Manual - 2013 - crc2 - 8/22/12
5-6 Instruments and Controls
Wagon Model
Pull the lever toward you to spray
washer fluid on the windshield. The
spray continues until the lever is
released. The wipers will run a few
times.
WASHER FLUID LOW ADD FLUID
displays on the Driver Information
Center (DIC) when the washer fluid
is low. SeeWasher Fluid Messages
on page 5‑45.
See Washer Fluid on page 10‑23 for
information on filling the windshield
washer fluid reservoir.
If the headlamps are on while the
windshield is being washed, the
headlamp washers, if the vehicle
has them, will also turn on. See
“Headlamp Washer” following for
more information.
Wiper Activated Headlamps
This feature activates the
headlamps and parking lamps after
the windshield wipers have been in use for about six seconds. For this
feature to work, the exterior lamp
control must be in AUTO.
The wiper-activated headlamps
immediately turn off, when the
ignition is turned to LOCK/OFF or
the windshield wiper control is
turned off.
Rear Window Wiper/
Washer
For vehicles with a rear window
wiper/washer, the controls are on
the end of the windshield wiper
lever.Press the upper or lower portion of
the button to control the rear wiper
and rear wiper delay.
The system turns off when the
button is returned to the middle
position.
Z(Rear Wiper Delay Short):
Sets a five‐second delay between
wipes.
5(Rear Wiper Delay Long): Sets
a 10‐second delay between wipes.
Page 142 of 478

Black plate (20,1)Cadillac CTS/CTS-V Owner Manual - 2013 - crc2 - 8/22/12
5-20 Instruments and Controls
Malfunctions often are indicated by
the system before any problem is
apparent. Being aware of the light
can prevent more serious damage
to the vehicle. This system also
assists the service technician in
correctly diagnosing any
malfunction.
Notice:If the vehicle is
continually driven with this light
on, the emission controls might
not work as well, the vehicle fuel
economy might not be as good,
and the engine might not run as
smoothly. This could lead to
costly repairs that might not be
covered by the vehicle warranty.
Notice: Modifications made to the
engine, transmission, exhaust,
intake, or fuel system of the
vehicle or the replacement of the
original tires with other than
those of the same Tire
Performance Criteria (TPC) can
affect the vehicle's emission
controls and can cause this light
to come on. Modifications to
these systems could lead to costly repairs not covered by the
vehicle warranty. This could also
result in a failure to pass a
required Emission Inspection/
Maintenance test. See
Accessories and Modifications on
page 10‑3.
This light comes on during a
malfunction in one of two ways:
Light Flashing:
A misfire condition
has been detected. A misfire
increases vehicle emissions and
could damage the emission control
system on the vehicle. Diagnosis
and service might be required.
To prevent more serious damage to
the vehicle:
.Reduce vehicle speed.
.Avoid hard accelerations.
.Avoid steep uphill grades.
.If towing a trailer, reduce the
amount of cargo being hauled as
soon as it is possible. If the light continues to flash, find a
safe place to stop and park the
vehicle. Turn the vehicle off, wait at
least 10 seconds, and restart the
engine. If the light is still flashing,
follow the previous steps and see
your dealer for service as soon as
possible.
Light On Steady:
An emission
control system malfunction has
been detected on the vehicle.
Diagnosis and service might be
required.
The following may correct an
emission control system
malfunction:
.Check that the fuel cap is fully
installed. See Filling the Tank on
page 9‑49. The diagnostic
system can determine if the fuel
cap has been left off or
improperly installed. A loose or
missing fuel cap allows fuel to
evaporate into the atmosphere.
A few driving trips with the cap
properly installed should turn the
light off.
Page 144 of 478
Black plate (22,1)Cadillac CTS/CTS-V Owner Manual - 2013 - crc2 - 8/22/12
5-22 Instruments and Controls
Brake System Warning
Light
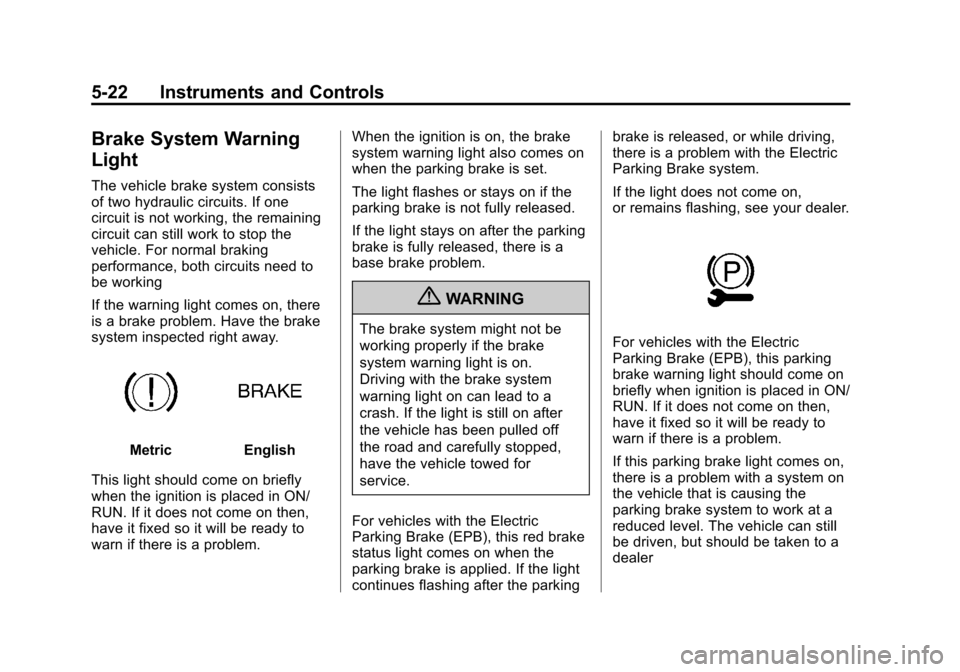
The vehicle brake system consists
of two hydraulic circuits. If one
circuit is not working, the remaining
circuit can still work to stop the
vehicle. For normal braking
performance, both circuits need to
be working
If the warning light comes on, there
is a brake problem. Have the brake
system inspected right away.
MetricEnglish
This light should come on briefly
when the ignition is placed in ON/
RUN. If it does not come on then,
have it fixed so it will be ready to
warn if there is a problem. When the ignition is on, the brake
system warning light also comes on
when the parking brake is set.
The light flashes or stays on if the
parking brake is not fully released.
If the light stays on after the parking
brake is fully released, there is a
base brake problem.
{WARNING
The brake system might not be
working properly if the brake
system warning light is on.
Driving with the brake system
warning light on can lead to a
crash. If the light is still on after
the vehicle has been pulled off
the road and carefully stopped,
have the vehicle towed for
service.
For vehicles with the Electric
Parking Brake (EPB), this red brake
status light comes on when the
parking brake is applied. If the light
continues flashing after the parking brake is released, or while driving,
there is a problem with the Electric
Parking Brake system.
If the light does not come on,
or remains flashing, see your dealer.For vehicles with the Electric
Parking Brake (EPB), this parking
brake warning light should come on
briefly when ignition is placed in ON/
RUN. If it does not come on then,
have it fixed so it will be ready to
warn if there is a problem.
If this parking brake light comes on,
there is a problem with a system on
the vehicle that is causing the
parking brake system to work at a
reduced level. The vehicle can still
be driven, but should be taken to a
dealer
Page 179 of 478

Black plate (1,1)Cadillac CTS/CTS-V Owner Manual - 2013 - crc2 - 8/22/12
Lighting 6-1
Lighting
Exterior Lighting
Exterior Lamp Controls . . . . . . . . 6-1
Exterior Lamps OffReminder . . . . . . . . . . . . . . . . . . . . 6-2
Headlamp High/Low-Beam Changer . . . . . . . . . . . . . . . . . . . . . 6-2
Flash-to-Pass . . . . . . . . . . . . . . . . . 6-2
Daytime Running Lamps (DRL) . . . . . . . . . . . . . . . . 6-2
Automatic Headlamp System . . . . . . . . . . . . . . . . . . . . . . 6-3
Adaptive Forward Lighting (AFL) . . . . . . . . . . . . . . . 6-4
Hazard Warning Flashers . . . . . 6-5
Turn and Lane-Change Signals . . . . . . . . . . . . . . . . . . . . . . 6-5
Fog Lamps . . . . . . . . . . . . . . . . . . . . 6-5
Interior Lighting
Instrument Panel Illumination Control . . . . . . . . . . . . . . . . . . . . . . 6-6
Reading Lamps . . . . . . . . . . . . . . . 6-6
Lighting Features
Entry Lighting . . . . . . . . . . . . . . . . . 6-7
Exit Lighting . . . . . . . . . . . . . . . . . . . 6-7
Parade Dimming . . . . . . . . . . . . . . 6-7
Battery Load Management . . . . 6-8
Battery Power Protection . . . . . . 6-8
Exterior Lighting Battery Saver . . . . . . . . . . . . . . . . . . . . . . . . 6-9
Exterior Lighting
Exterior Lamp Controls
The exterior lamp control is toward
the end of the turn signal/lane
change lever.
O(Exterior Lamp Control): Turn
the band with this symbol on it to
operate the exterior lamps.
The exterior lamp control has four
positions:
O(Off): Turns off all lamps, except
the Daytime Running Lamps (DRL).
AUTO (Automatic): Turns the
headlamps on and off automatically,
depending upon how much light is
available outside of the vehicle.
Page 180 of 478

Black plate (2,1)Cadillac CTS/CTS-V Owner Manual - 2013 - crc2 - 8/22/12
6-2 Lighting
;(Parking Lamps):Turns on the
parking lamps together with the
following:
.Sidemarker Lamps
.Taillamps
.License Plate Lamps
.Instrument Panel Lights
5(Headlamps): Turns on the
headlamps, together with the
previously listed lamps and lights.
Exterior Lamps Off
Reminder
A warning chime will sound if the
exterior lamp control is left on in
either the headlamp or parking lamp
position and the driver door is
opened with the ignition off.
Headlamp High/
Low-Beam Changer
Push the turn signal lever away
from you to turn the high beams on.
Pull the lever toward you and then
release it to return to low beams.
If the vehicle is turned off while the
high beams are on, they will come
on the next time the vehicle is
started.
This indicator light turns on in the
instrument cluster when the
high-beam headlamps are on.
Flash-to-Pass
This feature allows the high-beam
headlamps to be used to signal the
driver in front of you that you want
to pass. Pull and hold the turn signal lever
toward you to use this feature.
When this is done the following will
occur:
.If the headlamps are off or in
low-beam mode, the high-beam
headlamps will turn on at full
brightness. Release the lever to
turn them off.
.If the headlamps are already in
high-beam mode, they will
remain on high beam.
Daytime Running
Lamps (DRL)
Daytime Running Lamps (DRL) can
make it easier for others to see the
front of your vehicle during the day.
Fully functional daytime running
lamps are required on all vehicles
first sold in Canada.
Page 241 of 478

Black plate (7,1)Cadillac CTS/CTS-V Owner Manual - 2013 - crc2 - 8/22/12
Climate Controls 8-7
To replace the passenger
compartment air filter:
1. Turn the ignition to ON/RUN withthe engine off.
2. Turn on the windshield wipers and turn the ignition off again
when the wipers are straight up
on the windshield.
This allows access to the leaf
screen. The passenger
compartment air filter is under
the screen.
3. Open the hood to access the engine compartment. See Hood
on page 10‑4 for more
information.
4. Remove the three screws that hold the screen in place and lift
off the screen by lifting and
sliding it toward the center of the
vehicle.
5. Pull out on the two tabs on each end of the filter cover.
6. Lift the filter cover off by pulling it straight up. 7. Remove the old filter and insert
a new one.
See Maintenance Replacement
Parts on page 11‑15 for the
correct part number for the filter.
8. Reverse Steps 1 through 6 to reinstall the cover.
Page 244 of 478
Black plate (2,1)Cadillac CTS/CTS-V Owner Manual - 2013 - crc2 - 8/22/12
9-2 Driving and Operating
California FuelRequirements . . . . . . . . . . . . . . 9-48
Fuels in Foreign Countries . . . 9-48
Fuel Additives . . . . . . . . . . . . . . . 9-48
Filling the Tank . . . . . . . . . . . . . . 9-49
Filling a Portable Fuel Container . . . . . . . . . . . . . . . . . . . 9-51
Towing
General TowingInformation . . . . . . . . . . . . . . . . . 9-51
Driving Characteristics and Towing Tips . . . . . . . . . . . . . . . . 9-51
Trailer Towing (CTS-V and Coupe) . . . . . . . . . . . . . . . . . . . . . 9-54
Trailer Towing (Except CTS-V and Coupe) . . . . . . . . . . . . . . . . 9-55
Towing Equipment . . . . . . . . . . . 9-56
Conversions and Add-Ons
Add-On Electrical Equipment . . . . . . . . . . . . . . . . . 9-57
Driving Information
Distracted Driving
Distraction comes in many forms
and can take your focus from the
task of driving. Exercise good
judgment and do not let other
activities divert your attention away
from the road. Many local
governments have enacted laws
regarding driver distraction. Become
familiar with the local laws in
your area.
To avoid distracted driving, always
keep your eyes on the road, hands
on the wheel, and mind on the drive.
.Do not use a phone in
demanding driving situations.
Use a hands-free method to
place or receive necessary
phone calls.
.Watch the road. Do not read,
take notes, or look up
information on phones or other
electronic devices.
.Designate a front seat
passenger to handle potential
distractions.
.Become familiar with vehicle
features before driving, such as
programming favorite radio
stations and adjusting climate
control and seat settings.
Program all trip information into
any navigation device prior to
driving.
.Wait until the vehicle is parked
to retrieve items that have fallen
to the floor.
.Stop or park the vehicle to tend
to children.
.Keep pets in an appropriate
carrier or restraint.
.Avoid stressful conversations
while driving, whether with a
passenger or on a cell phone.
Page 252 of 478
Black plate (10,1)Cadillac CTS/CTS-V Owner Manual - 2013 - crc2 - 8/22/12
9-10 Driving and Operating
{WARNING
If the vehicle's tires spin at high
speed, they can explode, and you
or others could be injured. The
vehicle can overheat, causing an
engine compartment fire or other
damage. Spin the wheels as little
as possible and avoid going
above 56 km/h (35 mph).
Rocking the Vehicle to Get
it Out
Turn the steering wheel left and
right to clear the area around the
front wheels. Turn off any traction
system. Shift back and forth
between R (Reverse) and a low
forward gear, spinning the wheels
as little as possible. To prevent
transmission wear, wait until the
wheels stop spinning before shifting
gears. Release the accelerator
pedal while shifting, and press
lightly on the accelerator pedal
when the transmission is in gear.Slowly spinning the wheels in the
forward and reverse directions
causes a rocking motion that could
free the vehicle. If that does not get
the vehicle out after a few tries, it
might need to be towed out. If the
vehicle does need to be towed out,
see
Towing the Vehicle on
page 10‑103.
Vehicle Load Limits
It is very important to know how
much weight the vehicle can
carry. This weight is called the
vehicle capacity weight and
includes the weight of all
occupants, cargo and all
nonfactory-installed options.
Two labels on the vehicle show
how much weight it may
properly carry, the Tire and
Loading Information label and
the Certification label.
{WARNING
Do not load the vehicle any
heavier than the Gross
Vehicle Weight Rating
(GVWR), or either the
maximum front or rear Gross
Axle Weight Rating (GAWR).
This can cause systems to
break and change the way the
vehicle handles. This could
cause loss of control and a
crash. Overloading can also
shorten the life of the vehicle.
Page 254 of 478
Black plate (12,1)Cadillac CTS/CTS-V Owner Manual - 2013 - crc2 - 8/22/12
9-12 Driving and Operating
and luggage load capacity is
650 lbs (1400−750 (5 x 150)
= 650 lbs).
5.Determine the combined
weight of luggage and cargo
being loaded on the vehicle.
That weight may not safely
exceed the available cargo
and luggage load capacity
calculated in Step 4.
6.If your vehicle will be towing
a trailer, the load from your
trailer will be transferred to
your vehicle. Consult this
manual to determine how this
reduces the available cargo
and luggage load capacity of
your vehicle.
See Trailer Towing (CTS-V and
Coupe) on page 9‑54 orTrailer
Towing (Except CTS-V and
Coupe) on page 9‑55 for
important information on towing
a trailer, towing safety rules and
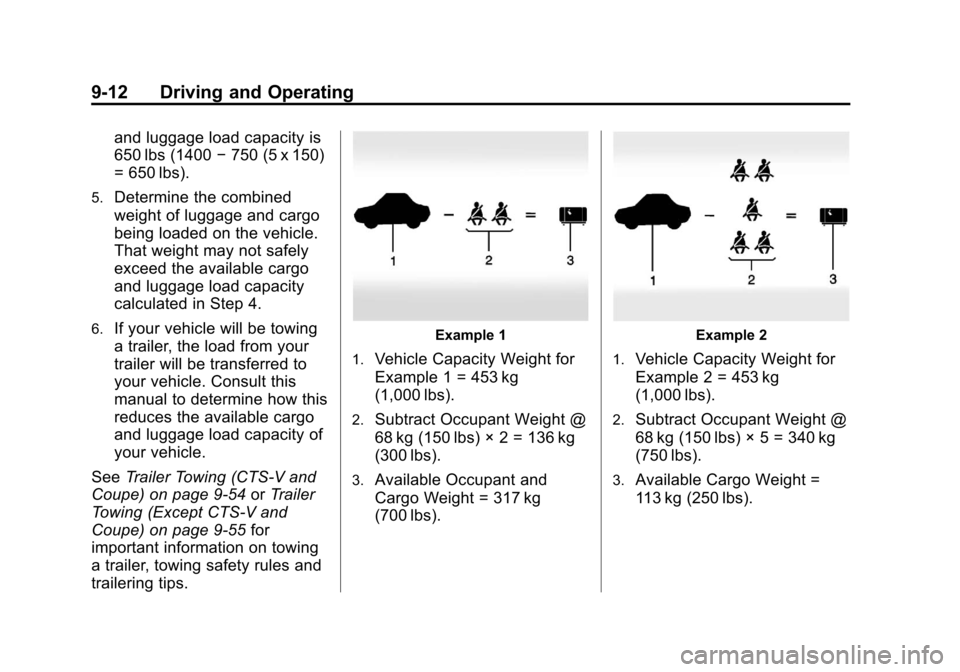
trailering tips.Example 1
1.
Vehicle Capacity Weight for
Example 1 = 453 kg
(1,000 lbs).
2.Subtract Occupant Weight @
68 kg (150 lbs) × 2 = 136 kg
(300 lbs).
3.Available Occupant and
Cargo Weight = 317 kg
(700 lbs).
Example 2
1.
Vehicle Capacity Weight for
Example 2 = 453 kg
(1,000 lbs).
2.Subtract Occupant Weight @
68 kg (150 lbs) × 5 = 340 kg
(750 lbs).
3.Available Cargo Weight =
113 kg (250 lbs).
Page 263 of 478
Black plate (21,1)Cadillac CTS/CTS-V Owner Manual - 2013 - crc2 - 8/22/12
Driving and Operating 9-21
Notice:If you add electrical parts
or accessories, you could change
the way the engine operates. Any
resulting damage would not be
covered by the vehicle warranty.
See Add-On Electrical Equipment
on page 9‑57.
Retained Accessory
Power (RAP)
These vehicle accessories can be
used for up to 10 minutes after the
engine is turned off:
.Audio System
.Power Windows
.Sunroof (if equipped)
Power to the audio system will work
up to 10 minutes or until the driver
door is opened. Power to the
windows or sunroof will work up to
10 minutes or until any door is
opened. For an additional
10 minutes of operation, close all
the doors and turn the key to ON/
RUN and then back to LOCK/OFF.
Engine Coolant Heater
Vehicles with the engine coolant
heater can use this option in cold
weather conditions at or below
−18°C (0°F) for easier starting and
better fuel economy during engine
warm-up. Plug in the coolant heater
at least four hours before starting
your vehicle. An internal thermostat
in the plug-end of the cord may exist
which will prevent engine coolant
heater operation at temperatures
above −18°C (0°F).
To Use the Engine Coolant
Heater
1. Turn off the engine.
2. Open the hood and unwrap the
electrical cord. The cord is near
the driver side strut tower.
Remove the plastic cap to
access the plug.
3. Plug it into a normal, grounded 110-volt AC outlet.
{WARNING
Plugging the cord into an
ungrounded outlet could cause an
electrical shock. Also, the wrong
kind of extension cord could
overheat and cause a fire. You
could be seriously injured. Plug
the cord into a properly grounded
three-prong 110-volt AC outlet.
If the cord will not reach, use a
heavy-duty three-prong extension
cord rated for at least 15 amps.
4. Before starting the engine, be sure to unplug and store the
cord as it was before to keep it
away from moving engine parts.
If you do not, it could be
damaged.
Contact your dealer for information
on how long to use the heater in
your particular area.