turn signal CADILLAC CTS 2014 Convenience & Personalization Guide
[x] Cancel search | Manufacturer: CADILLAC, Model Year: 2014, Model line: CTS, Model: CADILLAC CTS 2014Pages: 20, PDF Size: 4.24 MB
Page 2 of 20

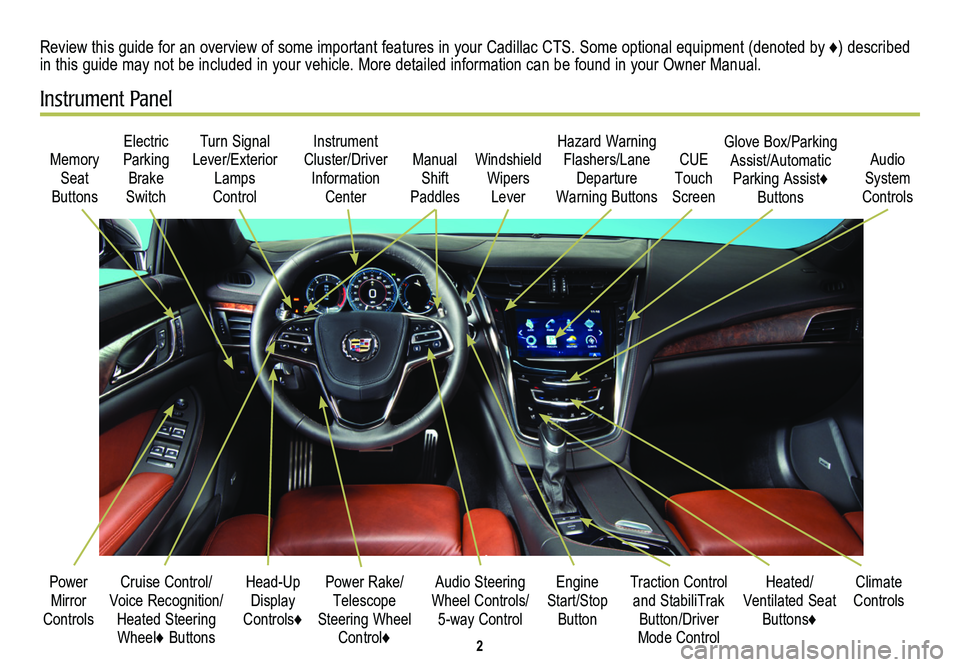
2
Cruise Control/Voice Recognition/Heated Steering Wheel♦ Buttons
Memory Seat
Buttons
Turn Signal Lever/Exterior Lamps
Control
Manual Shift
Paddles
Audio Steering Wheel Controls/ 5-way Control
Power Rake/ Telescope Steering Wheel Control♦
Instrument Cluster/Driver Information
Center
Engine Start/Stop Button
Electric Parking Brake
Switch
Power Mirror Controls
Review this guide for an overview of some important features in your Cadillac CTS. Some optional equipment (denoted by ♦) described in this guide may not be included in your vehicle. More detailed information can be found in your Owner Manual.
Instrument Panel
Hazard Warning Flashers/Lane Departure
Warning Buttons
Heated/ Ventilated Seat Buttons♦
Climate ControlsTraction Control and StabiliTrak Button/Driver Mode Control
Windshield Wipers
Lever
CUE Touch
Screen
Audio System
Controls
Glove Box/Parking Assist/Automatic Parking Assist♦ Buttons
Head-Up Display
Controls♦
Page 12 of 20

12
Remote Keyless Entry TransmitterKeyless Access System
Lock
Press to lock all doors.
Unlock
Press to unlock the driver's door. Press again to unlock all doors.
Note: To change the Remote Lock and Unlock settings, go to Remote Lock, Unlock, Start in the Vehicle Settings menu.
Remote Start♦
Use to start the engine from outside the vehicle. See Adaptive Remote Start on page 13.
Vehicle Locator/Panic Alarm
Press and release to locate your vehicle. The exterior lamps flash and the horn sounds.
Press and hold for three seconds to activate the alarm. The turn signal lamps flash and the horn sounds for 30 seconds, or until the button is pressed again or the vehicle is started.
Trunk Release
Press twice to open the trunk.
Door Key
Press the button (A) on the side of the transmitter to pull the door key out of the transmitter. Use the key to lock/unlock the driver’s door, front passenger’s door and rear folding seats.♦
See Keys, Doors and Windows in your Owner Manual.
The Keyless Access System enables operation of the doors,
ignition and trunk without removing the transmitter from your pocket or purse. The system will recognize the transmitter when it is within three feet of the doors or trunk.
Keyless Unlocking
With the transmitter within range:
Press the lock button on the driver’s door handle to unlock the driver’s door; press it again within five seconds to unlock all doors.
Press the lock button on a passenger door handle to unlock all doors.
Press the touch pad above the license plate to open the trunk.
Keyless Locking
With the ignition off, the transmitter removed from the vehicle, and all doors closed:
Press the lock button on any door handle to lock all doors immediately.
All doors will lock automatically after a short delay, if passive locking is turned on.
Note: To change the Keyless Locking and Unlocking settings, go to Remote Lock, Unlock, Start in the Vehicle Settings menu.
See Keys, Doors and Windows in your Owner Manual.
A
Page 13 of 20

13
Pushbutton StartAdaptive Remote Start
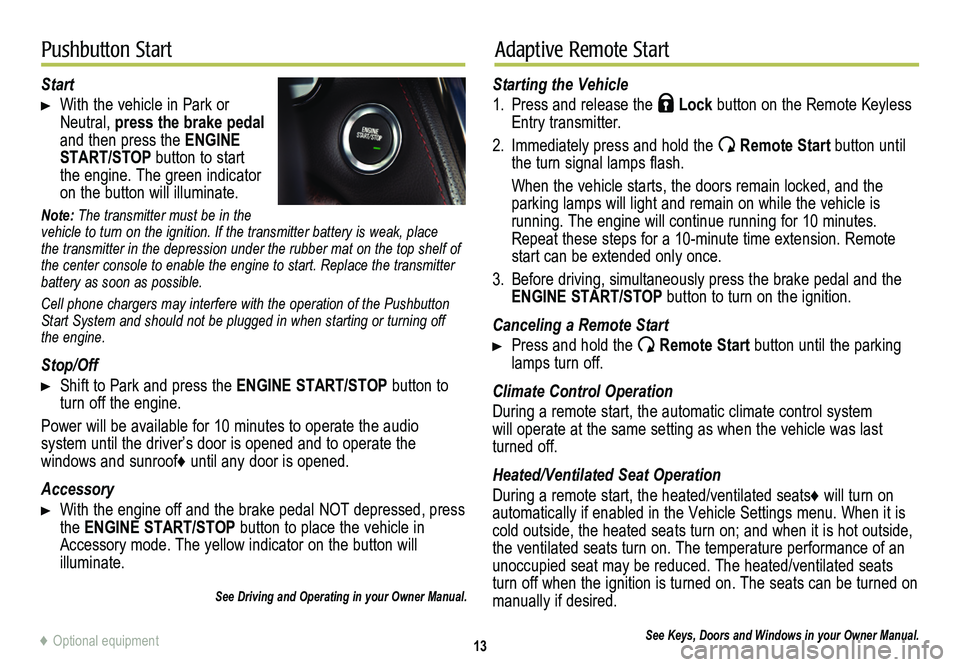
Start
With the vehicle in Park or Neutral, press the brake pedal and then press the ENGINE START/STOP button to start the engine. The green indicator on the button will illuminate.
Note: The transmitter must be in the vehicle to turn on the ignition. If the transmitter battery is weak, place the transmitter in the depression under the rubber mat on the top shelf of the center console to enable the engine to start. Replace the transmitte\
r battery as soon as possible.
Cell phone chargers may interfere with the operation of the Pushbutton Start System and should not be plugged in when starting or turning off the engine.
Stop/Off
Shift to Park and press the ENGINE START/STOP button to turn off the engine.
Power will be available for 10 minutes to operate the audio
system until the driver’s door is opened and to operate the
windows and sunroof♦ until any door is opened.
Accessory
With the engine off and the brake pedal NOT depressed, press the ENGINE START/STOP button to place the vehicle in Accessory mode. The yellow indicator on the button will illuminate.
See Driving and Operating in your Owner Manual.
Starting the Vehicle
1. Press and release the Lock button on the Remote Keyless Entry transmitter.
2. Immediately press and hold the Remote Start button until the turn signal lamps flash.
When the vehicle starts, the doors remain locked, and the parking lamps will light and remain on while the vehicle is
running. The engine will continue running for 10 minutes. Repeat these steps for a 10-minute time extension. Remote start can be extended only once.
3. Before driving, simultaneously press the brake pedal and the ENGINE START/STOP button to turn on the ignition.
Canceling a Remote Start
Press and hold the Remote Start button until the parking lamps turn off.
Climate Control Operation
During a remote start, the automatic climate control system will operate at the same setting as when the vehicle was last turned off.
Heated/Ventilated Seat Operation
During a remote start, the heated/ventilated seats♦ will turn on automatically if enabled in the Vehicle Settings menu. When it is cold outside, the heated seats turn on; and when it is hot outside, the ventilated seats turn on. The temperature performance of an unoccupied seat may be reduced. The heated/ventilated seats turn off when the ignition is turned on. The seats can be turned on manually if desired.
See Keys, Doors and Windows in your Owner Manual.♦ Optional equipment
Page 15 of 20

15
Driver Awareness and Driver Assist Features♦
See Driving and Operating in your Owner Manual.
Driver Awareness Package♦
Lane Departure Warning – When crossing a detected lane mark-ing without using a turn signal, a visual alert flashes on the instru-ment cluster and the left or right side of the driver’s seat pulses.*\
Press the Lane Departure Warning button on the left side of the CUE touch screen to turn the system on or off.
Forward Collision Alert – When approaching a vehicle directly ahead too quickly, a visual alert flashes on the windshield and the driver’s seat pulses.*
Press the Collision Alert button (or the Follow Distance Gap button if equipped with Adaptive Cruise Control) on the left side of the steering wheel to set the alert timing.
Rainsense™ Automatic Windshield Wipers – A sensor detects the amount of water on the windshield and controls the frequency of the wipers. See Windshield Wipers on page 16.
IntelliBeam® – Automatically turns the high-beam headlamps on or off depending on traffic conditions.
Side Blind Zone Alert – When a vehicle is detected in a side blind spot area, a warning symbol displays on the side mirror.
To turn off the system, see the Collision/Detection Systems menu under Vehicle Settings. The system turns on
automatically every time the vehicle is started.
Safety Alert Seat – Subtle seat cushion vibration pulses, left or right, or simultaneously, alert the driver of potential hazards.
*To select audible notification instead of Safety Alert Seat vibrations, see the Collision/Detection Systems menu under Vehicle Settings.
Rear Vision Camera – When the vehicle is in Reverse, a view of the area behind the vehicle appears on the CUE touch screen.
Rear Cross Traffic Alert – Warns of traffic coming in either
direction behind the vehicle by displaying a visual alert on the CUE touch screen and the left or right side of the driver’s seat pulses.*
To turn the system on or off, see the Collision/Detection Systems menu under Vehicle Settings.
Driver Assist Package♦ (includes Driver Awareness Package)
Front and Rear Automatic Braking – Applies the brakes in potential collision situations to help reduce damage or help avoid collisions at lower speeds.
Press the Parking Assist button on the right side of the CUE touch screen to turn Rear Automatic Braking on or off.
Adaptive Cruise Control – If a vehicle is detected ahead, the vehicle accelerates or brakes moderately to maintain the selected following gap. If driver action is required, a visual alert flashes on the windshield and the driver’s seat pulses.*
Press the Follow Distance Gap button on the left side of the steering wheel to set a following gap.
Automatic Collision Preparation – Prepares the brakes or applies the brakes if an emergency collision appears imminent or the driver does not react to previous alerts.
Automatic Safety Belt Tightening – When the vehicle starts moving, gently removes slack from the front safety belts. At higher speeds, tightens the front safety belts during emergency, hard braking or steering maneuvers.
The driver awareness and assist systems are based on a “control and a\
lert” strategy that helps identify potential collision situations and intervenes when a collision threat appears more imminent, employing visual, audible and/or tactile (vibration) alerts.
♦ Optional equipment
Page 19 of 20

19
Automatic Parking Assist♦Electric Parking Brake
Tire Pressure Monitor
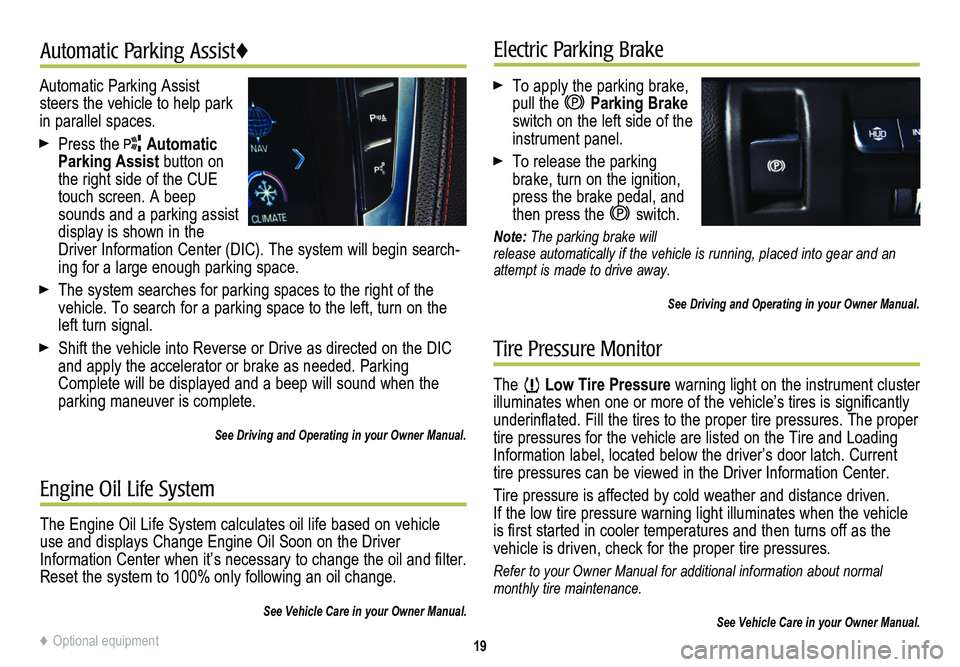
Automatic Parking Assist steers the vehicle to help park in parallel spaces.
Press the Automatic Parking Assist button on the right side of the CUE touch screen. A beep sounds and a parking assist display is shown in the Driver Information Center (DIC). The system will begin search-ing for a large enough parking space.
The system searches for parking spaces to the right of the vehicle. To search for a parking space to the left, turn on the left turn signal.
Shift the vehicle into Reverse or Drive as directed on the DIC and apply the accelerator or brake as needed. Parking Complete will be displayed and a beep will sound when the parking maneuver is complete.
See Driving and Operating in your Owner Manual.
To apply the parking brake, pull the Parking Brake switch on the left side of the instrument panel.
To release the parking brake, turn on the ignition, press the brake pedal, and then press the switch.
Note: The parking brake will release automatically if the vehicle is running, placed into gear and an attempt is made to drive away.
See Driving and Operating in your Owner Manual.
The Low Tire Pressure warning light on the instrument cluster illuminates when one or more of the vehicle’s tires is
significantly underinflated. Fill the tires to the proper tire
pressures. The proper tire pressures for the vehicle are listed on the Tire and Loading Information label, located below the driver’s door latch. Current tire pressures can be viewed in the Driver Information Center.
Tire pressure is affected by cold weather and distance driven. If the low tire pressure warning light illuminates when the vehicle is first started in cooler temperatures and then turns off as the vehicle is driven, check for the proper tire pressures.
Refer to your Owner Manual for additional information about normal monthly tire maintenance.
See Vehicle Care in your Owner Manual.
Engine Oil Life System
The Engine Oil Life System calculates oil life based on vehicle use and displays Change Engine Oil Soon on the Driver Information Center when it’s necessary to change the oil and filter. Reset the system to 100% only following an oil change.
See Vehicle Care in your Owner Manual.
♦ Optional equipment