steering CADILLAC CTS 2014 Workshop Manual
[x] Cancel search | Manufacturer: CADILLAC, Model Year: 2014, Model line: CTS, Model: CADILLAC CTS 2014Pages: 400, PDF Size: 4.53 MB
Page 258 of 400
Black plate (66,1)Cadillac CTS Owner Manual (GMNA-Localizing-U.S./Canada/Mexico-
6081492) - 2014 - CRC 2nd Edition - 11/18/13
9-66 Driving and Operating
Towing a trailer requires a certain
amount of experience. The
combination you are driving is
longer and not as responsive as the
vehicle itself. Get acquainted with
the handling and braking of the rig
before setting out for the open road.
Before starting, check all trailer hitch
parts and attachments, safety
chains, electrical connectors, lamps,
tires, and mirrors. If the trailer has
electric brakes, start the
combination moving and then apply
the trailer brake controller by hand
to be sure the brakes work.
During the trip, check occasionally
to be sure that the load is secure
and the lamps and any trailer
brakes still work.
Following Distance
Stay at least twice as far behind the
vehicle ahead as you would when
driving the vehicle without a trailer.
This can help to avoid heavy
braking and sudden turns.
Passing
More passing distance is needed
when towing a trailer. The
combination will not accelerate as
quickly and is longer so it is
necessary to go much farther
beyond the passed vehicle before
returning to the lane.
Backing Up
Hold the bottom of the steering
wheel with one hand. To move the
trailer to the left, move that hand to
the left. To move the trailer to the
right, move your hand to the right.
Always back up slowly and,
if possible, have someone
guide you.
Making Turns
{Caution
Making very sharp turns while
trailering could cause the trailer to
come in contact with the vehicle.(Continued)
Caution (Continued)
The vehicle could be damaged.
Avoid making very sharp turns
while trailering.
When turning with a trailer, make
wider turns than normal. Do this so
the trailer will not strike soft
shoulders, curbs, road signs, trees,
or other objects. Avoid jerky or
sudden maneuvers. Signal well in
advance.
If the trailer turn signal bulbs burn
out, the arrows on the instrument
cluster will still flash for turns. It is
important to check occasionally to
be sure the trailer bulbs are still
working.
Driving on Grades
Reduce speed and shift to a lower
gear before starting down a long or
steep downgrade. If the
transmission is not shifted down, the
brakes might get hot and no longer
work well.
Page 296 of 400
Black plate (34,1)Cadillac CTS Owner Manual (GMNA-Localizing-U.S./Canada/Mexico-
6081492) - 2014 - CRC 2nd Edition - 11/20/13
10-34 Vehicle Care
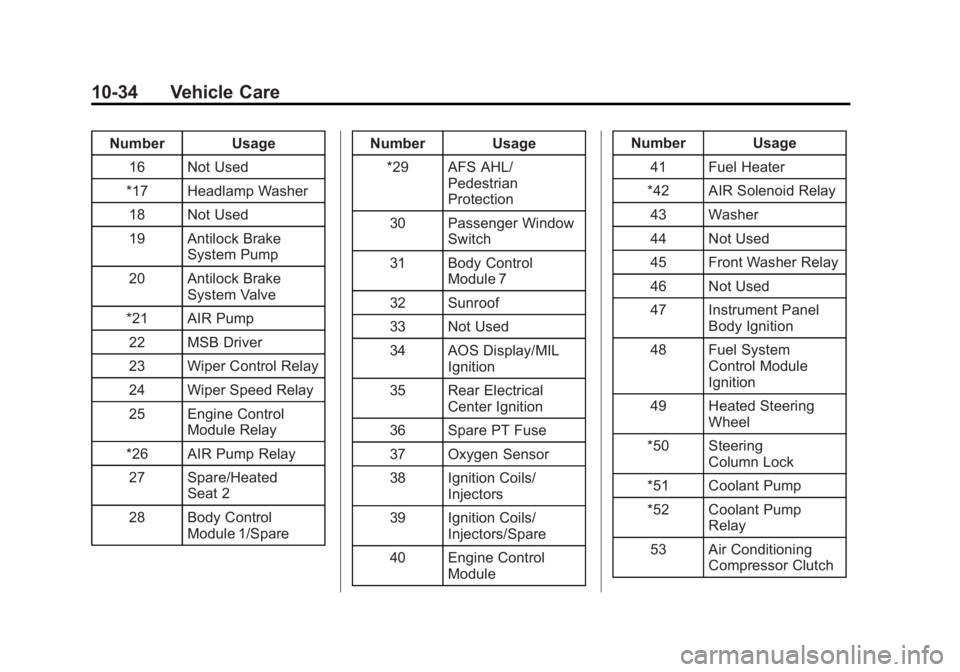
Number Usage16 Not Used
*17 Headlamp Washer
18 Not Used
19 Antilock Brake System Pump
20 Antilock Brake System Valve
*21 AIR Pump 22 MSB Driver
23 Wiper Control Relay
24 Wiper Speed Relay
25 Engine Control Module Relay
*26 AIR Pump Relay 27 Spare/Heated Seat 2
28 Body Control Module 1/Spare Number Usage
*29 AFS AHL/ Pedestrian
Protection
30 Passenger Window Switch
31 Body Control Module 7
32 Sunroof
33 Not Used
34 AOS Display/MIL Ignition
35 Rear Electrical Center Ignition
36 Spare PT Fuse
37 Oxygen Sensor
38 Ignition Coils/ Injectors
39 Ignition Coils/ Injectors/Spare
40 Engine Control Module Number Usage
41 Fuel Heater
*42 AIR Solenoid Relay
43 Washer
44 Not Used
45 Front Washer Relay
46 Not Used
47 Instrument Panel Body Ignition
48 Fuel System Control Module
Ignition
49 Heated Steering Wheel
*50 Steering Column Lock
*51 Coolant Pump
*52 Coolant Pump Relay
53 Air Conditioning Compressor Clutch
Page 299 of 400
Black plate (37,1)Cadillac CTS Owner Manual (GMNA-Localizing-U.S./Canada/Mexico-
6081492) - 2014 - CRC 2nd Edition - 11/18/13
Vehicle Care 10-37
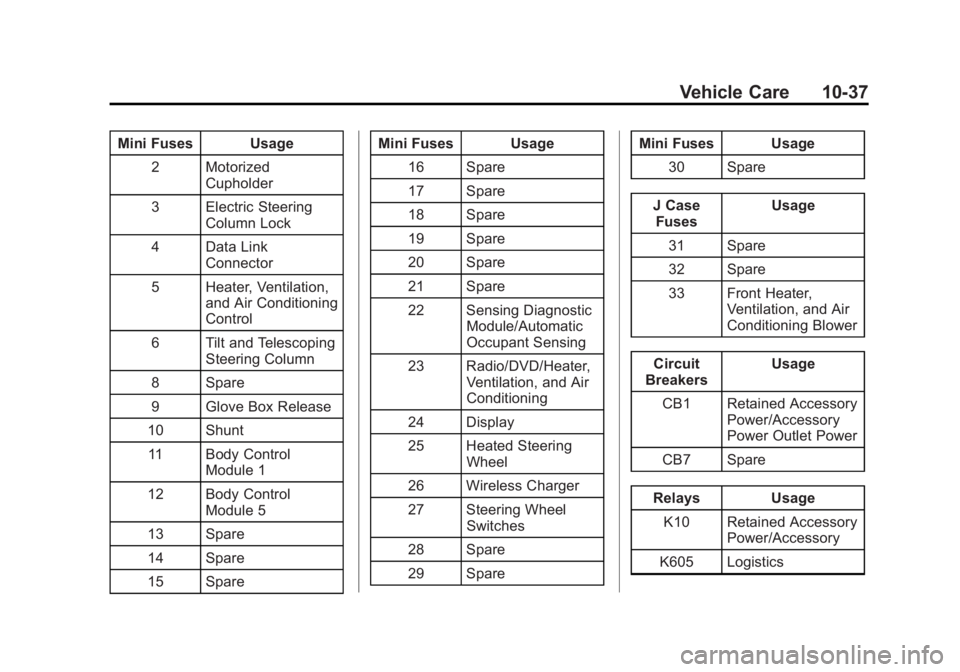
Mini Fuses Usage2 Motorized Cupholder
3 Electric Steering Column Lock
4 Data Link Connector
5 Heater, Ventilation, and Air Conditioning
Control
6 Tilt and Telescoping Steering Column
8 Spare
9 Glove Box Release
10 Shunt 11 Body Control Module 1
12 Body Control Module 5
13 Spare
14 Spare
15 Spare Mini Fuses Usage
16 Spare
17 Spare
18 Spare
19 Spare
20 Spare
21 Spare
22 Sensing Diagnostic Module/Automatic
Occupant Sensing
23 Radio/DVD/Heater, Ventilation, and Air
Conditioning
24 Display
25 Heated Steering Wheel
26 Wireless Charger
27 Steering Wheel Switches
28 Spare
29 Spare Mini Fuses Usage
30 Spare
J Case Fuses Usage
31 Spare
32 Spare
33 Front Heater, Ventilation, and Air
Conditioning Blower
Circuit
Breakers Usage
CB1 Retained Accessory Power/Accessory
Power Outlet Power
CB7 Spare
Relays Usage K10 Retained Accessory Power/Accessory
K605 Logistics
Page 316 of 400

Black plate (54,1)Cadillac CTS Owner Manual (GMNA-Localizing-U.S./Canada/Mexico-
6081492) - 2014 - CRC 2nd Edition - 11/18/13
10-54 Vehicle Care
using a TPMS relearn tool, in the
following order: driver side front tire,
passenger side front tire, passenger
side rear tire, and driver side rear
tire. See your dealer for service or
to purchase a relearn tool.
There are two minutes to match the
first tire/wheel position, and
five minutes overall to match all four
tire/wheel positions. If it takes
longer, the matching process stops
and must be restarted.
The TPMS sensor matching
process is:
1. Set the parking brake.
2. Place the vehicle power mode inON/RUN/START. See Ignition
Positions on page 9-16.
3. Make sure the Tire Pressure info display option is turned on. The
info displays on the DIC can be
turned on and off through the
Settings menu. See Driver
Information Center (DIC) on
page 5-30. 4. Use the five-way DIC control on
the right side of the steering
wheel to scroll to the Tire
Pressure screen under the DIC
info page. See Driver
Information Center (DIC) on
page 5-30.
5. Press and hold the SEL button in the center of the five-way DIC
control.
The horn sounds twice to signal
the receiver is in relearn mode
and the TIRE LEARNING
ACTIVE message displays on
the DIC screen.
6. Start with the driver side front tire.
7. Place the relearn tool against the tire sidewall, near the valve
stem. Then press the button to
activate the TPMS sensor.
A horn chirp confirms that the
sensor identification code has
been matched to this tire and
wheel position. 8. Proceed to the passenger side
front tire, and repeat the
procedure in Step 7.
9. Proceed to the passenger side rear tire, and repeat the
procedure in Step 7.
10. Proceed to the driver side rear tire, and repeat the procedure
in Step 7. The horn sounds two
times to indicate the sensor
identification code has been
matched to the driver side rear
tire, and the TPMS sensor
matching process is no longer
active. The TIRE LEARNING
ACTIVE message on the DIC
display screen goes off.
11. Press ENGINE START/STOP to turn the ignition off.
12. Set all four tires to the recommended air pressure
level as indicated on the Tire
and Loading Information label.
Page 325 of 400

Black plate (63,1)Cadillac CTS Owner Manual (GMNA-Localizing-U.S./Canada/Mexico-
6081492) - 2014 - CRC 2nd Edition - 11/18/13
Vehicle Care 10-63
Caution (Continued)
legal and only when necessary.
Use low profile chains that add no
more than 12 mm thickness to the
tire tread and inner sidewall. Use
chains that are the proper size for
the tires. Install them on the tires
of the rear axle. Don't use chains
on the tires of the front axle.
Tighten them as tightly as
possible with the ends securely
fastened. Drive slowly and follow
the chain manufacturer's
instructions. If the chains contact
the vehicle, stop and retighten
them. If the contact continues,
slow down until it stops. Driving
too fast or spinning the wheels
with chains on will damage the
vehicle.
If a Tire Goes Flat
It is unusual for a tire to blow out
while driving, especially if the tires
are maintained properly. If air goes
out of a tire, it is much more likely to
leak out slowly. SeeTires on
page 10-40 for additional
information. But if there ever is a
blowout, here are a few tips about
what to expect and what to do:
If a front tire fails, the flat tire
creates a drag that pulls the vehicle
toward that side. Take your foot off
the accelerator pedal and grip the
steering wheel firmly. Steer to
maintain lane position, and then
gently brake to a stop, well off the
road, if possible.
A rear blowout, particularly on a
curve, acts much like a skid and
may require the same correction as
used in a skid. Stop pressing the
accelerator pedal and steer to
straighten the vehicle. It may be
very bumpy and noisy. Gently brake
to a stop, well off the road,
if possible. The vehicle has no spare tire, no
tire changing equipment, and no
place to store a tire.
If the vehicle has run-flat tires, there
is no need to stop on the side of the
road to change a flat tire. See
Run-Flat Tires on page 10-42.
Page 335 of 400

Black plate (73,1)Cadillac CTS Owner Manual (GMNA-Localizing-U.S./Canada/Mexico-
6081492) - 2014 - CRC 2nd Edition - 11/18/13
Vehicle Care 10-73
Wheels and Trim—Aluminum
or Chrome
Use a soft, clean cloth with mild
soap and water to clean the wheels.
After rinsing thoroughly with clean
water, dry with a soft, clean towel.
A wax may then be applied.
{Caution
Chrome wheels and other chrome
trim may be damaged if the
vehicle is not washed after driving
on roads that have been sprayed
with magnesium, calcium,
or sodium chloride. These
chlorides are used on roads for
conditions such as ice and dust.
Always wash the chrome with
soap and water after exposure.
{Caution
To avoid surface damage, do not
use strong soaps, chemicals,
abrasive polishes, cleaners,
brushes, or cleaners that contain
acid on aluminum or
chrome-plated wheels. Use only
approved cleaners. Also, never
drive a vehicle with aluminum or
chrome-plated wheels through an
automatic car wash that uses
silicone carbide tire cleaning
brushes. Damage could occur
and the repairs would not be
covered by the vehicle warranty.
Steering, Suspension, and
Chassis Components
Visually inspect steering,
suspension, and chassis
components for damaged, loose,
or missing parts or signs of wear at
least once a year. Inspect power steering for proper
hook-up, binding, leaks, cracks,
chafing, etc.
Visually check constant velocity joint
boots and axle seals for leaks.
Body Component Lubrication
Lubricate all key lock cylinders,
hood hinges, liftgate hinges, and the
fuel door hinge unless the
components are plastic. Applying
silicone grease on weatherstrips
with a clean cloth will make them
last longer, seal better, and not stick
or squeak.
Underbody Maintenance
At least twice a year, Spring and
Fall, use plain water to flush dirt and
debris from the vehicle's underbody.
Your dealer or an underbody car
washing system can do this. If not
removed, rust and corrosion can
develop.
Page 345 of 400
Black plate (5,1)Cadillac CTS Owner Manual (GMNA-Localizing-U.S./Canada/Mexico-
6081492) - 2014 - CRC 2nd Edition - 11/20/13
Service and Maintenance 11-5
.Visually inspect steering,
suspension, and chassis
components for damaged, loose,
or missing parts or signs of
wear. SeeExterior Care on
page 10-69.
.Check restraint system
components. See Safety System
Check on page 3-20.
.Visually inspect fuel system for
damage or leaks.
.Visually inspect exhaust system
and nearby heat shields for
loose or damaged parts.
.Lubricate body components. See
Exterior Care on page 10-69.
.Check starter switch. See Starter
Switch Check on page 10-27.
.Check automatic transmission
shift lock control function. See
Automatic Transmission Shift
Lock Control Function Check on
page 10-27.
.Check parking brake and
automatic transmission park
mechanism. See Park Brake and
P (Park) Mechanism Check on
page 10-28.
.Check accelerator pedal for
damage, high effort, or binding.
Replace if needed.
.Visually inspect gas strut for
signs of wear, cracks, or other
damage. Check the hold open
ability of the strut. See your
dealer if service is required.
.Inspect sunroof track and seal,
if equipped. See Sunroof on
page 2-25.
Page 351 of 400

Black plate (11,1)Cadillac CTS Owner Manual (GMNA-Localizing-U.S./Canada/Mexico-
6081492) - 2014 - CRC 2nd Edition - 11/20/13
Service and Maintenance 11-11
Lamps
Properly working headlamps,
taillamps, and brake lamps are
important to see and be seen on
the road.
.Signs that the headlamps need
attention include dimming, failure
to light, cracking, or damage.
The brake lamps need to be
checked periodically to ensure
that they light when braking.
.With a multi-point inspection,
your dealer can check the lamps
and note any concerns.Shocks and Struts
Shocks and struts help aid in control
for a smoother ride.
.Signs of wear may include
steering wheel vibration, bounce/
sway while braking, longer
stopping distance, or uneven
tire wear.
.As part of the multi-point
inspection, trained dealer
technicians can visually inspect
the shocks and struts for signs
of leaking, blown seals,
or damage, and can advise
when service is needed.
Tires
Tires need to be properly inflated,
rotated, and balanced. Maintaining
the tires can save money and fuel,
and can reduce the risk of tire
failure.
.Signs that the tires need to be
replaced include three or more
visible treadwear indicators; cord
or fabric showing through the rubber; cracks or cuts in the
tread or sidewall; or a bulge or
split in the tire.
.Trained dealer technicians can
inspect and recommend the right
tires. Your dealer can also
provide tire/wheel balancing
services to ensure smooth
vehicle operation at all speeds.
Your dealer sells and services
name brand tires.
Vehicle Care
To help keep the vehicle looking like
new, vehicle care products are
available from your dealer. For
information on how to clean and
protect the vehicle’s interior and
exterior, see Interior Care on
page 10-74 andExterior Care on
page 10-69.
Page 373 of 400

Black plate (11,1)Cadillac CTS Owner Manual (GMNA-Localizing-U.S./Canada/Mexico-
6081492) - 2014 - CRC 2nd Edition - 11/18/13
Customer Information 13-11
obligated to have the vehicle
repaired with Genuine GM parts,
even if your insurance coverage
does not pay the full cost.
If another party's insurance
company is paying for the repairs,
you are not obligated to accept a
repair valuation based on that
insurance company's collision policy
repair limits, as you have no
contractual limits with that company.
In such cases, you can have control
of the repair and parts choices as
long as the cost stays within
reasonable limits.
Service Publications
Ordering Information
Service Manuals
Service Manuals have the diagnosis
and repair information on the
engines, transmission, axle,
suspension, brakes, electrical,
steering, body, etc.
Service Bulletins
Service Bulletins give additional
technical service information
needed to knowledgeably service
General Motors cars and trucks.
Each bulletin contains instructions
to assist in the diagnosis and
service of the vehicle.
Owner Information
Owner publications are written
specifically for owners and intended
to provide basic operational
information about the vehicle. The
Owner Manual includes the
Maintenance Schedule for all
models.
In-Portfolio: Includes a Portfolio,
Owner Manual, and Warranty
Manual.
RETAIL SELL PRICE:
$35.00 (U.S.) plus handling and
shipping fees.
Without Portfolio: Owner
Manual only.RETAIL SELL PRICE:
$25.00 (U.S.) plus handling and
shipping fees.
Current and Past Models
Technical Service Bulletins and
Manuals are available for current
and past model GM vehicles.
ORDER TOLL FREE:
1-800-551-4123 Monday
–Friday
8:00 AM –6:00 PM Eastern Time
For Credit Card Orders Only
(VISA-MasterCard-Discover), see
Helm, Inc. at: www.helminc.com.
Or write to:
Helm, Incorporated
Attention: Customer Service
47911 Halyard Drive
Plymouth, MI 48170
Prices are subject to change without
notice and without incurring
obligation. Allow ample time for
delivery.
All listed prices are quoted in U.S.
funds. Make checks payable in U.S.
funds.
Page 393 of 400
Black plate (5,1)Cadillac CTS Owner Manual (GMNA-Localizing-U.S./Canada/Mexico-
6081492) - 2014 - CRC 2nd Edition - 11/18/13
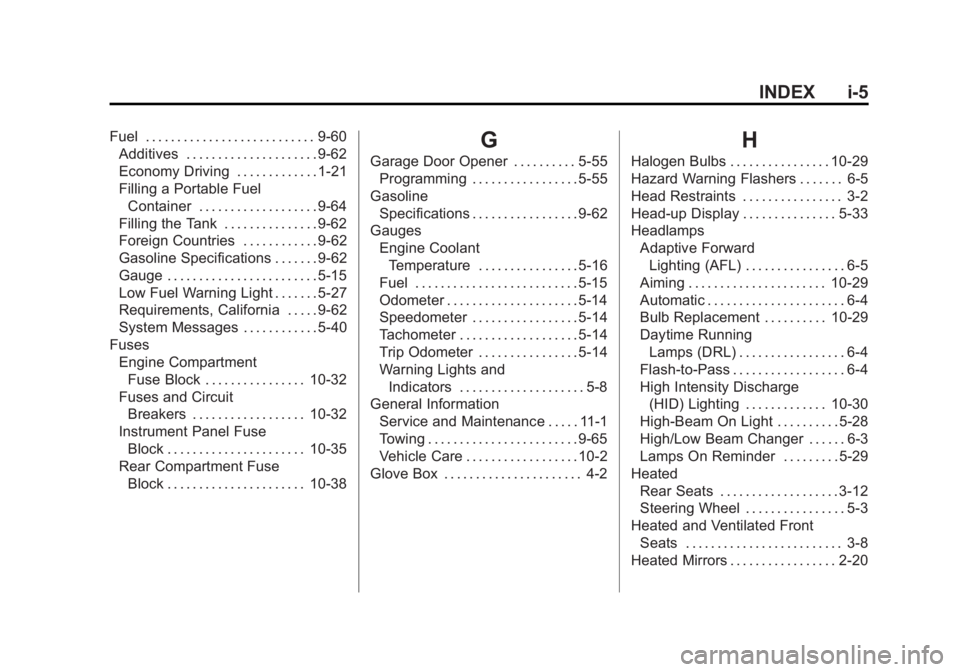
INDEX i-5
Fuel . . . . . . . . . . . . . . . . . . . . . . . . . . . 9-60Additives . . . . . . . . . . . . . . . . . . . . . 9-62
Economy Driving . . . . . . . . . . . . . 1-21
Filling a Portable Fuel
Container . . . . . . . . . . . . . . . . . . . 9-64
Filling the Tank . . . . . . . . . . . . . . . 9-62
Foreign Countries . . . . . . . . . . . . 9-62
Gasoline Specifications . . . . . . . 9-62
Gauge . . . . . . . . . . . . . . . . . . . . . . . . 5-15
Low Fuel Warning Light . . . . . . . 5-27
Requirements, California . . . . . 9-62
System Messages . . . . . . . . . . . . 5-40
Fuses Engine CompartmentFuse Block . . . . . . . . . . . . . . . . 10-32
Fuses and Circuit
Breakers . . . . . . . . . . . . . . . . . . 10-32
Instrument Panel Fuse Block . . . . . . . . . . . . . . . . . . . . . . 10-35
Rear Compartment Fuse Block . . . . . . . . . . . . . . . . . . . . . . 10-38G
Garage Door Opener . . . . . . . . . . 5-55
Programming . . . . . . . . . . . . . . . . . 5-55
Gasoline Specifications . . . . . . . . . . . . . . . . . 9-62
Gauges Engine Coolant
Temperature . . . . . . . . . . . . . . . . 5-16
Fuel . . . . . . . . . . . . . . . . . . . . . . . . . . 5-15
Odometer . . . . . . . . . . . . . . . . . . . . . 5-14
Speedometer . . . . . . . . . . . . . . . . . 5-14
Tachometer . . . . . . . . . . . . . . . . . . . 5-14
Trip Odometer . . . . . . . . . . . . . . . . 5-14
Warning Lights and Indicators . . . . . . . . . . . . . . . . . . . . 5-8
General Information
Service and Maintenance . . . . . 11-1
Towing . . . . . . . . . . . . . . . . . . . . . . . . 9-65
Vehicle Care . . . . . . . . . . . . . . . . . . 10-2
Glove Box . . . . . . . . . . . . . . . . . . . . . . 4-2
H
Halogen Bulbs . . . . . . . . . . . . . . . . 10-29
Hazard Warning Flashers . . . . . . . 6-5
Head Restraints . . . . . . . . . . . . . . . . 3-2
Head-up Display . . . . . . . . . . . . . . . 5-33
Headlamps Adaptive Forward
Lighting (AFL) . . . . . . . . . . . . . . . . 6-5
Aiming . . . . . . . . . . . . . . . . . . . . . . 10-29
Automatic . . . . . . . . . . . . . . . . . . . . . . 6-4
Bulb Replacement . . . . . . . . . . 10-29
Daytime Running Lamps (DRL) . . . . . . . . . . . . . . . . . 6-4
Flash-to-Pass . . . . . . . . . . . . . . . . . . 6-4
High Intensity Discharge (HID) Lighting . . . . . . . . . . . . . 10-30
High-Beam On Light . . . . . . . . . . 5-28
High/Low Beam Changer . . . . . . 6-3
Lamps On Reminder . . . . . . . . . 5-29
Heated
Rear Seats . . . . . . . . . . . . . . . . . . . 3-12
Steering Wheel . . . . . . . . . . . . . . . . 5-3
Heated and Ventilated Front Seats . . . . . . . . . . . . . . . . . . . . . . . . . 3-8
Heated Mirrors . . . . . . . . . . . . . . . . . 2-20