stop start CADILLAC CTS 2014 Owner's Manual
[x] Cancel search | Manufacturer: CADILLAC, Model Year: 2014, Model line: CTS, Model: CADILLAC CTS 2014Pages: 400, PDF Size: 4.53 MB
Page 9 of 400

Black plate (3,1)Cadillac CTS Owner Manual (GMNA-Localizing-U.S./Canada/Mexico-
6081492) - 2014 - CRC 2nd Edition - 11/18/13
In Brief 1-3
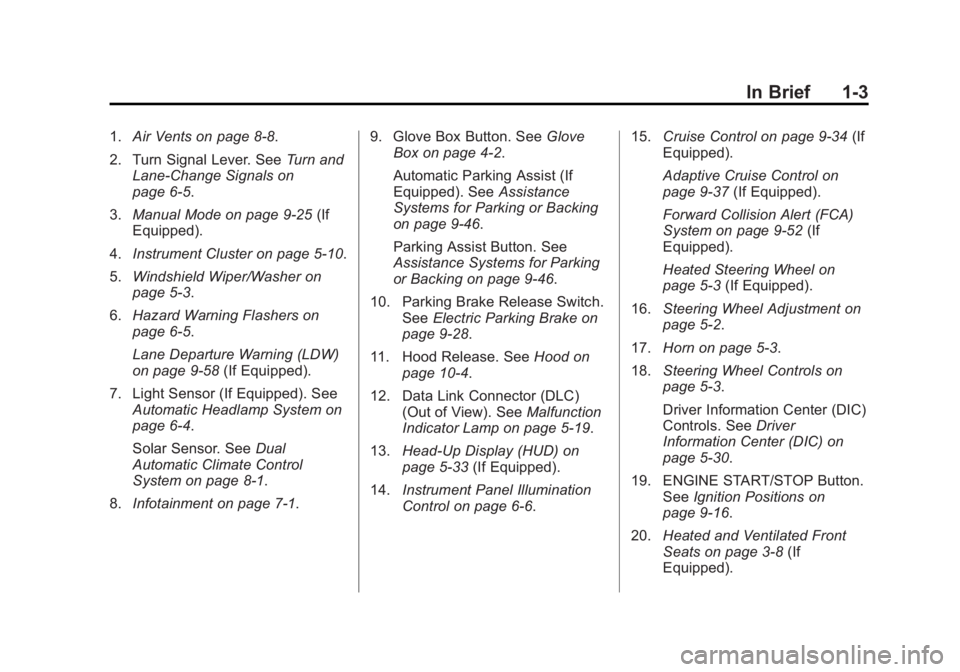
1.Air Vents on page 8-8.
2. Turn Signal Lever. See Turn and
Lane-Change Signals on
page 6-5.
3. Manual Mode on page 9-25 (If
Equipped).
4. Instrument Cluster on page 5-10.
5. Windshield Wiper/Washer on
page 5-3.
6. Hazard Warning Flashers on
page 6-5.
Lane Departure Warning (LDW)
on page 9-58 (If Equipped).
7. Light Sensor (If Equipped). See Automatic Headlamp System on
page 6-4.
Solar Sensor. See Dual
Automatic Climate Control
System on page 8-1.
8. Infotainment on page 7-1. 9. Glove Box Button. See
Glove
Box on page 4-2.
Automatic Parking Assist (If
Equipped). See Assistance
Systems for Parking or Backing
on page 9-46.
Parking Assist Button. See
Assistance Systems for Parking
or Backing on page 9-46.
10. Parking Brake Release Switch. SeeElectric Parking Brake on
page 9-28.
11. Hood Release. See Hood on
page 10-4.
12. Data Link Connector (DLC) (Out of View). See Malfunction
Indicator Lamp on page 5-19.
13. Head-Up Display (HUD) on
page 5-33 (If Equipped).
14. Instrument Panel Illumination
Control on page 6-6. 15.
Cruise Control on page 9-34 (If
Equipped).
Adaptive Cruise Control on
page 9-37 (If Equipped).
Forward Collision Alert (FCA)
System on page 9-52 (If
Equipped).
Heated Steering Wheel on
page 5-3 (If Equipped).
16. Steering Wheel Adjustment on
page 5-2.
17. Horn on page 5-3.
18. Steering Wheel Controls on
page 5-3.
Driver Information Center (DIC)
Controls. See Driver
Information Center (DIC) on
page 5-30.
19. ENGINE START/STOP Button. SeeIgnition Positions on
page 9-16.
20. Heated and Ventilated Front
Seats on page 3-8 (If
Equipped).
Page 26 of 400

Black plate (20,1)Cadillac CTS Owner Manual (GMNA-Localizing-U.S./Canada/Mexico-
6081492) - 2014 - CRC 2nd Edition - 11/18/13
1-20 In Brief
Performance and
Maintenance
Traction Control/
Electronic Stability
Control
The Traction Control System (TCS)
limits wheel spin. The system turns
on automatically every time the
vehicle is started.
StabiliTrak assists with directional
control of the vehicle in difficult
driving conditions. The system turns
on automatically every time the
vehicle is started.
.To turn off TCS, press and
release the TCS/StabiliTrak
button
Yon the center console.
iilluminates in the instrument
cluster. The appropriate DIC
message is displayed. See Ride
Control System Messages on
page 5-44.
.Press the TCS/StabiliTrak buttonYagain to turn traction control
back on.
.To turn off both TCS and
StabiliTrak, press and hold the
TCS/StabiliTrak button
Yon the
center console until
gandi
illuminate in the instrument
cluster. The appropriate DIC
message displays. See Ride
Control System Messages on
page 5-44.
.Press the TCS/StabiliTrak buttonYagain to turn on both
systems.
See Traction Control/Electronic
Stability Control on page 9-30.
Tire Pressure Monitor
This vehicle may have a Tire
Pressure Monitor System (TPMS).
The low tire pressure warning light
alerts to a significant loss in
pressure of one of the vehicle's
tires. If the warning light comes on,
stop as soon as possible and inflate
the tires to the recommended
pressure shown on the Tire and
Loading Information label. See
Vehicle Load Limits on page 9-11.
The warning light will remain on until
the tire pressure is corrected.
The low tire pressure warning light
may come on in cool weather when
the vehicle is first started, and then
turn off as the vehicle is driven. This
may be an early indicator that the
tire pressures are getting low and
the tires need to be inflated to the
proper pressure.
Page 27 of 400

Black plate (21,1)Cadillac CTS Owner Manual (GMNA-Localizing-U.S./Canada/Mexico-
6081492) - 2014 - CRC 2nd Edition - 11/18/13
In Brief 1-21
The TPMS does not replace normal
monthly tire maintenance. Maintain
the correct tire pressures.
SeeTire Pressure Monitor System
on page 10-50.
Engine Oil Life System
The engine oil life system calculates
engine oil life based on vehicle use
and displays the CHANGE ENGINE
OIL SOON message when it is time
to change the engine oil and filter.
The oil life system should be reset
to 100% only following an oil
change.
Resetting the Oil Life System
1. Using the DIC buttons, display REMAINING OIL LIFE on the
DIC. See Driver Information
Center (DIC) on page 5-30 and
Engine Oil Messages on
page 5-39. 2. Press the SEL button and hold
to clear the CHANGE ENGINE
OIL SOON message and reset
the oil life at 100%.
Be careful not to reset the oil life
display accidentally at any time
other than after the oil is
changed. It cannot be reset
accurately until the next oil
change.
The oil life system can also be reset
as follows:
1. Turn the ignition on with the engine off.
2. Fully press and release the accelerator pedal three times
within five seconds.
If the CHANGE ENGINE OIL
SOON message is not on, the
system is reset.
See Engine Oil Life System on
page 10-12.
Driving for Better Fuel
Economy
Driving habits can affect fuel
mileage. Here are some driving tips
to get the best fuel economy
possible.
.Avoid fast starts and accelerate
smoothly.
.Brake gradually and avoid
abrupt stops.
.Avoid idling the engine for long
periods of time.
.When road and weather
conditions are appropriate, use
cruise control.
.Always follow posted speed
limits or drive more slowly when
conditions require.
.Keep vehicle tires properly
inflated.
.Combine several trips into a
single trip.
Page 34 of 400

Black plate (6,1)Cadillac CTS Owner Manual (GMNA-Localizing-U.S./Canada/Mexico-
6081492) - 2014 - CRC 2nd Edition - 11/18/13
2-6 Keys, Doors, and Windows
3. Remove the key lock cylindercap on the driver door handle.
See Door Locks on page 2-11.
Insert the vehicle key into the
key lock cylinder on the driver
door handle, then turn the key
counterclockwise to the unlock
position five times within
10 seconds.
The Driver Information Center
(DIC) displays READY FOR
REMOTE #2, 3, 4, ETC.
4. Place the new transmitter into the transmitter pocket. The
center console storage area will need to be opened and the
rubber mat needs to be removed
to access the transmitter pocket.
5. Press the ENGINE START/ STOP button. When the
transmitter is learned, the DIC
display will show that it is ready
to program the next transmitter.
6. Remove the transmitter from the transmitter pocket and press
K
orQon the transmitter.
To program additional
transmitters, repeat Steps 4–6.
When all additional transmitters
are programmed, press and hold
the ENGINE START/STOP
button for approximately
12 seconds to exit
programming mode.
7. Return the vehicle key back into the transmitter. Programming without a
Recognized Transmitter
If there are no currently recognized
transmitters available, follow this
procedure to program up to eight
transmitters. This feature is not
available in Canada. This procedure
will take approximately 30 minutes
to complete. The vehicle must be off
and all transmitters to be
programmed must be with you.
1. Remove the vehicle key from the
transmitter.
2. Remove the key lock cylinder cap on the driver door handle.
See Door Locks on page 2-11.
Insert the vehicle key into the
key lock cylinder on the driver
door handle, then turn the key
counterclockwise to the unlock
position five times within
10 seconds.
The Driver Information Center
(DIC) displays REMOTE LEARN
PENDING, PLEASE WAIT.
Page 35 of 400

Black plate (7,1)Cadillac CTS Owner Manual (GMNA-Localizing-U.S./Canada/Mexico-
6081492) - 2014 - CRC 2nd Edition - 11/18/13
Keys, Doors, and Windows 2-7
3. Wait for 10 minutes until the DICdisplays PRESS ENGINE
START BUTTON TO LEARN
and then press the ENGINE
START/STOP button.
The DIC display will again show
REMOTE LEARN PENDING,
PLEASE WAIT.
4. Repeat Step 3 two additional times. After the third time all
previously known transmitters
will no longer work with the
vehicle. Remaining transmitters
can be relearned during the next
steps.
The DIC display should now
show READY FOR REMOTE
# 1.
5. Place the new transmitter in thetransmitter pocket. The center
console storage area will need
to be opened and the rubber mat
needs to be removed to access
the transmitter pocket.
6. Press the ENGINE START/ STOP button. When the
transmitter is learned, the DIC
display will show that it is ready
to program the next transmitter. 7. Remove the transmitter from the
transmitter pocket and press
K
orQon the transmitter.
To program additional
transmitters, repeat Steps 5–7.
When all additional transmitters
are programmed, press and hold
the ENGINE START/STOP
button for approximately
12 seconds to exit
programming mode.
8. Return the vehicle key back into the transmitter.
Starting the Vehicle with a Low
Transmitter Battery
If the transmitter battery is weak or if
there is interference with the signal,
the DIC may display NO REMOTE
DETECTED or NO REMOTE KEY
WAS DETECTED PLACE KEY IN
TRANSMITTER POCKET THEN
START YOUR VEHICLE when
starting the vehicle. See Key and
Lock Messages on page 5-40.
Page 36 of 400

Black plate (8,1)Cadillac CTS Owner Manual (GMNA-Localizing-U.S./Canada/Mexico-
6081492) - 2014 - CRC 2nd Edition - 11/18/13
2-8 Keys, Doors, and Windows
To start the vehicle:
1. Open the center console storagearea and remove the rubber mat.
2. Place the transmitter in thetransmitter pocket.
3. With the vehicle in P (Park) or N (Neutral) press the brake
pedal and the ENGINE START/
STOP button.
Replace the transmitter battery
as soon as possible.
Battery Replacement
{Caution
When replacing the battery, do
not touch any of the circuitry on
the transmitter. Static from your
body could damage the
transmitter.
Replace the battery if the REPLACE
BATTERY IN REMOTE KEY
message displays in the DIC.
1. Press the button on the side of the transmitter near the bottom
and pull the key out.
Page 61 of 400

Black plate (7,1)Cadillac CTS Owner Manual (GMNA-Localizing-U.S./Canada/Mexico-
6081492) - 2014 - CRC 2nd Edition - 11/18/13
Seats and Restraints 3-7
Manually Recalling Memory
Positions
If the vehicle is OFF or not in
P (Park), press and hold "1," "2," or
Bto manually recall the previously
stored memory positions. Releasing
"1,” "2," or
Bbefore the stored
positions are reached stops the
recall.
If the vehicle is ON and in P (Park),
press and release “1,” “2,”or
Bto
manually recall the previously
stored memory positions. Placing
the ignition in OFF before the stored
positions are reached stops the
recall.
If something has blocked the driver
seat and/or power tilt and
telescoping steering column (if
equipped) while recalling a memory
position, the recall may stop.
Remove the obstruction; then press
and hold the appropriate manual
control for the memory item that is
not recalling for two seconds. Try
recalling the memory position again
by pressing the appropriate memory button. If the memory position is still
not recalling, see your dealer for
service.
Automatically Recalling Memory
Positions
The Auto (Automatic) Memory
Recall feature automatically recalls
the current driver
’s previously stored
“1” or“2” position when entering the
vehicle.
Depending upon the Auto Memory
Recall feature enabled in the vehicle
personalization menu, memory “1”
or “2” positions are recalled in the
following ways:
To activate the recall when On -
Driver Door Open is selected in the
vehicle personalization menu:
.PressKon the RKE transmitter
and open the driver door.
.PressKon the RKE transmitter
when the driver door is
already open.
.Press the lock/unlock button on
the outside driver door handle
and open the driver door. The
RKE transmitter must be present
for the recall to activate.
To activate the recall when On - At
Ignition On is selected in the vehicle
personalization menu:
.Place the ignition in ON/RUN/
START.
See Vehicle Personalization on
page 5-48.
To stop recall movement, press one
of the memory, power mirror,
or power seat controls; or press the
power tilt and telescoping steering
column control (if equipped). If On -
At Ignition On is selected in the
vehicle personalization menu,
placing the ignition in OFF also
stops the recall.
If something has blocked the driver
seat and/or the power tilt and
telescoping steering column while
recalling a memory position, the
recall may stop. Remove the
obstruction; then press and hold the
Page 69 of 400

Black plate (15,1)Cadillac CTS Owner Manual (GMNA-Localizing-U.S./Canada/Mexico-
6081492) - 2014 - CRC 2nd Edition - 11/18/13
Seats and Restraints 3-15
.Wear the shoulder belt over the
shoulder and across the chest.
These parts of the body are best
able to take belt restraining
forces. The shoulder belt locks if
there is a sudden stop or crash.
{Warning
You can be seriously injured,
or even killed, by not wearing
your safety belt properly.
.Never allow the lap or
shoulder belt to become
loose or twisted.
.Never wear the shoulder belt
under both arms or behind
your back.
.Never route the lap or
shoulder belt over an
armrest.
Lap-Shoulder Belt
All seating positions in the vehicle
have a lap-shoulder belt.If you are using a rear seating
position with a detachable safety
belt and the safety belt is not
attached, see
Rear Seats on
page 3-10 for instruction on
reconnecting the safety belt to the
mini-buckle.
The following instructions explain
how to wear a lap-shoulder belt
properly.
1. Adjust the seat, if the seat is
adjustable, so you can sit up
straight. To see how, see “Seats”
in the Index.
2. Pick up the latch plate and pull the belt across you. Do not let it
get twisted.
The lap-shoulder belt may lock if
you pull the belt across you very
quickly. If this happens, let the
belt go back slightly to unlock it.
Then pull the belt across you
more slowly.
If the shoulder portion of a
passenger belt is pulled out all
the way, the child restraint
locking feature may be engaged.
If this happens, let the belt go
back all the way and start again.
Page 116 of 400

Black plate (4,1)Cadillac CTS Owner Manual (GMNA-Localizing-U.S./Canada/Mexico-
6081492) - 2014 - CRC 2nd Edition - 11/18/13
5-4 Instruments and Controls
Clear snow and ice from the wiper
blades and windshield before using
them. If frozen to the windshield,
carefully loosen or thaw them.
Damaged blades should be
replaced. SeeWiper Blade
Replacement on page 10-28.
Heavy snow or ice can overload the
wiper motor. See Electrical System
Overload on page 10-31.
Wiper Parking
When using intermittent or
Rainsense™ wipes, the wipers
pause briefly on the windshield.
If the wiper lever is moved to OFF
or if Rainsense and additional wipes
are not required, the wipers may
move to the base of the windshield.
If the ignition is put in OFF while the
wipers are on LO, HI, or INT, they
will immediately stop.
If the windshield wiper lever is then
moved to OFF before the driver
door is opened or within 10 minutes,
the wipers will restart and move to
the base of the windshield. If the ignition is put in OFF while the
wipers are performing wipes due to
windshield washing or Rainsense
wipes, the wipers continue to run
until they reach the base of the
windshield.
Rainsense
If equipped with Rainsense, a
sensor near the top center of the
windshield detects the amount of
water on the windshield and
controls the frequency of the
windshield wiper.
Keep this area of the windshield
clear of debris to allow for best
system performance.
INT (Rainsense Wipe Sensitivity
Control):
Move the windshield
wiper lever to INT. Turn the
xINT
band on the wiper lever to adjust the
sensitivity.
.Turn the band up for more
sensitivity to moisture.
.Turn the band down for less
sensitivity to moisture.
.Move the windshield wiper lever
out of the INT position to
deactivate Rainsense.
This feature can be changed. See
“Comfort and Convenience” under
Vehicle Personalization on
page 5-48.
Wiper Arm Assembly Protection
When using an automatic car wash,
move the windshield wiper lever to
OFF. This disables the automatic
Rainsense windshield wipers.
Page 129 of 400

Black plate (17,1)Cadillac CTS Owner Manual (GMNA-Localizing-U.S./Canada/Mexico-
6081492) - 2014 - CRC 2nd Edition - 11/18/13
Instruments and Controls 5-17
This gauge measures the
temperature of the vehicle's engine.
While driving under normal
operating conditions, if the needle
moves into the red area, the engine
is too hot. Pull off the road, stop the
vehicle, and turn off the engine as
soon as possible.
Safety Belt Reminders
Driver Safety Belt Reminder
Light
There is a driver safety belt
reminder light on the instrument
cluster.
When the vehicle is started, this
light flashes and a chime may come
on to remind the driver to fasten
their safety belt. Then the light stayson solid until the belt is buckled.
This cycle may continue several
times if the driver remains or
becomes unbuckled while the
vehicle is moving.
If the driver safety belt is buckled,
neither the light nor the chime
comes on.
Passenger Safety Belt
Reminder Light
There is a passenger safety belt
reminder light near the passenger
airbag status indicator. See
Passenger Sensing System on
page 3-28.
When the vehicle is started, this
light flashes and a chime may come
on to remind passengers to fasten
their safety belt. Then the light stays
on solid until the belt is buckled.This cycle continues several times if
the passenger remains or becomes
unbuckled while the vehicle is
moving.
If the passenger safety belt is
buckled, neither the chime nor the
light comes on.
The front passenger safety belt
warning light and chime may turn on
if an object is put on the seat such
as a briefcase, handbag, grocery
bag, laptop, or other electronic
device. To turn off the warning light
and/or chime, remove the object
from the seat or buckle the
safety belt.
Airbag Readiness Light
This light shows if there is an
electrical problem with the airbag
system. The system check includes
the airbag sensor(s), passenger
sensing system, the pretensioners,
the airbag modules, the wiring, and
the crash sensing and diagnostic