clock CADILLAC CTS 2019 Owner's Manual
[x] Cancel search | Manufacturer: CADILLAC, Model Year: 2019, Model line: CTS, Model: CADILLAC CTS 2019Pages: 401, PDF Size: 6.85 MB
Page 33 of 401

Cadillac CTS/CTS-V Owner Manual (GMNA-Localizing-U.S./Canada/Mexico-
12460273) - 2019 - CRC - 5/8/18
32 KEYS, DOORS, AND WINDOWS
chimes are heard. Passive locking will
then remain disabled until
Qon the
interior door is pressed, or until the
vehicle is turned on.
Remote Left In Vehicle Alert
When the vehicle is turned off and an
RKE transmitter is left in the vehicle,
the horn will chirp three times after
all doors are closed. To turn on or off
see Vehicle Personalization 0145.
Remote No Longer In Vehicle Alert
If the vehicle is on, with a door open,
and then all doors are closed, the
vehicle will check for RKE
transmitter(s) inside. If an RKE
transmitter is not detected, the Driver
Information Center (DIC) will display
NO REMOTE DETECTED and the horn
will chirp three times.
This occurs only once each time the
vehicle is driven. See Vehicle
Personalization 0145.
Keyless Trunk Opening
Press the touch pad on the rear of the
trunk above the license plate if the
RKE transmitter is within 1 m (3 ft). Key Access
To access a vehicle with a weak
transmitter battery, see
Door Locks
0 37.
Programming Transmitters to
the Vehicle
Only RKE transmitters programmed to
the vehicle will work. If a transmitter
is lost or stolen, a replacement can be
purchased and programmed through
your dealer. The vehicle can be
reprogrammed so that lost or stolen
transmitters no longer work. Each
vehicle can have up to eight
transmitters matched to it.
Programming with Recognized
Transmitters
A new transmitter can be programmed
to the vehicle when there are two
recognized transmitters.
To program, the vehicle must be off
and all transmitters, both currently
recognized and new, must be
with you.
1. Remove the vehicle key from the recognized transmitter. 2. Place the two recognized
transmitters in the cupholder.
3. Remove the key lock cylinder cap on the driver door handle. See
Door Locks 037. Insert the
vehicle key into the key lock
cylinder on the driver door
handle, then turn the key
counterclockwise to the unlock
position five times within
10 seconds.
The DIC displays READY FOR
REMOTE #2, 3, 4, ETC.
Page 34 of 401

Cadillac CTS/CTS-V Owner Manual (GMNA-Localizing-U.S./Canada/Mexico-
12460273) - 2019 - CRC - 5/8/18
KEYS, DOORS, AND WINDOWS 33
4. Open the center console, removethe rubber mat, and place the
new transmitter in the
transmitter pocket.
5. Press ENGINE START/STOP. When the transmitter is learned,
the DIC display will show that it
is ready to program the next
transmitter.
6. Remove the transmitter from the transmitter pocket and press
K
orQon the transmitter.
To program additional
transmitters, repeat Steps 4–6.
When all additional transmitters
are programmed, press and hold
ENGINE START/STOP for
approximately 12 seconds to exit
programming mode.
7. Return the vehicle key back into the transmitter.
8. Replace the key lock cylinder cap. See Door Locks 037. Programming without Recognized
Transmitters
If two currently recognized
transmitters are not available, follow
this procedure to program up to eight
transmitters. This feature is not
available in Canada. This procedure
will take approximately 30 minutes to
complete. The vehicle must be off and
all transmitters to be programmed
must be with you.
1. Remove the vehicle key from the transmitter.
2. Remove the key lock cylinder cap on the driver door handle. See
Door Locks 037. Insert the
vehicle key into the key lock
cylinder on the driver door
handle, then turn the key
counterclockwise to the unlock
position five times within
10 seconds.
The DIC displays REMOTE
LEARN PENDING,
PLEASE WAIT. 3. Wait for 10 minutes until the
DIC displays PRESS ENGINE
START BUTTON TO LEARN and
then press ENGINE
START/STOP.
The DIC display will again show
REMOTE LEARN PENDING,
PLEASE WAIT.
4. Repeat Step 3 two additional times. After the third time all
previously known transmitters
will no longer work with the
vehicle. Remaining transmitters
can be relearned during the next
steps.
The DIC should now display
READY FOR REMOTE # 1.
Page 110 of 401

Cadillac CTS/CTS-V Owner Manual (GMNA-Localizing-U.S./Canada/Mexico-
12460273) - 2019 - CRC - 5/8/18
INSTRUMENTS AND CONTROLS 109
Instruments and
Controls
Controls
Steering Wheel Adjustment . . . . . 110
Steering Wheel Controls . . . . . . . . . 110
Heated Steering Wheel . . . . . . . . . . 110
Horn . . . . . . . . . . . . . . . . . . . . . . . . . . . . . . . 111
Windshield Wiper/Washer . . . . . . . 111
Compass . . . . . . . . . . . . . . . . . . . . . . . . . . 113
Clock . . . . . . . . . . . . . . . . . . . . . . . . . . . . . . 113
Power Outlets . . . . . . . . . . . . . . . . . . . . . 113
Wireless Charging . . . . . . . . . . . . . . . . 115
Warning Lights, Gauges, and
Indicators
Warning Lights, Gauges, andIndicators . . . . . . . . . . . . . . . . . . . . . . . 118
Instrument Cluster . . . . . . . . . . . . . . . 119
Speedometer . . . . . . . . . . . . . . . . . . . . . . 123
Odometer . . . . . . . . . . . . . . . . . . . . . . . . . 123
Trip Odometer . . . . . . . . . . . . . . . . . . . . 123
Tachometer . . . . . . . . . . . . . . . . . . . . . . . 123
Fuel Gauge . . . . . . . . . . . . . . . . . . . . . . . . 123
Boost Gauge (Performance Configuration Only) . . . . . . . . . . . . 124 Engine Oil Temperature Gauge
(Performance
Configuration Only) . . . . . . . . . . . . 125
Engine Coolant Temperature Gauge . . . . . . . . . . . . . . . . . . . . . . . . . . . . 125
Seat Belt Reminders . . . . . . . . . . . . . . 126
Airbag Readiness Light . . . . . . . . . . 127
Passenger Airbag Status Indicator . . . . . . . . . . . . . . . . . . . . . . . . . 127
Charging System Light . . . . . . . . . . . 128
Malfunction Indicator Lamp (Check Engine Light) . . . . . . . . . . . 129
Brake System Warning Light . . . . 131
Electric Parking Brake Light . . . . . 131
Service Electric Parking Brake Light . . . . . . . . . . . . . . . . . . . . . . . . . . . . . 131
Antilock Brake System (ABS) Warning Light . . . . . . . . . . . . . . . . . . 132
Lane Keep Assist (LKA) Light . . . 132
Vehicle Ahead Indicator . . . . . . . . . 132
Traction Off Light . . . . . . . . . . . . . . . . 133
StabiliTrak OFF Light . . . . . . . . . . . . 133
Traction Control System (TCS)/ StabiliTrak Light . . . . . . . . . . . . . . . . 133
Engine Coolant Temperature Warning Light . . . . . . . . . . . . . . . . . . 134
Driver Mode Control Light (Uplevel) . . . . . . . . . . . . . . . . . . . . . . . . . 134
Tire Pressure Light . . . . . . . . . . . . . . . 135
Engine Oil Pressure Light . . . . . . . . 135 Low Fuel Warning Light . . . . . . . . . 135
Auto Stop Mode (Uplevel
Cluster Only) . . . . . . . . . . . . . . . . . . . . 136
Security Light . . . . . . . . . . . . . . . . . . . . . 136
High-Beam On Light . . . . . . . . . . . . . 136
Adaptive Forward Lighting (AFL) Light . . . . . . . . . . . . . . . . . . . . . . . . . . . . . 136
Lamps On Reminder . . . . . . . . . . . . . 137
Cruise Control Light . . . . . . . . . . . . . . 137
Door Ajar Light . . . . . . . . . . . . . . . . . . . 137
Information Displays
Driver Information Center (DIC) . . . . . . . . . . . . . . . . . . . . . 138
Head-Up Display (HUD) . . . . . . . . . 141
Vehicle Messages
Vehicle Messages . . . . . . . . . . . . . . . . . 144
Engine Power Messages . . . . . . . . . . 144
Vehicle Speed Messages . . . . . . . . . 145
Vehicle Personalization
Vehicle Personalization . . . . . . . . . . 145
Universal Remote System
Universal Remote System . . . . . . . . 150
Universal Remote System Programming . . . . . . . . . . . . . . . . . . . 150
Universal Remote System Operation . . . . . . . . . . . . . . . . . . . . . . . . 152
Page 114 of 401

Cadillac CTS/CTS-V Owner Manual (GMNA-Localizing-U.S./Canada/Mexico-
12460273) - 2019 - CRC - 5/8/18
INSTRUMENTS AND CONTROLS 113
The wiper operations return to normal
when the transmission is no longer in
N (Neutral) or the vehicle speed has
increased.
Wiper-Activated Headlamps
This feature activates the headlamps
and parking lamps after the
windshield wipers have been in use
for a while. The transition time for the
lamps coming on varies based on the
wiper speed. For this feature to work,
the exterior lamp control must be
in AUTO.
The wiper-activated headlamps
immediately turn off when the
ignition is turned to off, or the
windshield wiper control is turned off.
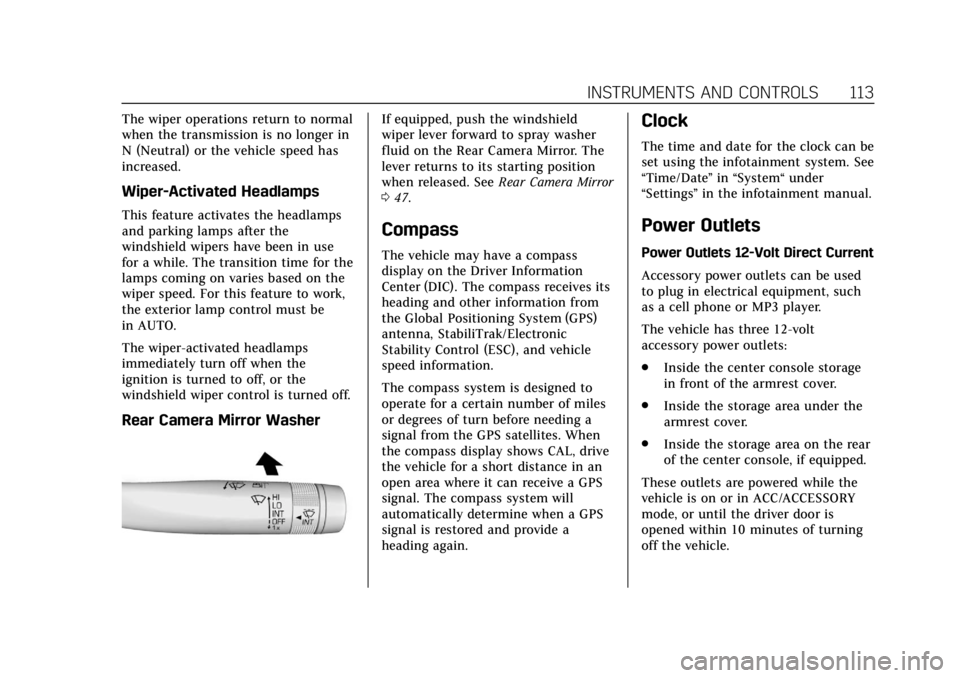
Rear Camera Mirror Washer
If equipped, push the windshield
wiper lever forward to spray washer
fluid on the Rear Camera Mirror. The
lever returns to its starting position
when released. SeeRear Camera Mirror
0 47.
Compass
The vehicle may have a compass
display on the Driver Information
Center (DIC). The compass receives its
heading and other information from
the Global Positioning System (GPS)
antenna, StabiliTrak/Electronic
Stability Control (ESC), and vehicle
speed information.
The compass system is designed to
operate for a certain number of miles
or degrees of turn before needing a
signal from the GPS satellites. When
the compass display shows CAL, drive
the vehicle for a short distance in an
open area where it can receive a GPS
signal. The compass system will
automatically determine when a GPS
signal is restored and provide a
heading again.
Clock
The time and date for the clock can be
set using the infotainment system. See
“Time/Date ”in “System“ under
“Settings ”in the infotainment manual.
Power Outlets
Power Outlets 12-Volt Direct Current
Accessory power outlets can be used
to plug in electrical equipment, such
as a cell phone or MP3 player.
The vehicle has three 12-volt
accessory power outlets:
.
Inside the center console storage
in front of the armrest cover.
. Inside the storage area under the
armrest cover.
. Inside the storage area on the rear
of the center console, if equipped.
These outlets are powered while the
vehicle is on or in ACC/ACCESSORY
mode, or until the driver door is
opened within 10 minutes of turning
off the vehicle.
Page 279 of 401

Cadillac CTS/CTS-V Owner Manual (GMNA-Localizing-U.S./Canada/Mexico-
12460273) - 2019 - CRC - 5/16/18
278 VEHICLE CARE
{Warning
Plain water, or other liquids such as
alcohol, can boil before the proper
coolant mixture will. With plain
water or the wrong mixture, the
engine could get too hot but there
would not be an overheat warning.
The engine could catch fire and you
or others could be burned.
{Warning
Steam and scalding liquids from a
hot cooling system are under
pressure. Turning the pressure cap,
even a little, can cause them to
come out at high speed and you
could be burned. Never turn the cap
when the cooling system, including
the pressure cap, is hot. Wait for
the cooling system and pressure
cap to cool.
Caution
Failure to follow the specific
coolant fill procedure could cause
the engine to overheat and could
cause system damage. If coolant is
not visible in the surge tank,
contact your dealer.
If no problem is found, check to see if
coolant is visible in the coolant surge
tank. If coolant is visible but the
coolant level is not at the bottom of
the fill neck, add a 50/50 mixture of
clean, drinkable water and DEX-COOL
coolant at the coolant surge tank, but
be sure the cooling system, including
the coolant surge tank pressure cap, is
cool before you do it.
1. Remove the coolant surge tank pressure cap from the top
chamber when the cooling
system, including the coolant
surge tank pressure cap and
upper radiator hose, is no
longer hot.
Turn the pressure cap slowly
counterclockwise. If you hear a
hiss, wait for that to stop. This
will allow any pressure still left
to be vented out the
discharge hose.
2. Keep turning the pressure cap slowly and remove it. Open the
surge tank service port cap to
the lower chamber. The service
port is behind the top chamber.
Page 290 of 401

Cadillac CTS/CTS-V Owner Manual (GMNA-Localizing-U.S./Canada/Mexico-
12460273) - 2019 - CRC - 5/16/18
VEHICLE CARE 289
Bulb Replacement
For the proper type of replacement
bulbs, or any bulb changing procedure
not listed in this section, contact your
dealer.
Caution
Do not replace incandescent bulbs
with aftermarket LED replacement
bulbs. This can cause damage to
the vehicle electrical system.
Halogen Bulbs
{Warning
Halogen bulbs have pressurized gas
inside and can burst if you drop or
scratch the bulb. You or others
could be injured. Be sure to read
and follow the instructions on the
bulb package.
High Intensity Discharge
(HID) Lighting
{Warning
The High Intensity Discharge (HID)
lighting system operates at a very
high voltage. If you try to service
any of the system components, you
could be seriously injured. Have
your dealer or a qualified technician
service them.
After an HID headlamp bulb has been
replaced, the beam might be a slightly
different shade than it was originally.
This is normal.
LED Lighting
This vehicle has several LED lamps.
For replacement of any LED lighting
assembly, contact your dealer.
Back-Up Lamps
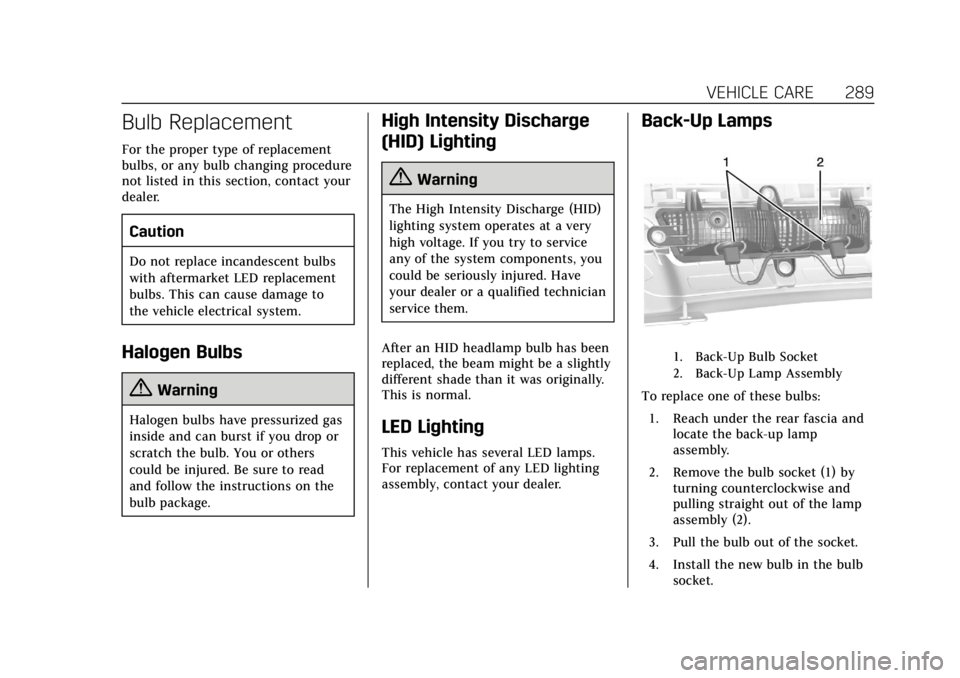
1. Back-Up Bulb Socket
2. Back-Up Lamp Assembly
To replace one of these bulbs: 1. Reach under the rear fascia and locate the back-up lamp
assembly.
2. Remove the bulb socket (1) by turning counterclockwise and
pulling straight out of the lamp
assembly (2).
3. Pull the bulb out of the socket.
4. Install the new bulb in the bulb socket.
Page 291 of 401

Cadillac CTS/CTS-V Owner Manual (GMNA-Localizing-U.S./Canada/Mexico-
12460273) - 2019 - CRC - 5/16/18
290 VEHICLE CARE
5. Install the bulb socket by turningclockwise.
License Plate Lamp
Lamp Assembly
Bulb Assembly
1. Bulb Socket
2. Bulb
3. Lamp Assembly
To replace one of these bulbs:
1. Push the lamp assembly (3) toward the center of the vehicle.
2. Pull the lamp assembly down to remove.
3. Turn the bulb socket (1) counterclockwise to remove it
from the lamp assembly (3).
4. Pull the bulb (2) straight out of the bulb socket (1).
5. Push the replacement bulb straight into the bulb socket and
turn the bulb socket clockwise to
install it into the lamp assembly.
6. Push the lamp assembly back into position until the release tab
locks into place.
Page 325 of 401

Cadillac CTS/CTS-V Owner Manual (GMNA-Localizing-U.S./Canada/Mexico-
12460273) - 2019 - CRC - 5/16/18
324 VEHICLE CARE
4. Pressure Deflation Button
5. Tire Sealant Canister
6. Sealant/Air Hose (Clear)
7. Air Only Hose (Black)
8. Power Plug
9. Canister Release Button(Under Sealant/Air Hose)
When using the tire sealant and
compressor kit during cold
temperatures, warm the kit in a
heated environment for five minutes.
This will help to inflate the tire faster.
If a tire goes flat, avoid further tire
and wheel damage by driving slowly
to a level place. Turn on the hazard
warning flashers. See Hazard Warning
Flashers 0158.
See If a Tire Goes Flat 0320 for other
important safety warnings.
Do not remove any objects that have
penetrated the tire.
1. Remove the tire sealant and compressor kit from its storage
location. See Storing the Tire
Sealant and Compressor Kit 0328.
2. Unwrap the sealant/air hose (6) and the power plug (8). 3. Place the kit on the ground.
Make sure the tire valve stem is
positioned close to the ground so
the hose will reach it.
4. Remove the valve stem cap from the flat tire by turning it
counterclockwise.
5. Attach the sealant/air hose (6) onto the tire valve stem. Turn it
clockwise until it is tight.
6. Plug the power plug (8) into the accessory power outlet in the
vehicle. Unplug all items from
other accessory power outlets.
See Power Outlets 0113.
If the vehicle has an accessory
power outlet, do not use the
cigarette lighter.
If the vehicle only has a cigarette
lighter, use the cigarette lighter.
Do not pinch the power plug
cord in the door or window.
7. Start the vehicle. The vehicle must be running while using the
air compressor. 8. Press and turn the selector
switch (1) counterclockwise to
the Sealant + Air position.
9. Press the on/off button (2) to turn the tire sealant and
compressor kit on.
The compressor will inject
sealant and air into the tire.
The pressure gauge (3) will
initially show a high pressure
while the compressor pushes the
sealant into the tire. Once the
sealant is completely dispersed
into the tire, the pressure will
quickly drop and start to rise
again as the tire inflates with
air only.
10. Inflate the tire to the recommended inflation pressure
using the pressure gauge (3). The
recommended inflation pressure
can be found on the Tire and
Loading Information label. See
Tire Pressure 0307.
The pressure gauge (3) may read
higher than the actual tire
pressure while the compressor is
on. Turn the compressor off to
Page 326 of 401

Cadillac CTS/CTS-V Owner Manual (GMNA-Localizing-U.S./Canada/Mexico-
12460273) - 2019 - CRC - 5/16/18
VEHICLE CARE 325
get an accurate pressure reading.
The compressor may be turned
on/off until the correct pressure
is reached.
Caution
If the recommended pressure
cannot be reached after
approximately 25 minutes, the
vehicle should not be driven farther.
The tire is too severely damaged
and the tire sealant and compressor
kit cannot inflate the tire. Remove
the power plug from the accessory
power outlet and unscrew the
inflating hose from the tire valve.
SeeRoadside Service 0367.
11. Press the on/off button (2) to turn the tire sealant and
compressor kit off.
The tire is not sealed and will
continue to leak air until the
vehicle is driven and the sealant
is distributed in the tire,
therefore, Steps 12–18 must be
done immediately after Step 11. Be careful while handling the tire
sealant and compressor kit as it
could be warm after usage.
12. Unplug the power plug (8) from the accessory power outlet in the
vehicle.
13. Turn the sealant/air hose (6) counterclockwise to remove it
from the tire valve stem.
14. Replace the tire valve stem cap.
15. Replace the sealant/air hose (6), and the power plug (8) back in
their original location.
16. If the flat tire was able to inflateto the recommended inflation
pressure, remove the maximum
speed label from the sealant
canister (5) and place it in a
highly visible location. Do not exceed the speed on this label
until the damaged tire is repaired
or replaced.
17. Return the equipment to its original storage location in the
vehicle.
18. Immediately drive the vehicle 8 km (5 mi) to distribute the
sealant in the tire.
19. Stop at a safe location and check the tire pressure. Refer to
Steps 1–11 under “Using the Tire
Sealant and Compressor Kit
without Sealant to Inflate a Tire
(Not Punctured).”
If the tire pressure has fallen
more than 68 kPa (10 psi) below
the recommended inflation
pressure, stop driving the vehicle.
The tire is too severely damaged
and the tire sealant cannot seal
the tire. See Roadside Service
0 367.
If the tire pressure has not
dropped more than 68 kPa
(10 psi) from the recommended
Page 327 of 401

Cadillac CTS/CTS-V Owner Manual (GMNA-Localizing-U.S./Canada/Mexico-
12460273) - 2019 - CRC - 5/16/18
326 VEHICLE CARE
inflation pressure, inflate the tire
to the recommended inflation
pressure.
20. Wipe off any sealant from the wheel, tire, and vehicle.
21. Dispose of the used sealant canister (5) and sealant/air hose
(6) assembly at a local dealer or
in accordance with local state
codes and practices.
22. Replace with a new canister assembly available from your
dealer.
23. After temporarily sealing the tire using the tire sealant and
compressor kit, take the vehicle
to an authorized dealer within
161 km (100 mi) of driving to
have the tire repaired or
replaced.
Using the Tire Sealant and
Compressor Kit without Sealant
to Inflate a Tire (Not Punctured)
To use the air compressor to inflate a
tire with air only and not sealant:1. Selector Switch (Sealant/Air
or Air Only)
2. On/Off Button
3. Pressure Gauge 4. Pressure Deflation Button
5. Tire Sealant Canister
6. Sealant/Air Hose (Clear)
7. Air Only Hose (Black)
8. Power Plug
9. Canister Release Button
(Under Sealant/Air Hose)
If a tire goes flat, avoid further tire
and wheel damage by driving slowly
to a level place. Turn on the hazard
warning flashers. See Hazard Warning
Flashers 0158.
See If a Tire Goes Flat 0320 for other
important safety warnings.
1. Remove the tire sealant and compressor kit from its storage
location. See Storing the Tire
Sealant and Compressor Kit 0328.
2. Unwrap the air only hose (7) and the power plug (8).
3. Place the kit on the ground. Make sure the tire valve stem is
positioned close to the ground so
the hose will reach it.
4. Remove the tire valve stem cap from the flat tire by turning it
counterclockwise.