change time CADILLAC CTS V 2006 1.G Owners Manual
[x] Cancel search | Manufacturer: CADILLAC, Model Year: 2006, Model line: CTS V, Model: CADILLAC CTS V 2006 1.GPages: 442, PDF Size: 2.57 MB
Page 2 of 442
GENERAL MOTORS, GM, the GM Emblem, CADILLAC,
the CADILLAC Crest & Wreath, and the name CTS are
registered trademarks of General Motors Corporation.
This manual includes the latest information at the time it
was printed. We reserve the right to make changes after
that time without notice. For vehicles �rst sold in Canada,
substitute the name “General Motors of Canada Limited”
for Cadillac Motor Car Division whenever it appears in
this manual.
This manual describes features that may be available in
this model, but your vehicle may not have all of them.
For example, more than one entertainment system may
be offered or your vehicle may have been ordered without
a front passenger or rear seats.
Keep this manual in the vehicle, so it will be there if it is
needed while you are on the road. If the vehicle is sold,
leave this manual in the vehicle.
Canadian Owners
A French language copy of this manual can be obtained
from your dealer or from:
Helm, Incorporated
P.O. Box 07130
Detroit, MI 48207
How to Use This Manual
Many people read the owner manual from beginning to
end when they �rst receive their new vehicle. If this
is done, it can help you learn about the features
and controls for the vehicle. Pictures and words work
together in the owner manual to explain things.
Index
A good place to quickly locate information about the
vehicle is the Index in the back of the manual. It is
an alphabetical list of what is in the manual and
the page number where it can be found.
Litho in U.S.A.
Part No. 06CTS B Second Printing
©2006 General Motors Corporation. All Rights Reserved.
ii
Page 83 of 442
Battery Replacement
Under normal use, the battery in your remote keyless
entry transmitter should last about four years.
You can tell the battery is weak if the transmitter won’t
work at the normal range in any location. If you have
to get close to your vehicle before the transmitter works,
it’s probably time to change the battery.
Notice:When replacing the battery, use care not to
touch any of the circuitry. Static from your body
transferred to these surfaces may damage the
transmitter.
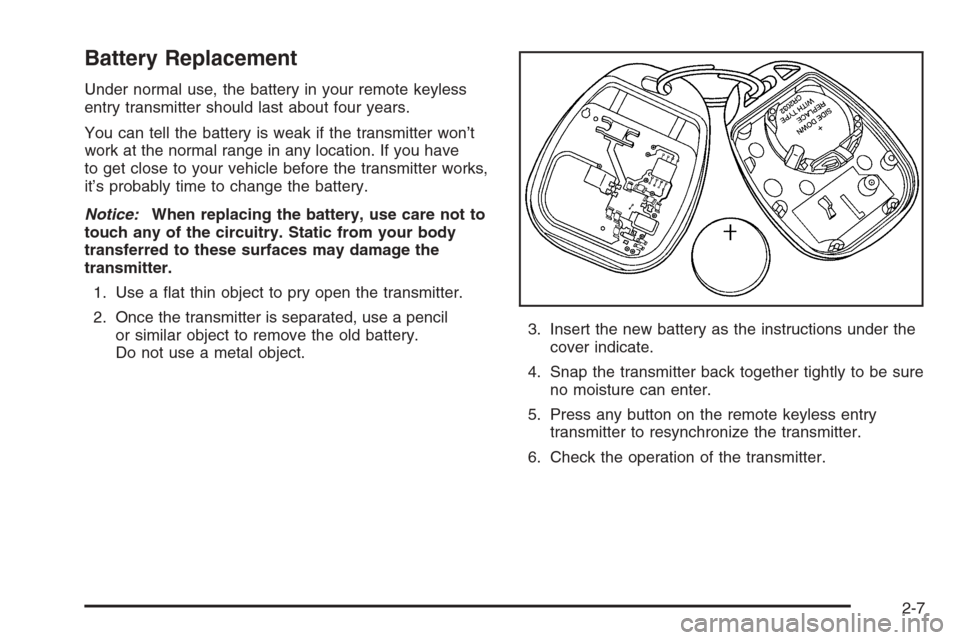
1. Use a �at thin object to pry open the transmitter.
2. Once the transmitter is separated, use a pencil
or similar object to remove the old battery.
Do not use a metal object.3. Insert the new battery as the instructions under the
cover indicate.
4. Snap the transmitter back together tightly to be sure
no moisture can enter.
5. Press any button on the remote keyless entry
transmitter to resynchronize the transmitter.
6. Check the operation of the transmitter.
2-7
Page 101 of 442
Starting the Engine
Automatic Transmission
Move your shift lever to PARK (P) or NEUTRAL (N).
Your engine will not start in any other position — that is
a safety feature. To restart when you are already
moving, use NEUTRAL (N) only.
Notice:Do not try to shift to PARK (P) if your
vehicle is moving. If you do, you could damage the
transmission. Shift to PARK (P) only when your
vehicle is stopped.
Manual Transmission
The shift lever should be in NEUTRAL and the parking
brake engaged. Hold the clutch pedal to the �oor and
start the engine. Your vehicle will not start if the clutch
pedal is not all the way down — that is a safety feature.
1. With your foot off the accelerator pedal, turn your
ignition key to START. Then, let go of the key; the
engine will start automatically. The idle speed
will go down as your engine gets warm. Do not race
the engine immediately after starting it. Operate
the engine and transmission gently until the
oil warms up and lubricates all moving parts.Your vehicle has a Computer-Controlled Cranking
System. This feature assists in starting the
engine and protects the electrical system. If the
ignition key is turned to the START position,
and then released when the engine begins cranking,
the engine will continue cranking until the vehicle
starts or until it exceeds the maximum cranking time
allowed, approximately 15 seconds to prevent
cranking motor damage. To prevent starter-motor
gear damage, this system also prevents cranking if
the engine is already running. The engine cranking
can be stopped by turning the ignition switch to
the ACCESSORY or OFF position.
2. If your engine will not start, or starts but then stops,
it could be �ooded with too much gasoline. Try
pushing your accelerator pedal all the way to the
�oor and holding it there as you turn the key
to START. If the vehicle starts brie�y but then stops
again, do the same thing.
Notice:Your engine is designed to work with the
electronics in your vehicle. If you add electrical
parts or accessories, you could change the way the
engine operates. Before adding electrical equipment,
check with your dealer. If you do not, your engine
might not perform properly. Any resulting damage
would not be covered by your vehicle’s warranty.
2-25
Page 105 of 442
Driver Shift Control (DSC)
Notice:If you drive your vehicle at high RPMs
without upshifting while using Driver Shift Control
(DSC), you could damage your vehicle. Always
upshift when necessary while using DSC.
Your automatic transmission has a Driver Shift Control
(DSC) feature that allows you to change gears similar to a
manual transmission. To use the DSC feature:
1. Slide the shift lever over from AUTOMATIC
OVERDRIVE (D) to the right into the DSC area.
The sport mode light in the
instrument panel cluster
will come on.
If you do not move the shift lever forward or
rearward, the vehicle will be in sport mode. When
you are in the sport mode the vehicle will still
shift automatically. While driving in sport mode, the
transmission may remain in a gear longer than it
would in the normal driving mode based on braking,
throttle input, and vehicle lateral acceleration.
2. To enter the DSC mode, press the shift lever
forward to upshift or rearward to downshift.The odometer on the instrument panel cluster will
change from the mileage to a number indicating the
requested gear range when moving the shift lever
forward or rearward. SeeSpeedometer and Odometer
on page 3-33for more information on the odometer.
While using the DSC feature, the vehicle will have �rmer
shifting and increased performance. You can use this
for sport driving or when climbing or descending hills, to
stay in gear longer, or to down shift for more power
or engine braking.
The transmission will only allow you to shift into gears
appropriate for the vehicle speed and engine
Revolutions Per Minute (RPM). The transmission will
not automatically shift to the next higher gear if the
engine RPM is too high.
If shifting is prevented for any reason, the currently
selected gear will �ash multiple times, indicating that the
transmission has not shifted gears.
While in the DSC mode, the transmission will
automatically downshift when the vehicle comes to a stop
and while quickly applying the accelerator to increase
speed. This will allow for more power during take-off.
When accelerating your vehicle from a stop in snowy
and icy conditions, you may want to shift into second
gear. A higher gear ratio allows you to gain more traction
on slippery surfaces.
2-29
Page 131 of 442
Instrument Panel Overview...............................3-4
Hazard Warning Flashers................................3-6
Other Warning Devices...................................3-6
Horn .............................................................3-6
Tilt Wheel.....................................................3-6
Recon�gurable Steering Wheel
Controls (SWC) (CTS).................................3-7
Turn Signal/Multifunction Lever.........................3-9
Turn and Lane-Change Signals........................3-9
Headlamp High/Low-Beam Changer.................3-10
Flash-to-Pass...............................................3-10
Windshield Wipers........................................3-11
Windshield Washer.......................................3-12
Headlamp Washer........................................3-12
Cruise Control..............................................3-13
Headlamps..................................................3-16
Wiper Activated Headlamps............................3-17
Headlamps on Reminder................................3-17
Daytime Running Lamps (DRL).......................3-17
Fog Lamps ..................................................3-19
Exterior Lighting Battery Saver........................3-20
Instrument Panel Brightness...........................3-20
Entry Lighting...............................................3-21
Parade Dimming...........................................3-21
Reading Lamps............................................3-21Accessory Power Outlet(s).............................3-21
Ashtray(s) and Cigarette Lighter......................3-22
Climate Controls............................................3-23
Dual Climate Control System..........................3-23
Outlet Adjustment.........................................3-28
Passenger Compartment Air Filter...................3-29
Steering Wheel Climate Controls (CTS)............3-30
Warning Lights, Gages, and Indicators............3-30
Instrument Panel Cluster................................3-31
Speedometer and Odometer...........................3-33
Trip Odometers............................................3-33
Tachometer.................................................3-33
Engine Speed Limiter....................................3-33
Safety Belt Reminder Light.............................3-34
Airbag Readiness Light..................................3-34
Passenger Airbag Status Indicator...................3-35
Charging System Light..................................3-37
Brake System Warning Light..........................3-38
Anti-Lock Brake System Warning Light.............3-39
Traction Control System (TCS) Warning Light......3-39
Engine Coolant Temperature
Warning Light (CTS)..................................3-40
Engine Coolant Temperature Gage..................3-40
Tire Pressure Light (CTS-V Only)....................3-41
Section 3 Instrument Panel
3-1
Page 140 of 442
Turn Signal On Chime
If the turn signal is left on for about 1 mile (1.6 km), a
warning chime will sound and the Turn Signal On
message will appear on the Driver Information
Center (DIC) display. See “Turn Signal On” under
DIC Warnings and Messages on page 3-61for more
information.
Headlamp High/Low-Beam Changer
Push forward on the turn signal/multifunction lever
to change the headlamps from low to high beam. Pull
the lever back and then release it to change from high to
low beam.
If you turn the vehicle off with the high beams on,
the high beams will be on the next time you start
your vehicle.
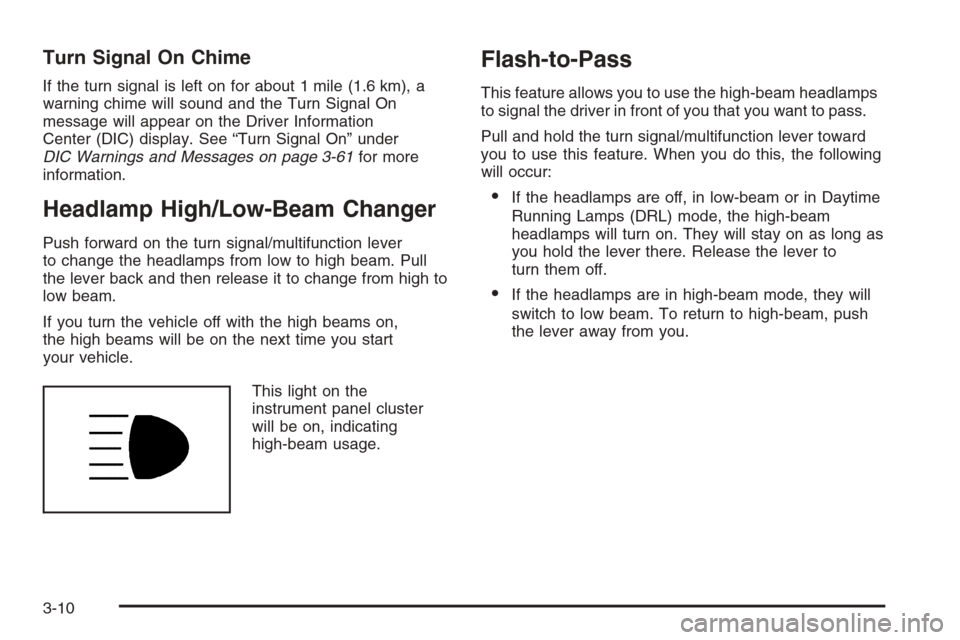
This light on the
instrument panel cluster
will be on, indicating
high-beam usage.
Flash-to-Pass
This feature allows you to use the high-beam headlamps
to signal the driver in front of you that you want to pass.
Pull and hold the turn signal/multifunction lever toward
you to use this feature. When you do this, the following
will occur:
If the headlamps are off, in low-beam or in Daytime
Running Lamps (DRL) mode, the high-beam
headlamps will turn on. They will stay on as long as
you hold the lever there. Release the lever to
turn them off.
If the headlamps are in high-beam mode, they will
switch to low beam. To return to high-beam, push
the lever away from you.
3-10
Page 154 of 442
Automatic Operation
AUTO (Automatic):When this button is pressed and
the temperature is set, the system will automatically
control the inside temperature, the air delivery mode,
the air conditioning compressor, and the fan speed.
AUTO will appear on the display.
1. Press the AUTO button.
2. Adjust the temperature to a comfortable setting
between 70°F (21°C) and 80°F (27°C).
Choosing the coldest or warmest temperature
setting will not cause the system to heat or cool
any faster. If you set the system at the warmest
temperature setting, the system will remain in
manual mode at that temperature and it will not go
into automatic mode.
In cold weather, the system will start at reduced fan
speeds to avoid blowing cold air into your vehicle
until warmer air is available. The system will
start out blowing air at the �oor but may change
modes automatically as the vehicle warms up
to maintain the chosen temperature setting. The
length of time needed for warm up will depend on
the outside temperature and the length of time
that has elapsed since your vehicle was last driven.
3. Wait for the system to regulate. This may take from
10 to 30 minutes. Then adjust the temperature, if
necessary.You can switch from English to metric units through the
Driver Information Center (DIC). If you have the Base
audio system, seeDIC Main Menu on page 3-57.Ifyou
have the Navigation system, see “Setup Menu” in the
Index of the Navigation System Owner Manual.
The air-conditioning system removes moisture from the
air, so you may sometimes notice a small amount of
water dripping underneath your vehicle while idling
or after turning off the engine. This is normal.
Do not cover the solar sensor located in the center of
the instrument panel, near the windshield. For more
information on the solar sensor, see “Sensors” later in
this section.
Manual Operation
yNz(Mode):Pressing the mode switch and
changing the mode cancels automatic operation and
places the system in manual mode. Press AUTO
to return to automatic operation.
The outboard air outlets will always receive air�ow
regardless of the mode selected. SeeOutlet Adjustment
on page 3-28to change this air�ow from the outboard
outlets.
3-24
Page 155 of 442
To change the current mode, select one of the following:
Y(Vent):This mode directs air to the instrument
panel outlets.
\(Bi-Level):This mode directs approximately half of
the air to the instrument panel outlets, and then
directs most of the remaining air to the �oor outlets. In
automatic operation, cooler air is directed to the
upper outlets and warmer air to the �oor outlets.
[(Floor):This mode directs most of the air to the
�oor outlets with some air directed to the outboard
outlets (for the side windows), and a little air directed to
the windshield.
The mode switch can also be used to select the defog
mode. Information on defogging and defrosting can
be found later in this section.
yAz(Fan):Press this switch to increase or
decrease the fan speed. Pressing this switch cancels
automatic operation and places the system in manual
mode. Press AUTO to return to automatic operation.
If the air�ow seems low when the fan speed is at
the highest setting, the passenger compartment air �lter
may need to be replaced. For more information, see
Passenger Compartment Air Filter on page 3-29
andScheduled Maintenance on page 6-4.
h(Recirculation):This mode keeps outside air
from coming in the vehicle. It can be used to prevent
outside air and odors from entering your vehicle or
to help heat or cool the air inside your vehicle more
quickly. Press this button to turn the recirculation mode
on or off. The air-conditioning compressor also comes
on. After manually selecting recirculation, the auto button
must be pressed to enable the system to select the
optimum air delivery setting for the vehicle.
Recirculation is not available in the defog or defrost
mode and will automatically turn off after 10 minutes
when defog is selected.
Using recirculation for long periods of time may cause
the air inside your vehicle to become too dry or stuffy.
To prevent this from happening, after the air in your
vehicle has cooled, turn the recirculation mode off
or press the auto button.
QPWRR(Power/Driver’s Temperature):Press
the PWR button located on the driver’s side of
the climate control panel to turn the entire climate
control system on or off. Press the up or down arrow on
the switch to increase or decrease the temperature
inside your vehicle.
3-25
Page 184 of 442
TUNE/SEL (Select) Knob:Turn this knob, located in
the lower right corner of the audio system, to scroll
through the menu items displayed. Press this knob to
select the menu item.
Status of Vehicle Systems
You can view the status of several vehicle systems
using the DIC.
Vehicle Information Menu
To access this menu, press the up or down arrow on
the INFO switch located to the right of the display.
The following items are available when the ignition is in
ON. These items will not be available when the
ignition is in ACCESSORY. The tire pressure menu
items are only available if your vehicle has the
Tire Pressure Monitor (TPM) system:
OUTSIDE TEMP
MI TRIP A (KM TRIP A)*
MI TRIP B (KM TRIP B)*
MILES RANGE (KM RANGE)
MPG AVG (L/100 KM AVG)*
MPG INST (L/100 KM INST)
GAL FUEL USED (L FUEL USED)*
AVG MPH (AVG KM/H)*
TIMER*
BATTERY VOLTS
ENGINE OIL LIFE*
TRANS FLUID LIFE* (Automatic Transmission Only)
PSI LF TIRE (KPA LF TIRE)
PSI RF TIRE (KPA RF TIRE)
PSI RR TIRE (KPA RR TIRE)
PSI LR TIRE (KPA LR TIRE)
BLANK LINE
*These items can be reset. Each one must be reset
individually. For a detailed description of the menu items
and how to reset them, see “Vehicle Information
Menu Item Descriptions” later in this section.
You can view any of these items at any time, but only
one item can be displayed at a time.
Vehicle Information Menu Item
Descriptions
The following paragraphs contain a more detailed
description of each menu item:
OUTSIDE TEMP:If you select this item, the current
outside temperature is displayed at the top of the
screen. It will be in either degrees Fahrenheit (°F) or
degrees Celsius (°C) depending upon whether the
system is set for English or metric units. If you wish to
change the units, seeDIC Main Menu on page 3-57.
3-54
Page 185 of 442

MI TRIP A and B (KM TRIP A and B):For information
on the trip odometers, seeTrip Odometers on page 3-33.
MILES RANGE (KM RANGE):If you select this item,
the approximate number of remaining miles or
kilometers you can drive without refueling is displayed.
This estimate is based on the current driving conditions
and will change if the driving conditions change. For
example, if you are driving in traffic making frequent
stops, the display may read one number, but if you enter
the freeway, the number may change even though
you still have the same amount of gas in the gas tank.
This is because different driving conditions produce
different fuel economies. Generally, freeway driving
produces better fuel economy than city driving.
If your vehicle is low on fuel, the Fuel Level Low
message will be displayed. See “Fuel Level Low” under
DIC Warnings and Messages on page 3-61for more
information.
MPG AVG (L/100 KM AVG):If you select this item, the
approximate average miles per gallon (mpg) or liters
per 100 kilometers (L/100 km) is displayed. This number
is calculated based on the number of mpg (L/100 km)
recorded since the last time this menu item was reset.
To reset the MPG AVG (L/100 KM AVG), press the CLR
button located to the right of the screen. The display
will return to zero.MPG INST (L/100 KM INST):If you select this item,
the current fuel economy is displayed. This number
re�ects only the fuel economy that the vehicle has right
now and will change frequently as driving conditions
change. Unlike average fuel economy, this menu item
cannot be reset.
GAL FUEL USED (L FUEL USED):If you select this
item, the number of gallons or liters of fuel used
since the last reset of this menu item is displayed.
To reset GAL FUEL USED (L FUEL USED), press the
CLR button located to the right of the screen. The
display will return to zero.
AVG MPH (AVG KM/H):If you select this item, the
average speed of the vehicle is displayed in miles per
hour (mph) or kilometers per hour (km/h). This average
is calculated based on the various vehicle speeds
recorded since the last reset of this menu item.
To reset AVG MPH (AVG KM/H), press the CLR button
located to the right of the screen. The display will
return to zero.
TIMER:If you select this item, a timing feature is
displayed. The timer functions like a stopwatch in that
you can record the time it takes to travel from one point
to another.
To turn on the timer, press the CLR button located to
the right of the screen once. The display will read
00:00:00 TIMER ON and begin counting.
3-55