warning CADILLAC CTS V 2017 3.G Owners Manual
[x] Cancel search | Manufacturer: CADILLAC, Model Year: 2017, Model line: CTS V, Model: CADILLAC CTS V 2017 3.GPages: 352, PDF Size: 3.99 MB
Page 301 of 352
Cadillac CTS/CTS-V Owner Manual (GMNA-Localizing-MidEast-10293089) -
2017 - crc - 6/22/16
300 VEHICLE CARE
Different Size Tires and
Wheels
If wheels or tires are installed that are
a different size than the original
equipment wheels and tires, vehicle
performance, including its braking,
ride and handling characteristics,
stability, and resistance to rollover
may be affected. If the vehicle has
electronic systems such as antilock
brakes, rollover airbags, traction
control, electronic stability control,
or All-Wheel Drive, the performance
of these systems can also be affected.
{Warning
If different sized wheels are used,
there may not be an acceptable
level of performance and safety if
tires not recommended for those
wheels are selected. This increases
the chance of a crash and serious
injury. Only use GM specific wheel
and tire systems developed for the
vehicle, and have them properly
installed by a GM certified
technician.See
Buying New Tires 0298 and
Accessories and Modifications 0248.
Wheel Alignment and Tire
Balance
The tires and wheels were aligned and
balanced at the factory to provide the
longest tire life and best overall
performance. Adjustments to wheel
alignment and tire balancing are not
necessary on a regular basis. Consider
an alignment check if there is unusual
tire wear or the vehicle is significantly
pulling to one side or the other. Some
slight pull to the left or right,
depending on the crown of the road
and/or other road surface variations
such as troughs or ruts, is normal.
If the vehicle is vibrating when driving
on a smooth road, the tires and
wheels may need to be rebalanced.
See your dealer for proper diagnosis.
Wheel Replacement
Replace any wheel that is bent,
cracked, or badly rusted or corroded.
If wheel nuts keep coming loose, the
wheel, wheel bolts, and wheel nuts
should be replaced. If the wheel leaks air, replace it. Some aluminum wheels
can be repaired. See your dealer if any
of these conditions exist.
Your dealer will know the kind of
wheel that is needed.
Each new wheel should have the same
load-carrying capacity, diameter,
width, offset, and be mounted the
same way as the one it replaces.
Replace wheels, wheel bolts, wheel
nuts, or Tire Pressure Monitor System
(TPMS) sensors with new GM original
equipment parts.
{Warning
Using the wrong replacement
wheels, wheel bolts, or wheel nuts
can be dangerous. It could affect
the braking and handling of the
vehicle. Tires can lose air, and
cause loss of control, causing a
crash. Always use the correct wheel,
wheel bolts, and wheel nuts for
replacement.
Page 302 of 352
Cadillac CTS/CTS-V Owner Manual (GMNA-Localizing-MidEast-10293089) -
2017 - crc - 6/22/16
VEHICLE CARE 301
Caution
The wrong wheel can also cause
problems with bearing life, brake
cooling, speedometer or odometer
calibration, headlamp aim, bumper
height, vehicle ground clearance,
and tire or tire chain clearance to
the body and chassis.
Used Replacement Wheels
{Warning
Replacing a wheel with a used one
is dangerous. How it has been used
or how far it has been driven may
be unknown. It could fail suddenly
and cause a crash. When replacing
wheels, use a new GM original
equipment wheel.
Tire Chains
{Warning
If the vehicle has P245/40R18, 245/
40R18, 275/35R18, 255/35R19, 265/
35ZR19, or 295/30ZR19 size tires,
do not use tire chains. There is not
enough clearance. Tire chains used
on a vehicle without the proper
amount of clearance can cause
damage to the brakes, suspension,
or other vehicle parts. The area
damaged by the tire chains could
cause loss of control and a crash.
Use another type of traction device
only if its manufacturer
recommends it for the vehicle's tire
size combination and road
conditions. Follow that
manufacturer's instructions. To
avoid vehicle damage, drive slow
and readjust or remove the traction
device if it contacts the vehicle. Do
not spin the wheels. If traction
devices are used, install them on
the rear tires.
Caution
If the vehicle is equipped with a tire
size other than P245/40R18, 245/
40R18, 275/35R18, 255/35R19, 265/
35ZR19, or 295/30ZR19 use tire
chains only where legal and only
when necessary. Use low profile
chains that add no more than
12 mm thickness to the tire tread
and inner sidewall. Use chains that
are the proper size for the tires.
Install them on the tires of the rear
axle. Don't use chains on the tires
of the front axle. Tighten them as
tightly as possible with the ends
securely fastened. Drive slowly and
follow the chain manufacturer's
instructions. If the chains contact
the vehicle, stop and retighten
them. If the contact continues, slow
down until it stops. Driving too fast
or spinning the wheels with chains
on will damage the vehicle.
Page 303 of 352

Cadillac CTS/CTS-V Owner Manual (GMNA-Localizing-MidEast-10293089) -
2017 - crc - 6/22/16
302 VEHICLE CARE
If a Tire Goes Flat
If the vehicle has run-flat tires, there
is no need to stop on the side of the
road to change a flat tire. SeeRun-Flat
Tires 0288.
{Warning
Special tools and procedures are
required to service a run-flat tire.
If these special tools and
procedures are not used, injury or
vehicle damage may occur. Always
be sure the proper tools and
procedures, as described in the
service manual, are used.
It is unusual for a tire to blow out
while driving, especially if the tires are
maintained properly. See Tires0287.
If air goes out of a tire, it is much
more likely to leak out slowly. But if
there is ever a blowout, here are a few
tips about what to expect and what
to do:
If a front tire fails, the flat tire creates
a drag that pulls the vehicle toward
that side. Take your foot off the accelerator pedal and grip the steering
wheel firmly. Steer to maintain lane
position, and then gently brake to a
stop, well off the road, if possible.
A rear blowout, particularly on a
curve, acts much like a skid and may
require the same correction as used in
a skid. Stop pressing the accelerator
pedal and steer to straighten the
vehicle. It may be very bumpy and
noisy. Gently brake to a stop, well off
the road, if possible.
{Warning
Lifting a vehicle and getting under
it to do maintenance or repairs is
dangerous without the appropriate
safety equipment and training. If a
jack is provided with the vehicle, it
is designed only for changing a flat
tire. If it is used for anything else,
you or others could be badly injured
or killed if the vehicle slips off the
jack. If a jack is provided with the
vehicle, only use it for changing a
flat tire.
If this vehicle does not have run-flat
tires and a tire goes flat, avoid further
tire and wheel damage by driving
slowly to a level place, well off the
road, if possible.
1. Turn on the hazard warning flashers. See Hazard Warning
Flashers 0161.
2. Set the parking brake firmly.
3. Put an automatic transmission in P (Park) or a manual
transmission in 1 (First) or
R (Reverse).
4. Turn off the ignition.
5. Inspect the flat tire.
{Warning
Driving on a flat tire will cause
permanent damage to the tire.
Re-inflating a tire after it has been
driven on while severely
underinflated or flat may cause a
blowout and a serious crash. Never
attempt to re-inflate a tire that has
been driven on while severely (Continued)
Page 304 of 352
Cadillac CTS/CTS-V Owner Manual (GMNA-Localizing-MidEast-10293089) -
2017 - crc - 6/22/16
VEHICLE CARE 303
Warning (Continued)
underinflated or flat. Have your
dealer or an authorized tire service
center repair or replace the flat tire
as soon as possible.
If this vehicle has a tire sealant kit
and the tire has been separated from
the wheel, has damaged sidewalls,
or has a puncture larger than
6 mm (0.25 in), the tire is too severely
damaged for the tire sealant and
compressor kit to be effective. If the
tire has a puncture less than
6 mm (0.25 in) in the tread area of the
tire, see Tire Sealant and Compressor
Kit 0303.
Tire Sealant and
Compressor Kit
{Warning
Idling a vehicle in an enclosed area
with poor ventilation is dangerous.
Engine exhaust may enter the
(Continued)
Warning (Continued)
vehicle. Engine exhaust contains
carbon monoxide (CO) which
cannot be seen or smelled. It can
cause unconsciousness and even
death. Never run the engine in an
enclosed area that has no fresh air
ventilation. For more information,
seeEngine Exhaust 0202.
{Warning
Overinflating a tire could cause the
tire to rupture and you or others
could be injured. Be sure to read
and follow the tire sealant and
compressor kit instructions and
inflate the tire to its recommended
pressure. Do not exceed the
recommended pressure.
{Warning
Storing the tire sealant and
compressor kit or other equipment
in the passenger compartment of
the vehicle could cause injury. In a
sudden stop or collision, loose
equipment could strike someone.
Store the tire sealant and
compressor kit in its original
location.
If this vehicle has a tire sealant and
compressor kit, there may not be a
spare tire, tire changing equipment,
and on some vehicles there may not
be a place to store a tire.
The tire sealant and compressor can
be used to temporarily seal punctures
up to 6 mm (0.25 in) in the tread area
of the tire. It can also be used to
inflate an under inflated tire.
If the tire has been separated from the
wheel, has damaged sidewalls, or has
a large puncture, the tire is too
severely damaged for the tire sealant
and compressor kit to be effective.
Page 306 of 352

Cadillac CTS/CTS-V Owner Manual (GMNA-Localizing-MidEast-10293089) -
2017 - crc - 6/22/16
VEHICLE CARE 305
When using the tire sealant and
compressor kit during cold
temperatures, warm the kit in a
heated environment for five minutes.
This will help to inflate the tire faster.If a tire goes flat, avoid further tire
and wheel damage by driving slowly
to a level place. Turn on the hazard
warning flashers. See
Hazard Warning
Flashers 0161.
See If a Tire Goes Flat 0302 for other
important safety warnings.
Do not remove any objects that have
penetrated the tire.
1. Remove the tire sealant and compressor kit from its storage
location. See Storing the Tire
Sealant and Compressor Kit 0309.
2. Unwrap the sealant/air hose (6) and the power plug (8).
3. Place the kit on the ground. Make sure the tire valve stem is
positioned close to the ground so
the hose will reach it.
4. Remove the valve stem cap from the flat tire by turning it
counterclockwise.
5. Attach the sealant/air hose (6) onto the tire valve stem. Turn it
clockwise until it is tight. 6. Plug the power plug (8) into the
accessory power outlet in the
vehicle. Unplug all items from
other accessory power outlets.
See Power Outlets 0109.
If the vehicle has an accessory
power outlet, do not use the
cigarette lighter.
If the vehicle only has a cigarette
lighter, use the cigarette lighter.
Do not pinch the power plug
cord in the door or window.
7. Start the vehicle. The vehicle must be running while using the
air compressor.
8. Press and turn the selector switch (1) counterclockwise to
the Sealant + Air position.
9. Press the on/off (2) button to turn the tire sealant and
compressor kit on.
The compressor will inject
sealant and air into the tire.
The pressure gauge (3) will
initially show a high pressure
while the compressor pushes the
sealant into the tire. Once the
Page 308 of 352
Cadillac CTS/CTS-V Owner Manual (GMNA-Localizing-MidEast-10293089) -
2017 - crc - 6/22/16
VEHICLE CARE 307
Sealant and Compressor Kit
without Sealant to Inflate a Tire
(Not Punctured).”
If the tire pressure has fallen
more than 68 kPa (10 psi) below
the recommended inflation
pressure, stop driving the vehicle.
The tire is too severely damaged
and the tire sealant cannot seal
the tire.
If the tire pressure has not
dropped more than 68 kPa
(10 psi) from the recommended
inflation pressure, inflate the tire
to the recommended inflation
pressure.
20. Wipe off any sealant from the wheel, tire, and vehicle.
21. Dispose of the used sealant canister (5) and sealant/air hose
(6) assembly at a local dealer or
in accordance with local
regulations and practices.
22. Replace with a new canister assembly available from your
dealer. 23. After temporarily sealing the tire
using the tire sealant and
compressor kit, take the vehicle
to an authorized dealer within
161 km (100 mi) of driving to
have the tire repaired or
replaced.
Using the Tire Sealant and
Compressor Kit without Sealant
to Inflate a Tire (Not Punctured)
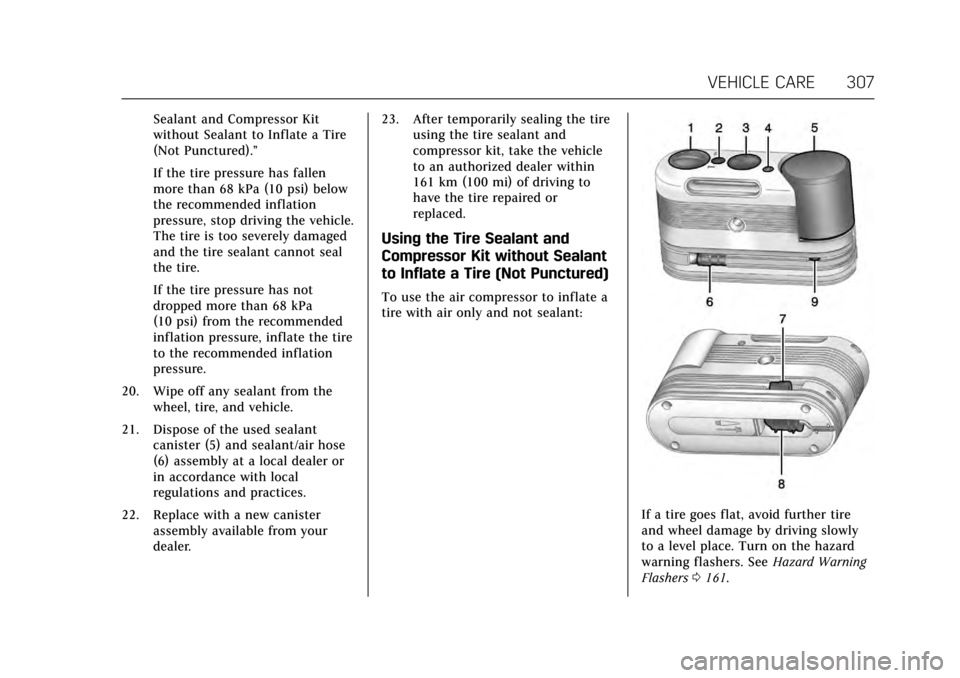
To use the air compressor to inflate a
tire with air only and not sealant:
If a tire goes flat, avoid further tire
and wheel damage by driving slowly
to a level place. Turn on the hazard
warning flashers. See Hazard Warning
Flashers 0161.
Page 309 of 352

Cadillac CTS/CTS-V Owner Manual (GMNA-Localizing-MidEast-10293089) -
2017 - crc - 6/22/16
308 VEHICLE CARE
SeeIf a Tire Goes Flat 0302 for other
important safety warnings.
1. Remove the tire sealant and compressor kit from its storage
location. See Storing the Tire
Sealant and Compressor Kit 0309.
2. Unwrap the air only hose (7) and the power plug (8).
3. Place the kit on the ground.
Make sure the tire valve stem is
positioned close to the ground so
the hose will reach it.
4. Remove the tire valve stem cap from the flat tire by turning it
counterclockwise.
5. Attach the air only hose (7) onto the tire valve stem by turning it
clockwise until it is tight.
6. Plug the power plug (8) into the accessory power outlet in the
vehicle. Unplug all items from
other accessory power outlets.
See Power Outlets 0109.
If the vehicle has an accessory
power outlet, do not use the
cigarette lighter. If the vehicle only has a cigarette
lighter, use the cigarette lighter.
Do not pinch the power plug
cord in the door or window.
7. Start the vehicle. The vehicle must be running while using the
air compressor.
8. Press and turn the selector switch (1) clockwise to the Air
Only position.
9. Press the on/off (2) button to turn the compressor on.
The compressor will inflate the
tire with air only.
10. Inflate the tire to the recommended inflation pressure
using the pressure gauge (3). The
recommended inflation pressure
can be found on the Tire and
Loading Information label. See
Tire Pressure 0290.
The pressure gauge (3) may read
higher than the actual tire
pressure while the compressor is
on. Turn the compressor off to
get an accurate reading. The compressor may be turned on/off
until the correct pressure is
reached.
If you inflate the tire higher than
the recommended pressure you
can adjust the excess pressure by
pressing the pressure deflation
button (4) until the proper
pressure reading is reached. This
option is only functional when
using the air only hose (7).
11. Press the on/off button (2) to turn the tire sealant and
compressor kit off.
Be careful while handling the tire
sealant and compressor kit as it
could be warm after usage.
12. Unplug the power plug (8) from the accessory power outlet in the
vehicle.
13. Disconnect the air only hose (7) from the tire valve stem, by
turning it counterclockwise, and
replace the tire valve stem cap.
14. Replace the air only hose (7) and the power plug (8) and cord back
in its original location.
Page 311 of 352
Cadillac CTS/CTS-V Owner Manual (GMNA-Localizing-MidEast-10293089) -
2017 - crc - 6/22/16
310 VEHICLE CARE
Jump Starting
For more information about the
vehicle battery, seeBattery0271.
If the battery has run down, try to use
another vehicle and some jumper
cables to start your vehicle. Be sure to
use the following steps to do it safely.
{Warning
Batteries can hurt you. They can be
dangerous because: . They contain acid that can
burn you.
. They contain gas that can
explode or ignite.
. They contain enough
electricity to burn you.
If you do not follow these steps
exactly, some or all of these things
can hurt you.
Caution
Ignoring these steps could result in
costly damage to the vehicle that
would not be covered by the vehicle
warranty. Trying to start the vehicle
by pushing or pulling it will not
work, and it could damage the
vehicle.
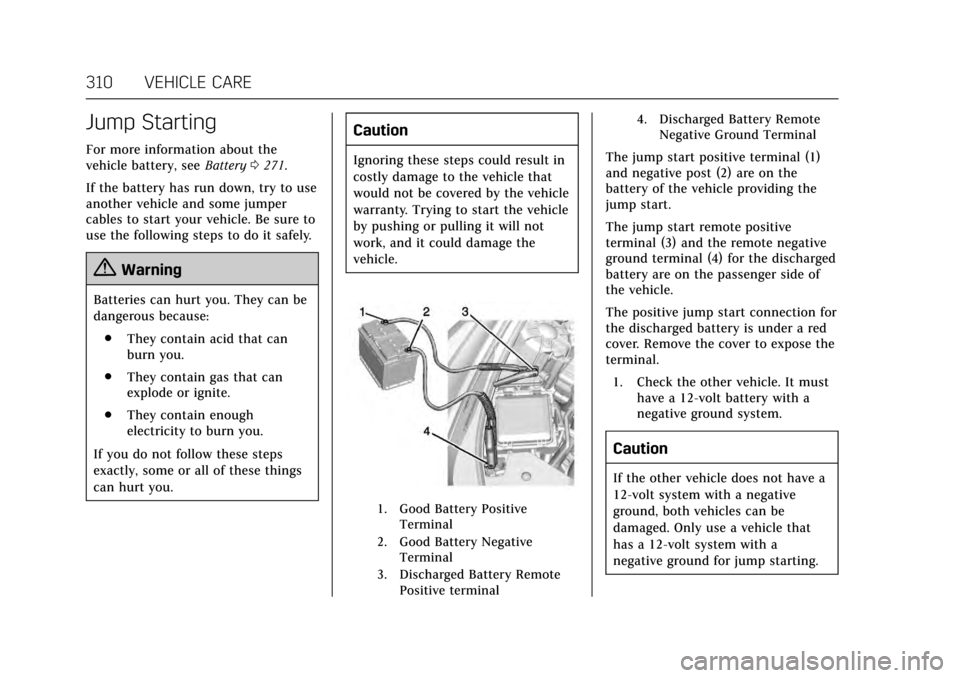
1. Good Battery Positive Terminal
2. Good Battery Negative Terminal
3. Discharged Battery Remote Positive terminal 4. Discharged Battery Remote
Negative Ground Terminal
The jump start positive terminal (1)
and negative post (2) are on the
battery of the vehicle providing the
jump start.
The jump start remote positive
terminal (3) and the remote negative
ground terminal (4) for the discharged
battery are on the passenger side of
the vehicle.
The positive jump start connection for
the discharged battery is under a red
cover. Remove the cover to expose the
terminal.
1. Check the other vehicle. It must have a 12-volt battery with a
negative ground system.
Caution
If the other vehicle does not have a
12-volt system with a negative
ground, both vehicles can be
damaged. Only use a vehicle that
has a 12-volt system with a
negative ground for jump starting.
Page 312 of 352
Cadillac CTS/CTS-V Owner Manual (GMNA-Localizing-MidEast-10293089) -
2017 - crc - 6/22/16
VEHICLE CARE 311
2. Position the two vehicles so thatthey are not touching.
3. Set the parking brake firmly and put the shift lever in P (Park)
with an automatic transmission,
or Neutral with a manual
transmission.
Caution
If any accessories are left on or
plugged in during the jump starting
procedure, they could be damaged.
The repairs would not be covered
by the vehicle warranty. Whenever
possible, turn off or unplug all
accessories on either vehicle when
jump starting.
4. Set the ignition to OFF. Turn off all lights and accessories in both
vehicles, except the hazard
warning flashers if needed.
{Warning
An electric fan can start up even
when the engine is not running and
can injure you. Keep hands,
clothing, and tools away from any
underhood electric fan.
{Warning
Using a match near a battery can
cause battery gas to explode. People
have been hurt doing this, and
some have been blinded. Use a
flashlight if you need more light.
Battery fluid contains acid that can
burn you. Do not get it on you.
If you accidentally get it in your
eyes or on your skin, flush the place
with water and get medical help
immediately.
{Warning
Fans or other moving engine parts
can injure you badly. Keep your
hands away from moving parts
once the engine is running.
5. Connect one end of the red positive (+) cable to the remote
positive (+) terminal on the
discharged battery.
6. Connect the other end of the red positive (+) cable to the
positive (+) terminal of the good
battery.
7. Connect one end of the black negative (–) cable to the
negative (–) terminal of the good
battery.
8. Connect the other end of the black negative (–) cable to the
remote negative (–) grounding
terminal for the discharged
battery.
9. Start the engine in the vehicle with the good battery and run
the engine at idle speed for at
least four minutes.
Page 323 of 352
Cadillac CTS/CTS-V Owner Manual (GMNA-Localizing-MidEast-10293089) -
2017 - crc - 6/22/16
322 VEHICLE CARE
{Warning
Do not bleach or dye safety belt
webbing. It may severely weaken
the webbing. In a crash, they might
not be able to provide adequate
protection. Clean and rinse safety
belt webbing only with mild soap
and lukewarm water. Allow the
webbing to dry.
Floor Mats
{Warning
If a floor mat is the wrong size or is
not properly installed, it can
interfere with the pedals.
Interference with the pedals can
cause unintended acceleration and/
or increased stopping distance
which can cause a crash and injury.
Make sure the floor mat does not
interfere with the pedals.
Use the following guidelines for
proper floor mat usage. .
The original equipment floor mats
were designed for your vehicle.
If the floor mats need replacing, it
is recommended that GM certified
floor mats be purchased. Non-GM
floor mats may not fit properly
and may interfere with the pedals.
Always check that the floor mats
do not interfere with the pedals.
. Do not use a floor mat if the
vehicle is not equipped with a
floor mat retainer on the driver
side floor.
. Use the floor mat with the correct
side up. Do not turn it over.
. Do not place anything on top of
the driver side floor mat.
. Use only a single floor mat on the
driver side.
. Do not place one floor mat on top
of another.
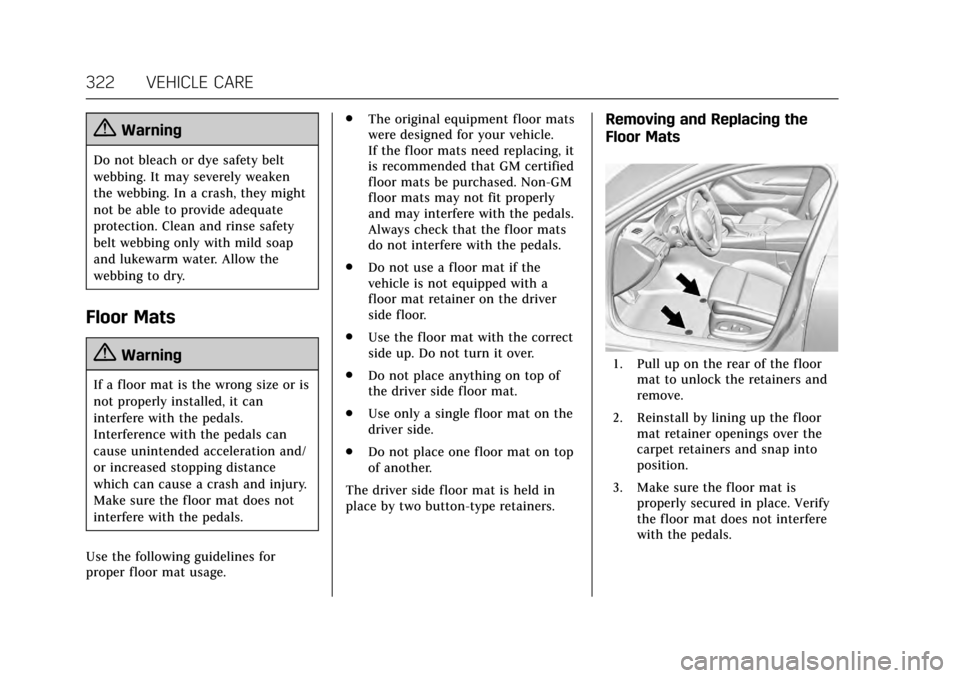
The driver side floor mat is held in
place by two button-type retainers.
Removing and Replacing the
Floor Mats
1. Pull up on the rear of the floor mat to unlock the retainers and
remove.
2. Reinstall by lining up the floor mat retainer openings over the
carpet retainers and snap into
position.
3. Make sure the floor mat is properly secured in place. Verify
the floor mat does not interfere
with the pedals.