steering CADILLAC DEVILLE 1997 7.G Owner's Guide
[x] Cancel search | Manufacturer: CADILLAC, Model Year: 1997, Model line: DEVILLE, Model: CADILLAC DEVILLE 1997 7.GPages: 386, PDF Size: 21.61 MB
Page 268 of 386

Downloaded from www.Manualslib.com manuals search engine If a Tire Goes Flat
It’s unusual for a tire to “blow out” while you’re driving,
especially if you maintain your tires properly.
If air goes
out
of a tire, it’s much more likely to leak out slowly.
But if you should ever have a “blowout,” here are a few
tips about what to expect and what to do:
If a front tire fails, the flat tire will create a drag that
pulls the vehicle toward that side. Take your foot off the
accelerator pedal and grip the steering wheel firmly.
Steer to maintain lane position, and then gently brake to
a stop well out of the traffic lane.
A rear blowout, particularly on a curve, acts much like a
skid and may require the same correction you’d use in a
skid. In any rear blowout, remove your foot from the
accelerator pedal. Get the vehicle under control by
steering the way you want the vehicle to go. It may be
very bumpy and noisy, but you can still steer. Gently
brake to a stop
-- well off the road if possible.
If a tire goes flat, the next part shows how to use your
jacking equipment to change a flat tire safely.
Changing a Flat Tire
If a tire goes flat, avoid further tire and wheel damage
by driving slowly
to a level place. Turn on your hazard
Wi *
; flashers.
I-
Changing a tire can cause an injury. The vehicle
can slip
off the jack and roll over you or other
people. You and they could be badly injured.
Find
a level place to change your tire. To help
prevent the vehicle from moving:
1. Put the shift lever in PARK (P).
2. Set the parking brake firmly.
3. Turn off the engine.
To be even more certain the vehicle won’t move,
you can put blocks at the front and rear of the
tire farthest away from the one being changed.
That would be the tire on the other side of the
vehicle, at the opposite end.
Page 280 of 386

Downloaded from www.Manualslib.com manuals search engine I NOTICE:
I I
Spinning your wheels can destroy parts of your
vehicle as well as the tires. If you spin the wheels
too fast while shifting your transaxle back and
forth, you can destroy your transaxle.
Rocking Your Vehicle To Get It Out
First, turn your steering wheel left and right. That will
clear the area around your front wheels. You should turn
your traction control system off. (See “Traction Control
System” in the Index.) Then shift back and forth
between REVERSE
(R) and a forward gear, spinning the
wheels as little
as possible. Release the accelerator pedal
while you shift, and press lightly on the accelerator
pedal when the transaxle is
in gear. If that doesn’t get
If you do need to be towed out, see “Towing Your
Vehicle”
in the Index.
-.
For information about using tire chains on your vehicle, you out after a few tries, you may need to be towed out.
see “Tire Chains” in the Index.
Page 288 of 386

Downloaded from www.Manualslib.com manuals search engine Filling Your Tank The cap is behind a hinged door on the driver’s side of
your vehicle.
A CAUTION:
-
Gasoline vapor is highly flammable. It burns
violently, and that can cause very bad injuries.
Don’t smoke if you’re near gasoline or refueling
your vehicle. Keep sparks, flames and smoking
materials away from gasoline.
The fuel door release
button is located to the
left
of the steering wheel
next to the headlamp
knob
and on the Remote Keyless
Entry (RKE) transmitter. The button only
works in
PARK
(P) when the ignition
key is in any position.
Page 292 of 386

Downloaded from www.Manualslib.com manuals search engine When you open the hood, you'll see:
A. Battery
B. Coolant Fill Location
C. Power Steering Fluid D. Oil
Fill Location
E. Engine Oil Dipstick Location
E Brake Master Cylinder
G. Transaxle DipstickPill
H. Air Cleaner
I. Windshield Washer Fluid
Before closing the hood, be sure all filler caps are on properly. Then pull the hood down and close
it firmly.
Page 308 of 386

Downloaded from www.Manualslib.com manuals search engine Power Steering Fluid
The power steering fluid
reservoir is located next to the coolant surge tank
When to Check Power Steering Fluid
It is not necessary to regularly check power steering
fluid unless you suspect there is a leak in the system or
you hear an unusual noise.
A fluid loss in this system
could indicate a problem. Have the system inspected
and repaired.
How To Check Power Steering Fluid
When the engine compartment is cool, wipe the cap and
the top of the reservoir clean, then unscrew the cap and
wipe the dipstick with a clean rag. Replace the cap and
completely tighten it. Then remove the cap again and
look
at the fluid level on the dipstick.
The level should be at the
FULL COLD mark. If
necessary, add only enough fluid to bring the level up
to the mark.
What to Use
To determine what kind of fluid to use, see
“Recommended Fluids and Lubricants” in the
Maintenance Schedule booklet. Always use the proper
fluid. Failure to use the proper fluid can cause leaks and
damage hoses and seals.
Windshield Washer Fluid
What to Use
When you need windshield washer fluid, be sure to read
the manufacturer’s instructions before use. If you will be
operating your vehicle in an area where the temperature
may fall below freezing, use a fluid that has sufficient
protection against freezing.
6-25
Page 344 of 386

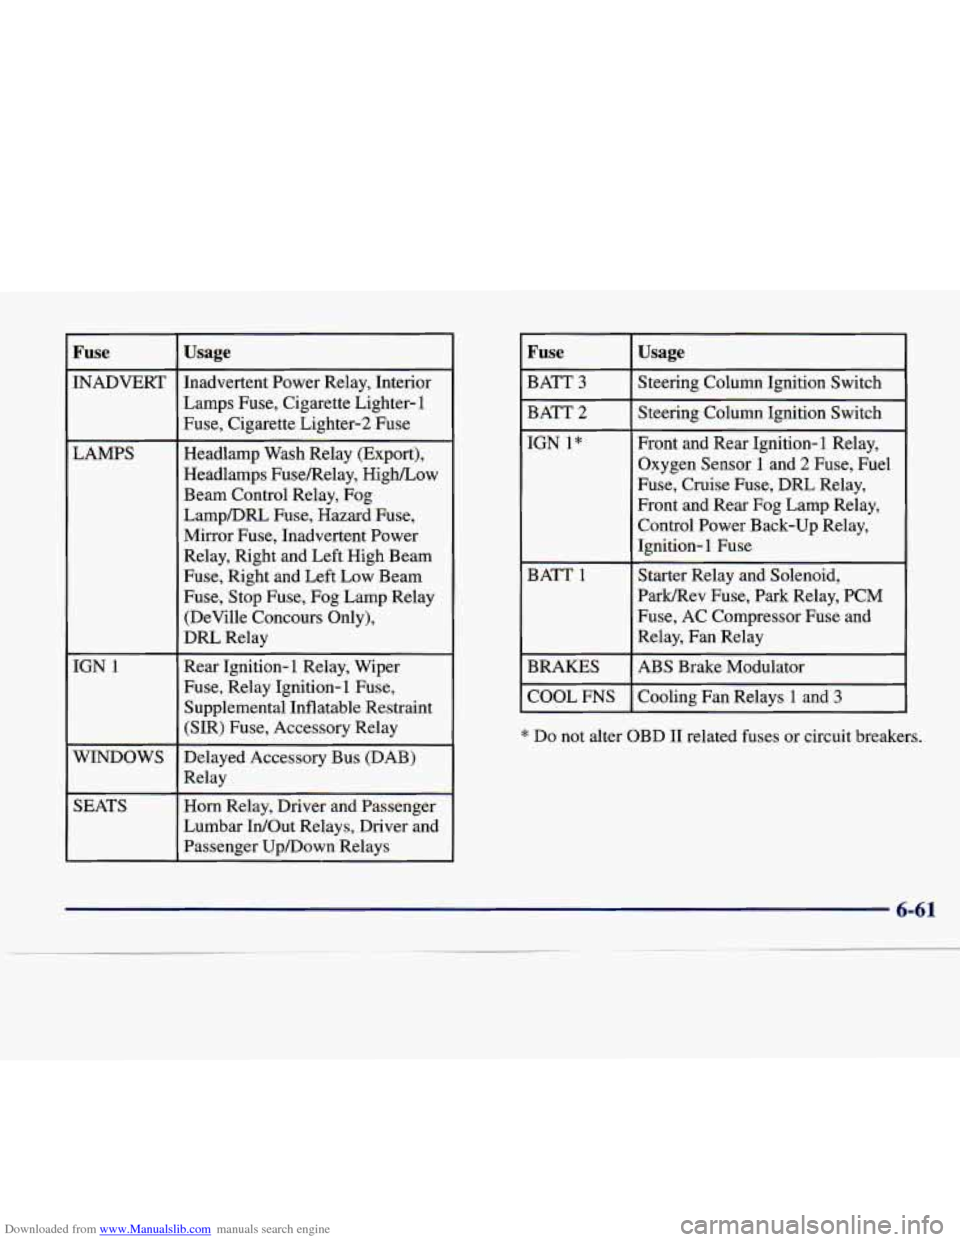
Downloaded from www.Manualslib.com manuals search engine Fuse
INADVERT LAMPS
IGN
1
WINDOWS
SEATS
Usage
Inadvertent Power Relay, Interior Lamps Fuse, Cigarette Lighter-
1
Fuse, Cigarette Lighter-2 Fuse
Headlamp Wash Relay (Export),
Headlamps Fusemelay, High/Low
Beam Control Relay, Fog
LampDRL Fuse, Hazard Fuse,
Mirror Fuse, Inadvertent Power
Relay, Right and Left High Beam
Fuse, Right and Left Low Beam
Fuse, Stop Fuse, Fog Lamp Relay
(DeVille Concours Only),
DRL Relay
Rear Ignition-
1 Relay, Wiper
Fuse, Relay Ignition-1 Fuse, Supplemental Inflatable Restraint
(SIR) Fuse, Accessory Relay
Delayed Accessory Bus (DAB)
Relay
Horn Relay, Driver and Passenger
Lumbar
In/Out Relays, Driver and
Passenger Upmown Relays
Fuse
Front and Rear Ignition- 1 Relay,
IGN l*
Steering Column Ignition Switch
BATT
2 Steering Column Ignition
Switch
BATT
3
Usage
Oxygen Sensor 1 and 2 Fuse, Fuel
Fuse, Cruise Fuse, DRL Relay,
Front and Rear Fog Lamp Relay,
Control Power Back-up Relay,
Ignition-
1 Fuse
BATT
1 Starter Relay and Solenoid,
ParMRev Fuse, Park Relay, PCM
Fuse, AC Compressor Fuse and
Relay, Fan Relay
BRAKES
* Do not alter OBD I1 related fuses or circuit breakers.
Cooling
Fan Relays
1 and 3 COOL FNS
ABS Brake Modulator
6-61
___~
Page 348 of 386

Downloaded from www.Manualslib.com manuals search engine r
ECS*
PCM
(IGN)*
DISTR* CRUISE
L
Usage
TCC and Exterior Travel Brake Switch, Reverse Relay,
Electrochromatic Mirror (in Header),
Park Relay, Brake Transaxle-Shift
Interlock (BTSI) Switch, BTSI, PZM
Transaxle Shift Solenoids, Mass
Airflow, Canister Purge, PCM,
Linear Exhaust Gas Recirculation
(EGR), Front Ignition-
1 Relay,
Torque Converter
Powertrain Control Module (PCM)
Electronic Ignition Control Module
Stepper Motor Cruise Control,
Power Steering Pressure Switch,
Low Refrigerant Pressure Cutoff Switch, Park Relay onverter
(CAT) Rear
* Do not alter OBD I1 related fuses or circuit breakers.
6-65
Page 350 of 386

Downloaded from www.Manualslib.com manuals search engine I Fuse I Usage
AMP (Bose Only) Right and
Left Hand Bose
(Optional) Relay, Right and
Left Front
Speakers (On Door), Right and
Left Rear Speakers
I PZM I PZM
RADIOPHONE Radio Receiver, Radio Interface
Module (RIM)(Bose Only),
Phone, DAB Relay, Trunk
Release Relay, Fuel Door Release
Relay, HighLow Beam Relay
I CLUSTER I Steering Wheel Controls, Cluster
ACC PZM, Electrochromic Mirror,
Rain Sensor (Optional),
Accessory Relay
Fuse Usage
HTD MIR Right and Left Outside
Heated Mirror
HTD SEAT
R Passenger Heated Seat Relay
(Optional)
(Optional)
HTD SEAT
L Driver Heated Seat Relay
PULL DOWN Trunk Pull-Down Motor
HDLP WASH
Headlamp Wash Relay (Export),
Headlamp Wash Motor
ANTENNA Power Mast Antenna
RSS CV-RTD Module (CV-RSS)
(DeVille Concours Only)
6-67
Page 369 of 386

Downloaded from www.Manualslib.com manuals search engine 1997 CADILLAC SERVICE PUBLICATIONS ORDERING INFORMATION
The following publications covering the operation and servicing of your vehicle can be purchased by filling out
the Service Publication Order Form
in this book and mailing it in with your check, money order,
or credit card information to Helm, incorporated (address below\
.)
CURRENT PUBLICATIONS FOR 1997 CADILLAC
SERVICE MANUALS
Service Manuals have the diagnosis and repair information
on engines, transmission, axle, suspension, brakes,
electrical, steering, body, etc. RETAIL SELL PRICE: $90.00
TRANSMISSION, TRANSAXLE, TRANSFER CASE
UNIT REPAIR MANUAL
This manual provides information on unit repair service procedures, adjustments and specifications for the 1997 GM transmissions, transaxles and transfer cases.
RETAIL SELL PRICE:
$40.00
SERVICE BULLETINS
Service Bulletins give technical service information needed
to knowledgeably service General Motors cars and trucks. Each bulletin contains instructions to assist
in the
diagnosis and service of your vehicle.
PLEASE COMPLETE THE ORDER FORM SHOWN ON
THE FOLLOWING PAGE AND MAIL TO:
Helm, Incorporated PO. Box 07130 Detroit, MI 48207 .
OWNER’S INFORMATION
Owner publications are written directly for Owners and intended to provide basic operational information about the
vehicle. The owner’s manual
will include the Maintenance
Schedule for all models.
In-Portfolio: Includes a Portfolio, Owner’s Manual and
Warranty Booklet. RETAIL SELL PRICE:
$1 5.00
Without Portfolio: Owner’s Manual only. RETAIL SELL PRICE: $1
0.00
CURRENT & PAST MODEL ORDER FORMS
Service Publications are available for current and past model GM vehicles. To request an order form, please
specify year and model name
of the vehicle.
OR ORDER TOLL FREE: 1-800-7824356
Monday-Friday 8:OO AM - 6:OO PM Eastern Time
For Credii Card Orders Only (VISA-MasterCard-Discover)
Page 372 of 386

Downloaded from www.Manualslib.com manuals search engine ........ ..
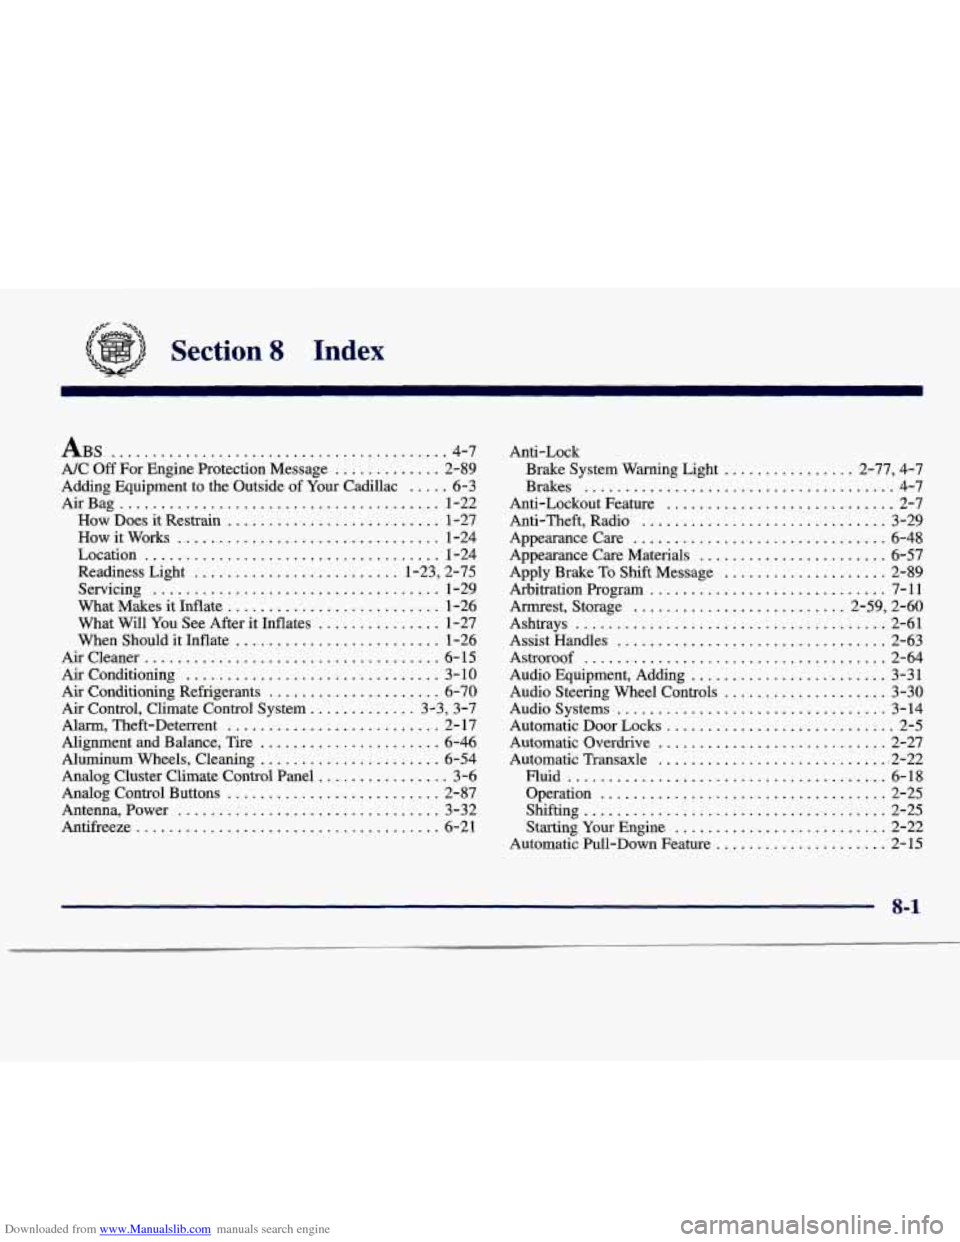
Section 8 Index
ABS ......................................... 4.7
NC
Off For Engine Protection Message ............. 2-89
Adding Equipment to the Outside of
Your Cadillac ..... 6-3
AirBag
....................................... 1-22
How Does it Restrain
.......................... 1-27
How it Works
................................ 1-24
Location
.................................... 1-24
Readiness Light
......................... 1.23. 2.75
Servicing
................................... 1-29
What Makes it Inflate
.......................... 1-26
What Will You See After it Inflates
............... 1-27
When Should it Inflate
......................... 1-26
Aircleaner
.................................... 6-15
Air Conditioning
............................... 3-10
Air Conditioning Refrigerants
..................... 6-70
Alarm. Theft-Deterrent .......................... 2- 17
Alignment and Balance. Tire
...................... 6-46
Aluminum Wheels. Cleaning
...................... 6-54
Analog Control Buttons
.......................... 2-87
Antenna. Power
................................ 3-32
Antifreeze
..................................... 6-21
Air Control. Climate Control System ............. 3.3. 3.7
Analog Cluster Climate Control Panel
................ 3-6 Anti-Lock
Brake System Warning Light
................ 2.77. 4.7
Brakes
...................................... 4-7
Anti-Lockout Feature
............................ 2-7
Anti.Theft. Radio
.............................. 3-29
Appearancecare
............................... 6-48
Appearance Care Materials
....................... 6-57
Apply Brake To Shift Message
.................... 2-89
Arbitration Program
............................. 7-11
Armrest. Storage
.......................... 2.59. 2.60
Ashtrays
...................................... 2-61
Assist Handles
................................. 2-63
Astroroof
..................................... 2-64
Audio Equipment. Adding
........................ 3-31
Audio Steering Wheel Controls
.................... 3-30
Audio Systems
................................. 3-14
Automatic Door Locks
............................ 2-5
Automatic Overdrive
............................ 2-27
Automatic Transaxle ............................. 2-22
Fluid
....................................... 6-18
Operation
................................... 2-25
Shifting
..................................... 2-25
Starting Your Engine
.......................... 2-22
Automatic Pull-Down Feature
..................... 2-15
8-1