dead battery CADILLAC DEVILLE 2003 8.G Owners Manual
[x] Cancel search | Manufacturer: CADILLAC, Model Year: 2003, Model line: DEVILLE, Model: CADILLAC DEVILLE 2003 8.GPages: 423, PDF Size: 2.91 MB
Page 98 of 423

Here are examples for using THIRD (3) instead of
AUTOMATIC OVERDRIVE (
X).
·When driving on hilly, winding roads.
·When towing a trailer, so there is less shifting
between gears.
·When going down a steep hill.
SECOND (2):This position gives you more power. You
can use SECOND (2) on hills. It can help control your
speed as you go down steep mountain roads, but then
you would also want to use your brakes off and on.
Notice:Don't shift into SECOND (2) unless you are
going slower than 65 mph (105 km/h), or you can
damage your engine.
FIRST (1):This position gives you even more power
than SECOND (2). You can use it on very steep hills, or
in deep snow or mud. (If the shift lever is put in FIRST
(1), the transaxle won't shift into ®rst gear until the
vehicle is going slowly enough.)
Notice:If your front wheels won't turn, don't try to
drive. This might happen if you were stuck in
very deep sand or mud or were up against a solid
object. You could damage your transaxle. Also,
if you stop when going uphill, don't hold your
vehicle there with only the accelerator pedal. This
could overheat and damage the transaxle. Use your
brakes to hold your vehicle in position on a hill.
Performance Shifting (DTS Only)
When your vehicle detects a change in driving
conditions, it will automatically initiate the appropriate
performance shift mode. When this occurs, the
gear display on the instrument panel cluster will change
to indicate that the transaxle has shifted to a different
gear. For example, the gear display on the cluster may
indicate 3 or 2 even though the gearshift is still in
AUTOMATIC OVERDRIVE (
X). Once the performance
shift mode ends, the gear display on the instrument
panel cluster will return to normal.
Shift Lock Release
This vehicle is equipped with an electric shift lock
release system. The shift lock release is designed to do
the following:
·Prevent the ignition key from being removed unless
the shift lever is in PARK (P), and
·prevent movement of the console shift lever
(DTS only) out of PARK (P) unless the ignition is in
a position other than OFF. The shift lock release
is always functional except in the case of a
dead battery or low voltage (less than 9 V) battery.
The following procedure allows the ignition to be turned
to OFF and for ignition key removal in case of a
dead battery or low voltage battery for vehicles equipped
with a column shift lever.
2-30
Page 99 of 423

1. Verify that the shift lever is in PARK (P).
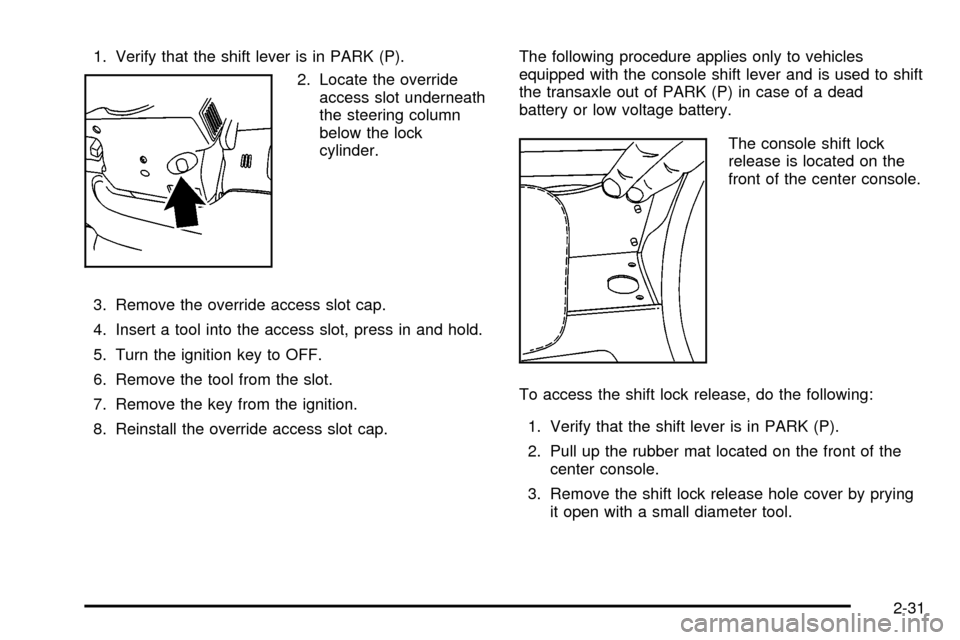
2. Locate the override
access slot underneath
the steering column
below the lock
cylinder.
3. Remove the override access slot cap.
4. Insert a tool into the access slot, press in and hold.
5. Turn the ignition key to OFF.
6. Remove the tool from the slot.
7. Remove the key from the ignition.
8. Reinstall the override access slot cap.The following procedure applies only to vehicles
equipped with the console shift lever and is used to shift
the transaxle out of PARK (P) in case of a dead
battery or low voltage battery.
The console shift lock
release is located on the
front of the center console.
To access the shift lock release, do the following:
1. Verify that the shift lever is in PARK (P).
2. Pull up the rubber mat located on the front of the
center console.
3. Remove the shift lock release hole cover by prying
it open with a small diameter tool.
2-31
Page 260 of 423

{CAUTION:
Snow can trap exhaust gases under your
vehicle. This can cause deadly CO (carbon
monoxide) gas to get inside. CO could
overcome you and kill you. You can't see it or
smell it, so you might not know it is in your
vehicle. Clear away snow from around the
base of your vehicle, especially any that is
blocking your exhaust pipe. And check around
again from time to time to be sure snow
doesn't collect there.
Open a window just a little on the side of the
vehicle that's away from the wind. This will
help keep CO out.Run your engine only as long as you must. This saves
fuel. When you run the engine, make it go a little
faster than just idle. That is, push the accelerator
slightly. This uses less fuel for the heat that you get and
it keeps the battery charged. You will need a
well-charged battery to restart the vehicle, and possibly
for signaling later on with your headlamps. Let the
heater run for a while.
Then, shut the engine off and close the window almost
all the way to preserve the heat. Start the engine
again and repeat this only when you feel really
uncomfortable from the cold. But do it as little as
possible. Preserve the fuel as long as you can. To help
keep warm, you can get out of the vehicle and do
some fairly vigorous exercises every half hour or so until
help comes.
4-29
Page 317 of 423

5. Check that the jumper cables don't have loose or
missing insulation. If they do, you could get a
shock. The vehicles could also be damaged, too.
Before you connect the cables, here are some basic
things you should know. Positive (+) will go to
positive (+) or to a remote positive (+) terminal if the
vehicle has one. Negative (-) will go to a heavy,
unpainted metal engine part or to a remote
negative (-) terminal if the vehicle has one.
Don't connect positive (+) to the negative (-)oryou
will get a short that would damage the battery
and maybe other parts, too. And don't connect the
negative (-) cable to negative (-) terminal on
the dead battery because this can cause sparks.6. Connect the red
positive (+) cable to the
remote positive (+)
terminal location on the
vehicle with the dead
battery. Use a
remote positive (+)
terminal if the vehicle
has one.
7. Don't let the other end
touch metal. Connect it
to the positive (+)
terminal location of the
vehicle with the
good battery. Use a
remote positive (+)
terminal if the vehicle
has one.
5-46
Page 318 of 423

8. Now connect the black
negative (-) cable to
the negative (-)
terminal location of the
vehicle with the
good battery. Use a
remote negative (-)
terminal if the vehicle
has one.
Don't let the other end of the cable touch anything
until the next step. The other end of the
negative (-) cable doesn't go to the dead battery. It
goes to a heavy, unpainted metal engine part or
to a remote negative (-) terminal on the vehicle with
the dead battery.9. Connect the other end
of the negative (-)
cable to the
negative (-) terminal
location on the vehicle
with the dead battery.
Your vehicle has a
remote negative (-)
terminal marked
GND (-).
10. Now start the vehicle with the good battery and run
the engine for a while.
11. Try to start the vehicle with the dead battery. If it
won't start after a few tries, it probably needs
service.
5-47
Page 319 of 423

Notice:Damage to your vehicle may result from
electrical shorting if jumper cables are removed
incorrectly. To prevent electrical shorting, take care
that the cables don't touch each other or any
other metal. The repairs wouldn't be covered by
your warranty.
A. Dead Battery or Remote Positive (+) Terminal
B. Good Battery or Remote Positive (+) and Remote
Negative (-) Terminals
C. Heavy, Unpainted Metal Engine Part or Remote
Negative (-) Terminal (GND)To disconnect the jumper cables from both vehicles, do
the following:
1. Disconnect the black negative (-) cable from the
vehicle that had the dead battery.
2. Disconnect the black negative (-) cable from the
vehicle with the good battery.
3. Disconnect the red positive (+) cable from the
vehicle with the good battery.
4. Disconnect the red positive (+) cable from the other
vehicle.
5. Return the remote positive (+) terminal cover to its
original position.
Jumper Cable Removal
5-48