odometer CADILLAC DEVILLE 2005 8.G Owners Manual
[x] Cancel search | Manufacturer: CADILLAC, Model Year: 2005, Model line: DEVILLE, Model: CADILLAC DEVILLE 2005 8.GPages: 420, PDF Size: 2.63 MB
Page 121 of 420

Instrument Panel Overview...............................3-4
Hazard Warning Flashers................................3-6
Other Warning Devices...................................3-6
Horn.............................................................3-6
Tilt Wheel.....................................................3-6
Power Tilt Wheel and Telescopic Steering
Column......................................................3-7
Heated Steering Wheel...................................3-7
Turn Signal/Multifunction Lever.........................3-8
Turn and Lane-Change Signals........................3-8
Headlamp High/Low-Beam Changer..................3-9
Flash-to-Pass.................................................3-9
Windshield Wipers..........................................3-9
Rainsense™ II Wipers...................................3-10
Windshield Washer.......................................3-11
Cruise Control..............................................3-12
Exterior Lamps.............................................3-15
Wiper Activated Headlamps............................3-16
Headlamps on Reminder................................3-16
Daytime Running Lamps (DRL).......................3-16
Fog Lamps..................................................3-18
Cornering Lamps..........................................3-18
Twilight Sentinel
®..........................................3-18
Exterior Lighting Battery Saver........................3-20
Instrument Panel Brightness...........................3-20
Courtesy Lamps...........................................3-21
Entry Lighting...............................................3-21Parade Dimming...........................................3-21
Reading Lamps............................................3-21
Battery Load Management.............................3-22
Inadvertent Power Battery Saver.....................3-22
Night Vision System......................................3-22
Ultrasonic Parking Assist................................3-26
Accessory Power Outlets...............................3-28
Ashtrays and Cigarette Lighter........................3-29
Climate Controls............................................3-30
Dual Climate Control System..........................3-30
Outlet Adjustment.........................................3-34
Rear Climate Control System.........................3-35
Passenger Compartment Air Filter...................3-36
Steering Wheel Climate Controls.....................3-38
Climate Controls Personalization.....................3-39
Warning Lights, Gages, and Indicators............3-40
Instrument Panel Cluster................................3-41
Speedometer and Odometer...........................3-43
Trip Odometer..............................................3-43
Tachometer (Analog Cluster Only)...................3-44
Engine Speed Limiter....................................3-44
Safety Belt Reminder Light.............................3-45
Airbag Readiness Light..................................3-45
Charging System Light..................................3-46
Brake System Warning and Parking Brake
Indicator Light...........................................3-47
Section 3 Instrument Panel
3-1
Page 163 of 420

Speedometer and Odometer
The speedometer lets you see your speed in both
miles per hour (mph) and kilometers per hour (km/h).
The odometer shows how far your vehicle has
been driven, in either miles (used in the United States)
or kilometers (used in Canada).
You may wonder what happens if a vehicle has to have
a new odometer installed. The new one may read
the correct mileage. This is because your vehicle’s
computer has stored the mileage in memory.
Trip Odometer
The trip odometer can record the number of miles or
kilometers traveled for up to two trips.
The trip odometer button is
located to the left of the
steering wheel on the
instrument panel.The two trip modes are indicated by Trip A and Trip B.
In order to change from one mode to the other,
press the A/B portion of the TRIP button.
By pressing the bottom of this button, you can tell how
many miles have been recorded on either Trip A or
Trip B since you last set the odometer back to zero.
Press the RESET part of the button until zeros appear
to reset each trip mode.
If your vehicle is �rst sold in the United States,
the trip odometer will return to zero after 999.9 miles
(1 609 km). If your vehicle is �rst sold in Canada, the trip
odometer will return to zero after 1,242 miles (1 999 km).
The RESET TRIP A/B button only resets the trip
mode (A or B) that is being displayed. Each trip mode
must be reset individually.
Display Mode
On vehicles equipped with the analog cluster, this
button is located between the trip odometer and
ENG/MET button to the left of the steering wheel on the
instrument panel. Press DSPL MODE to turn the
backlighting and the digital speed image on and off.
On vehicles equipped with the digital cluster, press
DSPL MODE to turn the digital displays other than the
speedometer and gear display on and off.
3-43
Page 164 of 420

English/Metric Button
By pressing this button
located to the left of the
steering wheel on the
instrument panel, you can
go back and forth from
English (miles) to
metric (kilometers).
Other readings such as temperature, fuel and trip
odometer also go back and forth between English
and metric.
Tachometer (Analog Cluster Only)
This gage indicates
the engine speed in
revolutions per
minute (rpm).
Engine Speed Limiter
This feature prevents the engine from operating at too
many revolutions per minute (rpm). When the engine’s
rpm are critically high, the fuel supply to the engine
will shut off. When the engine speed slows, the
fuel supply will come on again. This helps prevent
damage to the engine.
3-44
Page 177 of 420

Driver Information Center (DIC)
This display gives you the status of many of your
vehicle’s systems. The DIC is also used to display driver
personalization features and warning/status messages.
All messages will appear in the DIC display, located
at the bottom of the instrument panel cluster.
DIC Controls and Displays
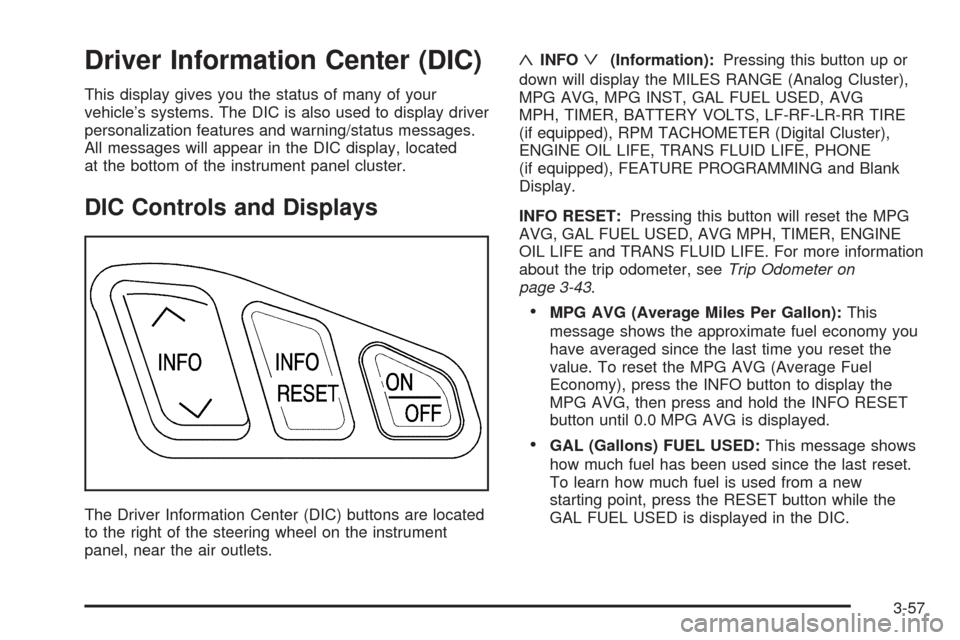
The Driver Information Center (DIC) buttons are located
to the right of the steering wheel on the instrument
panel, near the air outlets.
«INFOª(Information):Pressing this button up or
down will display the MILES RANGE (Analog Cluster),
MPG AVG, MPG INST, GAL FUEL USED, AVG
MPH, TIMER, BATTERY VOLTS, LF-RF-LR-RR TIRE
(if equipped), RPM TACHOMETER (Digital Cluster),
ENGINE OIL LIFE, TRANS FLUID LIFE, PHONE
(if equipped), FEATURE PROGRAMMING and Blank
Display.
INFO RESET:Pressing this button will reset the MPG
AVG, GAL FUEL USED, AVG MPH, TIMER, ENGINE
OIL LIFE and TRANS FLUID LIFE. For more information
about the trip odometer, seeTrip Odometer on
page 3-43.
MPG AVG (Average Miles Per Gallon):This
message shows the approximate fuel economy you
have averaged since the last time you reset the
value. To reset the MPG AVG (Average Fuel
Economy), press the INFO button to display the
MPG AVG, then press and hold the INFO RESET
button until 0.0 MPG AVG is displayed.
GAL (Gallons) FUEL USED:This message shows
how much fuel has been used since the last reset.
To learn how much fuel is used from a new
starting point, press the RESET button while the
GAL FUEL USED is displayed in the DIC.
3-57
Page 346 of 420

Each new wheel should have the same load-carrying
capacity, diameter, width, offset and be mounted
the same way as the one it replaces.
If you need to replace any of your wheels, wheel bolts
or wheel nuts, replace them only with new GM
original equipment parts. This way, you will be sure to
have the right wheel, wheel bolts and wheel nuts
for your vehicle.
{CAUTION:
Using the wrong replacement wheels, wheel
bolts or wheel nuts on your vehicle can be
dangerous. It could affect the braking and
handling of your vehicle, make your tires lose
air and make you lose control. You could have
a collision in which you or others could be
injured. Always use the correct wheel, wheel
bolts and wheel nuts for replacement.Notice:The wrong wheel can also cause problems
with bearing life, brake cooling, speedometer or
odometer calibration, headlamp aim, bumper height,
vehicle ground clearance and tire or tire chain
clearance to the body and chassis.
If your vehicle is a professional model, the wheels have
a unique offset and bolt hole diameter. Each of the
wheels on the professional vehicle have eight wheels
nuts. The wheels on the non-professional vehicle
have �ve wheel nuts. SeeChanging a Flat Tire on
page 5-77for more information.Used Replacement Wheels
{CAUTION:
Putting a used wheel on your vehicle is
dangerous. You can’t know how it’s been used
or how far it’s been driven. It could fail
suddenly and cause a crash. If you have to
replace a wheel, use a new GM original
equipment wheel.
5-74
Page 392 of 420

Maintenance Record
After the scheduled services are performed, record the date, odometer reading, who performed the service and the
type of services performed in the boxes provided. SeeMaintenance Requirements on page 6-2. Any additional
information fromOwner Checks and Services on page 6-9can be added on the following record pages. You should
retain all maintenance receipts.
Maintenance Record
DateOdometer
ReadingServiced ByMaintenanceIor
MaintenanceIIServices Performed
6-14
Page 393 of 420

Maintenance Record (cont’d)
DateOdometer
ReadingServiced ByMaintenanceIor
MaintenanceIIServices Performed
6-15
Page 394 of 420

Maintenance Record (cont’d)
DateOdometer
ReadingServiced ByMaintenanceIor
MaintenanceIIServices Performed
6-16
Page 415 of 420

N
Navigation/Radio System, see Navigation
Manual......................................................3-99
New Vehicle Break-In......................................2-24
Night Vision System........................................3-22
Normal Maintenance Replacement Parts............6-13
O
Odometer......................................................3-43
Odometer, Trip...............................................3-43
Off-Road Recovery..........................................4-12
Oil
Engine.......................................................5-14
Life Indicator...............................................3-79
Pressure Light.............................................3-53
Oil, Engine Oil Life System..............................5-17
Older Children, Restraints................................1-28
Online Owner Center........................................ 7-3
OnStar
®System, see OnStar®Manual...............2-42
Other Warning Devices...................................... 3-6
Outlet Adjustment............................................3-34
Outside
Automatic Dimming Mirror.............................2-41
Convex Mirror.............................................2-41
Curb View Assist Mirror................................2-41
Heated Mirrors............................................2-41
Power Mirrors.............................................2-40Overheated Engine Protection
Operating Mode..........................................5-29
Owner Checks and Services.............................. 6-9
Owners, Canadian............................................... ii
P
Parade Dimming.............................................3-21
Park Aid........................................................3-26
Park (P)
Shifting Into................................................2-32
Shifting Out of............................................2-34
Parking
Assist........................................................3-26
Brake........................................................2-31
Brake Indicator Light....................................3-47
Over Things That Burn.................................2-35
Passenger Compartment Air Filter.....................3-36
Passing.........................................................4-13
PASS-Key
®III ................................................2-21
PASS-Key®III Operation..................................2-22
Performance Shifting.......................................2-31
Personalization, Climate Controls......................3-39
Power
Accessory Outlets........................................3-28
Door Locks.................................................2-10
Electrical System.........................................5-97
Inadvertent Battery Saver.............................3-22
9
Page 419 of 420

Tires (cont.)
Chains.......................................................5-75
Changing a Flat Tire....................................5-77
Cleaning....................................................5-94
Compact Spare Tire.....................................5-86
If a Tire Goes Flat.......................................5-76
In�ation -- Tire Pressure...............................5-65
Inspection and Rotation................................5-69
Installing the Spare Tire................................5-80
Pressure Monitor Operation...........................5-68
Removing the Flat Tire.................................5-80
Removing the Spare Tire and Tools...............5-78
Storing a Flat or Spare Tire and Tools............5-85
Tire Sidewall Labelling..................................5-58
Tire Terminology and De�nitions....................5-62
Uniform Tire Quality Grading.........................5-72
Wheel Alignment and Tire Balance.................5-73
Wheel Replacement.....................................5-73
When It Is Time for New Tires......................5-70
Top Strap......................................................1-38
Top Strap Anchor Location...............................1-39
Towing
Recreational Vehicle.....................................4-35
Towing a Trailer..........................................4-37
Your Vehicle...............................................4-35
Traction
Continuous Variable Road Sensing
Suspension (CVRSS)................................4-10
Control System (TCS).................................... 4-8Traction (cont.)
Control System Warning Light.......................3-48
Transaxle
Fluid, Automatic...........................................5-21
Transaxle Operation, Automatic.........................2-28
Trip Computer
Oil Life Indicator..........................................3-79
Trip Odometer................................................3-43
Trunk............................................................2-12
Turn and Lane-Change Signals.......................... 3-8
Turn Signal/Multifunction Lever........................... 3-8
Twilight Sentinel
®............................................3-18
U
Ultrasonic Rear Parking Assist (URPA)...............3-26
Umbrella Holder..............................................2-51
Understanding Radio Reception.......................3-104
Uniform Tire Quality Grading............................5-72
V
Valet Lockout Switch.......................................2-21
Vehicle
Control........................................................ 4-5
Damage Warnings........................................... iv
Loading......................................................4-30
Symbols......................................................... iv
13