audio CADILLAC ELR 2014 Owner's Manual
[x] Cancel search | Manufacturer: CADILLAC, Model Year: 2014, Model line: ELR, Model: CADILLAC ELR 2014Pages: 408, PDF Size: 4.47 MB
Page 4 of 408
Black plate (4,1)Cadillac ELR Owner Manual (GMNA-Localizing-U.S./Canada-6081525) -
2014 - Second Edition - 1/22/14
iv Introduction
{Warning
Text marked{Warning provides
information on risk of accident or
injury. Disregarding this
information may lead to injury.
{Caution
Text marked{Caution provides
information that may indicate a
hazard that could result in injury
or death. It could also result in
possible damage to the vehicle.
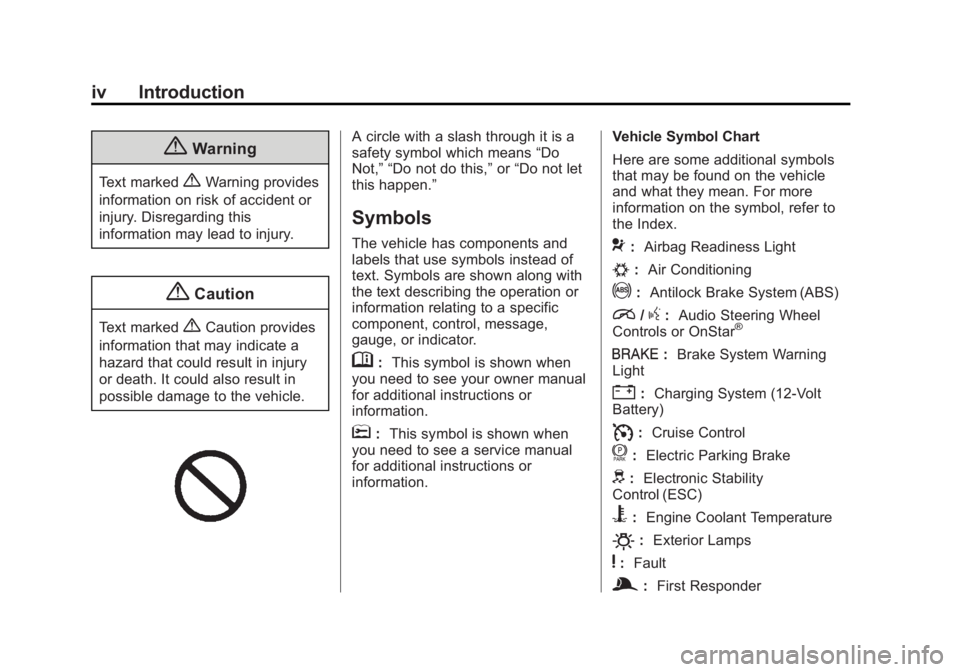
A circle with a slash through it is a
safety symbol which means “Do
Not,” “Do not do this,” or“Do not let
this happen.”
Symbols
The vehicle has components and
labels that use symbols instead of
text. Symbols are shown along with
the text describing the operation or
information relating to a specific
component, control, message,
gauge, or indicator.
M: This symbol is shown when
you need to see your owner manual
for additional instructions or
information.
*: This symbol is shown when
you need to see a service manual
for additional instructions or
information. Vehicle Symbol Chart
Here are some additional symbols
that may be found on the vehicle
and what they mean. For more
information on the symbol, refer to
the Index.
9:
Airbag Readiness Light
#:Air Conditioning
!:Antilock Brake System (ABS)
i/g:Audio Steering Wheel
Controls or OnStar®
I: Brake System Warning
Light
": Charging System (12-Volt
Battery)
I: Cruise Control
f: Electric Parking Brake
d:Electronic Stability
Control (ESC)
B: Engine Coolant Temperature
O:Exterior Lamps
y:Fault
g:First Responder
Page 22 of 408

Black plate (16,1)Cadillac ELR Owner Manual (GMNA-Localizing-U.S./Canada-6081525) -
2014 - Second Edition - 1/22/14
1-16 In Brief
J:Press to turn the system on
and off. A white cruise control
indicator appears in the instrument
cluster when cruise is turned on.
+RES: Press the control up briefly
to make the vehicle resume to a
previously set speed or press and
hold to accelerate. If cruise control
is already active, use to increase
vehicle speed. To increase speed by
1 km/h or 1 mph, press +RES up to
the first detent. To increase speed to
the next 5 km/h or 5 mph mark on
the speedometer, press +RES up to
the second detent.
SET−: Press the control down
briefly to set the speed and activate
cruise control. If cruise control is
already active, use to decrease
vehicle speed. To decrease speed
by 1 km/h or 1 mph, press SET−
down to the first detent. To decrease
speed to the next 5 km/h or 5 mph
mark on the speedometer, press
SET− down to the second detent.*:Press to disengage cruise
control without erasing the set
speed from memory.
See Cruise Control on page 9-36 or
Adaptive Cruise Control on
page 9-39 (if equipped).
Infotainment System
See the infotainment manual for
information on the radio, audio
players, phone, navigation system,
and voice or speech recognition.
It also includes information on
settings.
Driver Information
Center (DIC)
The DIC display is in the instrument
cluster. It shows the status of many
vehicle systems.
yorz:Move SEL up or down to
go to the previous or next selection.
SorT: Press to move between
the interactive display zones in the
cluster. Press
Sto go back to the
previous menu.
SEL: Press to open a menu or
select a menu item. Press and hold
to reset values on certain screens.
See Driver Information Center (DIC)
on page 5-38.
Page 119 of 408

Black plate (11,1)Cadillac ELR Owner Manual (GMNA-Localizing-U.S./Canada-6081525) -
2014 - Second Edition - 1/22/14
Instruments and Controls 5-11
the selection. Press SEL to
select the desired cluster
configuration.
4. Exit the Display Layout menu by pressing
S.
Cluster Menu
There is an interactive display area
in the center of the instrument
cluster.
Use the right steering wheel control
to open and scroll through the
different items and displays. Press
Sto access the cluster
applications. Use
yorzto scroll
through the list of applications.
.Info. This is where you can view
the Driver Information Center
(DIC) displays. See Driver
Information Center (DIC) on
page 5-38.
.Audio
.Phone
.Navigation
.Display Layout. See
“Reconfigurable Instrument
Cluster” earlier in this section.
.Settings
Audio
While the Audio application page is
displayed, press
Tto enter the
Audio menu. In the Audio menu,
search for music or change the
audio source. Phone
While the Phone application page is
displayed, press
Tto enter the
Phone menu. In the Phone menu,
if there is no active phone call, view
recent calls or scroll through
contacts. If there is an active call,
mute the phone or switch to handset
operation.
Navigation
If there is no active route, a
compass will be displayed. If there
is an active route, press
Tto end
route guidance or turn the voice
prompts on or off.
Settings
Press
Tto enter the Settings menu.
Use
yorzto scroll through the
items in the Settings menu
Units: Press SEL while Units is
highlighted to enter the Unit menu.
Choose US, Metric, or Imperial units
by pressing SEL while the desired
Page 159 of 408
Black plate (51,1)Cadillac ELR Owner Manual (GMNA-Localizing-U.S./Canada-6081525) -
2014 - Second Edition - 1/22/14
Instruments and Controls 5-51
You can receive more than one tire
pressure message at a time. The
DIC also shows the tire pressure
values. SeeDriver Information
Center (DIC) on page 5-38.
Vehicle Reminder
Messages
ICE POSSIBLE DRIVE
WITH CARE
This message displays when ice
conditions are possible.
Vehicle Speed Messages
SELECTED SPEED LIMIT
EXCEEDED
This message is displayed when the
vehicle speed is greater than the set
speed. See "Speed Warning" under
Instrument Cluster on page 5-7.
Washer Fluid Messages
WASHER FLUID LOW ADD
FLUID
This message may display when the
washer fluid level is low. See
Washer Fluid on page 10-19.
Window Messages
OPEN, THEN CLOSE DRIVER/
PASSENGER WINDOW
This message is displayed when the
window needs to be reprogrammed.
If the vehicle's battery has been
recharged or disconnected, you will
need to program each front window
for the express-up feature to work.
See Power Windows on page 2-19.
Vehicle
Personalization
Use the audio system controls to
access the personalization menus
for customizing vehicle features.
The following are all possible
personalization features. Depending
on the vehicle, some may not be
available.
Infotainment System Audio
System Controls
To access the personalization
menus:
1. Press SETTINGS on the Home
Page on the infotainment system
display.
2. Press the desired feature to display a list of available
options.
3. Press to select the desired option setting.
4. Press the
[Back screen button
to return to the previous menu.
Page 160 of 408
Black plate (52,1)Cadillac ELR Owner Manual (GMNA-Localizing-U.S./Canada-6081525) -
2014 - Second Edition - 1/22/14
5-52 Instruments and Controls
Personalization Menus
The following list of menu items may
be available:
.Time and Date
.Language [Language]
.Valet Mode
.Radio
.Vehicle
.Bluetooth
.Voice
.Display
.Rear Camera
.Return to Factory Settings
.Software Information
Each menu is detailed in the
following information.
Time and Date
Manually set the time and date. See
Clock on page 5-5.
Language [Language]
Select Language, then select from
the available language(s).
Valet Mode
This will lock the infotainment
system, the infotainment controls,
the storage area behind the radio,
glove box and trunk.
To turn Valet Mode on and off, enter
a four-digit code on the keypad.
Press Enter to go to the
confirmation screen. Re-enter the
four-digit code. Press LOCK to lock
the system. Enter the four-digit code
to unlock the system. Press the
Back screen button to go back to
the previous menu.
Radio
Press to display the Radio menu
and the following may display:
.Manage Favorites
.Number of Favorites Shown
.Auto Volume
.Maximum Startup Volume
.Audio Cue Volume
Manage Favorites
This allows favorites to be edited.
See “Manage Favorites” in
“Settings” under“Radio” in the
infotainment manual.
Number of Favorites Shown
Press to set the number of favorites
to display.
Select the desired number or select
Auto and the infotainment system
will automatically adjust the number
of favorites shown.
Auto Volume
This feature adjusts the volume
based on vehicle speed and
ambient noise.
Select Off, Low, Medium-Low,
Medium, Medium-High, or High.
Maximum Startup Volume
This feature sets the maximum
startup volume. If the vehicle is
started and the volume is greater
than this level, the volume is
Page 161 of 408

Black plate (53,1)Cadillac ELR Owner Manual (GMNA-Localizing-U.S./Canada-6081525) -
2014 - Second Edition - 1/22/14
Instruments and Controls 5-53
adjusted to this level. To set the
maximum startup volume, press +
or−to increase or decrease.
Audio Cue Volume
This feature sets the volume of
audio files played at system startup
and shutdown.
Select On, then press + or −to
increase or decrease the volume.
Vehicle
Select and the following may
display:
.Climate and Air Quality
.Collision/Detection Systems
.Comfort and Convenience
.Energy
.Lighting
.Power Door Locks
.Remote Lock, Unlock, Start Climate and Air Quality
Select and the following may
display:
.Auto Fan Max Speed
.Auto Heated Seats
.Auto Defog
.Engine Assisted Heating
Plugged-In
Auto Fan Max Speed
This feature will set the maximum
auto fan speed.
Select Low, Medium, or High.
Auto Heated Seats
When enabled, the auto heated seat
buttons on the touch screen will be
highlighted. This feature will
automatically activate heated seats
at the level required by the interior
temperature. The auto heated seats
can be turned off by using the
heated seat buttons on the center
stack.
Select Off or On. Auto Defog
When set to On, the front defog will
automatically come on when the
vehicle is started.
Select Off or On.
Engine Assisted Heating
Plugged-In
During remote start, this feature
turns on or off the ability for the
engine to run to help heat the
vehicle when it is plugged in.
A change in setting will not take
affect until after the vehicle is first
powered down.
Select Off or On.
Collision/Detection Systems
Select and the following may
display:
.Alert Type
.Auto Collision Preparation
.Go Notifier
.Side Blind Zone Alert
.Rear Cross Traffic Alert
Page 165 of 408
Black plate (57,1)Cadillac ELR Owner Manual (GMNA-Localizing-U.S./Canada-6081525) -
2014 - Second Edition - 1/22/14
Instruments and Controls 5-57
Passive Door Unlock
This allows the selection of what
doors will unlock when using the
door handle touch pad button on the
driver door to unlock the vehicle.
Select All Doors or Driver Door.
Passive Door Lock
This allows passive locking to be
turned on or off and selects
feedback. See“Passive Locking” in
Remote Keyless Entry (RKE)
System Operation on page 2-2.
Select Off, On with Horn
Chirp, or On.
Remote Left in Vehicle Alert
This feature sounds an alert when
the RKE transmitter is left in the
vehicle.
Select Off or On.Bluetooth
Select and the following may
display:
.Pair New Device
.Device Management
.Ringtones
.Voice Mail Numbers
Pair New Device
Select to pair a new device. See
“Pairing” in“Infotainment Controls”
under “Bluetooth” in the infotainment
manual.
Device Management
Select to connect to a different
phone source, disconnect a phone,
or delete a phone.
Ringtones
Press to change the ring tone for
the specific phone. The phone does
not need to be connected to change
the ring tone. Voice Mail Numbers
This feature displays the voice mail
number for all connected phones.
To change the voice mail number,
select EDIT or pressing the EDIT
button and typing in a new number,
then select SAVE or press the
SAVE button.Voice
Select and the following may
display:
.Confidence Threshold
.Prompt Length
.Audio Feedback Speed
Confidence Threshold
This feature allows the adjustment
of the sensitivity of the speech
recognition system.
Select Confirm More or
Confirm Less.
Page 166 of 408

Black plate (58,1)Cadillac ELR Owner Manual (GMNA-Localizing-U.S./Canada-6081525) -
2014 - Second Edition - 1/22/14
5-58 Instruments and Controls
Prompt Length
This feature adjusts the voice
prompt length.
Select Short or Long.
Audio Feedback Speed
This feature adjusts the audio
feedback speed.
Select Slow, Medium, or Fast.
Display
Select and the following may
display:
.Mode
.Proximity Sensing
.Calibrate Touchscreen
.Turn Display Off
Mode
Select to change the display screen
for day or night driving.
Select Auto, Day, or Night. Proximity Sensing
When on, certain screen buttons
and features will become visible
when a hand approaches the
screen.
Select Off, On, or On - Map Only.
Calibrate Touchscreen
Select to calibrate the touchscreen,
then follow the prompts.
Turn Display Off
Select to turn the display off. Press
anywhere on the display area or any
faceplate button to turn the
display on.
Rear Camera
Select and the following may be
display:
.Guidance Lines
.Rear Cross Traffic Alert
.Rear Park Assist Symbols
Guidance Lines
Select to turn Off or On. See
Assistance Systems for Parking or
Backing on page 9-47.
Rear Cross Traffic Alert
This allows the Rear Cross Traffic
Alert to be turned on or off.
Select to turn Off or On. See
Assistance Systems for Parking or
Backing on page 9-47.
Rear Park Assist Symbols
Select to turn Off or On. See
Assistance Systems for Parking or
Backing on page 9-47.
Return to Factory Settings
Select and the following may
display:
.Restore Vehicle Settings
.Clear All Private Data
.Restore Radio Settings
Page 179 of 408
Black plate (1,1)Cadillac ELR Owner Manual (GMNA-Localizing-U.S./Canada-6081525) -
2014 - Second Edition - 1/22/14
Infotainment System 7-1
Infotainment
System
Introduction
Infotainment . . . . . . . . . . . . . . . . . . . 7-1
Introduction
Infotainment
See the infotainment manual for
information on the radio, audio
players, phone, navigation system,
and voice or speech recognition.
It also includes information on
settings.
Page 205 of 408

Black plate (17,1)Cadillac ELR Owner Manual (GMNA-Localizing-U.S./Canada-6081525) -
2014 - Second Edition - 1/22/14
Driving and Operating 9-17
ON/RUN power mode. When the
vehicle is turned off, the POWER
O
button light will turn off.
The Remote Keyless Entry (RKE)
transmitter must be in the vehicle for
the system to operate. If the vehicle
will not start, place the RKE
transmitter in the transmitter slot.
SeeRemote Keyless Entry (RKE)
System Operation on page 2-2.
ON/RUN: This position is for
starting and driving. With the vehicle
off, and the brake pedal applied,
pressing the POWER
Obutton once
will place the vehicle in ON/RUN.
When the READY light is on in the
instrument cluster, the vehicle is
ready to be driven. This could take
up to 15 seconds at extremely cold
temperatures. See Vehicle Ready
Light on page 5-25. The engine will
only start if needed. If the vehicle
did not start, the instrument cluster
will display a screen with inactive
fuel and battery gauges. See
Starting and Stopping the Vehicle
on page 9-18. Service Only Mode
This power mode is available for
service and diagnostics, and to
verify the proper operation of the
malfunction indicator lamp as may
be required for emission inspection
purposes. With the vehicle off, and
the brake pedal not applied,
pressing and holding the POWER
O
button for more than five seconds
will place the vehicle in Service
Only Mode. The instruments and
audio systems will operate as they
do in ON/RUN, but the vehicle will
not be able to be driven. The
propulsion system will not start in
Service Only Mode. Press the
button again to turn the vehicle off.
{Caution
Service Only Mode will discharge
the 12-volt battery. Do not use
Service Only Mode for an
extended period, or the vehicle
may not start.
STOPPING THE VEHICLE/OFF:
To turn the vehicle off, press the
POWER
Obutton with the vehicle
in P (Park). Retained Accessory
Power (RAP) will remain active until
the driver door is opened. See
Retained Accessory Power (RAP)
on page 9-19. When turning off the
vehicle, if the vehicle is not in
P (Park), the vehicle will go to ACC/
ACCESSORY and display the
message SHIFT TO PARK in the
Driver Information Center (DIC).
See Electric Drive Unit Messages
on page 5-44.
If the vehicle must be shut off in an
emergency:
1. Brake using a firm and steady pressure. Do not pump the
brakes repeatedly. This may
deplete power assist, requiring
increased brake pedal force.
2. Shift the vehicle to N (Neutral). This can be done while the
vehicle is moving. After shifting