Back window CADILLAC ESCALADE 2003 2.G Owners Manual
[x] Cancel search | Manufacturer: CADILLAC, Model Year: 2003, Model line: ESCALADE, Model: CADILLAC ESCALADE 2003 2.GPages: 486, PDF Size: 3.32 MB
Page 64 of 486
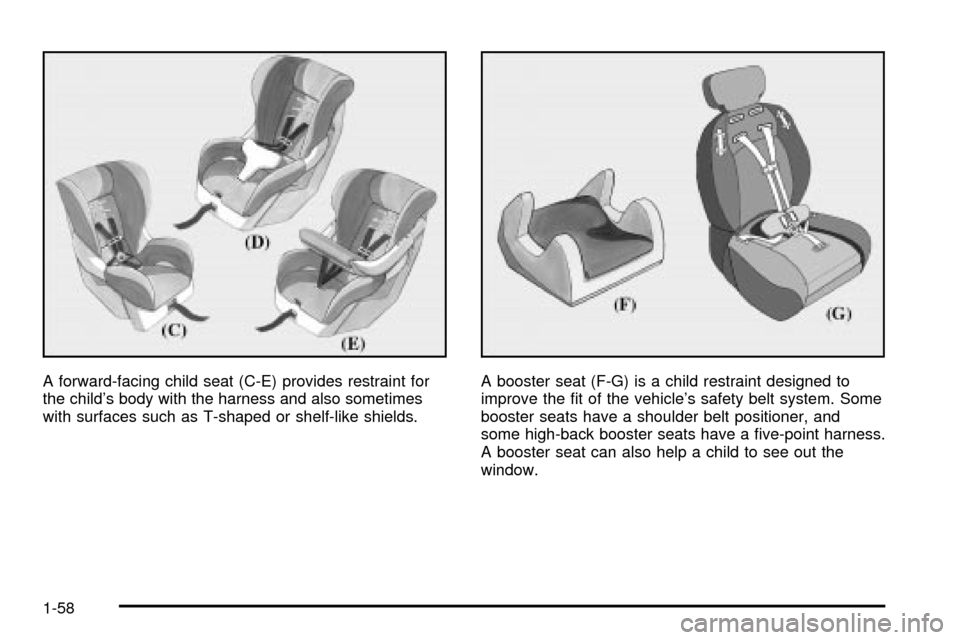
A forward-facing child seat (C-E) provides restraint for
the child's body with the harness and also sometimes
with surfaces such as T-shaped or shelf-like shields.A booster seat (F-G) is a child restraint designed to
improve the ®t of the vehicle's safety belt system. Some
booster seats have a shoulder belt positioner, and
some high-back booster seats have a ®ve-point harness.
A booster seat can also help a child to see out the
window.
1-58
Page 89 of 486
What Will You See After an Air Bag
In¯ates?
After the air bag in¯ates, it quickly de¯ates, so quickly
that some people may not even realize the air bag
in¯ated. Some components of the air bag module will be
hot for a short time. These components include the
steering wheel hub for the driver's frontal air bag and the
instrument panel for the right front passenger's frontal
air bag. For side impact air bags, the side of the
seatback closest to the driver's and/or right front
passenger's door will be hot. The parts of the bag that
come into contact with you may be warm, but not
too hot to touch. There will be some smoke and dust
coming from the vents in the de¯ated air bags. Air bag
in¯ation doesn't prevent the driver from seeing or
being able to steer the vehicle, nor does it stop people
from leaving the vehicle.
{CAUTION:
When an air bag in¯ates, there is dust in the
air. This dust could cause breathing problems
for people with a history of asthma or other
breathing trouble. To avoid this, everyone in
the vehicle should get out as soon as it is safe
to do so. If you have breathing problems but
can't get out of the vehicle after an air bag
in¯ates, then get fresh air by opening a
window or a door. If you experience breathing
problems following an air bag deployment, you
should seek medical attention.
In many crashes severe enough to in¯ate an air bag,
windshields are broken by vehicle deformation.
Additional windshield breakage may also occur from the
right front passenger air bag.
·Air bags are designed to in¯ate only once. After an
air bag in¯ates, you'll need some new parts for your
air bag system. If you don't get them, the air bag
system won't be there to help protect you in another
crash. A new system will include air bag modules
and possibly other parts. The service manual for your
vehicle covers the need to replace other parts.
1-83
Page 181 of 486
Outlet Adjustment
Use the air outlets located in the center and on the side
of your instrument panel to direct the air¯ow.
Your vehicle has air outlets that allow you to adjust the
direction and amount of air¯ow inside the vehicle.
Move the louvers up or down. Use the thumbwheel next
to or underneath the outlet to close the louvers. For
the most efficient air¯ow and temperature control, keep
the outlet in the fully opened position.
Operation Tips
·
Keep the hood and front air inlets free of ice, snow,
or any other obstruction (such as leaves). The
heater and defroster will work far better, reducing
the chance of fogging the inside of your windows.
·Keep the air path under the front seats clear
of objects. This helps air to circulate throughout your
vehicle.
·Adding outside equipment to the front of your
vehicle, such as hood-air de¯ectors, etc., may affect
the performance of the heating and air conditioning
system. Check with your dealer before adding
equipment to the outside of your vehicle.
Rear Climate Control System
With this system the front or rear passengers can
control the air temperature, air ¯ow and fan speed for
the rear seat passengers. The climate control has
an overhead control near the driver and a control on the
back of the center console.
Driver Overhead Control
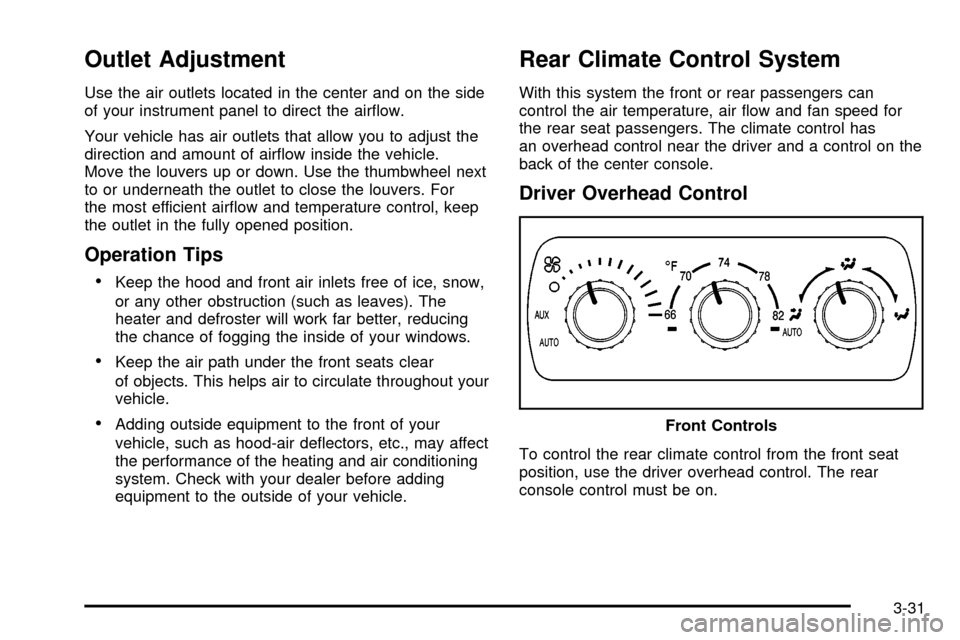
To control the rear climate control from the front seat
position, use the driver overhead control. The rear
console control must be on.Front Controls
3-31
Page 244 of 486
Problem Recommended Action
The disc was ejected, but
it was pulled back into the
DVD player.The disc is being stored in
the DVD player. Press the
eject button again to eject
the disc.
In auxiliary mode, the
picture moves or scrolls.Check the signal coming
from the auxiliary device
and make sure that the
connection and the signal
is good.
Change the Video
Format to PAL or NTSC.
See ªStereo RCA Jacksº
previously for how to
change the video format.
The language in the
audio or on the screen is
wrong.Press the Menu button
on the DVD player or on
the remote control and
change the audio or
language selection on the
DVD menu.Problem Recommended Action
The remote control does
not work.Point the remote control
directly at the infrared
window below the video
screen while using.
Check that the batteries
are not dead or put in
wrong.
The parental control
button might have been
pressed. (The power
indicator light will ¯ash.)
After stopping the player,
I push Play but
sometimes the DVD
starts where I left off and
sometimes at the
beginning.If the stop button was
pressed one time, the
DVD player will resume
playing where the DVD
was stopped. If the stop
button was pressed two
times the DVD player will
begin to play from the
beginning of the DVD.
3-94
Page 255 of 486

Cleaning the Video Screen
Pour some isopropyl or rubbing alcohol on a clean cloth
and gently wipe the video screen. Do not spray
directly onto the screen and do not press too hard or
too long on the video screen.
Diversity Antenna System
Your AM-FM antennas are located in the rear side
windows. Be sure that the inside surfaces of the rear
side windows are not scratched and that the lines on the
glass are not damaged. If the inside surfaces are
damaged, they could interfere with radio reception.
Notice:Do not try to clear frost or other material
from the inside of the front windshield or rear
window with a razor blade or anything else that is
sharp. This may damage the rear defogger grid and
affect your radio's ability to pick up stations
clearly. The repairs wouldn't be covered by your
warranty.
Notice:Do not apply aftermarket glass tinting with
metallic ®lm. The metallic ®lm in some tinting
materials will interfere with or distort the incoming
radio reception. Any damage caused to your
backglass antenna due to metallic tinting materials
will not be covered by your warranty.If you choose to add an aftermarket cellular telephone
to your vehicle, and the antenna needs to be attached to
the glass, be sure that you do not damage the grid
lines for the AM-FM antennas or place the cellular
telephone antenna over the grid lines.
XMŸ Satellite Radio Antenna
System (United States Only)
Your XMŸ Satellite Radio antenna is located on the
roof of your vehicle. Keep this antenna clear of
snow and ice build up for clear radio reception.
The performance of your XMŸ system may be affected
if your sunroof is open.
Loading items onto the roof of your vehicle can interfere
with the performance of your XMŸ system. Make
sure that the XMŸ satellite antenna is not obstructed.
3-105
Page 350 of 486
If you get the overheat warning with no sign of steam,
try this for a minute or so:
1. Turn on your heater to full hot at the highest fan
speed and open the window as necessary.
2. If you're in a traffic jam, shift to NEUTRAL (N);
otherwise, shift to the highest gear while
driving ± DRIVE (D).
If you no longer have the overheat warning, you can
drive. Just to be safe, drive slower for about 10 minutes.
If the warning doesn't come back on, you can drive
normally.
If the warning continues, pull over, stop, and park your
vehicle right away.
If there's still no sign of steam, push down the
accelerator until the engine speed is about twice as fast
as normal idle speed for at least three minutes while
you're parked. If you still have the warning,
turn off the
engine and get everyone out of the vehicleuntil it
cools down. Also, see ªOverheated Engine Protection
Operating Modeº listed previously in this section.
You may decide not to lift the hood but to get service
help right away.
Cooling System
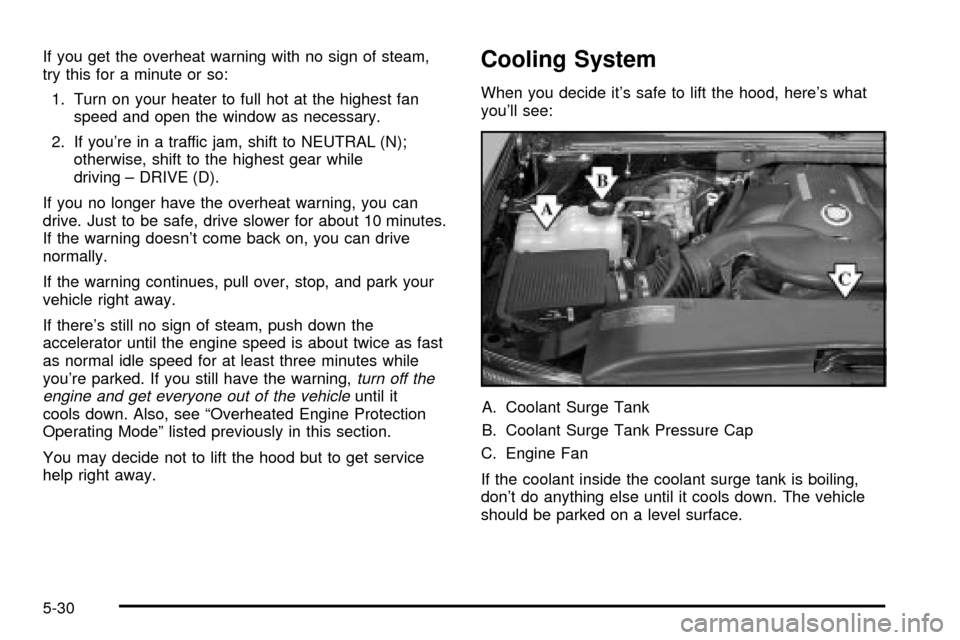
When you decide it's safe to lift the hood, here's what
you'll see:
A. Coolant Surge Tank
B. Coolant Surge Tank Pressure Cap
C. Engine Fan
If the coolant inside the coolant surge tank is boiling,
don't do anything else until it cools down. The vehicle
should be parked on a level surface.
5-30
Page 430 of 486

Fuses Usage
SUNROOF Sunroof
SEO B2 Off-Road Lamps
4WSVent Solenoid
Canister/Quadrasteer Module
Power
RR HVAC Rear Climate Control
AUX PWRAuxiliary Power Outlet Ð
Console
IGN 1 Ignition Relay
PCM 1 Powertrain Control Module
ETC/ECMElectronic Throttle Control,
Electronic Brake Controller
IGN EInstrument Panel Cluster, Air
Conditioning Relay, Turn
Signal/Hazard Switch, Starter
Relay
RTD Ride Control
TRL B/U Backup Lamps Trailer Wiring
PCM BPowertrain Control Module,
Fuel PumpFuses Usage
F/PMP Fuel Pump (Relay)
B/U LPBack-up Lamps, Automatic
Transmission Shift Lock
Control System
RR DEFOG Rear Window Defogger
HDLP-HI Headlamp High Beam Relay
PRIME Not Used
SIRSupplemental In¯atable
Restraint System
FRT PARKFront Parking Lamps,
Sidemarker Lamps
DRLDaytime Running Lamps
(Relay)
SEO IGN Rear Defog Relay
TBC IGN1 Truck Body Controller Ignition
HI HDLP-LT High Beam Headlamp-Left
LH HIDLeft Hand High Intensity
Discharge Lamps
DRL Daytime Running Lamps
5-110
Page 481 of 486

Rear Seat Armrest..........................................2-47
Rear Seat Audio Controls.................................3-97
Rear Seat Audio (RSA)....................................3-97
Rear Seat Entertainment System.......................3-85
Rear Seat Operation......................................... 1-8
Rear Seat Outside Passenger Positions.............1-44
Rear Seat Passengers, Safety Belts..................1-44
Rear Storage Area..........................................2-46
Rear Window Defogger....................................3-30
Rearview Mirror, Automatic Dimming with OnStar
ž,
Compass and Temperature Display..................2-33
Reclining Seatbacks.......................................... 1-6
Reclining the Seatbacks...................................1-25
Recreational Vehicle Towing.............................4-50
REDUCED ENGINE POWER...........................3-63
Remote Control..............................................3-88
Remote Keyless Entry System, Operation............ 2-5
Remote Keyless Entry System............................ 2-4
Removing the 50/50 Split Bench Seats..............1-16
Removing the Bench Seat................................1-22
Removing the Flat Tire and Installing the
Spare Tire..................................................5-80
Removing the Spare Tire and Tools...................5-77
REPLACE LIFTGATE FUSE.............................3-67
Replacement Bulbs.........................................5-64
Replacing Brake System Parts..........................5-42
Replacing Restraint System Parts After
a Crash.....................................................1-91
Replacing the 50/50 Split Bench Seat................1-18Replacing the Bench Seat................................1-24
Reporting Safety Defects.................................7-10
Canadian Government..................................7-10
General Motors...........................................7-10
United States Government............................7-10
Reprogramming a Single HomeLink
žButton.......2-44
Resetting Defaults...........................................2-44
Restraint System Check...................................6-12
Checking Your Restraint Systems...................1-90
Replacing Restraint System Parts After
a Crash..................................................1-91
Restraint Systems...........................................1-90
Checking....................................................1-90
Replacing Parts...........................................1-91
Retained Accessory Power (RAP)......................2-21
Returning the Seat to an Upright Position...........1-22
Returning the Seatbacks to an Upright Position......1-27
Returning the Seats to an Upright Position.........1-12
Returning the Seat(s) to an Upright Position.......1-15
Right Front Passenger Position, Safety Belts......1-42
RIGHT REAR DOOR AJAR..............................3-67
Road Sensing Suspension................................. 4-9
Roadside Service Availability.............................. 7-7
Roadside Service for the Hearing or Speech
Impaired...................................................... 7-7
Roadside......................................................... 7-6
Service........................................................ 7-6
Rocking Your Vehicle To Get It Out...................4-48
Running Your Engine While You Are Parked.......2-32
13