Jack CADILLAC ESCALADE 2005 2.G Owners Manual
[x] Cancel search | Manufacturer: CADILLAC, Model Year: 2005, Model line: ESCALADE, Model: CADILLAC ESCALADE 2005 2.GPages: 470, PDF Size: 2.86 MB
Page 158 of 470
How the System Works
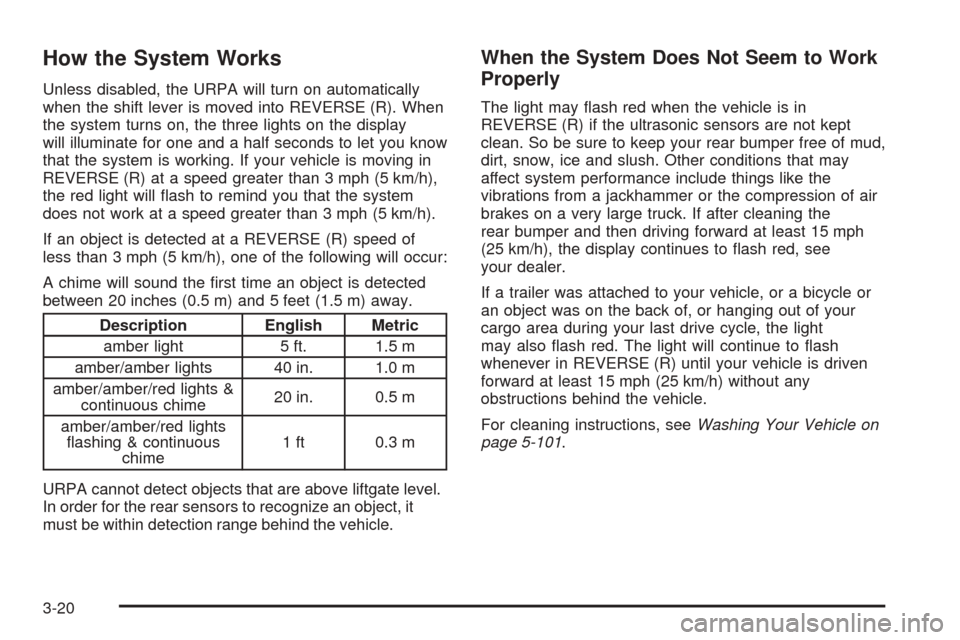
Unless disabled, the URPA will turn on automatically
when the shift lever is moved into REVERSE (R). When
the system turns on, the three lights on the display
will illuminate for one and a half seconds to let you know
that the system is working. If your vehicle is moving in
REVERSE (R) at a speed greater than 3 mph (5 km/h),
the red light will �ash to remind you that the system
does not work at a speed greater than 3 mph (5 km/h).
If an object is detected at a REVERSE (R) speed of
less than 3 mph (5 km/h), one of the following will occur:
A chime will sound the �rst time an object is detected
between 20 inches (0.5 m) and 5 feet (1.5 m) away.
Description English Metric
amber light 5 ft. 1.5 m
amber/amber lights 40 in. 1.0 m
amber/amber/red lights &
continuous chime20 in. 0.5 m
amber/amber/red lights
�ashing & continuous
chime1 ft 0.3 m
URPA cannot detect objects that are above liftgate level.
In order for the rear sensors to recognize an object, it
must be within detection range behind the vehicle.
When the System Does Not Seem to Work
Properly
The light may �ash red when the vehicle is in
REVERSE (R) if the ultrasonic sensors are not kept
clean. So be sure to keep your rear bumper free of mud,
dirt, snow, ice and slush. Other conditions that may
affect system performance include things like the
vibrations from a jackhammer or the compression of air
brakes on a very large truck. If after cleaning the
rear bumper and then driving forward at least 15 mph
(25 km/h), the display continues to �ash red, see
your dealer.
If a trailer was attached to your vehicle, or a bicycle or
an object was on the back of, or hanging out of your
cargo area during your last drive cycle, the light
may also �ash red. The light will continue to �ash
whenever in REVERSE (R) until your vehicle is driven
forward at least 15 mph (25 km/h) without any
obstructions behind the vehicle.
For cleaning instructions, seeWashing Your Vehicle on
page 5-101.
3-20
Page 224 of 470
Stereo RCA Jacks
The RCA jacks are located behind the video screen.
The RCA jacks allow audio and video signals to
be connected from an auxiliary device such as a
camcorder or a video game unit to the RSE system.
Standard RCA cables, not included, are needed
to connect the auxiliary device to the RCA jacks. The
yellow connector inputs video and the red and white
connectors input right and left audio. Refer to the
manufacturer’s instructions for proper connection of the
auxiliary device.
To use the auxiliary inputs on the RSE system, connect
an external auxiliary device to the color-coded RCA
jacks and turn both the auxiliary device and the
RSE system power on. If the RSE system had been
previously in the DVD player mode, pressing the SRCE
button on the faceplate or the remote control will
switch the RSE system between the auxiliary device
and the DVD player.
How to Change the Video Format when in
the Auxiliary Mode
The auxiliary input video format is preset to NTSC. In
some countries, the video format may be in PAL system.
To change the video format, perform the following:
1. Press the display menu button.
2. Press the down arrow button to highlight the Video
Format option.
3. Press the enter button to select Video Format.
4. Press the right or left arrow button to select
the desired video format.
5. Press the enter button to accept the change.
3-86
Page 225 of 470
Audio Output
Audio from the DVD player or auxiliary inputs may be
heard through the following possible sources:
Wireless Headphones
Vehicle Speakers
Vehicle wired headphone jacks on the Rear Seat
Audio system (if equipped)
The RSE system will always transmit the audio signal
by infrared to the wireless headphones, if there is audio
available. See “Headphones” previously for more
information.
The RSE system is capable of outputting audio to the
vehicle speakers by using the radio. The RSE
system may be selected as an audio source on the
radio if the RSE system power is on. Once the
RSE system is selected as an audio source on the
radio, adjust the speaker volume on the radio, if
necessary. If the RSE system power is not on, the RSE
system will not be an available source on the radio.
Refer to the radio information for the radio that
your vehicle has for more information.
The RSE system is capable of outputting audio to the
wired headphone jacks on the Rear Seat Audio system
(if equipped). The RSE system may be selected as
an audio source on the Rear Seat Audio system if the
RSE system power is on. Refer toRear Seat
Audio (RSA) on page 3-96for more information.
Video Screen
The video screen is located in the overhead console. To
use the video screen, push forward on the release
latch and the screen will fold down. Adjust the screen’s
position as desired. When the video screen is not in
use, push it up into its latched position.
The DVD player and display will continue to operate
when the screen is in the up or the down position. This
video screen contains the transmitters for the wireless
headphones and the remote control. If the screen
is in the closed position, the signals will not be available
for the operation of the wireless headphones and the
remote control.
Your vehicle may also have a video screen for the third
row passengers. The second row video screen must
be in the down position for the wireless headphones and
the remote control to work with the third row video
screen.
To use the video screen, push forward on the release
latch and the screen will fold down. Adjust the screen’s
position as desired. When the video screen is not in
use, push it up into its latched position.
Notice:Directly touching the video screen may
damage it. Do not touch the screen. See “Cleaning
the Video Screen” later in this section for more
information.
3-87
Page 226 of 470
DVD Player
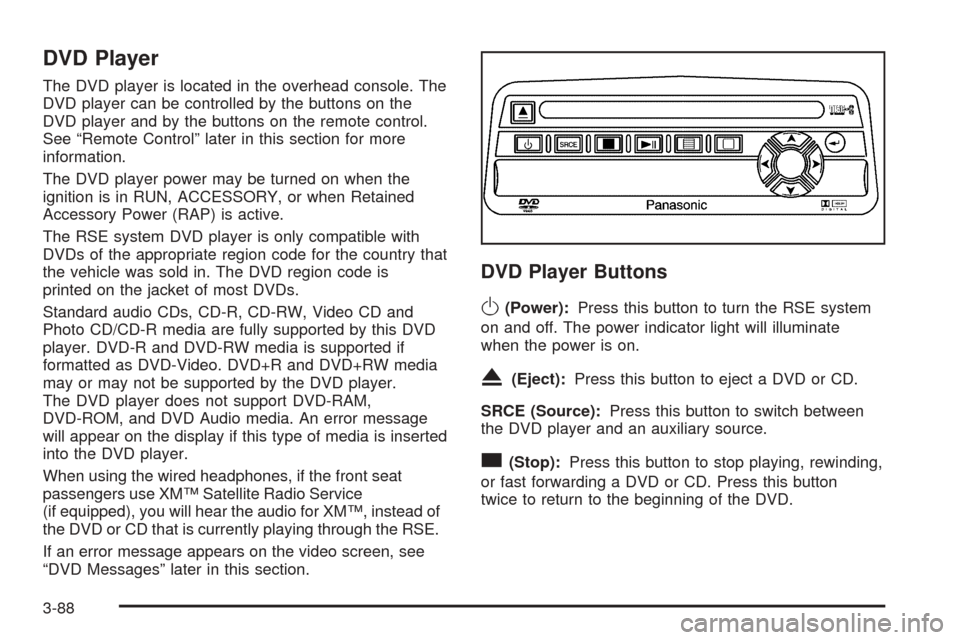
The DVD player is located in the overhead console. The
DVD player can be controlled by the buttons on the
DVD player and by the buttons on the remote control.
See “Remote Control” later in this section for more
information.
The DVD player power may be turned on when the
ignition is in RUN, ACCESSORY, or when Retained
Accessory Power (RAP) is active.
The RSE system DVD player is only compatible with
DVDs of the appropriate region code for the country that
the vehicle was sold in. The DVD region code is
printed on the jacket of most DVDs.
Standard audio CDs, CD-R, CD-RW, Video CD and
Photo CD/CD-R media are fully supported by this DVD
player. DVD-R and DVD-RW media is supported if
formatted as DVD-Video. DVD+R and DVD+RW media
may or may not be supported by the DVD player.
The DVD player does not support DVD-RAM,
DVD-ROM, and DVD Audio media. An error message
will appear on the display if this type of media is inserted
into the DVD player.
When using the wired headphones, if the front seat
passengers use XM™ Satellite Radio Service
(if equipped), you will hear the audio for XM™, instead of
the DVD or CD that is currently playing through the RSE.
If an error message appears on the video screen, see
“DVD Messages” later in this section.
DVD Player Buttons
O(Power):Press this button to turn the RSE system
on and off. The power indicator light will illuminate
when the power is on.
X(Eject):Press this button to eject a DVD or CD.
SRCE (Source):Press this button to switch between
the DVD player and an auxiliary source.
c(Stop):Press this button to stop playing, rewinding,
or fast forwarding a DVD or CD. Press this button
twice to return to the beginning of the DVD.
3-88
Page 232 of 470
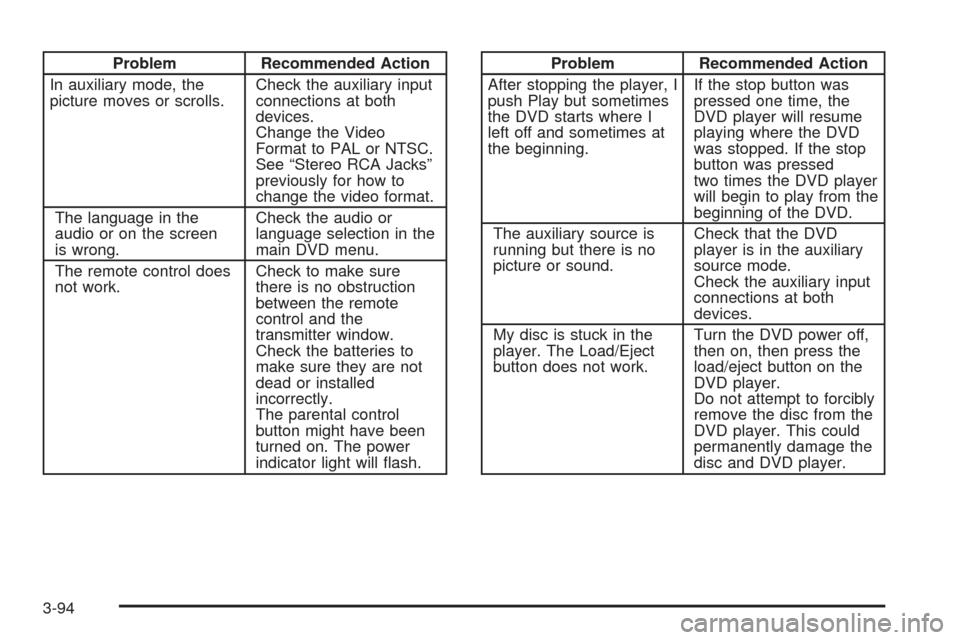
Problem Recommended Action
In auxiliary mode, the
picture moves or scrolls.Check the auxiliary input
connections at both
devices.
Change the Video
Format to PAL or NTSC.
See “Stereo RCA Jacks”
previously for how to
change the video format.
The language in the
audio or on the screen
is wrong.Check the audio or
language selection in the
main DVD menu.
The remote control does
not work.Check to make sure
there is no obstruction
between the remote
control and the
transmitter window.
Check the batteries to
make sure they are not
dead or installed
incorrectly.
The parental control
button might have been
turned on. The power
indicator light will �ash.Problem Recommended Action
After stopping the player, I
push Play but sometimes
the DVD starts where I
left off and sometimes at
the beginning.If the stop button was
pressed one time, the
DVD player will resume
playing where the DVD
was stopped. If the stop
button was pressed
two times the DVD player
will begin to play from the
beginning of the DVD.
The auxiliary source is
running but there is no
picture or sound.Check that the DVD
player is in the auxiliary
source mode.
Check the auxiliary input
connections at both
devices.
My disc is stuck in the
player. The Load/Eject
button does not work.Turn the DVD power off,
then on, then press the
load/eject button on the
DVD player.
Do not attempt to forcibly
remove the disc from the
DVD player. This could
permanently damage the
disc and DVD player.
3-94
Page 383 of 470
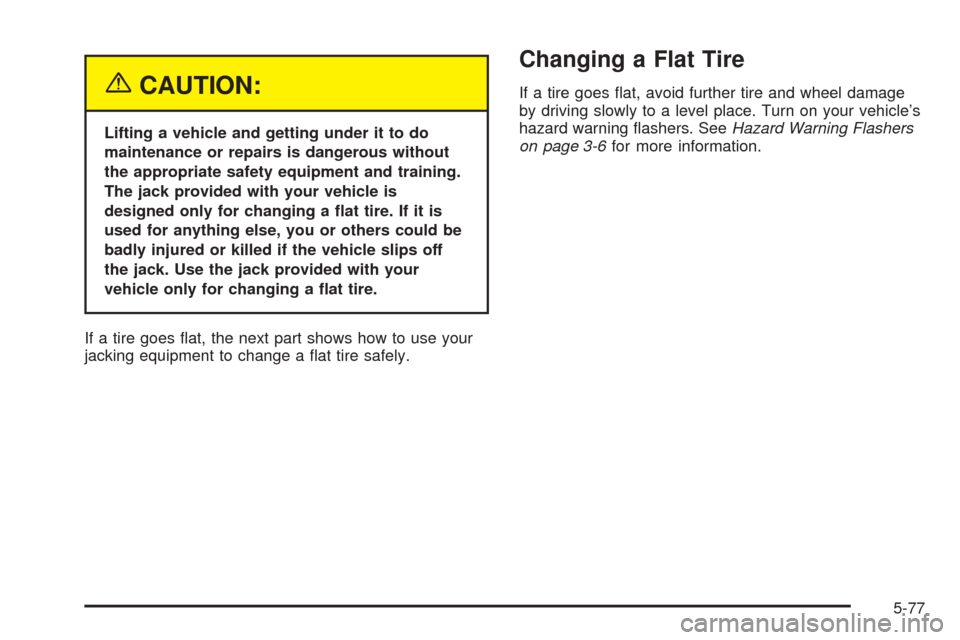
{CAUTION:
Lifting a vehicle and getting under it to do
maintenance or repairs is dangerous without
the appropriate safety equipment and training.
The jack provided with your vehicle is
designed only for changing a �at tire. If it is
used for anything else, you or others could be
badly injured or killed if the vehicle slips off
the jack. Use the jack provided with your
vehicle only for changing a �at tire.
If a tire goes �at, the next part shows how to use your
jacking equipment to change a �at tire safely.
Changing a Flat Tire
If a tire goes �at, avoid further tire and wheel damage
by driving slowly to a level place. Turn on your vehicle’s
hazard warning �ashers. SeeHazard Warning Flashers
on page 3-6for more information.
5-77
Page 384 of 470
{CAUTION:
Changing a tire can be dangerous. The vehicle
can slip off the jack and roll over or fall on you
or other people. You and they could be badly
injured or even killed. Find a level place to
change your tire. To help prevent the vehicle
from moving:
1. Set the parking brake �rmly.
2. Put the shift lever in PARK (P).
3. Turn off the engine and do not restart
while the vehicle is raised.
4. Do not allow passengers to remain in the
vehicle.
To be even more certain the vehicle will not
move, you should put blocks at the front and
rear of the tire farthest away from the one
being changed. That would be the tire, on the
other side, at the opposite end of the vehicle.
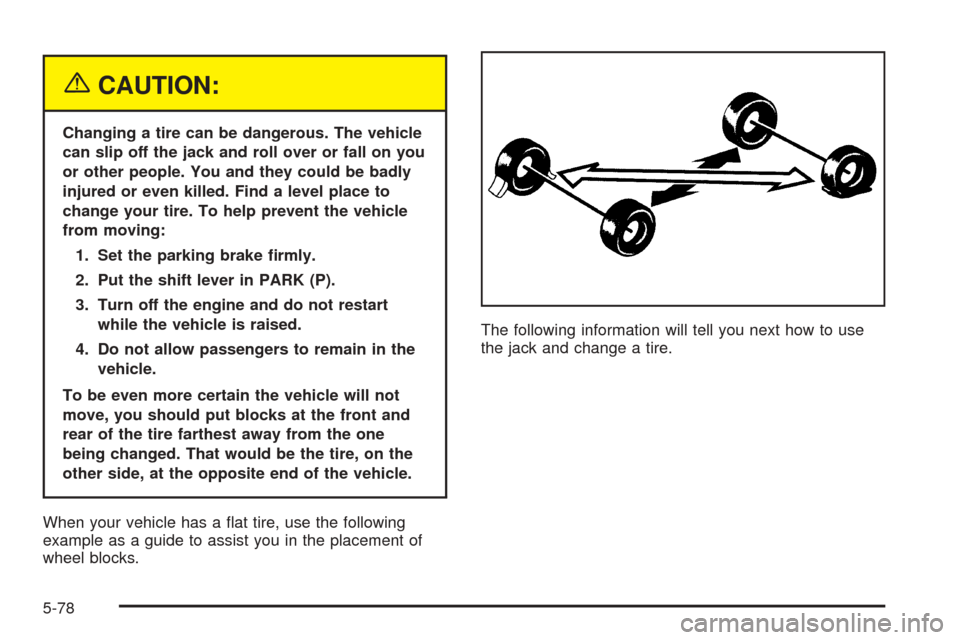
When your vehicle has a �at tire, use the following
example as a guide to assist you in the placement of
wheel blocks.The following information will tell you next how to use
the jack and change a tire.
5-78
Page 385 of 470
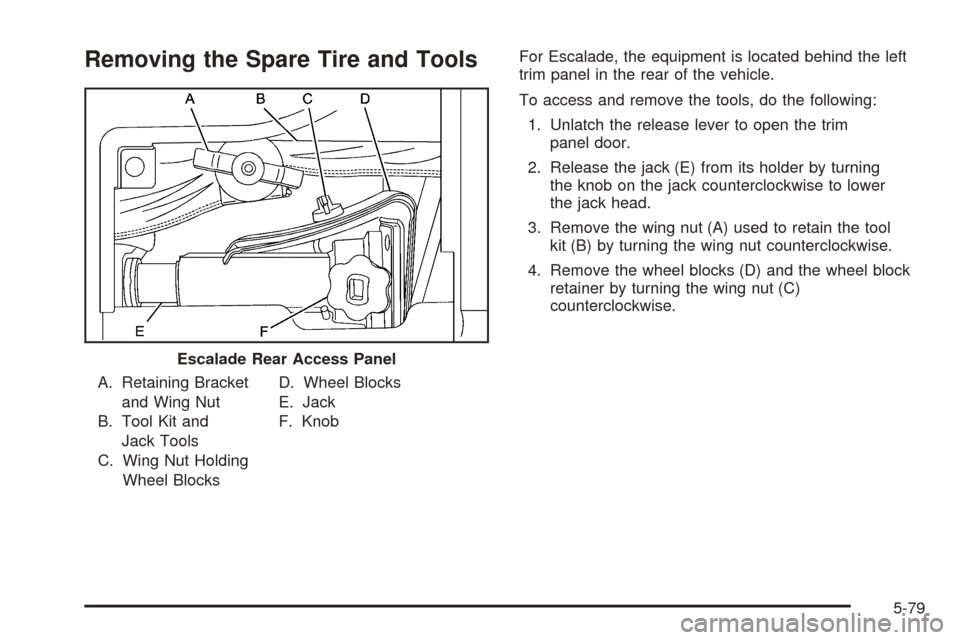
Removing the Spare Tire and Tools
A. Retaining Bracket
and Wing Nut
B. Tool Kit and
Jack Tools
C. Wing Nut Holding
Wheel BlocksD. Wheel Blocks
E. Jack
F. KnobFor Escalade, the equipment is located behind the left
trim panel in the rear of the vehicle.
To access and remove the tools, do the following:
1. Unlatch the release lever to open the trim
panel door.
2. Release the jack (E) from its holder by turning
the knob on the jack counterclockwise to lower
the jack head.
3. Remove the wing nut (A) used to retain the tool
kit (B) by turning the wing nut counterclockwise.
4. Remove the wheel blocks (D) and the wheel block
retainer by turning the wing nut (C)
counterclockwise.
Escalade Rear Access Panel
5-79
Page 386 of 470
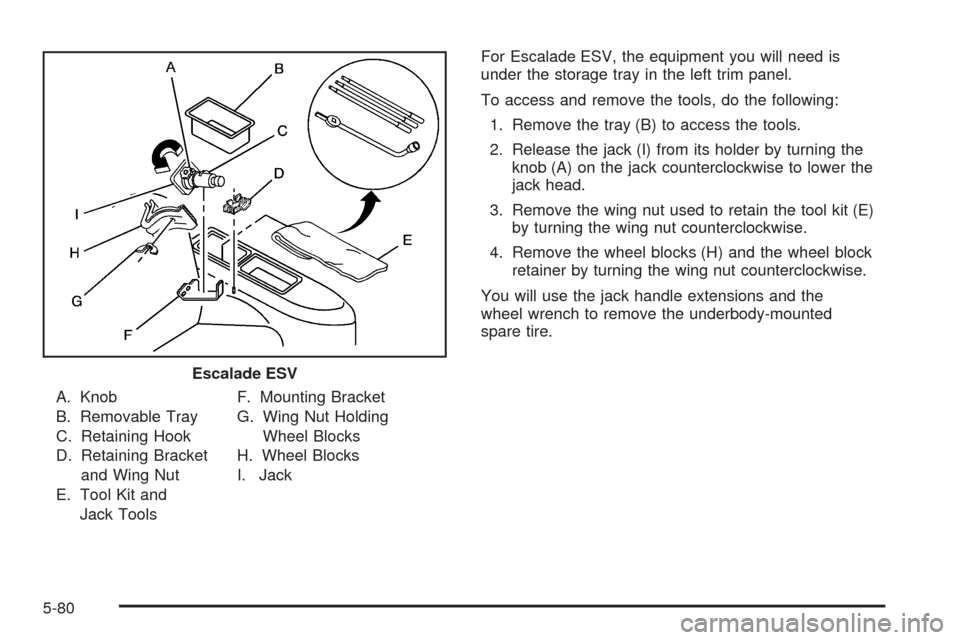
A. Knob
B. Removable Tray
C. Retaining Hook
D. Retaining Bracket
and Wing Nut
E. Tool Kit and
Jack ToolsF. Mounting Bracket
G. Wing Nut Holding
Wheel Blocks
H. Wheel Blocks
I. JackFor Escalade ESV, the equipment you will need is
under the storage tray in the left trim panel.
To access and remove the tools, do the following:
1. Remove the tray (B) to access the tools.
2. Release the jack (I) from its holder by turning the
knob (A) on the jack counterclockwise to lower the
jack head.
3. Remove the wing nut used to retain the tool kit (E)
by turning the wing nut counterclockwise.
4. Remove the wheel blocks (H) and the wheel block
retainer by turning the wing nut counterclockwise.
You will use the jack handle extensions and the
wheel wrench to remove the underbody-mounted
spare tire.
Escalade ESV
5-80
Page 387 of 470
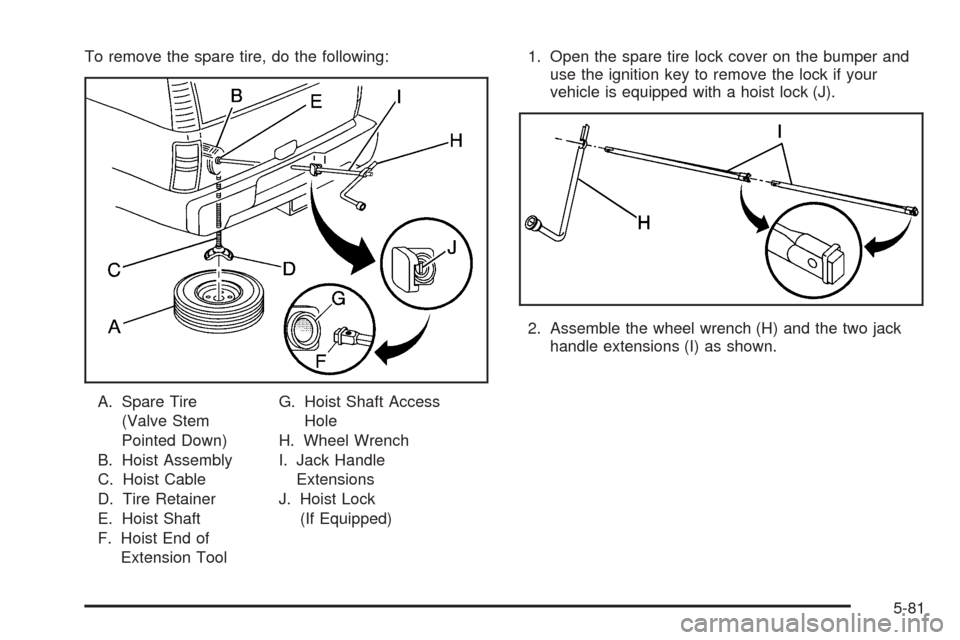
To remove the spare tire, do the following:
A. Spare Tire
(Valve Stem
Pointed Down)
B. Hoist Assembly
C. Hoist Cable
D. Tire Retainer
E. Hoist Shaft
F. Hoist End of
Extension ToolG. Hoist Shaft Access
Hole
H. Wheel Wrench
I. Jack Handle
Extensions
J. Hoist Lock
(If Equipped)1. Open the spare tire lock cover on the bumper and
use the ignition key to remove the lock if your
vehicle is equipped with a hoist lock (J).
2. Assemble the wheel wrench (H) and the two jack
handle extensions (I) as shown.
5-81