wheel CADILLAC ESCALADE 2006 2.G Repair Manual
[x] Cancel search | Manufacturer: CADILLAC, Model Year: 2006, Model line: ESCALADE, Model: CADILLAC ESCALADE 2006 2.GPages: 484, PDF Size: 2.84 MB
Page 320 of 484
Tire Pressure Monitor System.........................5-66
Tire Inspection and Rotation...........................5-70
When It Is Time for New Tires.......................5-71
Buying New Tires.........................................5-72
Different Size Tires and Wheels......................5-73
Uniform Tire Quality Grading..........................5-74
Wheel Alignment and Tire Balance..................5-75
Wheel Replacement......................................5-76
Tire Chains..................................................5-77
If a Tire Goes Flat........................................5-78
Changing a Flat Tire.....................................5-78
Removing the Spare Tire and Tools................5-80
Removing the Flat Tire and Installing the
Spare Tire................................................5-83
Secondary Latch System...............................5-89
Storing a Flat or Spare Tire
and Tools.................................................5-92
Spare Tire...................................................5-97
Appearance Care............................................5-97
Cleaning the Inside of Your Vehicle.................5-97
Fabric/Carpet...............................................5-99
Leather.......................................................5-99
Instrument Panel, Vinyl, and
Other Plastic Surfaces..............................5-100
Wood Panels..............................................5-100
Speaker Covers..........................................5-100Care of Safety Belts....................................5-100
Weatherstrips.............................................5-100
Washing Your Vehicle..................................5-101
Cleaning Exterior Lamps/Lenses....................5-101
Finish Care................................................5-101
Windshield, Backglass, and Wiper Blades.......5-102
Aluminum or Chrome-Plated Wheels..............5-102
Tires.........................................................5-103
Sheet Metal Damage...................................5-103
Finish Damage...........................................5-103
Underbody Maintenance...............................5-104
Chemical Paint Spotting...............................5-104
Vehicle Care/Appearance Materials................5-104
Vehicle Identi�cation.....................................5-105
Vehicle Identi�cation Number (VIN)................5-105
Service Parts Identi�cation Label...................5-106
Electrical System..........................................5-106
Add-On Electrical Equipment.........................5-106
Windshield Wiper Fuses...............................5-107
Power Windows and Other Power Options......5-107
Fuses and Circuit Breakers..........................5-107
Instrument Panel Fuse Block........................5-108
Center Instrument Panel Fuse Block..............5-110
Underhood Fuse Block................................5-111
Capacities and Speci�cations........................5-116
Section 5 Service and Appearance Care
5-2
Page 327 of 484
Hood Release
To open the hood do the following:
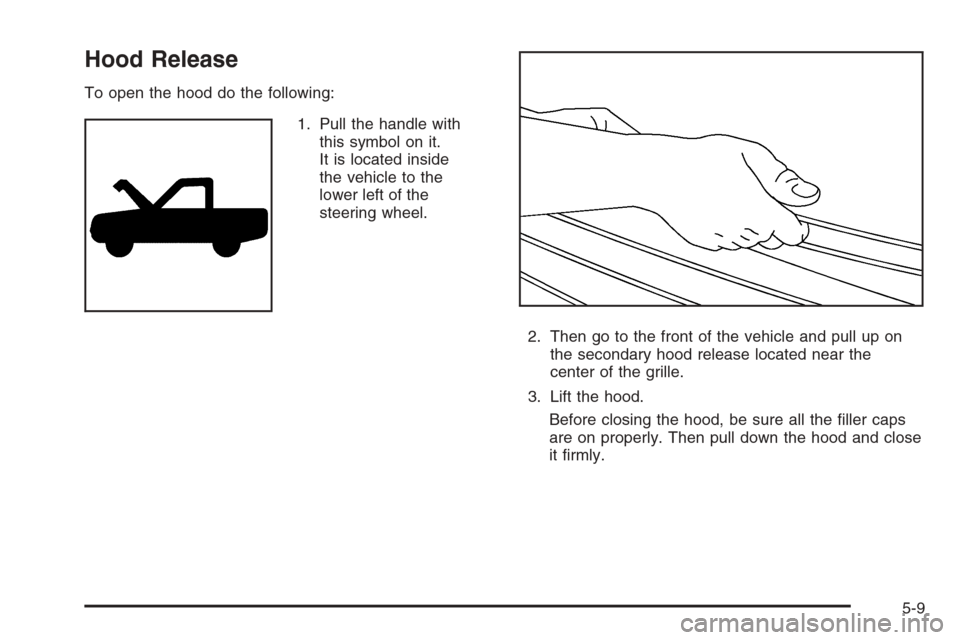
1. Pull the handle with
this symbol on it.
It is located inside
the vehicle to the
lower left of the
steering wheel.
2. Then go to the front of the vehicle and pull up on
the secondary hood release located near the
center of the grille.
3. Lift the hood.
Before closing the hood, be sure all the �ller caps
are on properly. Then pull down the hood and close
it �rmly.
5-9
Page 354 of 484
Brake Wear
Your vehicle has four-wheel disc brakes.
Disc brake pads have built-in wear indicators that make
a high-pitched warning sound when the brake pads
are worn and new pads are needed. The sound
may come and go or be heard all the time your vehicle
is moving, except when you are pushing on the
brake pedal �rmly.
{CAUTION:
The brake wear warning sound means that
soon your brakes will not work well. That
could lead to an accident. When you hear the
brake wear warning sound, have your vehicle
serviced.
Notice:Continuing to drive with worn-out brake
pads could result in costly brake repair.Some driving conditions or climates may cause a brake
squeal when the brakes are �rst applied or lightly
applied. This does not mean something is wrong with
your brakes.
Properly torqued wheel nuts are necessary to help
prevent brake pulsation. When tires are rotated, inspect
brake pads for wear and evenly tighten wheel nuts in
the proper sequence to GM torque speci�cations.
Brake linings should always be replaced as complete
axle sets.
Brake Pedal Travel
See your dealer if the brake pedal does not return to
normal height, or if there is a rapid increase in
pedal travel. This could be a sign of brake trouble.
Brake Adjustment
Every time you make a brake stop, your disc brakes
adjust for wear.
5-36
Page 361 of 484
All-Wheel Drive
Transfer Case
Be sure to perform the lubricant checks described in
this section. There are two additional systems that need
lubrication.
When to Check Lubricant
Refer to the Maintenance Schedule to determine how
often to check the lubricant. SeeScheduled
Maintenance on page 6-4.
How to Check Lubricant
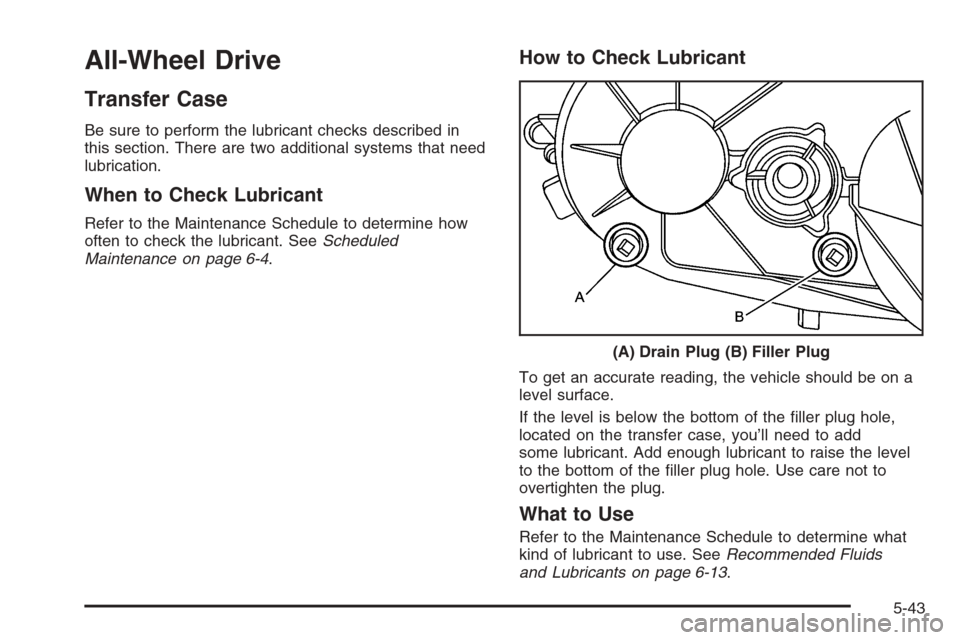
To get an accurate reading, the vehicle should be on a
level surface.
If the level is below the bottom of the �ller plug hole,
located on the transfer case, you’ll need to add
some lubricant. Add enough lubricant to raise the level
to the bottom of the �ller plug hole. Use care not to
overtighten the plug.
What to Use
Refer to the Maintenance Schedule to determine what
kind of lubricant to use. SeeRecommended Fluids
and Lubricants on page 6-13. (A) Drain Plug (B) Filler Plug
5-43
Page 379 of 484
Tire Size
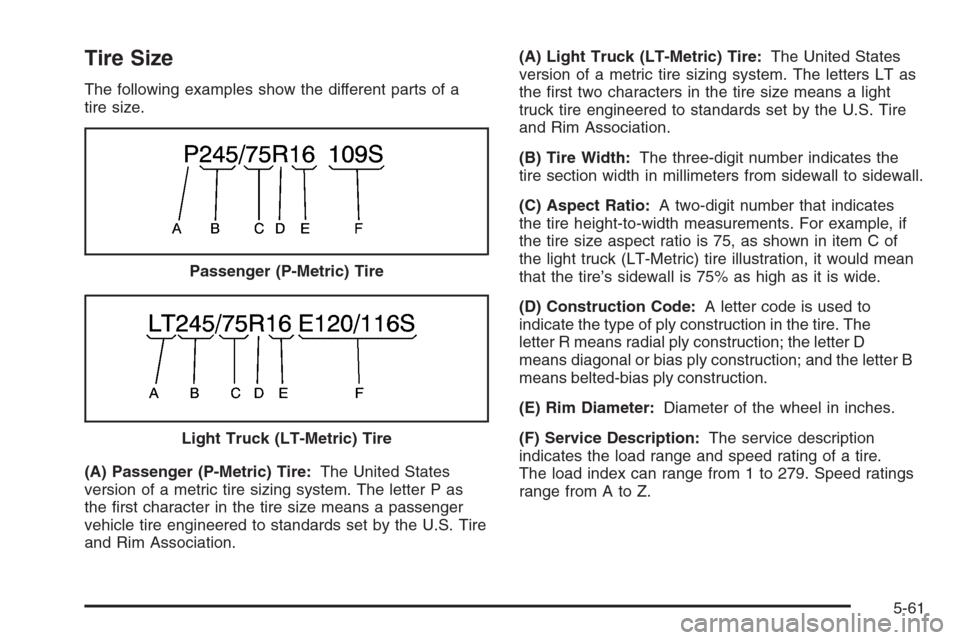
The following examples show the different parts of a
tire size.
(A) Passenger (P-Metric) Tire:The United States
version of a metric tire sizing system. The letter P as
the �rst character in the tire size means a passenger
vehicle tire engineered to standards set by the U.S. Tire
and Rim Association.(A) Light Truck (LT-Metric) Tire:The United States
version of a metric tire sizing system. The letters LT as
the �rst two characters in the tire size means a light
truck tire engineered to standards set by the U.S. Tire
and Rim Association.
(B) Tire Width:The three-digit number indicates the
tire section width in millimeters from sidewall to sidewall.
(C) Aspect Ratio:A two-digit number that indicates
the tire height-to-width measurements. For example, if
the tire size aspect ratio is 75, as shown in item C of
the light truck (LT-Metric) tire illustration, it would mean
that the tire’s sidewall is 75% as high as it is wide.
(D) Construction Code:A letter code is used to
indicate the type of ply construction in the tire. The
letter R means radial ply construction; the letter D
means diagonal or bias ply construction; and the letter B
means belted-bias ply construction.
(E) Rim Diameter:Diameter of the wheel in inches.
(F) Service Description:The service description
indicates the load range and speed rating of a tire.
The load index can range from 1 to 279. Speed ratings
range from A to Z. Passenger (P-Metric) Tire
Light Truck (LT-Metric) Tire
5-61
Page 384 of 484
High Speed Operation
{CAUTION:
Driving at high speeds, 100 mph (160 km/h)
or higher, puts an additional strain on tires.
Sustained high-speed driving causes
excessive heat build up and can cause sudden
tire failure. You could have a crash and you or
others could be killed. Some high-speed rated
tires require in�ation pressure adjustment for
high speed operation. When speed limits and
road conditions are such that a vehicle can be
driven at high speeds, make sure the tires are
rated for high speed operation, in excellent
condition, and set to the correct cold tire
in�ation pressure for the vehicle load.
If your vehicle has P265/70R17 AL2 or P275/55R20
AL2 size tires and you will be driving at high speeds,
speeds of 100 mph (160 km/h) or higher, set the
cold in�ation pressure to the maximum in�ation pressure
shown on the tire sidewall, or 38 psi (265 kPa),
whichever is lower. See the example following.When you end this high-speed driving, return the tires
to the cold in�ation pressure shown on the Tire and
Loading Information label. SeeLoading Your Vehicle
on page 4-47.
Example:
You will �nd the maximum load and in�ation pressure
molded on the tire’s sidewall, in small letters, near
the rim �ange. It will read something like this: Maximum
load 690 kg (1521 lbs) 300 kPa (44 psi) Max. Press.
For this example, you would set the in�ation pressure for
high-speed driving at 38 psi (265 kPa).
Tire Pressure Monitor System
The Tire Pressure Monitor System (TPMS) uses radio
and sensor technology to check tire pressure levels.
If your vehicle has this feature, sensors are mounted on
each tire and wheel assembly, except the spare tire.
The TPMS sensors monitor the air pressure in your
vehicle’s tires and transmit tire pressure readings to a
receiver located in the vehicle.
The TPMS is designed to alert the driver, if a low tire
pressure condition exists. This system also allows
the driver to check tire pressure levels using the Driver
Information Center (DIC).
5-66
Page 386 of 484
The Tire and Loading Information label (tire information
placard) shows the size of your vehicle’s original tires and
the correct in�ation pressure for your vehicle’s tires when
they are cold. SeeIn�ation - Tire Pressure on page 5-64.
For the location of the tire and loading information label,
seeLoading Your Vehicle on page 4-47.
Your vehicle’s TPMS can alert you about a low tire
pressure condition but it does not replace normal tire
maintenance. SeeTire Inspection and Rotation on
page 5-70andTires on page 5-57.
Notice:Do not use a tire sealant if your vehicle has
Tire Pressure Monitors. The liquid sealant can
damage the tire pressure monitor sensors.
Resetting the TPMS Identi�cation Codes
Each TPMS sensor has a unique identi�cation code. Any
time you rotate your vehicle’s tires or replace one or more
of the TPMS sensors, the identi�cation codes will need to
be matched to the new tire/wheel position. Each tire/
wheel position is matched to a sensor, by increasing or
decreasing the tire’s air pressure. The sensors are
matched to the tire/wheel positions in the following order:
LF TIRE (left front tire on the driver’s side of the vehicle),
RF TIRE (right front tire on the passengers side of the
vehicle), RR TIRE (right rear tire on the passengers side
of the vehicle), and LR TIRE (left rear tire on the driver’s
side of the vehicle).You will have one minute to match the �rst tire/wheel
position, and �ve minutes overall to match all four
tire/wheel positions. If it takes longer than one minute,
to match the �rst tire and wheel, or more than �ve
minutes to match all four tire and wheel positions the
matching process stops and you will need to start over.
The TPMS sensor matching process is outlined below:
1. Set the parking brake.
2. Turn the ignition switch to RUN with the engine off.
3. Turn the headlamp switch from off to the parking
lamps setting four times within three seconds. A
double horn chirp will sound and the TPMS low tire
warning light will begin to �ash. The double horn
chirp and �ashing TPMS warning light indicate that
the TPMS matching process has started. The
TPMS warning light should continue �ashing
throughout the matching procedure. The SERVICE
TIRE MONITOR message will be displayed on
the Driver Information Center (DIC).
4. Start with the driver’s side front tire.
5-68
Page 387 of 484
5. Remove the valve cap from the valve cap stem.
Activate the TPMS sensor by increasing or
decreasing the tire’s air pressure for 10 seconds,
then stop and listen for a single horn chirp.
The single horn chirp should sound within
15 seconds, con�rming that the sensor identi�cation
code has been matched to this tire and wheel
position. If you do not hear the con�rming single
horn chirp, you will need to start over with Step 1.
To let air-pressure out of a tire you can use the
pointed end of the valve cap, a pencil-style
air pressure gage or a key.
6. Proceed to the passenger’s side front tire, and
repeat the procedure in Step 5.
7. Proceed to the passenger’s side rear tire, and
repeat the procedure in Step 5.
8. Proceed to the driver’s side rear tire, and repeat the
procedure in Step 5.
9. After hearing the con�rming horn chirp for the
left rear tire, check to see if the TPMS warning
light is still �ashing. If it is, turn the ignition switch
to LOCK to exit the sensor matching process.
If the TPMS warning light is not �ashing, the
�ve minute time limit has passed and you will need
to start the process over beginning with Step 1.10. Set all four tires to the recommended air pressure
level as indicated on the Tire and Loading
Information label.
11. Put the valve caps back on the valve stems
The spare tire does not have a TPMS sensor. If you
replace one of the road tires with the spare, the CHECK
TIRE PRESSURE message will be displayed on the
DIC screen. This message should go off once you
re-install the road tire containing the TPMS sensor.
The SERVICE TIRE MONITOR message is displayed
when the TPMS is malfunctioning. One or more missing
or inoperable TPMS sensors will cause the service
tire monitor message to be displayed. See your dealer
for service.
Federal Communications Commission
(FCC) and Industry and Science Canada
The Tire Pressure Monitor System (TPMS) operates
on a radio frequency and complies with Part 15 of
the FCC Rules. Operation is subject to the following
two conditions:
1. This device may not cause harmful interference.
2. This device must accept any interference received,
including interference that may cause undesired
operation.
5-69
Page 388 of 484
The Tire Pressure Monitor System (TPMS) operates
on a radio frequency and complies with RSS-210
of Industry and Science Canada. Operation is subject to
the following two conditions:
1. This device may not cause interference.
2. This device must accept any interference received,
including interference that may cause undesired
operation of the device.
Changes or modi�cations to this system by other than
an authorized service facility could void authorization to
use this equipment.
Tire Inspection and Rotation
Tires should be rotated every 5,000 to 8,000 miles
(8 000 to 13 000 km).
Any time you notice unusual wear, rotate your tires as
soon as possible and check wheel alignment. Also
check for damaged tires or wheels. SeeWhen It Is Time
for New Tires on page 5-71andWheel Replacement
on page 5-76for more information.
Make sure the spare tire is stored securely. Push,
pull, and then try to rotate or turn the tire. If it moves,
use the ratchet/wheel wrench to tighten the cable.
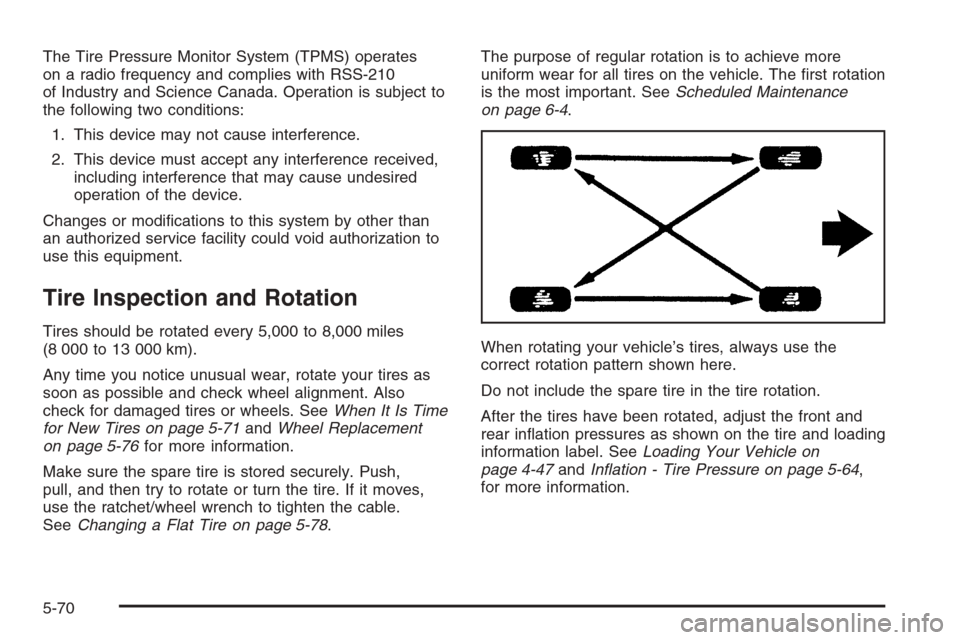
SeeChanging a Flat Tire on page 5-78.The purpose of regular rotation is to achieve more
uniform wear for all tires on the vehicle. The �rst rotation
is the most important. SeeScheduled Maintenance
on page 6-4.
When rotating your vehicle’s tires, always use the
correct rotation pattern shown here.
Do not include the spare tire in the tire rotation.
After the tires have been rotated, adjust the front and
rear in�ation pressures as shown on the tire and loading
information label. SeeLoading Your Vehicle on
page 4-47andIn�ation - Tire Pressure on page 5-64,
for more information.
5-70
Page 389 of 484
Vehicles that have the Tire Pressure Monitor System
(TPMS) will need to have the TPMS sensors reset after
a tire rotation. See “TPMS Sensor Identi�cation
Codes” underTire Pressure Monitor System on
page 5-66.
Make certain that all wheel nuts are properly tightened.
See “Wheel Nut Torque” underCapacities and
Speci�cations on page 5-116.
{CAUTION:
Rust or dirt on a wheel, or on the parts to
which it is fastened, can make wheel nuts
become loose after a time. The wheel could
come off and cause an accident. When you
change a wheel, remove any rust or dirt from
places where the wheel attaches to the vehicle.
In an emergency, you can use a cloth or a
paper towel to do this; but be sure to use a
scraper or wire brush later, if needed, to get
all the rust or dirt off. SeeChanging a Flat Tire
on page 5-78.
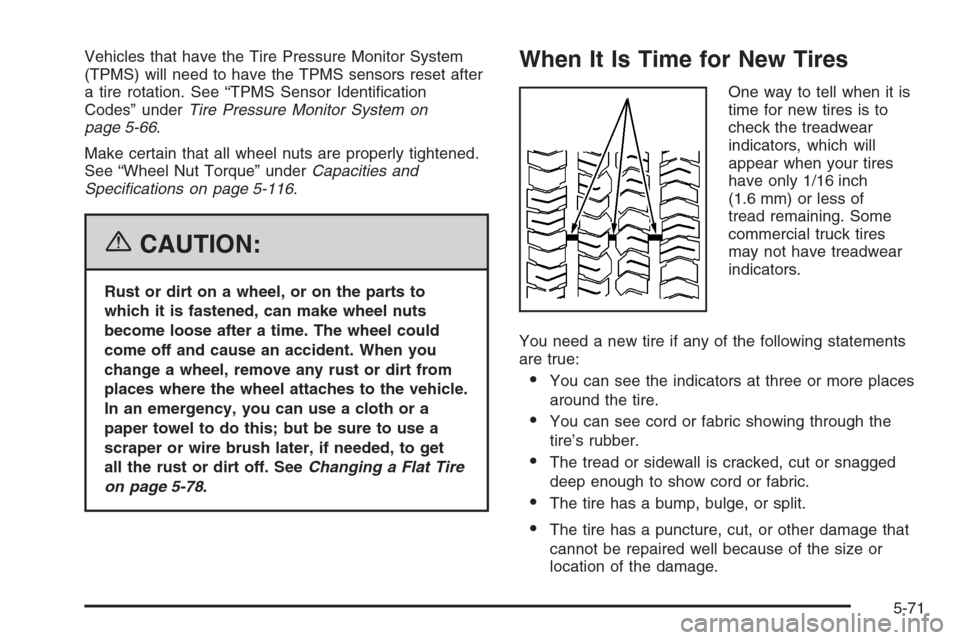
When It Is Time for New Tires
One way to tell when it is
time for new tires is to
check the treadwear
indicators, which will
appear when your tires
have only 1/16 inch
(1.6 mm) or less of
tread remaining. Some
commercial truck tires
may not have treadwear
indicators.
You need a new tire if any of the following statements
are true:
You can see the indicators at three or more places
around the tire.
You can see cord or fabric showing through the
tire’s rubber.
The tread or sidewall is cracked, cut or snagged
deep enough to show cord or fabric.
The tire has a bump, bulge, or split.
The tire has a puncture, cut, or other damage that
cannot be repaired well because of the size or
location of the damage.
5-71