climate control CADILLAC ESCALADE 2010 3.G Owner's Manual
[x] Cancel search | Manufacturer: CADILLAC, Model Year: 2010, Model line: ESCALADE, Model: CADILLAC ESCALADE 2010 3.GPages: 616, PDF Size: 39.41 MB
Page 216 of 616

#(Air Conditioning):Press to turn the airconditioning (A/C) compressor on and off. An indicatorlight comes on to show that the air conditioning is on.
Pressing this button when the outside temperatureis too cool for air conditioning will make the airconditioning indicator flash three times and then turn offindicating the air conditioning mode is not available.If the air conditioning is on and the outside temperaturedrops below a temperature which is too cool for airconditioning to be effective, the air conditioning lightturns off to show that the air conditioning mode hasbeen canceled.
On hot days, open the windows long enough to let hotinside air escape. This helps to reduce the time it takesfor the vehicle to cool down. It also helps the system tooperate more efficiently.
The air conditioning system removes moisture from theair, so a small amount of water might drip under thevehicle while idling or after turning off the engine.This is normal.
@(Recirculation):Press to turn the recirculationmode on or off. An indicator light comes on to show thatthe recirculation is on.
This mode recirculates and helps to quickly cool the airinside the vehicle. It can be used to help preventoutside air and odors from entering the vehicle.
The recirculation mode cannot be used with floor, defog,or defrost modes. If recirculation is selected with one ofthose modes, the indicator light flashes three times andthen turns off. The air conditioning compressor alsocomes on when this mode is activated. While inrecirculation mode the windows may fog when theweather is cold and damp. To clear the fog, select eitherthe defog or defrost mode and increase the fan speed.
The recirculation mode can also be turned off by turningoff the ignition.
REAR :For vehicles with the rear heating and airconditioning controls. Press the REAR button to turn therear climate control system on or off. SeeRear AirConditioning and Heating System and ElectronicClimate Controls on page 4!26.
4-24
Page 218 of 616
Rear Air Conditioning and Heating
System and Electronic Climate
Controls
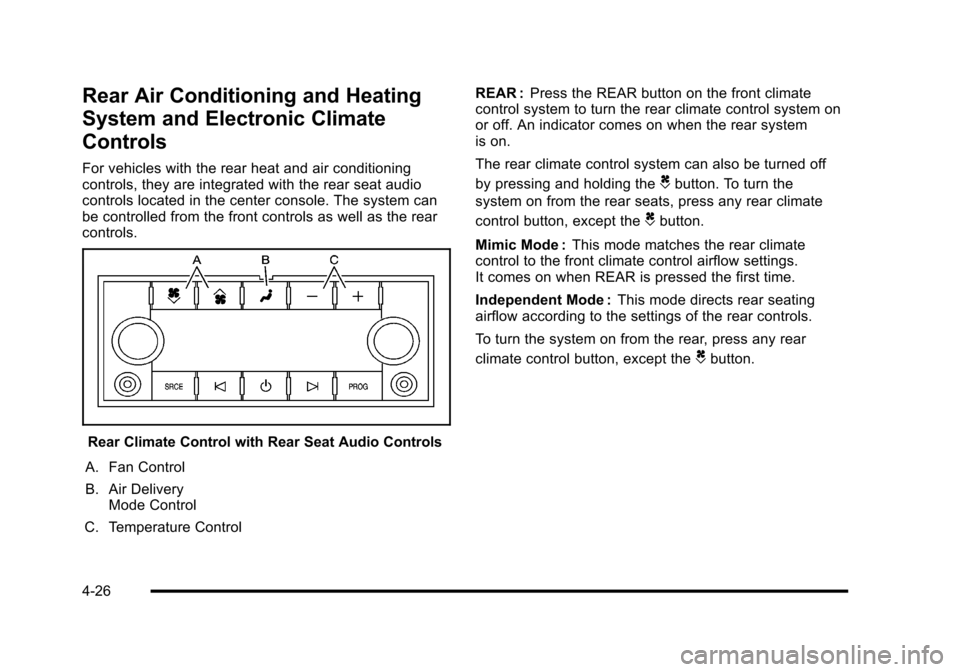
For vehicles with the rear heat and air conditioningcontrols, they are integrated with the rear seat audiocontrols located in the center console. The system canbe controlled from the front controls as well as the rearcontrols.
Rear Climate Control with Rear Seat Audio Controls
A. Fan Control
B. Air DeliveryMode Control
C. Temperature Control
REAR :Press the REAR button on the front climatecontrol system to turn the rear climate control system onor off. An indicator comes on when the rear systemis on.
The rear climate control system can also be turned off
by pressing and holding theCbutton. To turn the
system on from the rear seats, press any rear climate
control button, except theCbutton.
Mimic Mode :This mode matches the rear climatecontrol to the front climate control airflow settings.It comes on when REAR is pressed the first time.
Independent Mode :This mode directs rear seatingairflow according to the settings of the rear controls.
To turn the system on from the rear, press any rear
climate control button, except theCbutton.
4-26
Page 219 of 616

Automatic Operation, If Equipped.
AUTO :Press the air delivery mode button until thissetting is selected to control the inside temperature, airdelivery, and fan speed. AUTO appears in the displaywhen automatic operation is active.
+/!(Increase/Decrease Temperature) :Pressthe + or!buttons to increase or decrease the cabintemperature. The rear control temperature display willshow the temperature setting increasing or decreasing.
The display only indicates climate control functionswhen the system is in rear independent mode.
Manual Operation
DC(Fan Control):Press these buttons on the rearseat audio control panel to increase or decrease theairflow. Pressing the fan up button when the system isoff will turn the system on. The air delivery mode willremain under automatic control.
+/!(Temperature Control) :Press these buttons toadjust the temperature of the air flowing into thepassenger area. Press the + button for warmer air andpress the!button for cooler air.
N(Air Delivery Mode Control):Press the modebutton to change the direction of the airflow in thevehicle. Repeatedly press the button until the desiredmode appears on the display. Multiple presses will cyclethrough the delivery selections.
Warning Lights, Gages, and
Indicators
Warning lights and gages can signal that something iswrong before it becomes serious enough to cause anexpensive repair or replacement. Paying attention to thewarning lights and gages could prevent injury.
Warning lights come on when there might be or there isa problem with one of the vehicle's functions. Somewarning lights come on briefly when the engine isstarted to indicate they are working.
Gages can indicate when there might be or there is aproblem with one of the vehicle's functions. Often gagesand warning lights work together to indicate a problemwith the vehicle.
When one of the warning lights comes on and stays onwhile driving, or when one of the gages shows therecould be a problem, check the section that explainswhat to do. Follow this manual's advice. Waiting to dorepairs can be costly and even dangerous.
4-27
Page 240 of 616
Compass Calibration
The compass can be manually calibrated. Only calibratethe compass in a magnetically clean and safe location,such as an open parking lot, where driving the vehiclein circles is not a danger. It is suggested to calibrateaway from tall buildings, utility wires, manhole covers,or other industrial structures, if possible.
If CAL should ever appear in the DIC display, thecompass should be calibrated.
If the DIC display does not show a heading, forexample, N for North, or the heading does not changeafter making turns, there may be a strong magnetic fieldinterfering with the compass. Such interference may becaused by a magnetic CB or cell phone antenna mount,a magnetic emergency light, magnetic note pad holder,or any other magnetic item. Turn off the vehicle, movethe magnetic item, then turn on the vehicle and calibratethe compass.
To calibrate the compass, use the following procedure:
Compass Calibration Procedure
1. Before calibrating the compass, make sure thecompass zone is set to the variance zone in whichthe vehicle is located. See“Compass Variance(Zone) Procedure”earlier in this section.
Do not operate any switches such as window,sunroof, climate controls, seats, etc. during thecalibration procedure.
2. Press the vehicle information button until
PRESSVTO CALIBRATE COMPASS displays.
3. Press the set/reset button to start the compasscalibration.
4. The DIC will display CALIBRATING: DRIVE INCIRCLES. Drive the vehicle in tight circles at lessthan 5 mph (8 km/h) to complete the calibration.The DIC will display CALIBRATION COMPLETEfor a few seconds when the calibration is complete.The DIC display will then return to theprevious menu.
DIC Warnings and Messages
Messages are displayed on the DIC to notify the driverthat the status of the vehicle has changed and thatsome action may be needed by the driver to correct thecondition. Multiple messages may appear one afteranother.
Some messages may not require immediate action, butyou can press any of the DIC buttons on the instrumentpanel to acknowledge that you received the messagesand to clear them from the display.
Some messages cannot be cleared from the DICdisplay because they are more urgent. Thesemessages require action before they can be cleared.
4-48
Page 241 of 616
You should take any messages that appear on thedisplay seriously and remember that clearing themessages will only make the messages disappear,not correct the problem.
The following are the possible messages that can bedisplayed and some information about them.
BATTERY LOW START VEHICLE
When the vehicle’s battery is severely discharged, thismessage will display and four chimes will sound. Startthe vehicle immediately. If the vehicle is not started andthe battery continues to discharge, the climate controls,heated seats, and audio systems will shut off and thevehicle may require a jump start. These systems willfunction again after the vehicle is started.
CHANGE ENGINE OIL SOON
This message displays when the engine oil needs to bechanged. When you change the engine oil, be sure toreset the CHANGE ENGINE OIL SOON message. SeeEngine Oil Life Systemon page 7!20for informationon how to reset the message. SeeEngine Oilonpage 7!17andScheduled Maintenanceo n p a g e 8!3for more information.
DRIVER DOOR OPEN
This message displays and a chime sounds if the driverdoor is not fully closed and the vehicle is shifted out ofP (Park). Stop and turn off the vehicle, check the doorfor obstructions, and close the door again. Check to seeif the message still appears on the DIC.
ENGINE HOT A/C (Air Conditioning)
TURNED OFF
This message displays when the engine coolantbecomes hotter than the normal operating temperature.SeeEngine Coolant Temperature Gageon page 4!35.To avoid added strain on a hot engine, the airconditioning compressor automatically turns off.When the coolant temperature returns to normal,the air conditioning compressor turns back on. You cancontinue to drive your vehicle.
If this message continues to appear, have the systemrepaired by your dealer/retailer as soon as possible toavoid damage to the engine.
ENGINE OIL HOT IDLE ENGINE
This message displays when the engine oil becomeshotter than the normal operating temperature. Stop andallow the vehicle to idle until it cools down. SeeEngineCoolant Temperature Gageon page 4!35.
4-49
Page 397 of 616

If the system fails to turn on or activate, the StabiliTraklight along with one of the following messages will bedisplayed on the Driver Information Center (DIC):TRACTION CONTROL OFF, SERVICE TRACTIONCONTROL, STABILITRAK OFF, SERVICESTABILITRAK. If these DIC messages appear, makesure the StabiliTrak system has not been turned offusing the StabiliTrak on/off button. Then turn thesteering wheel clockwise from the nine o'clock positionto the three o'clock position. If this clears themessage(s), the vehicle does not need servicing.If this does not clear the message(s), then turn thevehicle off, wait 15 seconds, and then turn it back onagain to reset the system. If any of these messagesstill appear on the Driver Information Center (DIC), thevehicle should be taken in for service. For moreinformation on the DIC messages, seeDriverInformation Center (DIC) on page 4!41.
The StabiliTrak light willflash on the instrumentpanel cluster when thesystem is both onand activated.
The system may be heard or felt while it is working; thisis normal.
The traction controldisable button is locatedon the instrument panelbelow the climatecontrols.
The traction control part of StabiliTrak can be turnedoff by pressing and releasing the StabiliTrak button ifboth systems (traction control and StabiliTrak) werepreviously on. To disable both traction control andStabiliTrak, press and hold the button for five seconds.
Traction control and StabiliTrak can be turned on bypressing and releasing the StabiliTrak button if notautomatically shut off for any other reason.
When the TCS or StabiliTrak system is turned off,the StabiliTrak light and the appropriate TCS off orStabiliTrak off message will be displayed on the DIC towarn the driver. The vehicle will still have brake-tractioncontrol when traction control is off, but will not be ableto use the engine speed management system. See“Traction Control Operation”next for more information.
When the traction control system has been turned off,system noises may still be heard as a result of thebrake-traction control coming on.
6-7
Page 419 of 616

{WARNING:
Snow can trap engine exhaust under the vehicle.
This may cause exhaust gases to get inside.
Engine exhaust contains carbon monoxide (CO)
which cannot be seen or smelled. It can cause
unconsciousness and even death.
If the vehicle is stuck in the snow:
.Clear away snow from around the base of
your vehicle, especially any that is blocking
the exhaust pipe.
.Check again from time to time to be sure
snow does not collect there.
.Open a window about 5 cm (two inches) on
the side of the vehicle that is away from the
wind to bring in fresh air.
.Fully open the air outlets on or under the
instrument panel.
.Adjust the Climate Control system to a setting
that circulates the air inside the vehicle and
set the fan speed to the highest setting.
See Climate Control System in the Index.
(Continued)
WARNING: (Continued)
For more information about carbon monoxide, see
Engine Exhaust on page 3!41.
Snow can trap exhaust gases under your vehicle.
This can cause deadly CO (carbon monoxide) gas
to get inside. CO could overcome you and kill you.
You cannot see it or smell it, so you might not
know it is in your vehicle. Clear away snow from
around the base of your vehicle, especially any
that is blocking the exhaust.
Run the engine for short periods only as needed tokeep warm, but be careful.
To save fuel, run the engine for only short periods asneeded to warm the vehicle and then shut the engineoff and close the window most of the way to save heat.Repeat this until help arrives but only when you feelreally uncomfortable from the cold. Moving about tokeep warm also helps.
If it takes some time for help to arrive, now and thenwhen you run the engine, push the accelerator pedalslightly so the engine runs faster than the idle speed.This keeps the battery charged to restart the vehicleand to signal for help with the headlamps. Do this aslittle as possible to save fuel.
6-29
Page 440 of 616

Trailer Brakes
A loaded trailer that weighs more than 2,000 lbs(900 kg) needs to have its own brake system that isadequate for the weight of the trailer. Be sure to readand follow the instructions for the trailer brakes so theyare installed, adjusted and maintained properly.
Since the vehicle is equipped with StabiliTrak®, thetrailer brakes cannot tap into the vehicle's hydraulicsystem.
Driving with a Trailer
{WARNING:
When towing a trailer, exhaust gases may collect
at the rear of the vehicle and enter if the liftgate,
trunk/hatch, or rear-most window is open.
Engine exhaust contains carbon monoxide (CO)
which cannot be seen or smelled. It can cause
unconsciousness and even death.
To maximize safety when towing a trailer:
.Have the exhaust system inspected for
leaks and make necessary repairs before
starting a trip.
(Continued)
WARNING: (Continued)
.Never drive with the liftgate, trunk/hatch,
or rear-most window open.
.Fully open the air outlets on or under the
instrument panel.
.Adjust the Climate Control system to a setting
that brings in only outside air and set the fan
speed to the highest setting. See Climate
Control System in the Index.
For more information about carbon monoxide, see
Engine Exhaust on page 3!41.
Towing a trailer requires a certain amount ofexperience. The combination you are driving is longerand not as responsive as the vehicle itself. Getacquainted with the handling and braking of the rigbefore setting out for the open road.
Before starting, check all trailer hitch parts andattachments, safety chains, electrical connectors,lamps, tires and mirrors. If the trailer has electricbrakes, start the combination moving and then applythe trailer brake controller by hand to be sure thebrakes work.
6-50
Page 522 of 616
Uniform Tire Quality Grading
Quality grades can be found where applicable on
the tire sidewall between tread shoulder and
maximum section width. For example:
Treadwear 200 Traction AA
Temperature A
The following information relates to the system
developed by the United States National Highway
Traffic Safety Administration (NHTSA), which
grades tires by treadwear, traction, and
temperature performance. This applies only to
vehicles sold in the United States. The grades are
molded on the sidewalls of most passenger car
tires. The Uniform Tire Quality Grading (UTQG)
system does not apply to deep tread, winter-type
snow tires, space-saver, or temporary use spare
tires, tires with nominal rim diameters of
10 to 12 inches (25 to 30 cm), or to some
limited-production tires.
While the tires available on General Motors
passenger cars and light trucks may vary with
respect to these grades, they must also conform
to federal safety requirements and additional
General Motors Tire Performance Criteria (TPC)
standards.
Treadwear
The treadwear grade is a comparative rating
based on the wear rate of the tire when tested
under controlled conditions on a specified
government test course. For example, a tire
graded 150 would wear one and a half (1.5) times
as well on the government course as a tire
graded 100. The relative performance of tires
depends upon the actual conditions of their use,
however, and may depart significantly from the
norm due to variations in driving habits, service
practices, and differences in road characteristics
and climate.
Traction–AA, A, B, C
The traction grades, from highest to lowest, are
AA, A, B, and C. Those grades represent the
tire's ability to stop on wet pavement as measured
under controlled conditions on specified
government test surfaces of asphalt and concrete.
A tire marked C may have poor traction
performance.
7-76
Page 555 of 616
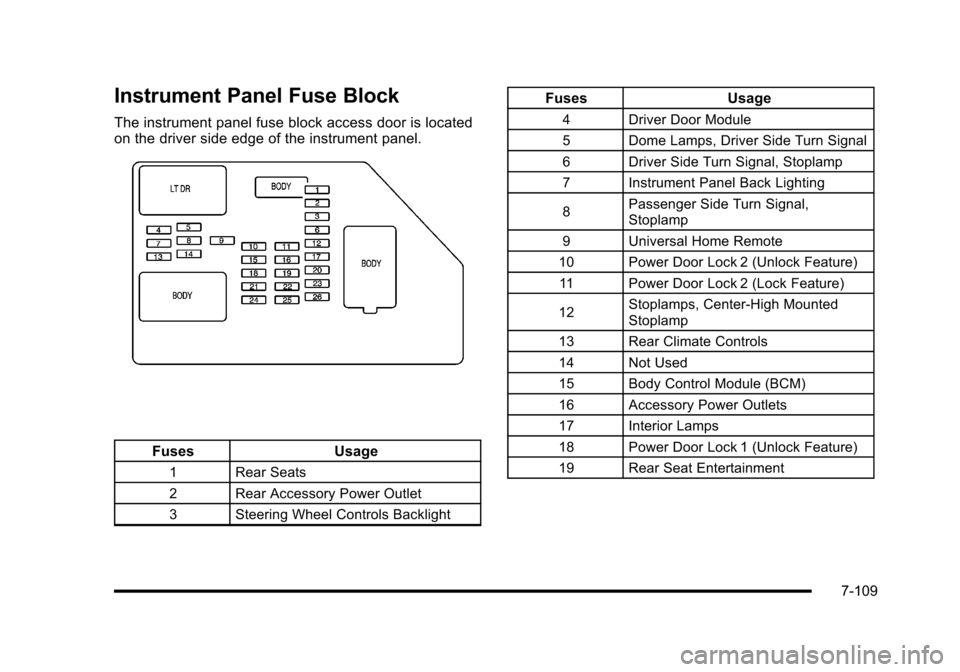
Instrument Panel Fuse Block
The instrument panel fuse block access door is locatedon the driver side edge of the instrument panel.
FusesUsage
1Rear Seats
2Rear Accessory Power Outlet
3Steering Wheel Controls Backlight
FusesUsage
4Driver Door Module
5Dome Lamps, Driver Side Turn Signal
6Driver Side Turn Signal, Stoplamp
7Instrument Panel Back Lighting
8Passenger Side Turn Signal,Stoplamp
9Universal Home Remote
10Power Door Lock 2 (Unlock Feature)
11Power Door Lock 2 (Lock Feature)
12Stoplamps, Center-High MountedStoplamp
13Rear Climate Controls
14Not Used
15Body Control Module (BCM)
16Accessory Power Outlets
17Interior Lamps
18Power Door Lock 1 (Unlock Feature)
19Rear Seat Entertainment
7-109