brake fluid CADILLAC ESCALADE 2010 3.G Owners Manual
[x] Cancel search | Manufacturer: CADILLAC, Model Year: 2010, Model line: ESCALADE, Model: CADILLAC ESCALADE 2010 3.GPages: 616, PDF Size: 39.41 MB
Page 5 of 616
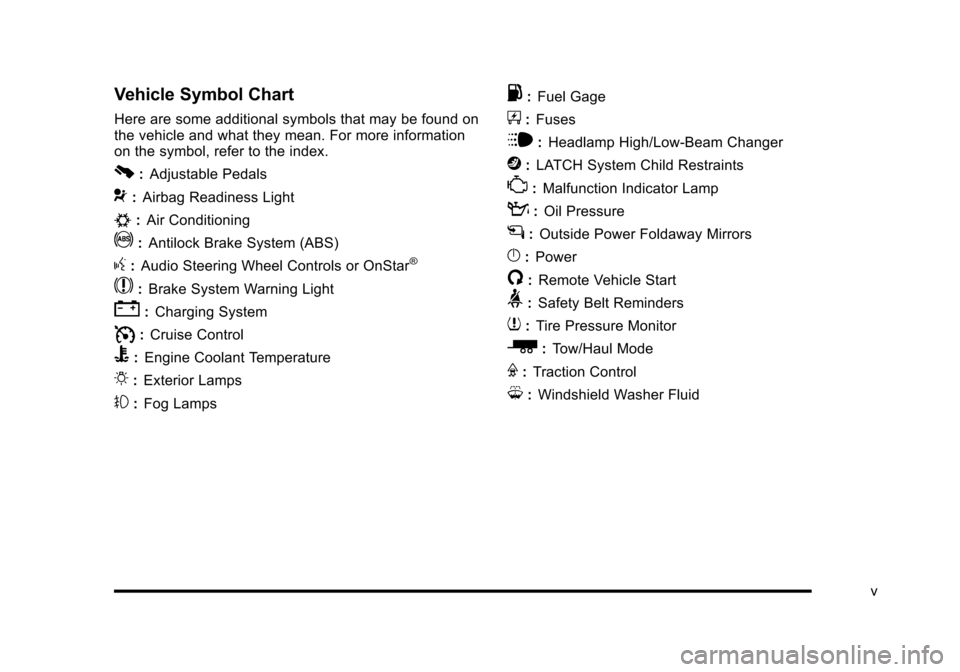
Vehicle Symbol Chart
Here are some additional symbols that may be found onthe vehicle and what they mean. For more informationon the symbol, refer to the index.
0:Adjustable Pedals
9:Airbag Readiness Light
#:Air Conditioning
!:Antilock Brake System (ABS)
g:Audio Steering Wheel Controls or OnStar®
$:Brake System Warning Light
":Charging System
I:Cruise Control
B:Engine Coolant Temperature
O:Exterior Lamps
#:Fog Lamps
.:Fuel Gage
+:Fuses
i:Headlamp High/Low-Beam Changer
j:LATCH System Child Restraints
*:Malfunction Indicator Lamp
::Oil Pressure
g:Outside Power Foldaway Mirrors
}:Power
/:Remote Vehicle Start
>:Safety Belt Reminders
7:Tire Pressure Monitor
_:Tow/Haul Mode
F:Traction Control
M:Windshield Washer Fluid
v
Page 9 of 616
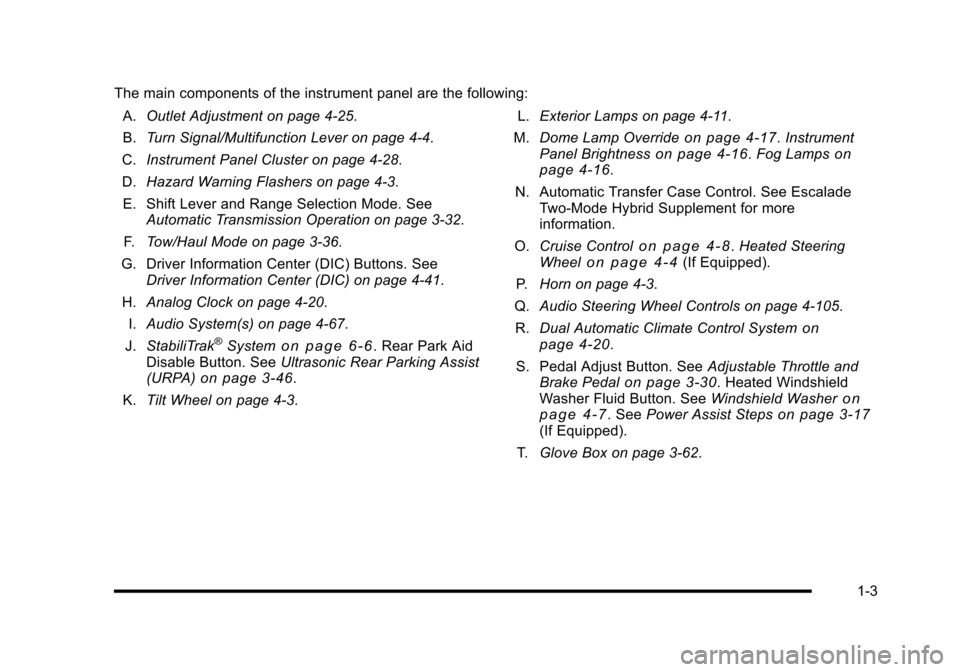
The main components of the instrument panel are the following:
A.Outlet Adjustment on page 4!25.
B.Turn Signal/Multifunction Lever on page 4!4.
C.Instrument Panel Cluster on page 4!28.
D.Hazard Warning Flashers on page 4!3.
E. Shift Lever and Range Selection Mode. SeeAutomatic Transmission Operation on page 3!32.
F.Tow/Haul Mode on page 3!36.
G. Driver Information Center (DIC) Buttons. SeeDriver Information Center (DIC) on page 4!41.
H.Analog Clock on page 4!20.
I.Audio System(s) on page 4!67.
J.StabiliTrak®Systemo n p a g e 6!6. Rear Park AidDisable Button. SeeUltrasonic Rear Parking Assist(URPA)on page 3!46.
K.Tilt Wheel on page 4!3.
L.Exterior Lamps on page 4!11.
M.Dome Lamp Overrideon page 4!17.InstrumentPanel Brightnesson page 4!16.Fog Lampsonpage 4!16.
N. Automatic Transfer Case Control. See EscaladeTwo!Mode Hybrid Supplement for moreinformation.
O.Cruise Controlo n p a g e 4!8.Heated SteeringWheelo n p a g e 4!4(If Equipped).
P.Horn on page 4!3.
Q.Audio Steering Wheel Controls on page 4!105.
R.Dual Automatic Climate Control Systemonpage 4!20.
S. Pedal Adjust Button. SeeAdjustable Throttle andBrake Pedalon page 3!30. Heated WindshieldWasher Fluid Button. SeeWindshield Washeronp a g e 4!7. SeePower Assist Stepson page 3!17(If Equipped).
T.Glove Box on page 3!62.
1-3
Page 201 of 616
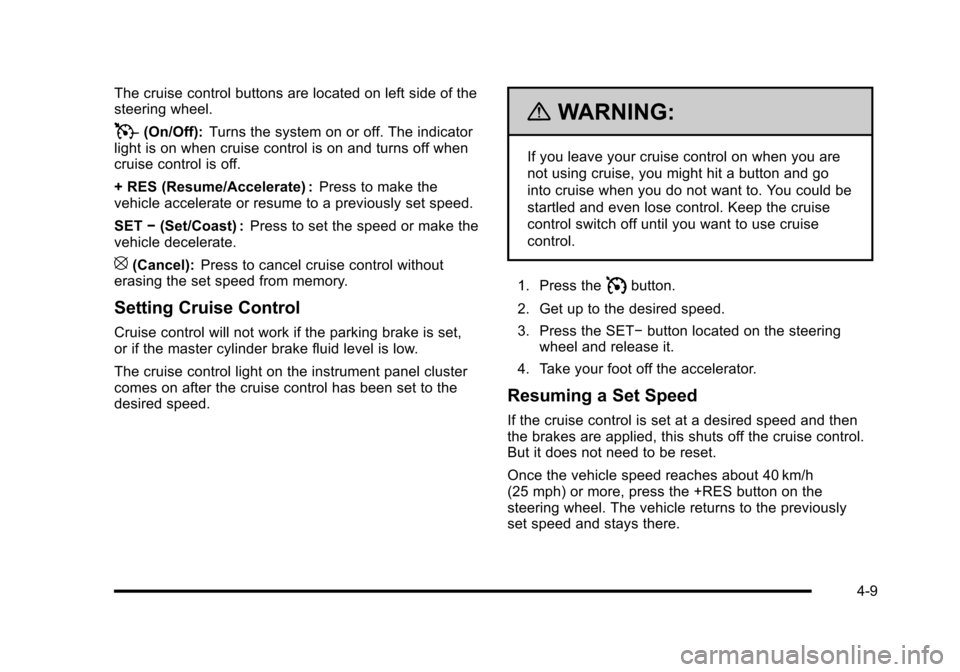
The cruise control buttons are located on left side of thesteering wheel.
T(On/Off):Turns the system on or off. The indicatorlight is on when cruise control is on and turns off whencruise control is off.
+ RES (Resume/Accelerate) :Press to make thevehicle accelerate or resume to a previously set speed.
SET!(Set/Coast) :Press to set the speed or make thevehicle decelerate.
[(Cancel):Press to cancel cruise control withouterasing the set speed from memory.
Setting Cruise Control
Cruise control will not work if the parking brake is set,or if the master cylinder brake fluid level is low.
The cruise control light on the instrument panel clustercomes on after the cruise control has been set to thedesired speed.
{WARNING:
If you leave your cruise control on when you are
not using cruise, you might hit a button and go
into cruise when you do not want to. You could be
startled and even lose control. Keep the cruise
control switch off until you want to use cruise
control.
1. Press theIbutton.
2. Get up to the desired speed.
3. Press the SET!button located on the steeringwheel and release it.
4. Take your foot off the accelerator.
Resuming a Set Speed
If the cruise control is set at a desired speed and thenthe brakes are applied, this shuts off the cruise control.But it does not need to be reset.
Once the vehicle speed reaches about 40 km/h(25 mph) or more, press the +RES button on thesteering wheel. The vehicle returns to the previouslyset speed and stays there.
4-9
Page 225 of 616
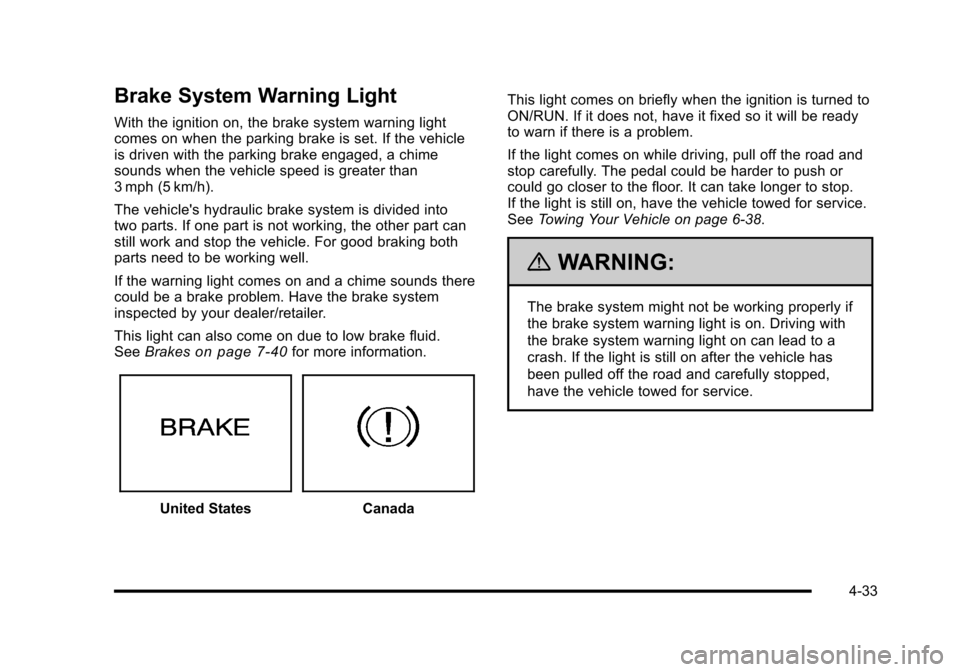
Brake System Warning Light
With the ignition on, the brake system warning lightcomes on when the parking brake is set. If the vehicleis driven with the parking brake engaged, a chimesounds when the vehicle speed is greater than3 mph (5 km/h).
The vehicle's hydraulic brake system is divided intotwo parts. If one part is not working, the other part canstill work and stop the vehicle. For good braking bothparts need to be working well.
If the warning light comes on and a chime sounds therecould be a brake problem. Have the brake systeminspected by your dealer/retailer.
This light can also come on due to low brake fluid.SeeBrakeson page 7!40for more information.
United StatesCanada
This light comes on briefly when the ignition is turned toON/RUN. If it does not, have it fixed so it will be readyto warn if there is a problem.
If the light comes on while driving, pull off the road andstop carefully. The pedal could be harder to push orcould go closer to the floor. It can take longer to stop.If the light is still on, have the vehicle towed for service.SeeTowing Your Vehicle on page 6!38.
{WARNING:
The brake system might not be working properly if
the brake system warning light is on. Driving with
the brake system warning light on can lead to a
crash. If the light is still on after the vehicle has
been pulled off the road and carefully stopped,
have the vehicle towed for service.
4-33
Page 417 of 616

Hill and Mountain Roads
Driving on steep hills or through mountains is differentthan driving on flat or rolling terrain. Tips for driving inthese conditions include:
.Keep the vehicle serviced and in good shape.
.Check all fluid levels and brakes, tires, coolingsystem, and transmission.
.Going down steep or long hills, shift to alower gear.
{WARNING:
If you do not shift down, the brakes could get so
hot that they would not work well. You would then
have poor braking or even none going down a hill.
You could crash. Shift down to let the engine
assist the brakes on a steep downhill slope.
{WARNING:
Coasting downhill in N (Neutral) or with the
ignition off is dangerous. The brakes will have to
do all the work of slowing down and they could
get so hot that they would not work well. You
would then have poor braking or even none going
down a hill. You could crash. Always have the
engine running and the vehicle in gear when
going downhill.
.Stay in your own lane. Do not swing wide or cutacross the center of the road. Drive at speeds thatlet you stay in your own lane.
.Top of hills: Be alert—something could be in yourlane (stalled car, accident).
.Pay attention to special road signs (falling rocksarea, winding roads, long grades, passing orno-passing zones) and take appropriate action.
SeeOff-Road Drivingon page 6!13for informationabout driving off-road.
6-27
Page 443 of 616
4. Reapply the brake pedal. Then apply the parkingbrake and shift into P (Park).
5. Release the brake pedal.
{WARNING:
It can be dangerous to get out of the vehicle if the
shift lever is not fully in P (Park) with the parking
brake firmly set. The vehicle can roll.
If the engine has been left running, the vehicle
can move suddenly. You or others could be
injured. To be sure the vehicle will not move, even
when on fairly level ground, always put the shift
lever fully in P (Park) with the parking brake
firmly set.
Leaving After Parking on a Hill
1. Apply and hold the brake pedal.
2. Start the engine
3. Shift into a gear
4. Release the parking brake
5. Let up on the brake pedal.
6. Drive slowly until the trailer is clear of the chocks.
7. Stop and have someone pick up and storethe chocks.
Maintenance When Trailer Towing
The vehicle needs service more often when pulling atrailer. See this manual's Maintenance Schedule orIndex for more information. Things that are especiallyimportant in trailer operation are automatic transmissionfluid, engine oil, axle lubricant, belts, cooling systemand brake system. It is a good idea to inspect thesebefore and during the trip.
Check periodically to see that all hitch nuts and boltsare tight.
6-53
Page 447 of 616
Section 7 Service and Appearance Care
Service. . . . . . . . . . . . . . . . . . . . . . . . . . . . . . . . . . . . . . . . . . . . . 7-4Accessories and Modifications . . . . . . . . . . . . . . . . . . 7-4California Proposition 65 Warning . . . . . . . . . . . . . . . 7-5California Perchlorate MaterialsRequirements . . . . . . . . . . . . . . . . . . . . . . . . . . . . . . . . . 7-5Doing Your Own Service Work . . . . . . . . . . . . . . . . . . 7-6Adding Equipment to the Outside of theVehicle . . . . . . . . . . . . . . . . . . . . . . . . . . . . . . . . . . . . . . . . 7-6
Fuel. . . . . . . . . . . . . . . . . . . . . . . . . . . . . . . . . . . . . . . . . . . . . . . . . 7-7Gasoline Octane . . . . . . . . . . . . . . . . . . . . . . . . . . . . . . . . 7-8Gasoline Specifications . . . . . . . . . . . . . . . . . . . . . . . . . 7-8California Fuel . . . . . . . . . . . . . . . . . . . . . . . . . . . . . . . . . . 7-8Additives . . . . . . . . . . . . . . . . . . . . . . . . . . . . . . . . . . . . . . . . 7-9Fuel E85 (85% Ethanol) . . . . . . . . . . . . . . . . . . . . . . . . . 7-9Fuels in Foreign Countries . . . . . . . . . . . . . . . . . . . . . 7-10Filling the Tank . . . . . . . . . . . . . . . . . . . . . . . . . . . . . . . . . 7-11Filling a Portable Fuel Container . . . . . . . . . . . . . . . 7-13
Checking Things Under the Hood. . . . . . . . . . . . . . . 7-14Hood Release . . . . . . . . . . . . . . . . . . . . . . . . . . . . . . . . . 7-15Engine Compartment Overview . . . . . . . . . . . . . . . . 7-16Engine Oil . . . . . . . . . . . . . . . . . . . . . . . . . . . . . . . . . . . . . 7-17Engine Oil Life System . . . . . . . . . . . . . . . . . . . . . . . . 7-20Engine Air Cleaner/Filter . . . . . . . . . . . . . . . . . . . . . . . 7-22
Automatic Transmission Fluid . . . . . . . . . . . . . . . . . . 7-24Cooling System . . . . . . . . . . . . . . . . . . . . . . . . . . . . . . . . 7-28Engine Coolant . . . . . . . . . . . . . . . . . . . . . . . . . . . . . . . . 7-29Engine Overheating . . . . . . . . . . . . . . . . . . . . . . . . . . . 7-34Overheated Engine ProtectionOperating Mode . . . . . . . . . . . . . . . . . . . . . . . . . . . . . 7-37Engine Fan Noise . . . . . . . . . . . . . . . . . . . . . . . . . . . . . 7-37Power Steering Fluid . . . . . . . . . . . . . . . . . . . . . . . . . . 7-38Windshield Washer Fluid . . . . . . . . . . . . . . . . . . . . . . 7-39Brakes . . . . . . . . . . . . . . . . . . . . . . . . . . . . . . . . . . . . . . . . . 7-40Battery . . . . . . . . . . . . . . . . . . . . . . . . . . . . . . . . . . . . . . . . . 7-43Jump Starting . . . . . . . . . . . . . . . . . . . . . . . . . . . . . . . . . . 7-44
All-Wheel Drive. . . . . . . . . . . . . . . . . . . . . . . . . . . . . . . . . . . 7-49
Rear Axle. . . . . . . . . . . . . . . . . . . . . . . . . . . . . . . . . . . . . . . . . 7-50
Front Axle. . . . . . . . . . . . . . . . . . . . . . . . . . . . . . . . . . . . . . . . . 7-51
Headlamp Aiming. . . . . . . . . . . . . . . . . . . . . . . . . . . . . . . . 7-52
Bulb Replacement. . . . . . . . . . . . . . . . . . . . . . . . . . . . . . . . 7-54High Intensity Discharge (HID) Lighting . . . . . . . . 7-54LED Lighting . . . . . . . . . . . . . . . . . . . . . . . . . . . . . . . . . . . 7-55Back-Up Lamps . . . . . . . . . . . . . . . . . . . . . . . . . . . . . . . 7-55License Plate Lamp . . . . . . . . . . . . . . . . . . . . . . . . . . . . 7-56Replacement Bulbs . . . . . . . . . . . . . . . . . . . . . . . . . . . . 7-56
7-1
Page 460 of 616
Checking Things Under
the Hood
{WARNING:
An electric fan under the hood can start up and
injure you even when the engine is not running.
Keep hands, clothing, and tools away from any
underhood electric fan.
{WARNING:
Things that burn can get on hot engine parts and
start a fire. These include liquids like fuel, oil,
coolant, brake fluid, windshield washer and other
fluids, and plastic or rubber. You or others could
be burned. Be careful not to drop or spill things
that will burn onto a hot engine.
7-14
Page 463 of 616
A.Engine Air Cleaner/Filter on page 7!22.
B. Coolant Surge Tank and Pressure Cap.SeeCooling System on page 7!28.
C. Remote Positive (+) Terminal. SeeJump Startingon page 7!44.
D.Battery on page 7!43.
E. Engine Oil Fill Cap. See“When to Add Engine Oil”underEngine Oil on page 7!17.
F. Automatic Transmission Dipstick (Out of View).See“Checking the Fluid Level”underAutomaticTransmission Fluid on page 7!24.
G. Remote Negative (!) Terminal (GND) (Out ofView). SeeJump Starting on page 7!44.
H. Engine Oil Dipstick (Out of View). See“CheckingEngine Oil”underEngine Oil on page 7!17.
I. Engine Cooling Fan (Out of View). SeeCoolingSystem on page 7!28.
J. Power Steering Fluid Reservoir (Out of View).SeePower Steering Fluid on page 7!38.
K. Brake Master Cylinder Reservoir. See“BrakeFluid”underBrakes on page 7!40.
L.Underhood Fuse Block on page 7!111.
M. Windshield Washer Fluid Reservoir. See“AddingWasher Fluid”underWindshield Washer Fluidonpage 7!39.
Engine Oil
Checking Engine Oil
It is a good idea to check the engine oil level at eachfuel fill. In order to get an accurate reading, the oil mustbe warm and the vehicle must be on level ground.
The engine oil dipstick handle is a yellow loop. SeeEngine Compartment Overviewon page 7!16for thelocation of the engine oil dipstick.
1. Turn off the engine and give the oil several minutesto drain back into the oil pan. If this is not done, theoil dipstick might not show the actual level.
2. Pull out the dipstick and clean it with a paper towelor cloth, then push it back in all the way. Remove itagain, keeping the tip down, and check the level.
7-17
Page 470 of 616
Automatic Transmission Fluid
When to Check and Change Automatic
Transmission Fluid
It is usually not necessary to check the transmissionfluid level. The only reason for fluid loss is atransmission leak or overheating the transmission.If you suspect a small leak, then use the followingchecking procedures to check the fluid level. However,if there is a large leak, then it may be necessary to havethe vehicle towed to a dealer/retailer service departmentand have it repaired before driving the vehicle further.
Notice:Use of the incorrect automatic transmissionfluid may damage the vehicle, and the damages maynot be covered by the vehicle's warranty. Alwaysuse the automatic transmission fluid listed inRecommended Fluids and Lubricants on page 8!10.
Change the fluid and filter at the intervals listed in theMaintenance Schedule. SeeScheduled Maintenanceo n p a g e 8!3. Be sure to use the transmission fluidlisted inRecommended Fluids and Lubricantsonpage 8!10.
How to Check Automatic Transmission
Fluid
Notice:Too much or too little fluid can damage yourtransmission. Too much can mean that some of thefluid could come out and fall on hot engine parts orexhaust system parts, starting a fire. Too little fluidcould cause the transmission to overheat. Be sureto get an accurate reading if you check yourtransmission fluid.
Before checking the fluid level, prepare the vehicle asfollows:
1. Start the engine and park the vehicle on a levelsurface. Keep the engine running.
2. Apply the parking brake and place the shiftlever in P (Park).
3. With your foot on the brake pedal, move the shiftlever through each gear range, pausing for aboutthree seconds in each range. Then, move the shiftlever back to P (Park).
7-24