sensor CADILLAC ESCALADE 2015 4.G Owners Manual
[x] Cancel search | Manufacturer: CADILLAC, Model Year: 2015, Model line: ESCALADE, Model: CADILLAC ESCALADE 2015 4.GPages: 435, PDF Size: 4.59 MB
Page 10 of 435

Black plate (3,1)Cadillac Escalade Owner Manual (GMNA-Localizing-U.S./Canada/Mexico-
7063683) - 2015 - crc - 2/24/14
In Brief 1-3
1.Air Vents on page 8-7.
2. Head-Up Display (HUD) on
page 5-29 (If Equipped).
3. Turn Signal Lever. See Turn and
Lane-Change Signals on
page 6-6.
Windshield Wiper/Washer on
page 5-3.
Rear Window Wiper/Washer on
page 5-5.
4. Hazard Warning Flashers on
page 6-6.
5. Instrument Cluster on page 5-10.
6. Shift Lever. See Automatic
Transmission on page 9-27.
Tow/Haul Mode Selector Button.
See Tow/Haul Mode on
page 9-31.
Range Selection Mode Buttons
(If Equipped). See Manual Mode
on page 9-30. 7.
Power Assist Steps on
page 2-18 (If Equipped).
Pedal Adjust Switch. See
Adjustable Throttle and Brake
Pedal on page 9-19.
Magnetic Ride Control Button (if
Equipped). See Magnetic Ride
Control on page 9-40.
8. Light Sensor. See Automatic
Headlamp System on page 6-4.
9. Infotainment on page 7-1.
10. Glove Box Button. See Glove
Box on page 4-1.
Parking Assist Button. See
Assistance Systems for
Parking or Backing on
page 9-52.
Lane Departure Warning
(LDW) on page 9-63.
Traction Control/Electronic
Stability Control on page 9-38.
11. Instrument Panel Illumination
Control on page 6-7. 12.
Exterior Lamp Controls on
page 6-1.
13. Electric Parking Brake on
page 9-36 (If Equipped).
14. Data Link Connector (DLC) (Out of View). See Malfunction
Indicator Lamp on page 5-17.
15. Automatic Transfer Case Knob (If Equipped). See Four-Wheel
Drive on page 9-32.
16. Cruise Control on page 9-41 (If
Equipped).
Adaptive Cruise Control on
page 9-44 (If Equipped).
Forward Collision Alert (FCA)
System on page 9-57 (If
Equipped).
Phone Button. See
Infotainment on page 7-1.
17. Steering Wheel Adjustment on
page 5-2.
18. Horn on page 5-3.
Page 21 of 435
Black plate (14,1)Cadillac Escalade Owner Manual (GMNA-Localizing-U.S./Canada/Mexico-
7063683) - 2015 - crc - 2/24/14
1-14 In Brief
;:Turns on the parking lamps
including all lamps, except the
headlamps.
5: Turns on the headlamps
together with the parking lamps and
instrument panel lights.
See:
.Exterior Lamp Controls on
page 6-1
.Daytime Running Lamps (DRL)
on page 6-4
.Automatic Headlamp System on
page 6-4
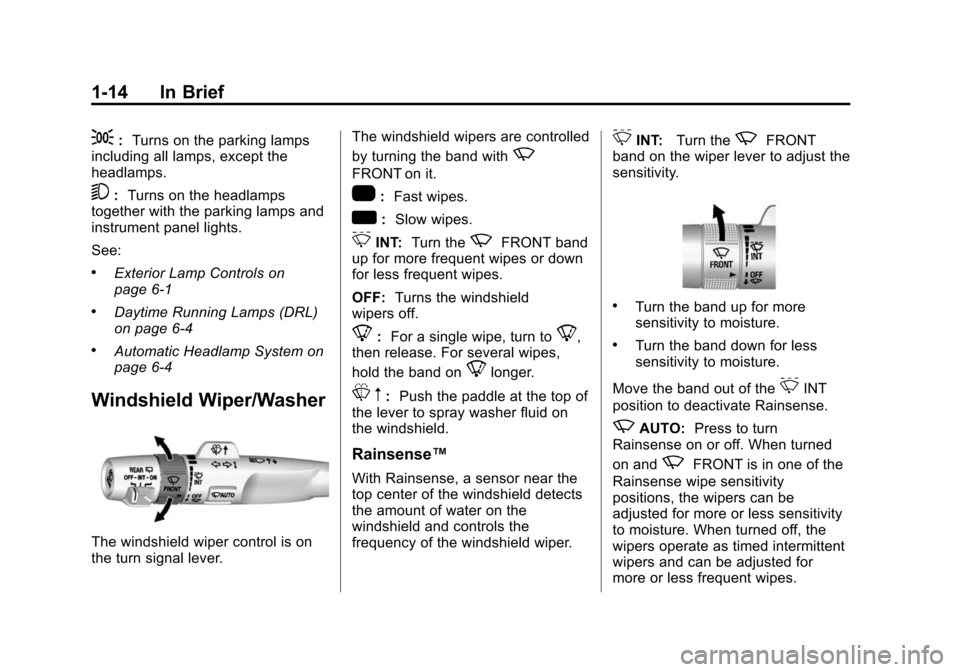
Windshield Wiper/Washer
The windshield wiper control is on
the turn signal lever. The windshield wipers are controlled
by turning the band with
z
FRONT on it.
1:
Fast wipes.
w:Slow wipes.
3INT: Turn thezFRONT band
up for more frequent wipes or down
for less frequent wipes.
OFF: Turns the windshield
wipers off.
8: For a single wipe, turn to8,
then release. For several wipes,
hold the band on
8longer.
L m:Push the paddle at the top of
the lever to spray washer fluid on
the windshield.
Rainsense™
With Rainsense, a sensor near the
top center of the windshield detects
the amount of water on the
windshield and controls the
frequency of the windshield wiper.
3INT: Turn thezFRONT
band on the wiper lever to adjust the
sensitivity.
.Turn the band up for more
sensitivity to moisture.
.Turn the band down for less
sensitivity to moisture.
Move the band out of the
3INT
position to deactivate Rainsense.
zAUTO: Press to turn
Rainsense on or off. When turned
on and
zFRONT is in one of the
Rainsense wipe sensitivity
positions, the wipers can be
adjusted for more or less sensitivity
to moisture. When turned off, the
wipers operate as timed intermittent
wipers and can be adjusted for
more or less frequent wipes.
Page 25 of 435
Black plate (18,1)Cadillac Escalade Owner Manual (GMNA-Localizing-U.S./Canada/Mexico-
7063683) - 2015 - crc - 2/24/14
1-18 In Brief
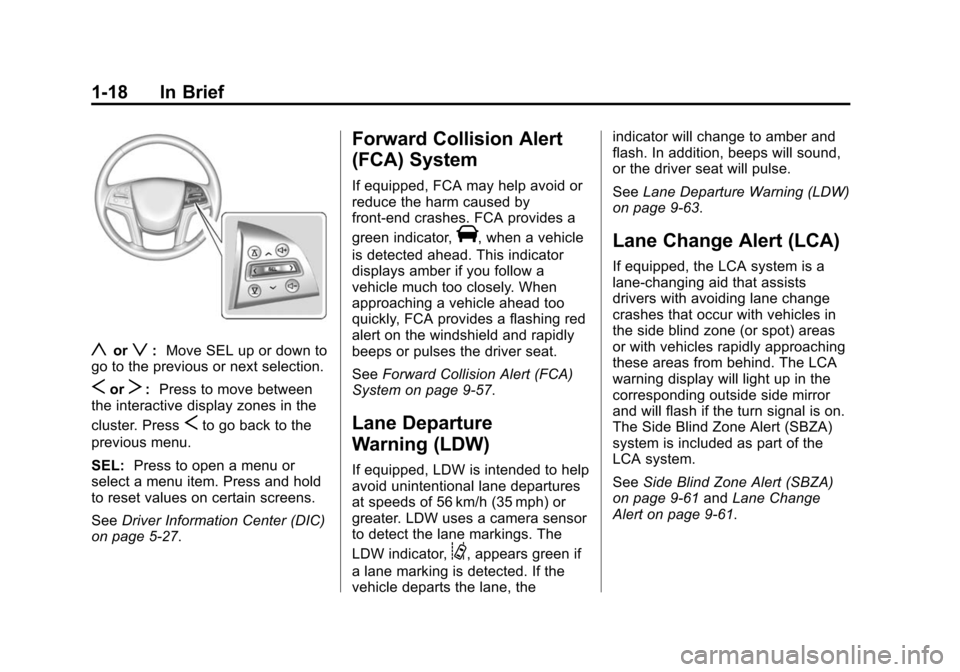
yorz:Move SEL up or down to
go to the previous or next selection.
SorT: Press to move between
the interactive display zones in the
cluster. Press
Sto go back to the
previous menu.
SEL: Press to open a menu or
select a menu item. Press and hold
to reset values on certain screens.
See Driver Information Center (DIC)
on page 5-27.
Forward Collision Alert
(FCA) System
If equipped, FCA may help avoid or
reduce the harm caused by
front-end crashes. FCA provides a
green indicator,
V, when a vehicle
is detected ahead. This indicator
displays amber if you follow a
vehicle much too closely. When
approaching a vehicle ahead too
quickly, FCA provides a flashing red
alert on the windshield and rapidly
beeps or pulses the driver seat.
See Forward Collision Alert (FCA)
System on page 9-57.
Lane Departure
Warning (LDW)
If equipped, LDW is intended to help
avoid unintentional lane departures
at speeds of 56 km/h (35 mph) or
greater. LDW uses a camera sensor
to detect the lane markings. The
LDW indicator,
@, appears green if
a lane marking is detected. If the
vehicle departs the lane, the indicator will change to amber and
flash. In addition, beeps will sound,
or the driver seat will pulse.
See
Lane Departure Warning (LDW)
on page 9-63.
Lane Change Alert (LCA)
If equipped, the LCA system is a
lane-changing aid that assists
drivers with avoiding lane change
crashes that occur with vehicles in
the side blind zone (or spot) areas
or with vehicles rapidly approaching
these areas from behind. The LCA
warning display will light up in the
corresponding outside side mirror
and will flash if the turn signal is on.
The Side Blind Zone Alert (SBZA)
system is included as part of the
LCA system.
See Side Blind Zone Alert (SBZA)
on page 9-61 andLane Change
Alert on page 9-61.
Page 26 of 435
Black plate (19,1)Cadillac Escalade Owner Manual (GMNA-Localizing-U.S./Canada/Mexico-
7063683) - 2015 - crc - 2/24/14
In Brief 1-19
Rear Vision
Camera (RVC)
If equipped, RVC displays a view of
the area behind the vehicle on the
center stack display when the
vehicle is shifted into R (Reverse).
SeeAssistance Systems for Parking
or Backing on page 9-52.
Parking Assist
If equipped, Front and Rear Parking
Assist (FRPA) uses sensors on the
front and rear bumpers to assist
with parking and avoiding objects
during low speed parking
maneuvers. It operates at speeds
less than 8 km/h (5 mph). FRPA may
display a warning triangle on the
Rear Vision Camera screen and a
graphic on the instrument cluster to
provide the object distance. In
addition, multiple beeps or seat
pulses may occur if very close to an
object. The vehicle may also have a higher
speed Backing Warning System and
the Rear Automatic Braking system.
See
Driver Assistance Systems on
page 9-52.
Active Emergency
Braking System
If the vehicle has Adaptive Cruise
Control (ACC) it also has the Active
Emergency Braking System, which
includes Intelligent Brake
Assist (IBA) and the Automatic
Collision Preparation (ACP) System.
These systems can provide a boost
to braking or automatically brake the
vehicle to help avoid or lessen the
severity of crashes while moving
forward.
See Active Emergency Braking
System on page 9-59.
Power Outlets
Accessory power outlets can be
used to plug in electrical equipment,
such as a cell phone, MP3
player, etc.
The vehicle has five accessory
power outlets:
.One near the cupholders on the
center console.
.One inside the center console.
.One on the rear of the center
console.
.One in the third row seat on the
driver side.
.One in the rear cargo area on
the passenger side.
Lift the cover to access and replace
when not in use.
See Power Outlets on page 5-6.
Page 47 of 435
Black plate (16,1)Cadillac Escalade Owner Manual (GMNA-Localizing-U.S./Canada/Mexico-
7063683) - 2015 - crc - 2/24/14
2-16 Keys, Doors, and Windows
Do not manually force the liftgate to
open or close during a power cycle.
The power liftgate may be
temporarily disabled in extremely
low temperatures, or after repeated
power cycling over a short period of
time. If this occurs, the liftgate can
still be operated manually. Select
OFF on the liftgate switch.
If the vehicle is shifted out of
P (Park) while the power function is
in progress, the liftgate will continue
to completion. If the vehicle is
accelerated before the liftgate has
completed moving, the liftgate may
stop or reverse direction. Make sure
the liftgate is closed and latched
before driving.
If the power liftgate support strut
has lost pressure, the turn signals
will flash and a chime will sound
while the liftgate automatically
closes. See your dealer for service
before using the power liftgate.Obstacle Detection Features
If the liftgate encounters an obstacle
during a power open or close cycle,
a warning chime will sound and the
liftgate will automatically reverse
direction and move a short distance
away from the obstacle. After
removing the obstruction, the power
liftgate operation can be used again.
If the liftgate encounters multiple
obstacles on the same power cycle,
the power function will deactivate.
After removing the obstructions,
manually close the liftgate. This will
allow normal power operation
functions to resume.
If the vehicle is locked while the
liftgate is closing, and an obstacle
prevents the liftgate from completely
closing, the horn will sound as an
alert that the liftgate did not close.
Pinch sensors are on the side
edges of the liftgate. If an object is
caught between the liftgate and the
vehicle and presses against a
sensor, the liftgate will reversedirection and open fully. The liftgate
will remain open until it is activated
again or closed manually.
Setting the 3/4 Mode
To change the position the liftgate
stops at when opening:
1. Select MAX or 3/4 mode and
open the liftgate.
2. Stop the liftgate movement at the desired height by pressing
any liftgate button. Manually
adjust the liftgate position if
needed.
3. Press and hold
lnext to the
latch on the outside of the
liftgate until the turn signals flash
and a beep sounds. This
indicates the setting has been
recorded.
The liftgate cannot be set below a
minimum programmable height.
If there is no light flash or sound,
then the height adjustment may be
too low.
Page 51 of 435
Black plate (20,1)Cadillac Escalade Owner Manual (GMNA-Localizing-U.S./Canada/Mexico-
7063683) - 2015 - crc - 2/24/14
2-20 Keys, Doors, and Windows
Power Sounder, Inclination
Sensor and Intrusion Sensor
In addition to the standard
theft-deterrent system features, this
system may also have a power
sounder, inclination sensor and
intrusion sensor.
The power sounder provides an
audible alarm which is distinct from
the vehicle’s horn. It has its own
power source, and can sound an
alarm if the vehicle’s battery is
compromised.
The inclination sensor can set off
the alarm if it senses movement of
the vehicle, such as a change in
vehicle orientation.
The intrusion sensor monitors the
vehicle interior, and can activate the
alarm if it senses unauthorized entry
into the vehicle’s interior. Do not
allow passengers or pets to remain
in the vehicle when the intrusion
sensor is activated. Before arming the theft-deterrent
system and activating the intrusion
sensor:.Make sure all doors and
windows are completely closed.
.Secure any loose items such as
sunshades.
.Make sure there are no
obstructions blocking the
sensors in the front overhead
console.
.Close DVD screens before
leaving the vehicle.
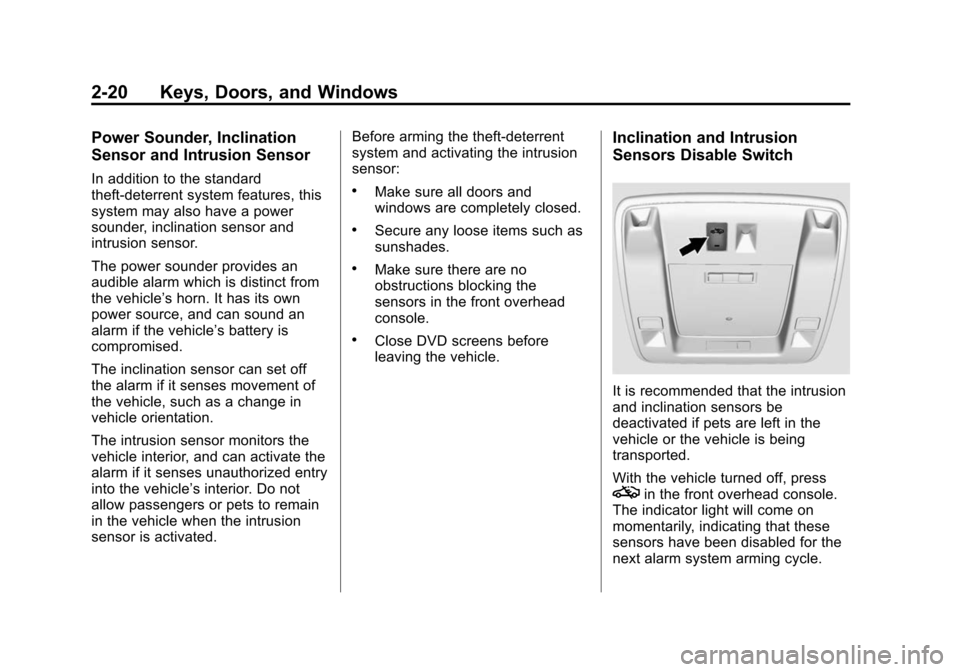
Inclination and Intrusion
Sensors Disable Switch
It is recommended that the intrusion
and inclination sensors be
deactivated if pets are left in the
vehicle or the vehicle is being
transported.
With the vehicle turned off, press
oin the front overhead console.
The indicator light will come on
momentarily, indicating that these
sensors have been disabled for the
next alarm system arming cycle.
Page 90 of 435
Black plate (29,1)Cadillac Escalade Owner Manual (GMNA-Localizing-U.S./Canada/Mexico-
7063683) - 2015 - crc - 2/24/14
Seats and Restraints 3-29
Warning (Continued)
that person causing severe injury
or even death. The path of an
inflating airbag must be kept
clear. Do not put anything
between an occupant and an
airbag, and do not attach or put
anything on the steering wheel
hub or on or near any other
airbag covering.
Do not use seat or console
accessories that block the
inflation path of a seat-mounted
side impact airbag or the front
center airbag.
Never secure anything to the roof
of a vehicle with roof-rail airbags
by routing a rope or tie-down
through any door or window
opening. If you do, the path of an
inflating roof-rail airbag will be
blocked.
When Should an Airbag
Inflate?
This vehicle is equipped with
airbags. SeeAirbag System on
page 3-25. Airbags are designed to
inflate if the impact exceeds the
specific airbag system's deployment
threshold. Deployment thresholds
are used to predict how severe a
crash is likely to be in time for the
airbags to inflate and help restrain
the occupants. The vehicle has
electronic sensors that help the
airbag system determine the
severity of the impact. Deployment
thresholds can vary with specific
vehicle design.
Frontal airbags are designed to
inflate in moderate to severe frontal
or near frontal crashes to help
reduce the potential for severe
injuries, mainly to the driver's or
front outboard passenger's head
and chest.
Whether the frontal airbags will or
should inflate is not based primarily
on how fast the vehicle is traveling. It depends on what is hit, the
direction of the impact, and how
quickly the vehicle slows down.
Frontal airbags may inflate at
different crash speeds depending on
whether the vehicle hits an object
straight on or at an angle, and
whether the object is fixed or
moving, rigid or deformable, narrow
or wide.
Frontal airbags are not intended to
inflate during vehicle rollovers, rear
impacts, or many side impacts.
In addition, the vehicle has
advanced technology frontal
airbags. Advanced technology
frontal airbags adjust the restraint
according to crash severity.
The vehicle also has a seat position
sensor that enables the sensing
system to monitor the position of the
driver seat. The seat position sensor
provides information that is used to
adjust the deployment of the driver
frontal airbag.
Page 94 of 435
Black plate (33,1)Cadillac Escalade Owner Manual (GMNA-Localizing-U.S./Canada/Mexico-
7063683) - 2015 - crc - 2/24/14
Seats and Restraints 3-33
certain conditions. No other airbag
is affected by the passenger
sensing system.
The passenger sensing system
works with sensors that are part of
the front outboard passenger seat
and safety belt. The sensors are
designed to detect the presence of
a properly seated occupant and
determine if the front outboard
passenger frontal airbag should be
allowed to inflate or not.
According to accident statistics,
children are safer when properly
secured in a rear seat in the correct
child restraint for their weight
and size.
Whenever possible, children aged
12 and under should be secured in
a rear seating position.
Never put a rear-facing child seat in
the front. This is because the risk to
the rear-facing child is so great,
if the airbag inflates.{Warning
A child in a rear-facing child
restraint can be seriously injured
or killed if the passenger frontal
airbag inflates. This is because
the back of the rear-facing child
restraint would be very close to
the inflating airbag. A child in a
forward-facing child restraint can
be seriously injured or killed if the
passenger frontal airbag inflates
and the passenger seat is in a
forward position.
Even if the passenger sensing
system has turned off the
passenger frontal airbag, no
system is fail-safe. No one can
guarantee that an airbag will not
inflate under some unusual
circumstance, even though the
airbag is off.(Continued)
Warning (Continued)
Secure rear-facing child restraints
in a rear seat, even if the airbag
is off. If you secure a
forward-facing child restraint in
the front outboard passenger
seat, always move the seat as far
back as it will go. It is better to
secure the child restraint in a
rear seat.
The passenger sensing system is
designed to turn off the front
outboard passenger frontal airbag if:
.The front outboard passenger
seat is unoccupied.
.The system determines an infant
is present in a child restraint.
.A front outboard passenger
takes his/her weight off of the
seat for a period of time.
.There is a critical problem with
the airbag system or the
passenger sensing system.
Page 98 of 435
Black plate (37,1)Cadillac Escalade Owner Manual (GMNA-Localizing-U.S./Canada/Mexico-
7063683) - 2015 - crc - 2/24/14
Seats and Restraints 3-37
purchase a service manual, see
Service Publications Ordering
Information on page 13-10.
{Warning
For up to 10 seconds after the
vehicle is turned off and the
battery is disconnected, an airbag
can still inflate during improper
service. You can be injured if you
are close to an airbag when it
inflates. Avoid yellow connectors.
They are probably part of the
airbag system. Be sure to follow
proper service procedures, and
make sure the person performing
work for you is qualified to do so.
Adding Equipment to the
Airbag-Equipped Vehicle
Adding accessories that change the
vehicle's frame, bumper system,
height, front end, or side sheet
metal may keep the airbag system
from working properly.The operation of the airbag system
can also be affected by changing
any parts of the front seats, safety
belts, airbag sensing and diagnostic
module, steering wheel, instrument
panel, any airbag module, ceiling or
pillar garnish trim, overhead
console, front sensors, side impact
sensors, airbag wiring, or front
center console.
Your dealer and the service manual
have information about the location
of the airbag sensors, sensing and
diagnostic module, and airbag
wiring.
In addition, the vehicle has a
passenger sensing system that
includes sensors as part of the front
outboard passenger seat. The
passenger sensing system may not
operate properly if the original seat
trim is replaced with non-GM
covers, upholstery, or trim; or with
GM covers, upholstery, or trim
designed for a different vehicle. Any
object, such as an aftermarket seat
heater or a comfort-enhancing pad
or device, installed under or on topof the seat fabric, could also
interfere with the operation of the
passenger sensing system. This
could either prevent proper
deployment of the passenger
airbag(s) or prevent the passenger
sensing system from properly
turning off the passenger airbag(s).
See
Passenger Sensing System on
page 3-32.
If the vehicle has rollover roof-rail
airbags, see Different Size Tires
and Wheels on page 10-58 for
additional information.
If you have to modify your vehicle
because you have a disability and
you have questions about whether
the modifications will affect the
vehicle's airbag system, or if you
have questions about whether the
airbag system will be affected if the
vehicle is modified for any other
reason, call Customer Assistance.
See Customer Assistance Offices
on page 13-3.
Page 130 of 435
Black plate (3,1)Cadillac Escalade Owner Manual (GMNA-Localizing-U.S./Canada/Mexico-
7063683) - 2015 - crc - 2/24/14
Instruments and Controls 5-3
Horn
To sound the horn, press the center
pad on the steering wheel.
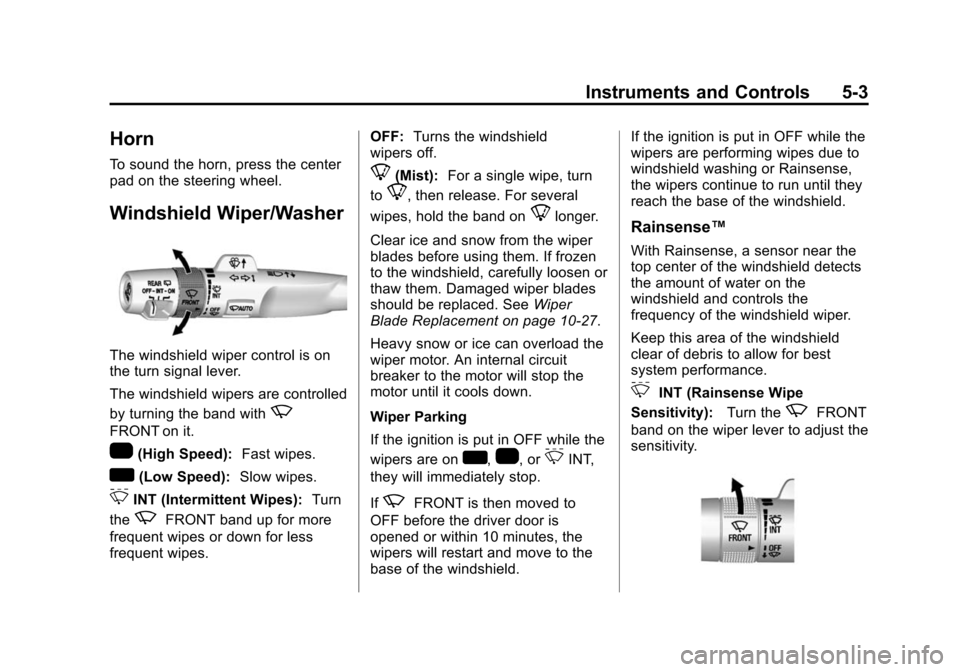
Windshield Wiper/Washer
The windshield wiper control is on
the turn signal lever.
The windshield wipers are controlled
by turning the band with
z
FRONT on it.
1(High Speed):Fast wipes.
w(Low Speed):Slow wipes.
3INT (Intermittent Wipes): Turn
the
zFRONT band up for more
frequent wipes or down for less
frequent wipes. OFF:
Turns the windshield
wipers off.
8(Mist): For a single wipe, turn
to
8, then release. For several
wipes, hold the band on
8longer.
Clear ice and snow from the wiper
blades before using them. If frozen
to the windshield, carefully loosen or
thaw them. Damaged wiper blades
should be replaced. See Wiper
Blade Replacement on page 10-27.
Heavy snow or ice can overload the
wiper motor. An internal circuit
breaker to the motor will stop the
motor until it cools down.
Wiper Parking
If the ignition is put in OFF while the
wipers are on
w,1, or3INT,
they will immediately stop.
If
zFRONT is then moved to
OFF before the driver door is
opened or within 10 minutes, the
wipers will restart and move to the
base of the windshield. If the ignition is put in OFF while the
wipers are performing wipes due to
windshield washing or Rainsense,
the wipers continue to run until they
reach the base of the windshield.
Rainsense™
With Rainsense, a sensor near the
top center of the windshield detects
the amount of water on the
windshield and controls the
frequency of the windshield wiper.
Keep this area of the windshield
clear of debris to allow for best
system performance.
3INT (Rainsense Wipe
Sensitivity): Turn the
zFRONT
band on the wiper lever to adjust the
sensitivity.