ECU CADILLAC ESCALADE 2021 Workshop Manual
[x] Cancel search | Manufacturer: CADILLAC, Model Year: 2021, Model line: ESCALADE, Model: CADILLAC ESCALADE 2021Pages: 492, PDF Size: 7.92 MB
Page 415 of 492

Cadillac Escalade Owner Manual (GMNA-Localizing-U.S./Canada/Mexico-
13690472) - 2021 - CRC - 8/10/21
414 VEHICLE CARE
the load floor, secured with velcro
straps. The jack is behind a door in
the trim panel on the driver side.
1. Pull to open the trim panel door.
The third row driver side seat
may need to be folded to access
the trim panel door.
2. Turn the jack knobcounterclockwise to release the
jack and wheel blocks from the
bracket. If equipped, remove the
wheel blocks from the jack and
place the wheel blocks on both
sides of the tire at the opposite
corner of the tire being changed.
See If a Tire Goes Flat 0412 for
more information on the
placement of the wheel blocks.
Place the jack and wheel blocks
near the tire being changed.Short Wheel Base Shown, Extended Wheel Base Similar
3. Lift the load floor. Remove the
jacking tools and place them near
the tire being changed.
Page 422 of 492

Cadillac Escalade Owner Manual (GMNA-Localizing-U.S./Canada/Mexico-
13690472) - 2021 - CRC - 8/10/21
VEHICLE CARE 421
Warning (Continued)
damage if the hoist cable fails or if
the tire comes loose. Make sure the
tire is stored securely before
driving.
Caution
Always store the spare tire or flat
tire with the valve stem pointed up.
Stowing a tire with the valve stem
pointed down could result in
damage to the wheel.
Caution
The tire hoist is designed to be
raised and lowered with tension on
the cable. If the hoist must be
raised or lowered without a tire
attached, do so only by hand, and
at a slow pace, to avoid damaging
the mechanism. Do not use power
tools.
{Warning
An improperly stored spare tire
could come loose and cause a crash.
To avoid personal injury or property
damage, always store the spare tire
when the vehicle is parked on a
level surface.
If the vehicle has 275/60R20 or 275/
50R22 size tires, the flat tire must be
stored inside of the vehicle using the
flat tire secure strap inside the glove
box. See “Storing a Flat Tire Inside of
the Vehicle ”later in this section.
If the vehicle has 265/65R18 or 275/
55R20 size tires, store the flat tire
under the rear of the vehicle in the
spare tire carrier. Refer to the
following graphics and instructions:
1. Hoist Assembly
2. Hoist Shaft
3. Hoist Shaft Access Cover/Hole
4. Jack Handle Extension
5. Wheel Wrench
6. Spare Tire Lock
7. Hoist End of Extension Tool
8. Hoist Shaft Access Hole
9. Spare Tire (Valve Stem Pointed Up)
10.Tire/Wheel Retainer
11.Hoist Cable
1. Put the tire (9) on the ground at the rear of the vehicle with the
valve stem pointed up, and to
the rear.
Page 423 of 492
Cadillac Escalade Owner Manual (GMNA-Localizing-U.S./Canada/Mexico-
13690472) - 2021 - CRC - 8/10/21
422 VEHICLE CARE
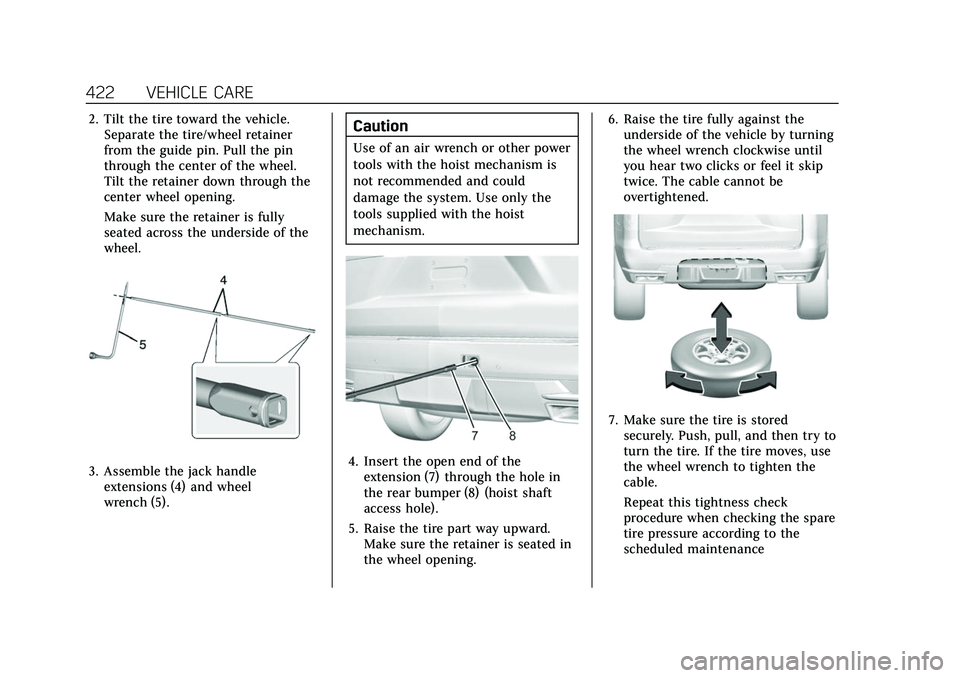
2. Tilt the tire toward the vehicle.Separate the tire/wheel retainer
from the guide pin. Pull the pin
through the center of the wheel.
Tilt the retainer down through the
center wheel opening.
Make sure the retainer is fully
seated across the underside of the
wheel.
3. Assemble the jack handleextensions (4) and wheel
wrench (5).
Caution
Use of an air wrench or other power
tools with the hoist mechanism is
not recommended and could
damage the system. Use only the
tools supplied with the hoist
mechanism.
4. Insert the open end of theextension (7) through the hole in
the rear bumper (8) (hoist shaft
access hole).
5. Raise the tire part way upward. Make sure the retainer is seated in
the wheel opening. 6. Raise the tire fully against the
underside of the vehicle by turning
the wheel wrench clockwise until
you hear two clicks or feel it skip
twice. The cable cannot be
overtightened.
7. Make sure the tire is storedsecurely. Push, pull, and then try to
turn the tire. If the tire moves, use
the wheel wrench to tighten the
cable.
Repeat this tightness check
procedure when checking the spare
tire pressure according to the
scheduled maintenance
Page 424 of 492

Cadillac Escalade Owner Manual (GMNA-Localizing-U.S./Canada/Mexico-
13690472) - 2021 - CRC - 8/10/21
VEHICLE CARE 423
information or any time the spare
tire is handled due to service of
other components.
Correctly Stored
Incorrectly Stored
8. Reinstall the spare tire lock.
9. Reinstall the hoist shaft access cover.
Storing the Tools
To store the tools:
1. Return the tools (wheel wrench, jack handle, and jack handle
extensions) to the tool bag. Use the
velcro straps to secure the tool bag
under the load floor in the
cargo area.
2. Position the jack and wheel blocks in the driver side trim panel over
the wheelhouse. 3. Turn the jack knob clockwise until
the jack is secured tight in the
mounting bracket. Be sure to
position the holes in the base of
the jack onto the pin in the
mounting bracket.
4. Close the trim panel door.
Storing a Flat Tire Inside of the
Vehicle
If the vehicle has 275/60R20 or 275/
50R22 size tires, the flat tire must be
stored inside of the vehicle in the
cargo area using the flat tire secure
strap inside the glove box. 1. Store the tools. See “Storing the
Tools ”earlier in this section.
2. The third row seat must be folded down to provide sufficient space to
store the flat tire. If the third row
seat cannot be folded down, the
flat tire cannot be stored and must
be left in a safe location, to be
picked up at a later time.
3. Once there is sufficient space in the rear of the vehicle, lift the flat
tire and place it on top of the load
floor, with the valve stem
pointed up.
Page 425 of 492

Cadillac Escalade Owner Manual (GMNA-Localizing-U.S./Canada/Mexico-
13690472) - 2021 - CRC - 8/10/21
424 VEHICLE CARE
4. Remove the flat tire secure strapfrom the glove box and place the
loop end of the strap through the
cargo tie-down. Place the hook end
of the strap through the loop and
pull it until the strap is fastened
securely to the tie-down.5. Route the hook end of the strapthrough the wheel, as shown.
6. Attach the hook to the other cargo tie-down in the rear of the vehicle.
7. Tighten the strap.
Full-Size Spare Tire
If this vehicle came with a full-size
spare tire, it was fully inflated when
new, however, it can lose air over
time. Check the inflation pressure
regularly. See Tire Pressure0400 and
Vehicle Load Limits 0240 for
information regarding proper tire
inflation and loading the vehicle. For instructions on how to remove, install,
or store a spare tire, see
Tire Changing
0 413.
If equipped with a temporary use
full-size spare tire, it is indicated on
the tire sidewall. See Tire Sidewall
Labeling 0395. This spare tire should
not be driven on over 112 km/h
(70 mph), or 88 km/h (55 mph) when
pulling a trailer, at the proper
inflation pressure. Repair and replace
the road tire as soon as it is
convenient, and stow the spare tire for
future use.
Caution
If the vehicle has four-wheel drive
and a different size spare tire is
installed, do not drive in four-wheel
drive until the flat tire is repaired
and/or replaced. The vehicle could
be damaged and the repairs would
not be covered by the warranty.
Never use four-wheel drive when a
different size spare tire is installed
on the vehicle.
Page 429 of 492
Cadillac Escalade Owner Manual (GMNA-Localizing-U.S./Canada/Mexico-
13690472) - 2021 - CRC - 8/10/21
428 VEHICLE CARE
7. Connect one end of the redpositive (+) cable to the remote
positive (+) terminal of the vehicle
with the discharged battery.
8. Do not let the other end touch metal. Connect it to the positive (+)
terminal of the good battery. Use a
remote positive (+) terminal if the
vehicle has one.
9. Connect one end of the black negative (−) cable to the negative
(−) terminal of the good battery.
Use a remote negative (−) terminal
if the vehicle has one.
Do not let the other end touch
anything until the next step.
10. Connect the other end of the negative (−) cable to the remote
negative (−) terminal to the
discharged battery.
11. Start the vehicle with the good battery and run the engine for a
while.
12. Try to start the vehicle that had the dead battery. If it will not start
after a few tries, it probably needs
service.Caution
If the jumper cables are connected
or removed in the wrong order,
electrical shorting may occur and
damage the vehicle. The repairs
would not be covered by the vehicle
warranty. Always connect and
remove the jumper cables in the
correct order, making sure that the
cables do not touch each other or
other metal.
Jumper Cable Removal
Reverse the sequence exactly when
removing the jumper cables.
After starting the disabled vehicle and
removing the jumper cables, allow it
to idle for several minutes.
Towing the Vehicle
Caution
Incorrectly towing a disabled
vehicle may cause damage. The
damage would not be covered by
the vehicle warranty. Do not lash or (Continued)
Caution (Continued)
hook to suspension components.
Use the proper straps around the
tires to secure the vehicle. Do not
drag a locked wheel/tire. Use tire
skates or dollies under any locked
wheel/tire while loading the vehicle.
Do not use a sling type lift to tow
the vehicle. This could damage the
vehicle.
Caution
Improper use of the tow eye can
damage the vehicle. If equipped, use
the tow eye to load a disabled
vehicle onto a flatbed tow truck
from a flat road surface, or to move
the vehicle a short distance. Use
caution and low speeds. The
transmission must be
in (N) Neutral when moving the
vehicle.
GM recommends a flatbed tow truck
to transport a disabled vehicle. Use
ramps to help reduce approach angles,
if necessary. A towed vehicle should
Page 431 of 492
Cadillac Escalade Owner Manual (GMNA-Localizing-U.S./Canada/Mexico-
13690472) - 2021 - CRC - 8/10/21
430 VEHICLE CARE
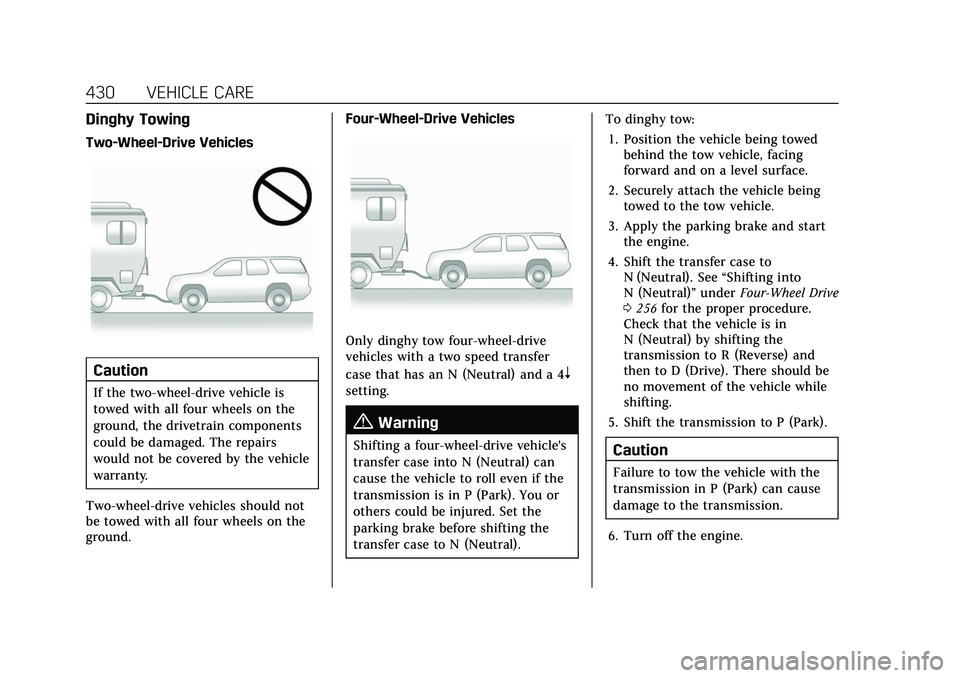
Dinghy Towing
Two-Wheel-Drive Vehicles
Caution
If the two-wheel-drive vehicle is
towed with all four wheels on the
ground, the drivetrain components
could be damaged. The repairs
would not be covered by the vehicle
warranty.
Two-wheel-drive vehicles should not
be towed with all four wheels on the
ground. Four-Wheel-Drive Vehicles
Only dinghy tow four-wheel-drive
vehicles with a two speed transfer
case that has an N (Neutral) and a 4
n
setting.
{Warning
Shifting a four-wheel-drive vehicle's
transfer case into N (Neutral) can
cause the vehicle to roll even if the
transmission is in P (Park). You or
others could be injured. Set the
parking brake before shifting the
transfer case to N (Neutral).To dinghy tow:
1. Position the vehicle being towed behind the tow vehicle, facing
forward and on a level surface.
2. Securely attach the vehicle being towed to the tow vehicle.
3. Apply the parking brake and start the engine.
4. Shift the transfer case to N (Neutral). See “Shifting into
N (Neutral)” underFour-Wheel Drive
0 256 for the proper procedure.
Check that the vehicle is in
N (Neutral) by shifting the
transmission to R (Reverse) and
then to D (Drive). There should be
no movement of the vehicle while
shifting.
5. Shift the transmission to P (Park).Caution
Failure to tow the vehicle with the
transmission in P (Park) can cause
damage to the transmission.
6. Turn off the engine.
Page 432 of 492
Cadillac Escalade Owner Manual (GMNA-Localizing-U.S./Canada/Mexico-
13690472) - 2021 - CRC - 8/10/21
VEHICLE CARE 431
7. Place the vehicle in ACC/ACCESSORY mode by pressing the
start button without stepping on
the brake pedal.
8. Release the parking brake only when you are confident it is
secured to tow vehicle and will
not roll.
Before going on to the next step, be
sure to take the mechanical key
with you. It will be needed to
re-enter the vehicle after the power
is disconnected. See “Drive Door
Key Lock Cylinder Access” under
Door Locks 015.
9. Disconnect the negative battery cable at the battery and secure the
nut and bolt. Cover the negative
battery post with a non-conductive
material to prevent any contact
with the negative battery terminal.
Caution
Failure to disconnect the negative
battery cable or to have it contact
the terminals can cause damage to
the vehicle. 10. Move the steering wheel to make
sure the steering column is
unlocked.
Caution
If the steering column is locked,
vehicle damage may occur.
11. Rock the vehicle to make sure the parking brake is not set and
transfer case is in N (Neutral).
Caution
Towing the vehicle with the parking
brake set can damage it. Always
release the parking brake prior to
towing the vehicle.
Disconnecting the Towed Vehicle
Before disconnecting the towed
vehicle: 1. Park on a level surface.
2. Connect the battery.
3. Apply the brake pedal.
{Warning
The vehicle can roll when the brake
pedal is released. Always apply and
hold the brake pedal when setting
the parking brake. Make sure the
parking brake is fully engaged
before releasing the brake pedal.
4. Start the engine and shift the transfer case out of N (Neutral) to
2
m. See “Shifting out of
N (Neutral)” underFour-Wheel Drive
0 256. See your dealer if the
transfer case cannot be shifted out
of N (Neutral).
5. Check that the vehicle is in 2
mby
shifting the transmission to
R (Reverse) and then to D (Drive).
There should be movement of the
vehicle while shifting.
6. Shift the transmission to P (Park) and turn off the vehicle.
7. Set the parking brake.
8. Release the parking brake.
9. Disconnect the vehicle from the tow vehicle.
Page 441 of 492
Cadillac Escalade Owner Manual (GMNA-Localizing-U.S./Canada/Mexico-
13690472) - 2021 - CRC - 8/10/21
440 VEHICLE CARE
Floor Mats
{Warning
If a floor mat is the wrong size or is
not properly installed, it can
interfere with the pedals.
Interference with the pedals can
cause unintended acceleration and/
or increased stopping distance
which can cause a crash and injury.
Make sure the floor mat does not
interfere with the pedals.
Use the following guidelines for
proper floor mat usage:
.The original equipment floor mats
were designed for your vehicle.
If the floor mats need replacing, it
is recommended that GM certified
floor mats be purchased. Non-GM
floor mats may not fit properly and
may interfere with the pedals.
Always check that the floor mats do
not interfere with the pedals.
.Do not use a floor mat if the vehicle
is not equipped with a floor mat
retainer on the driver side floor.
.Use the floor mat with the correct
side up. Do not turn it over.
.Do not place anything on top of the
driver side floor mat.
.Use only a single floor mat on the
driver side.
.Do not place one floor mat on top
of another.
Removing and Replacing the
Floor Mats
Pull up on the rear of the floor mat to
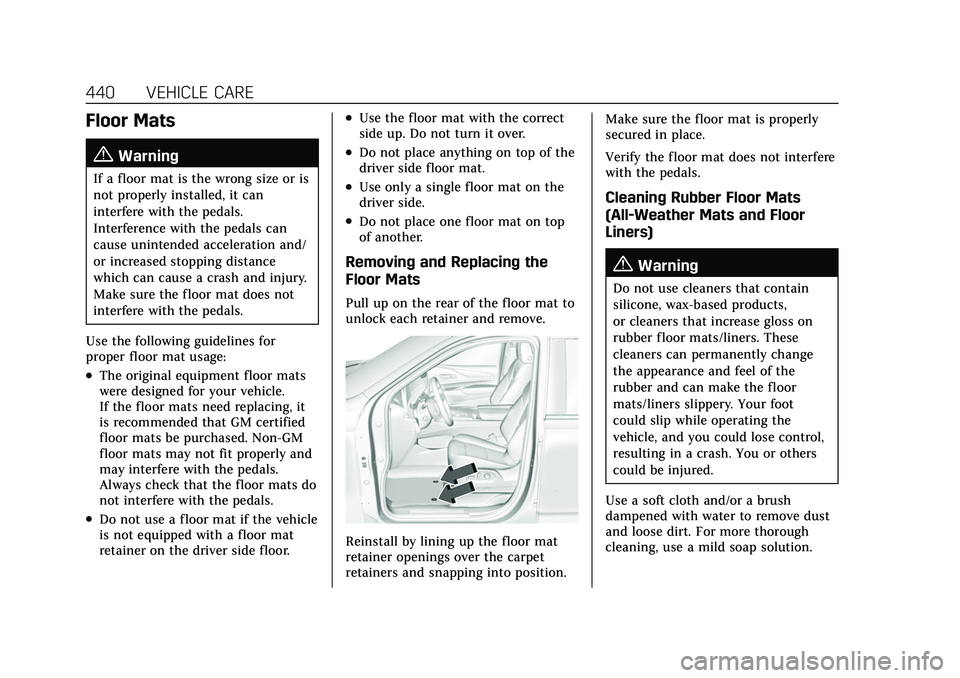
unlock each retainer and remove.
Reinstall by lining up the floor mat
retainer openings over the carpet
retainers and snapping into position. Make sure the floor mat is properly
secured in place.
Verify the floor mat does not interfere
with the pedals.
Cleaning Rubber Floor Mats
(All-Weather Mats and Floor
Liners)
{Warning
Do not use cleaners that contain
silicone, wax-based products,
or cleaners that increase gloss on
rubber floor mats/liners. These
cleaners can permanently change
the appearance and feel of the
rubber and can make the floor
mats/liners slippery. Your foot
could slip while operating the
vehicle, and you could lose control,
resulting in a crash. You or others
could be injured.
Use a soft cloth and/or a brush
dampened with water to remove dust
and loose dirt. For more thorough
cleaning, use a mild soap solution.
Page 459 of 492

Cadillac Escalade Owner Manual (GMNA-Localizing-U.S./Canada/Mexico-
13690472) - 2021 - CRC - 8/10/21
458 CUSTOMER INFORMATION
Customer
Information
Customer Information
Customer SatisfactionProcedure . . . . . . . . . . . . . . . . . . . . . . . 458
Customer Assistance Offices . . . . 460
Customer Assistance for Text Telephone (TTY) Users . . . . . . . . . 460
Online Owner Center . . . . . . . . . . . . . 461
GM Mobility Reimbursement Program . . . . . . . . . . . . . . . . . . . . . . . . . 461
Roadside Service . . . . . . . . . . . . . . . . . 462
Scheduling Service Appointments . . . . . . . . . . . . . . . . . . . 463
Courtesy Transportation Program . . . . . . . . . . . . . . . . . . . . . . . . . 464
Collision Damage Repair . . . . . . . . . 465
Publication Ordering Information . . . . . . . . . . . . . . . . . . . . . 467
Radio Frequency Statement . . . . . 467
Reporting Safety Defects
Reporting Safety Defects to the United States Government . . . . . 468
Reporting Safety Defects to the Canadian Government . . . . . . . . . 468
Reporting Safety Defects to General Motors . . . . . . . . . . . . . . . . . 468
Vehicle Data Recording and
Privacy
Vehicle Data Recording andPrivacy . . . . . . . . . . . . . . . . . . . . . . . . . . . 469
Cybersecurity . . . . . . . . . . . . . . . . . . . . . 469
Event Data Recorders . . . . . . . . . . . . 469
OnStar . . . . . . . . . . . . . . . . . . . . . . . . . . . . . 470
Infotainment System . . . . . . . . . . . . . 470
Customer Information
Customer Satisfaction
Procedure
Your satisfaction and goodwill are
important to your dealer and to
Cadillac. Normally, any concerns with
the sales transaction or the operation
of the vehicle will be resolved by your
dealer's sales or service departments.
Sometimes, however, despite the best
intentions of all concerned,
misunderstandings can occur. If your
concern has not been resolved to your
satisfaction, the following steps
should be taken:
STEP ONE : Discuss your concern
with a member of dealership
management. Normally, concerns can
be quickly resolved at that level. If the
matter has already been reviewed with
the sales, service or parts manager,
contact the owner of your dealership
or the general manager.
STEP TWO : If after contacting a
member of dealership management, it
appears your concern cannot be
resolved by your dealership without