torque CADILLAC ESCALADE 2022 Owners Manual
[x] Cancel search | Manufacturer: CADILLAC, Model Year: 2022, Model line: ESCALADE, Model: CADILLAC ESCALADE 2022Pages: 508, PDF Size: 9.18 MB
Page 260 of 508

Cadillac Escalade Owner Manual (GMNA-Localizing-U.S./Canada/Mexico-
15567102) - 2022 - CRC - 11/17/21
DRIVING AND OPERATING 259
4n(Four-Wheel Drive Low) :This
setting engages the front axle and
delivers extra torque. Choose 4
nwhen
driving off-road in deep sand, deep
mud, or deep snow, and while
climbing or descending steep hills.
While driving in 4
n, keep vehicle
speed below 72 km/h (45 mph).
Shifting into 4
nwill turn Traction
Control and StabiliTrak/ESC off. See
Traction Control/Electronic Stability
Control 0265.
Shifts between 2
m, 4m, and AUTO
Any of these shifts can be made at
normal driving speed.
The actual 4x4 shift request is only
made after the button is released. The
4x4 graphic will remain flashing until
the shift request has completed. A DIC
message displays to indicate that the
4x4 transfer case has been requested
to shift to the new desired state.
Once the 4x4 shift has completed, the
DIC message disappears, the 4x4
graphic stops flashing, and the current
setting is indicated. When a shift to 2
mis completed
successfully while in P (Park), the
parking brake will engage. To resume
driving, shift the transmission to the
desired gear and manually release the
parking bake or press the accelerator
pedal to begin driving. See Electric
Parking Brake 0262.
If equipped, use 4
n, AUTO, or 4mto
provide additional traction when
parking on a steep grade with poor
traction such as ice, snow, mud,
or gravel.
Shifting Into 4
n
1. The ignition must be on and the vehicle must be stopped or moving
less than 5 km/h (3 mph) with the
transmission in N (Neutral). It is
best for the vehicle to be moving
1.6 to 3.2 km/h (1 to 2 mph).
2. Press 4
n. The actual 4x4 shift
request is only made after the
button is released. The 4x4 graphic
will remain flashing until the shift
request has completed. A DIC
message displays to indicate that the 4x4 transfer case has been
requested to shift to the new
desired state.
Once the 4x4 shift has completed,
the DIC message disappears, the
4x4 graphic stops flashing and the
current setting is indicated.
If vehicle speed is higher when shift
request occurs, a DIC message
displays. Reduce vehicle speed.
If the transmission is not in
N (Neutral) when shift request occurs,
a DIC message displays. The vehicle
will allow 20 seconds for the shift to
occur. After this time, a graphic in the
instrument cluster will indicate that
the transfer case is in 4
n.
Caution
Shifting the transmission into gear
before the requested mode indicator
light has stopped flashing could
damage the transfer case.
If the transmission is not shifted into
N (Neutral) or the vehicle has not
slowed to 5 km/h (3 mph) within
Page 270 of 508

Cadillac Escalade Owner Manual (GMNA-Localizing-U.S./Canada/Mexico-
15567102) - 2022 - CRC - 11/17/21
DRIVING AND OPERATING 269
remain active. Otherwise, the vehicle
will start in Tour mode. Tow/Haul
mode turns on trailer sway control.
If equipped with a diesel engine,
exhaust braking is automatically
activated when Tow/Haul mode is
selected. The system will command
down shifts to reduce vehicle speed
when the brake is applied. The normal
tow/haul shift pattern will return once
the vehicle is on a low grade or when
the accelerator pedal is pressed. While
in the Electronic Range Select (ERS)
Mode (seeManual Mode 0256), grade
braking is deactivated, allowing the
driver to select a range, and limiting
the highest gear available.
For more information on trailer
weight specifications, see Towing
Equipment 0344.
gTerrain Mode : Use this mode
when traveling on very rough roads at
very low speeds, such as a two-track
or heavily rutted road. This mode can
also be used for pulling a boat out of
the water on a trailer. When in Terrain
mode, the vehicle shifts automatically,
but will hold a lower gear longer to
maximize engine torque. This mode has a unique pedal map and
transmission shift pattern for better
control at lower speeds and over
rough terrain. This mode modifies
accelerator pedal mapping,
transmission shift pattern, ride height,
and Electronic Limited-Slip
Differential (eSLD).
When the vehicle comes to a stop on
an upward grade, automatic vehicle
hold is engaged until the driver
presses the accelerator pedal. Stop/
Start and cruise control are disabled
in Terrain mode.
Active Braking during lift throttle will
be engaged. This feature automatically
applies light braking to simulate
heavy engine braking of
four-wheel-drive low. It also applies
light braking in D (Drive) until the
vehicle is at idle speeds. In L1 and L2
light braking will typically bring the
vehicle to a stop. Active Braking
during lift throttle also reduces trailer
braking.
Terrain mode automatically exits to
Tour mode if the brake temperatures
become too hot, electronic parking
brake becomes inoperable, or the
vehicle cannot perform braking or
vehicle hold.
For more information on off-road
driving, see
Off-Road Driving 0235 and
Hill and Mountain Roads 0239.
My Mode
My mode is used to personalize
everyday driving. This mode allows
the driver to configure the vehicle
system settings to their driving
preferences. My mode will remain
active every time the vehicle is
started. To customize My mode, see
“Drive Mode Customization.”
Drive Mode Customization
The vehicle is equipped to modify the
following settings based on vehicle
content. Through the center radio
display, select Vehicle Settings>Drive
Mode Customization to customize and
personalize My mode, or turn off or
on Visualization.
My Mode
These settings will be retained over
each key cycle, and do not have to be
reset each time the vehicle is started.
Page 385 of 508

Cadillac Escalade Owner Manual (GMNA-Localizing-U.S./Canada/Mexico-
15567102) - 2022 - CRC - 11/17/21
384 VEHICLE CARE
heard all the time when the vehicle is
moving, except when applying the
brake pedal firmly.
{Warning
The brake wear warning sound
means that soon the brakes will not
work well. That could lead to a
crash. When the brake wear
warning sound is heard, have the
vehicle serviced.
Caution
Continuing to drive with worn-out
brake linings could result in costly
brake repairs.
Some driving conditions or climates
can cause a brake squeal when the
brakes are first applied, clearing up
following several applications. This
does not mean something is wrong
with the brakes.
Properly torqued wheel nuts are
necessary to help prevent brake
pulsation. When tires are rotated,
inspect brake linings for wear and
evenly tighten wheel nuts in the proper sequence to torque
specifications. See
Capacities and
Specifications 0468.
Brake pads should be replaced as
complete axle sets.
Brake Pedal Travel
See your dealer if the brake pedal does
not return to normal height, or if
there is a rapid increase in pedal
travel. This could be a sign that brake
service may be required.
Replacing Brake System Parts
Always replace brake system parts
with new, approved replacement parts.
If this is not done, the brakes may not
work properly. The braking
performance can change in many
ways if the wrong brake parts are
installed or if parts are improperly
installed.
Brake Pad Life System
When to Change Brake Pads
This vehicle has a system that
estimates the remaining life of the
front and rear brake pads. Brake pad
life is displayed in the Driver Information Center (DIC), along with
a percentage for each axle. The system
must be reset every time the brake
pads are changed.
When the system has determined that
the brake pads need to be replaced, a
message will display, which may
include mileage remaining.
Brake pads should always be replaced
as complete axle sets.
How to Reset the Brake Pad Life
System
The system will automatically detect
when significantly worn brake pads
are replaced. When the ignition is
turned on after new pads and wear
sensors are installed, a message will
display. Follow the prompts to reset
the system.
The brake pad life system can also be
manually reset:
1. Display Brake Pad Life on the DIC. See Driver Information Center (DIC)
0 133.
2. Select the Brake Pad Life menu.
3. Select front or rear pads as appropriate.
Page 418 of 508

Cadillac Escalade Owner Manual (GMNA-Localizing-U.S./Canada/Mexico-
15567102) - 2022 - CRC - 11/17/21
VEHICLE CARE 417
Tire Rotation
Tires should be rotated every
12 000 km (7,500 mi). See
Maintenance Schedule0455.
Tires are rotated to achieve a
more uniform wear for all tires.
The first rotation is the most
important.
Anytime unusual wear is noticed,
rotate the tires as soon as
possible, check for proper tire
inflation pressure, and check for
damaged tires or wheels. If the
unusual wear continues after the
rotation, check the wheel
alignment. See When It Is Time for
New Tires 0418 and
Wheel Replacement 0422.
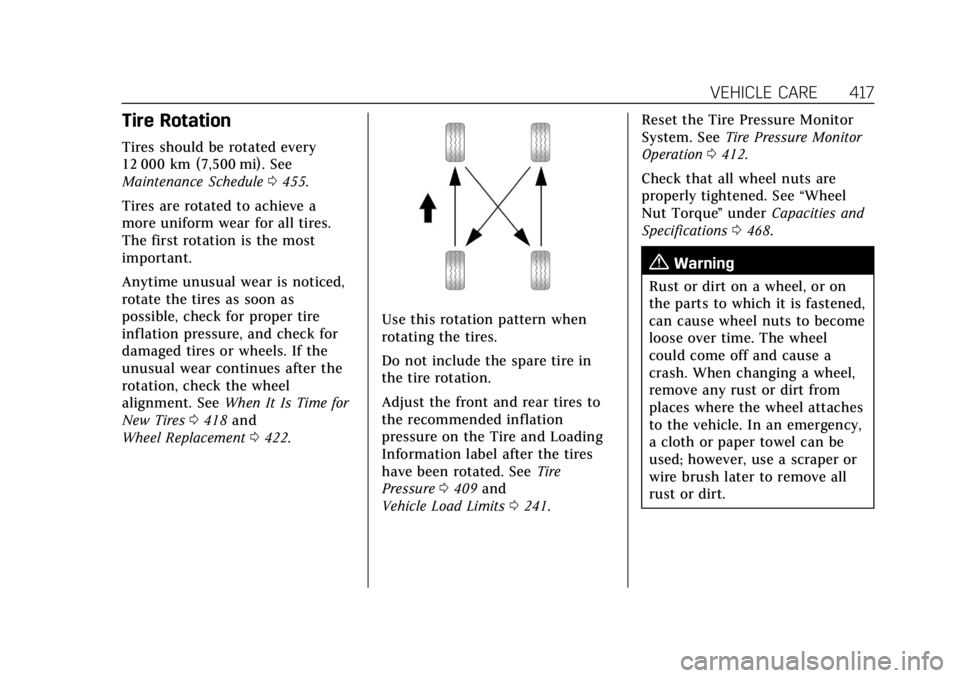
Use this rotation pattern when
rotating the tires.
Do not include the spare tire in
the tire rotation.
Adjust the front and rear tires to
the recommended inflation
pressure on the Tire and Loading
Information label after the tires
have been rotated. See Tire
Pressure 0409 and
Vehicle Load Limits 0241. Reset the Tire Pressure Monitor
System. See
Tire Pressure Monitor
Operation 0412.
Check that all wheel nuts are
properly tightened. See “Wheel
Nut Torque ”under Capacities and
Specifications 0468.
{Warning
Rust or dirt on a wheel, or on
the parts to which it is fastened,
can cause wheel nuts to become
loose over time. The wheel
could come off and cause a
crash. When changing a wheel,
remove any rust or dirt from
places where the wheel attaches
to the vehicle. In an emergency,
a cloth or paper towel can be
used; however, use a scraper or
wire brush later to remove all
rust or dirt.
Page 432 of 508

Cadillac Escalade Owner Manual (GMNA-Localizing-U.S./Canada/Mexico-
15567102) - 2022 - CRC - 11/17/21
VEHICLE CARE 431
11. Turn the wheel wrenchcounterclockwise to lower the
vehicle. Lower the jack completely.
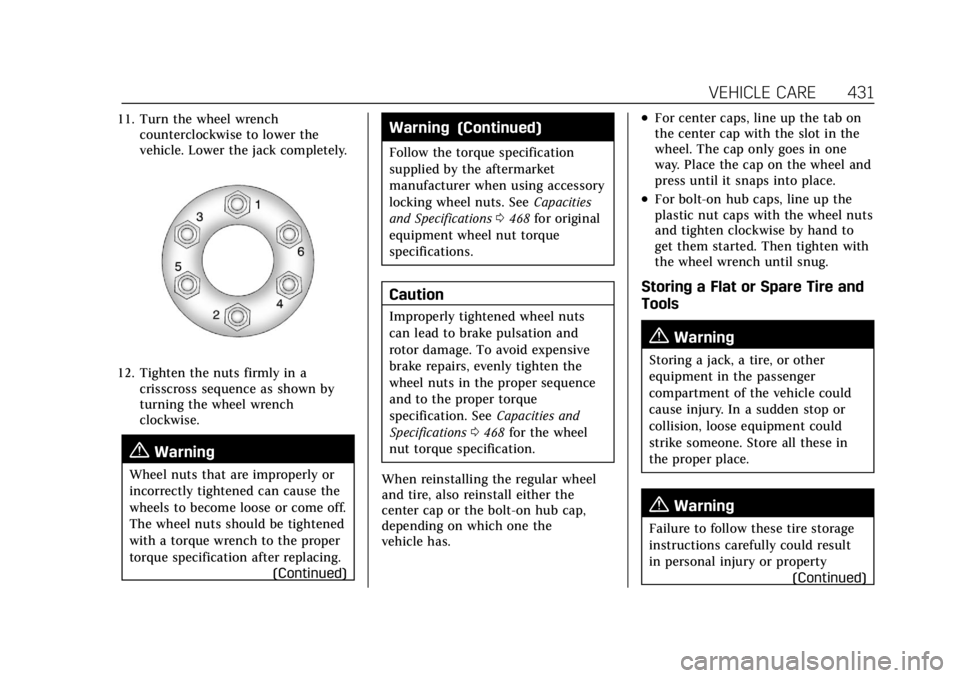
12. Tighten the nuts firmly in acrisscross sequence as shown by
turning the wheel wrench
clockwise.
{Warning
Wheel nuts that are improperly or
incorrectly tightened can cause the
wheels to become loose or come off.
The wheel nuts should be tightened
with a torque wrench to the proper
torque specification after replacing.
(Continued)
Warning (Continued)
Follow the torque specification
supplied by the aftermarket
manufacturer when using accessory
locking wheel nuts. See Capacities
and Specifications 0468 for original
equipment wheel nut torque
specifications.
Caution
Improperly tightened wheel nuts
can lead to brake pulsation and
rotor damage. To avoid expensive
brake repairs, evenly tighten the
wheel nuts in the proper sequence
and to the proper torque
specification. See Capacities and
Specifications 0468 for the wheel
nut torque specification.
When reinstalling the regular wheel
and tire, also reinstall either the
center cap or the bolt-on hub cap,
depending on which one the
vehicle has.
.For center caps, line up the tab on
the center cap with the slot in the
wheel. The cap only goes in one
way. Place the cap on the wheel and
press until it snaps into place.
.For bolt-on hub caps, line up the
plastic nut caps with the wheel nuts
and tighten clockwise by hand to
get them started. Then tighten with
the wheel wrench until snug.
Storing a Flat or Spare Tire and
Tools
{Warning
Storing a jack, a tire, or other
equipment in the passenger
compartment of the vehicle could
cause injury. In a sudden stop or
collision, loose equipment could
strike someone. Store all these in
the proper place.
{Warning
Failure to follow these tire storage
instructions carefully could result
in personal injury or property (Continued)
Page 470 of 508

Cadillac Escalade Owner Manual (GMNA-Localizing-U.S./Canada/Mexico-
15567102) - 2022 - CRC - 11/17/21
TECHNICAL DATA 469
ApplicationCapacities
Metric English
Rear Axle
IMechanical Limited Slip 1.5 L
1.6 qt
IElectronic Limited Slip 1.5 L
1.6 qt
Wheel Nut Torque 190Y 140 lb ft
All capacities are approximate. When adding, be sure to fill to the approximate level, as recommended in this manual.
Recheck fluid level after filling.
*Engine cooling system capacity values are based on the entire cooling system and its components.
Engine Specifications
Engine VIN CodeSpark Plug Gap
6.2L V8 Engine (L87) L0.95–1.10 mm (0.037–0.043 in)
Spark plug gaps are preset by the manufacturer. Re-gapping the spark plug is not recommended and can damage the
spark plug.