check CADILLAC ESCALADE 2023 Owners Manual
[x] Cancel search | Manufacturer: CADILLAC, Model Year: 2023, Model line: ESCALADE, Model: CADILLAC ESCALADE 2023Pages: 461, PDF Size: 7.99 MB
Page 398 of 461

Cadillac Escalade Owner Manual (GMNA-Localizing-U.S./Canada/Mexico-
16417396) - 2023 - CRC - 5/9/22
396 Vehicle Care
8. Hoist Shaft Access Hole
9. Spare Tire (Valve Stem Pointed Up)
10. Tire/Wheel Retainer
11. Hoist Cable
1. Put the tire (9) on the ground at the rearof the vehicle with the valve stem
pointed up, and to the rear.
2. Tilt the tire toward the vehicle. Separate the tire/wheel retainer from the guide
pin. Pull the pin through the center of
the wheel. Tilt the retainer down
through the center wheel opening.
Make sure the retainer is fully seated
across the underside of the wheel.
3. Assemble the jack handle extensions (4)and wheel wrench (5).
Caution
Use of an air wrench or other power
tools with the hoist mechanism is not
recommended and could damage the
system. Use only the tools supplied with
the hoist mechanism.
4. Insert the open end of the extension (7)through the hole in the rear bumper (8)
(hoist shaft access hole).
5. Raise the tire part way upward. Make sure the retainer is seated in the wheel
opening. 6. Raise the tire fully against the underside
of the vehicle by turning the wheel
wrench clockwise until you hear two
clicks or feel it skip twice. The cable
cannot be overtightened.
7. Make sure the tire is stored securely.Push, pull, and then try to turn the tire.
If the tire moves, use the wheel wrench
to tighten the cable.
Repeat this tightness check procedure
when checking the spare tire pressure
according to the scheduled maintenance
information or any time the spare tire is
handled due to service of other
components.
Page 400 of 461
Cadillac Escalade Owner Manual (GMNA-Localizing-U.S./Canada/Mexico-
16417396) - 2023 - CRC - 5/9/22
398 Vehicle Care
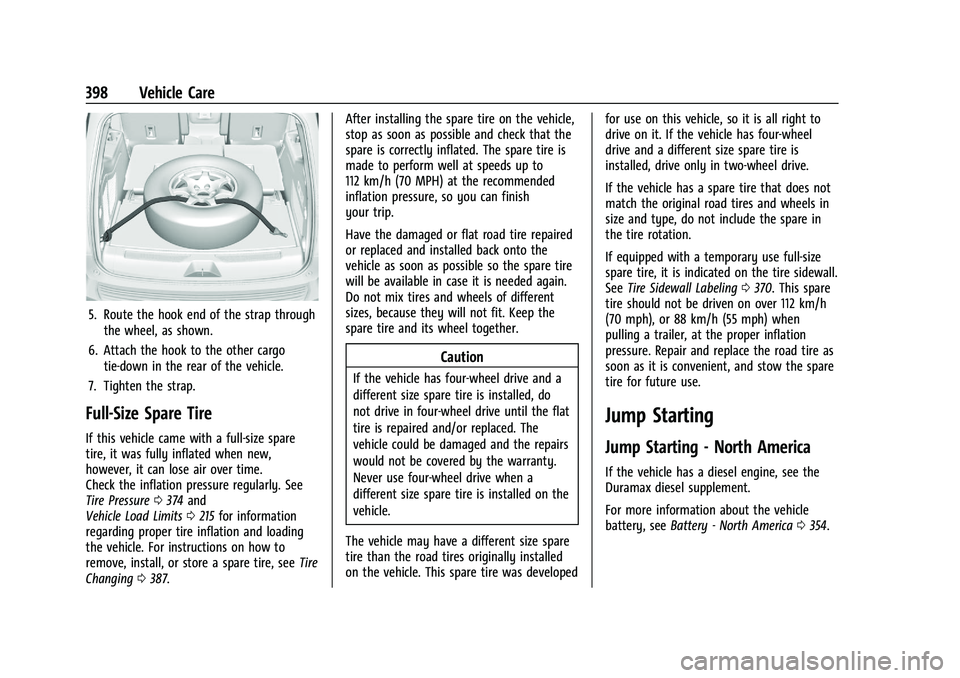
5. Route the hook end of the strap throughthe wheel, as shown.
6. Attach the hook to the other cargo tie-down in the rear of the vehicle.
7. Tighten the strap.
Full-Size Spare Tire
If this vehicle came with a full-size spare
tire, it was fully inflated when new,
however, it can lose air over time.
Check the inflation pressure regularly. See
Tire Pressure 0374 and
Vehicle Load Limits 0215 for information
regarding proper tire inflation and loading
the vehicle. For instructions on how to
remove, install, or store a spare tire, see Tire
Changing 0387. After installing the spare tire on the vehicle,
stop as soon as possible and check that the
spare is correctly inflated. The spare tire is
made to perform well at speeds up to
112 km/h (70 MPH) at the recommended
inflation pressure, so you can finish
your trip.
Have the damaged or flat road tire repaired
or replaced and installed back onto the
vehicle as soon as possible so the spare tire
will be available in case it is needed again.
Do not mix tires and wheels of different
sizes, because they will not fit. Keep the
spare tire and its wheel together.
Caution
If the vehicle has four-wheel drive and a
different size spare tire is installed, do
not drive in four-wheel drive until the flat
tire is repaired and/or replaced. The
vehicle could be damaged and the repairs
would not be covered by the warranty.
Never use four-wheel drive when a
different size spare tire is installed on the
vehicle.
The vehicle may have a different size spare
tire than the road tires originally installed
on the vehicle. This spare tire was developed for use on this vehicle, so it is all right to
drive on it. If the vehicle has four-wheel
drive and a different size spare tire is
installed, drive only in two-wheel drive.
If the vehicle has a spare tire that does not
match the original road tires and wheels in
size and type, do not include the spare in
the tire rotation.
If equipped with a temporary use full-size
spare tire, it is indicated on the tire sidewall.
See
Tire Sidewall Labeling 0370. This spare
tire should not be driven on over 112 km/h
(70 mph), or 88 km/h (55 mph) when
pulling a trailer, at the proper inflation
pressure. Repair and replace the road tire as
soon as it is convenient, and stow the spare
tire for future use.
Jump Starting
Jump Starting - North America
If the vehicle has a diesel engine, see the
Duramax diesel supplement.
For more information about the vehicle
battery, see Battery - North America 0354.
Page 402 of 461

Cadillac Escalade Owner Manual (GMNA-Localizing-U.S./Canada/Mexico-
16417396) - 2023 - CRC - 5/9/22
400 Vehicle Care
The discharged battery positive (+) terminal
is under a cover. Open the cover to expose
the terminal.1. Check the other vehicle. It must have a 12-volt battery with a negative ground
system.
Caution
If the other vehicle does not have a
12-volt system with a negative ground,
both vehicles can be damaged. Only use
a vehicle that has a 12-volt system with a
negative ground for jump starting.
2. If you have a vehicle with a diesel engine with two batteries, you should
know before you begin that, especially in
cold weather, you may not be able to
get enough power from a single battery
in another vehicle to start your diesel
engine. If your vehicle has more than
one battery, using the battery that is
closer to the starter will reduce electrical
resistance. This is located on the
passenger side, in the rear of the engine
compartment.
3. Get the vehicles close enough so the jumper cables can reach, but be sure the
vehicles are not touching each other. If they are, it could cause an unwanted
ground connection. You would not be
able to start your vehicle, and the bad
grounding could damage the electrical
systems.
To avoid the possibility of the vehicles
rolling, set the parking brake firmly on
both vehicles involved in the jump start
procedure. Put the automatic
transmission in P (Park) before setting
the parking brake. If you have a
four-wheel-drive vehicle, be sure the
transfer case is in a drive gear, not in
N (Neutral).
Caution
If any accessories are left on or plugged
in during the jump starting procedure,
they could be damaged. The repairs
would not be covered by the vehicle
warranty. Whenever possible, turn off or
unplug all accessories on either vehicle
when jump starting.
4. Turn the ignition off on both vehicles. Unplug unnecessary accessories plugged
into the accessory power outlets. Turn
off the radio and all the lamps that are not needed. This will avoid sparks and
help save both batteries. And it could
save the radio!
5. Open the hood on the other vehicle and locate the positive (+) and negative (−)
terminal locations on that vehicle.
{Warning
An electric fan can start up even when
the engine is not running and can injure
you. Keep hands, clothing, and tools
away from any underhood electric fan.
{Warning
Using a match near a battery can cause
battery gas to explode. People have been
hurt doing this, and some have been
blinded. Use a flashlight if you need
more light.
Battery fluid contains acid that can burn
you. Do not get it on you. If you
accidentally get it in your eyes or on
your skin, flush the place with water and
get medical help immediately.
Page 403 of 461

Cadillac Escalade Owner Manual (GMNA-Localizing-U.S./Canada/Mexico-
16417396) - 2023 - CRC - 5/9/22
Vehicle Care 401
{Warning
Fans or other moving engine parts can
injure you badly. Keep your hands away
from moving parts once the engine is
running.
6. Check that the jumper cables do not have loose or missing insulation. If they
do, you could get a shock. The vehicles
could be damaged too.
Before you connect the cables, here are
some basic things you should know.
Positive (+) will go to positive (+) or to a
remote positive (+) terminal if the
vehicle has one. Negative (−) will go to a
heavy, unpainted metal engine part or to
a remote negative (−) terminal if the
vehicle has one.
Do not connect positive (+) to negative
(−) or you will get a short that would
damage the battery and maybe other
parts too. And do not connect the
negative (−) cable to the negative (−)
terminal on the dead battery because
this can cause sparks.
7. Connect one end of the red positive (+) cable to the discharged battery
positive (+) terminal. 8. Do not let the other end touch metal.
Connect it to the good battery
positive (+) terminal. Use a remote
positive (+) terminal if the vehicle
has one.
9. Connect one end of the black negative (−) cable to the good battery negative
(−) terminal. Use a remote negative (−)
terminal if the vehicle has one.
Do not let the other end touch anything
until the next step.
10. Connect the other end of the negative (−) cable to the discharged battery
negative (−) grounding point.
11. Start the vehicle with the good battery and run the engine for a while.
12. Try to start the vehicle that had the dead battery. If it will not start after a
few tries, it probably needs service.
Jumper Cable Removal
Reverse the sequence exactly when
removing the jumper cables.
After starting the disabled vehicle and
removing the jumper cables, allow it to idle
for several minutes.
Towing the Vehicle
Transporting a Disabled Vehicle
Caution
Incorrectly transporting a disabled vehicle
may cause damage to the vehicle. Use
proper tire straps to secure the vehicle to
the flatbed tow truck. Do not strap or
hook to any frame, underbody,
or suspension component not specified
below. Do not move vehicles with drive
axle tires on the ground. Damage is not
covered by the vehicle warranty.
Caution
The vehicle may be equipped with an
electric parking brake and/or an
electronic shifter. In the event of a loss of
12-volt battery power, the electric parking
brake cannot be released, and the vehicle
cannot be shifted to N (Neutral). Tire
skates or dollies must be used under the
non-rolling tires to prevent damage while
loading/unloading the vehicle. Dragging
the vehicle will cause damage not
covered by the vehicle warranty.
Page 406 of 461

Cadillac Escalade Owner Manual (GMNA-Localizing-U.S./Canada/Mexico-
16417396) - 2023 - CRC - 5/9/22
404 Vehicle Care
Four-Wheel-Drive Vehicles
Only dinghy tow four-wheel-drive vehicles
with a two speed transfer case that has an
N (Neutral) and a 4
nsetting.
{Warning
Shifting a four-wheel-drive vehicle's
transfer case into N (Neutral) can cause
the vehicle to roll even if the
transmission is in P (Park). You or others
could be injured. Set the parking brake
before shifting the transfer case to
N (Neutral).To dinghy tow:
1. Position the vehicle being towed behind the tow vehicle, facing forward and on a
level surface.
2. Securely attach the vehicle being towed to the tow vehicle.
3. Apply the parking brake and start the engine.
4. Shift the transfer case to N (Neutral). See “Shifting into N (Neutral)” under
Four-Wheel Drive 0231 for the proper
procedure. Check that the vehicle is in
N (Neutral) by shifting the transmission
to R (Reverse) and then to D (Drive).
There should be no movement of the
vehicle while shifting.
5. Shift the transmission to P (Park).Caution
Failure to tow the vehicle with the
transmission in P (Park) can cause
damage to the transmission.
6. Turn off the engine.
7. Place the vehicle in accessory mode by pressing the start button without
stepping on the brake pedal. 8. Release the parking brake only when you
are confident it is secured to tow vehicle
and will not roll.
Before going on to the next step, be
sure to take the mechanical key with
you. It will be needed to re-enter the
vehicle after the power is disconnected.
See “Drive Door Key Lock Cylinder
Access” underDoor Locks 015.
9. Disconnect the negative battery cable at the battery and secure the nut and bolt.
Cover the negative battery post with a
non-conductive material to prevent any
contact with the negative battery
terminal.
Caution
Failure to disconnect the negative battery
cable or to have it contact the terminals
can cause damage to the vehicle.
10. Move the steering wheel to make sure the steering column is unlocked.
Caution
If the steering column is locked, vehicle
damage may occur.
Page 407 of 461

Cadillac Escalade Owner Manual (GMNA-Localizing-U.S./Canada/Mexico-
16417396) - 2023 - CRC - 5/9/22
Vehicle Care 405
11. Rock the vehicle to make sure theparking brake is not set and transfer case
is in N (Neutral).
Caution
Towing the vehicle with the parking
brake set can damage it. Always release
the parking brake prior to towing the
vehicle.
Disconnecting the Towed Vehicle
Before disconnecting the towed vehicle: 1. Park on a level surface.
2. Connect the battery.
3. Apply the brake pedal.
{Warning
The vehicle can roll when the brake pedal
is released. Always apply and hold the
brake pedal when setting the parking
brake. Make sure the parking brake is
fully engaged before releasing the brake
pedal.
4. Start the engine and shift the transfer case out of N (Neutral) to 2
m. See “Shifting out of N (Neutral)”
under
Four-Wheel Drive 0231. See your dealer
if the transfer case cannot be shifted out
of N (Neutral).
5. Check that the vehicle is in 2
mby
shifting the transmission to R (Reverse)
and then to D (Drive). There should be
movement of the vehicle while shifting.
6. Shift the transmission to P (Park) and turn off the vehicle.
7. Set the parking brake.
8. Release the parking brake.
9. Disconnect the vehicle from the tow vehicle.
10. Reset any lost presets. The outside temperature display will
default to 0 °C (32 °F) but will reset with
normal usage.
Dolly Towing
Page 410 of 461

Cadillac Escalade Owner Manual (GMNA-Localizing-U.S./Canada/Mexico-
16417396) - 2023 - CRC - 5/9/22
408 Vehicle Care
.Washer fluids and other cleaning agents
in higher concentrations than suggested
by the manufacturer.
.Solvents, alcohols, fuels, or other harsh
cleaners.
.Ice scrapers or other hard items.
.Aftermarket appearance caps or covers
while the lamps are illuminated, due to
excessive heat generated.
Caution
Failure to clean lamps properly can cause
damage to the lamp cover that would
not be covered by the vehicle warranty.
Caution
Using wax on low gloss black finish
stripes can increase the gloss level and
create a non-uniform finish. Clean low
gloss stripes with soap and water only.
Air Intakes
Clear debris from the air intakes, between
the hood and windshield, when washing the
vehicle.
Shutter System
The vehicle may have a shutter system
designed to help improve fuel economy.
Keep the shutter system clear of debris,
snow, and ice. If the check engine light is
activated, please check to see if the shutter
system is clear of debris, snow, or ice.
Windshield and Wiper Blades
Clean the outside of the windshield with
glass cleaner.
Clean rubber blades using a lint-free cloth or
paper towel soaked with windshield washer
fluid or a mild detergent. Wash the
windshield thoroughly when cleaning theblades. Bugs, road grime, sap, and a buildup
of vehicle wash/wax treatments may cause
wiper streaking.
Replace the wiper blades if they are worn or
damaged. Damage can be caused by
extreme dusty conditions, sand, salt, heat,
sun, snow, and ice.
Weatherstrips
Apply weatherstrip lubricant on
weatherstrips to make them last longer, seal
better, and eliminate sticking or squeaking.
Lubricate weatherstrips at least once a year.
Hot, dry climates may require more
frequent lubrication. Black marks from
rubber material on painted surfaces can be
removed by rubbing with a clean cloth. See
Recommended Fluids and Lubricants
0419.
Tires
Use a stiff brush with tire cleaner to clean
the tires.
Caution
Using petroleum-based tire dressing
products on the vehicle may damage the
paint finish and/or tires. When applying a
(Continued)
Page 411 of 461

Cadillac Escalade Owner Manual (GMNA-Localizing-U.S./Canada/Mexico-
16417396) - 2023 - CRC - 5/9/22
Vehicle Care 409
Caution (Continued)
tire dressing, always wipe off any
overspray from all painted surfaces on
the vehicle.
Wheels and Wheel Trim
Use a soft, clean cloth with mild soap and
water to clean the wheels. After rinsing
thoroughly with clean water, dry with a
soft, clean towel. Once dry, wax as desired.
Caution
Chrome wheels and chrome wheel trim
may be damaged if the vehicle is not
washed after driving on roads that have
been sprayed with magnesium chloride or
calcium chloride. These are used on roads
for conditions such as dust and ice.
Always wash the chrome with soap and
water after exposure.
Caution
To avoid surface damage on wheels and
wheel trim, do not use strong soaps,
chemicals, abrasive polishes, cleaners,
or brushes. Use only GM approved
(Continued)
Caution (Continued)
cleaners. Do not drive the vehicle through
an automatic car wash that uses silicon
carbide tire/wheel cleaning brushes.
Damage could occur and the repairs
would not be covered by the vehicle
warranty.
Brake System
Visually inspect brake lines and hoses for
proper hook-up, binding, leaks, cracks,
chafing, etc. Inspect disc brake pads for wear
and rotors for surface condition. Inspect
drum brake linings/shoes for wear or cracks.
Inspect all other brake parts.
Steering, Suspension, and Chassis
Components
Visually inspect steering, suspension, and
chassis components for damaged, loose,
or missing parts or signs of wear at least
once a year.
Inspect power steering for proper
attachment, connections, binding, cut/
punctured tie rod boots that could allow
water intrusion, cracks, chafing, etc.
Visually check constant velocity joint boots
and axle seals for leaks.Control arm ball joints and outer tie rod
ends are maintenance-free.
Body Component Lubrication
Lubricate all key lock cylinders, hood hinges,
liftgate hinges, steel fuel door hinge and
power assist step hinges, unless the
components are plastic. Applying silicone
grease on weatherstrips with a clean cloth
will make them last longer, seal better, and
eliminate sticking or squeaking
Underbody Maintenance
Caution
Avoid pressure washing the vehicle frame.
Use of high-pressure washers can result
in removal of corrosion protection and
possible vehicle damage.
At least twice a year, spring and fall, use
plain water to flush any corrosive materials
from the underbody. Take care to
thoroughly clean any areas where mud and
other debris can collect. If equipped with
power assist steps, extend them and then
use a high pressure wash to clean all joints
and gaps.
Page 415 of 461

Cadillac Escalade Owner Manual (GMNA-Localizing-U.S./Canada/Mexico-
16417396) - 2023 - CRC - 5/9/22
Vehicle Care 413
Cargo Cover and Convenience Net
If equipped, wash with warm water and
mild detergent. Do not use chlorine bleach.
Rinse with cold water, and then dry
completely.
Care of Seat Belts
Keep belts clean and dry.
{Warning
Do not bleach or dye seat belt webbing.
It may severely weaken the webbing. In
a crash, they might not be able to
provide adequate protection. Clean and
rinse seat belt webbing only with mild
soap and lukewarm water. Allow the
webbing to dry.
Floor Mats
{Warning
If a floor mat is the wrong size or is not
properly installed, it can interfere with
the pedals. Interference with the pedals
can cause unintended acceleration and/or
increased stopping distance which can(Continued)
Warning (Continued)
cause a crash and injury. Make sure the
floor mat does not interfere with the
pedals.
Use the following guidelines for proper floor
mat use:
.The original equipment floor mats are
designed for your vehicle. If the floor
mats need to be replaced, it is
recommended that GM-certified floor
mats are purchased. Non-GM floor mats
may not fit properly and may interfere
with the pedals. Always check that the
floor mats do not interfere with the
pedals.
.Do not use a floor mat if the vehicle is
not equipped with a floor mat retainer on
the driver side floor.
.Use the floor mat with the correct side
up. Do not turn it over.
.Do not place anything on top of the
driver side floor mat.
.Use only a single floor mat on the
driver side.
.Do not place one floor mat on top of
another.
Removing and Replacing the Floor Mats
Pull up on the rear of the floor mat to
unlock each retainer and remove.
Reinstall by lining up the floor mat retainer
openings over the carpet retainers and
snapping into position.
Make sure the floor mat is properly secured
in place.
Verify the floor mat does not interfere with
the pedals.
Cleaning Rubber Floor Mats (All-Weather
Mats and Floor Liners)
See “Vinyl/Rubber” underInterior Care
0 410 for important cleaning information.
Page 416 of 461

Cadillac Escalade Owner Manual (GMNA-Localizing-U.S./Canada/Mexico-
16417396) - 2023 - CRC - 5/9/22
414 Service and Maintenance
Service and Maintenance
General Information
General Information . . . . . . . . . . . . . . . . . . . 414
Maintenance Schedule
Maintenance Schedule . . . . . . . . . . . . . . . . . 415
Multi-Point Vehicle Inspection (MPVI)
Multi-Point VehicleInspection (MPVI) . . . . . . . . . . . . . . . . . . . . 417
Special Application Services
Special Application Services . . . . . . . . . . . . 418
Recommended Fluids, Lubricants, and
Parts
Recommended Fluids and
Lubricants . . . . . . . . . . . . . . . . . . . . . . . . . . . 419
Maintenance Replacement Parts . . . . . . 420
Maintenance Records
Maintenance Records . . . . . . . . . . . . . . . . . . 422
General Information
Your vehicle is an important investment.
This section describes the required
maintenance for the vehicle. Follow this
schedule to help protect against major repair
expenses resulting from neglect or
inadequate maintenance. It may also help to
maintain the value of the vehicle if it is
sold. It is the responsibility of the owner to
have all required maintenance performed.
Your dealer has trained technicians who can
perform required maintenance using genuine
replacement parts. They have up-to-date
tools and equipment for fast and accurate
diagnostics. Many dealers have extended
evening and Saturday hours, courtesy
transportation, and online scheduling to
assist with service needs.
Your dealer recognizes the importance of
providing competitively priced maintenance
and repair services. With trained technicians,
the dealer is the place for routine
maintenance such as oil changes and tire
rotations and additional maintenance items
like tires, brakes, batteries, and wiper blades.
Caution
Damage caused by improper maintenance
can lead to costly repairs and may not be
covered by the vehicle warranty.
Maintenance intervals, checks,
inspections, recommended fluids, and
lubricants are important to keep the
vehicle in good working condition.
Do not have chemical flushes that are not
approved by GM performed on the
vehicle. The use of flushes, solvents,
cleaners, or lubricants that are not
approved by GM could damage the
vehicle, requiring expensive repairs that
are not covered by the vehicle warranty.
The Tire Rotation and Required Services are
the responsibility of the vehicle owner. It is
recommended to have your dealer perform
these services every 12 000 km/7,500 mi.
Proper vehicle maintenance helps to keep
the vehicle in good working condition,
improves fuel economy, and reduces vehicle
emissions.