brakes CADILLAC ESCALADE ESV 2005 2.G Owner's Manual
[x] Cancel search | Manufacturer: CADILLAC, Model Year: 2005, Model line: ESCALADE ESV, Model: CADILLAC ESCALADE ESV 2005 2.GPages: 470, PDF Size: 2.86 MB
Page 301 of 470
Towing a trailer requires a certain amount of experience.
Before setting out for the open road, you’ll want to get
to know your rig. Acquaint yourself with the feel of
handling and braking with the added weight of the trailer.
And always keep in mind that the vehicle you are
driving is now a good deal longer and not nearly as
responsive as your vehicle is by itself.
Before you start, check all trailer hitch parts and
attachments, safety chains, electrical connector, lamps,
tires and mirror adjustment. If the trailer has electric
brakes, start your vehicle and trailer moving and then
apply the trailer brake controller by hand to be sure
the brakes are working. This lets you check your
electrical connection at the same time.
During your trip, check occasionally to be sure that the
load is secure, and that the lamps and any trailer
brakes are still working.Following Distance
Stay at least twice as far behind the vehicle ahead as
you would when driving your vehicle without a trailer.
This can help you avoid situations that require
heavy braking and sudden turns.
Passing
You’ll need more passing distance up ahead when
you’re towing a trailer. And, because you’re a good deal
longer, you’ll need to go much farther beyond the
passed vehicle before you can return to your lane.
Backing Up
Hold the bottom of the steering wheel with one hand.
Then, to move the trailer to the left, just move that hand
to the left. To move the trailer to the right, move your
hand to the right. Always back up slowly and, if possible,
have someone guide you.
4-57
Page 302 of 470
Making Turns
Notice:Making very sharp turns while trailering
could cause the trailer to come in contact with the
vehicle. Your vehicle could be damaged. Avoid
making very sharp turns while trailering.
When you’re turning with a trailer, make wider turns
than normal. Do this so your trailer won’t strike
soft shoulders, curbs, road signs, trees or other objects.
Avoid jerky or sudden maneuvers. Signal well in
advance.
Turn Signals When Towing a Trailer
The arrows on your instrument panel will ash whenever
you signal a turn or lane change. Properly hooked up,
the trailer lamps will also ash, telling other drivers
you’re about to turn, change lanes or stop.
When towing a trailer, the arrows on your instrument
panel will ash for turns even if the bulbs on the trailer
are burned out. Thus, you may think drivers behind
you are seeing your signal when they are not. It’s
important to check occasionally to be sure the trailer
bulbs are still working.
Driving On Grades
Reduce speed and shift to a lower gearbeforeyou start
down a long or steep downgrade. If you don’t shift
down, you might have to use your brakes so much that
they would get hot and no longer work well.
You can tow in DRIVE (D). You may want to shift the
transmission to THIRD (3) or, if necessary, a lower
gear selection if the transmission shifts too often
(e.g., under heavy loads and/or hilly conditions).
You may also want to activate the tow/haul mode if the
transmission shifts too often. See “Tow/Haul Mode”
earlier.
When towing at high altitude on steep uphill grades,
consider the following: Engine coolant will boil at a lower
temperature than at normal altitudes. If you turn your
engine off immediately after towing at high altitude
on steep uphill grades, your vehicle may show signs
similar to engine overheating. To avoid this, let the
engine run while parked (preferably on level ground)
with the automatic transmission in PARK (P) for a
few minutes before turning the engine off. If you do get
the overheat warning, seeEngine Overheating on
page 5-26.
4-58
Page 303 of 470

Parking on Hills
{CAUTION:
You really should not park your vehicle, with a
trailer attached, on a hill. If something goes
wrong, your rig could start to move. People
can be injured, and both your vehicle and the
trailer can be damaged.
But if you ever have to park your rig on a hill, here’s
how to do it:
1. Apply your regular brakes, but don’t shift into
PARK (P) yet.
2. Have someone place chocks under the trailer
wheels.
3. When the wheel chocks are in place, release the
regular brakes until the chocks absorb the load.
4. Reapply the regular brakes. Then apply your
parking brake and shift into PARK (P).
5. Release the regular brakes.
When You Are Ready to Leave After
Parking on a Hill
1. Apply your regular brakes and hold the pedal down
while you:
start your engine,
shift into a gear, and
release the parking brake.
2. Let up on the brake pedal.
3. Drive slowly until the trailer is clear of the chocks.
4. Stop and have someone pick up and store the
chocks.
4-59
Page 307 of 470
Service............................................................5-3
Doing Your Own Service Work.........................5-4
Adding Equipment to the Outside of
Your Vehicle..............................................5-5
Fuel................................................................5-5
Gasoline Octane............................................5-5
Gasoline Specications....................................5-6
California Fuel...............................................5-6
Additives.......................................................5-7
Fuels in Foreign Countries...............................5-8
Filling the Tank..............................................5-8
Filling a Portable Fuel Container.....................5-10
Checking Things Under the Hood....................5-10
Hood Release..............................................5-11
Engine Compartment Overview.......................5-12
Engine Oil...................................................5-13
Engine Oil Life System..................................5-16
Engine Air Cleaner/Filter................................5-18
Automatic Transmission Fluid.........................5-21
Engine Coolant.............................................5-23
Coolant Surge Tank Pressure Cap..................5-26
Engine Overheating.......................................5-26
Overheated Engine Protection
Operating Mode........................................5-28
Cooling System............................................5-28
Engine Fan Noise.........................................5-33Power Steering Fluid.....................................5-33
Windshield Washer Fluid................................5-34
Brakes........................................................5-36
Battery........................................................5-39
Jump Starting...............................................5-40
All-Wheel Drive..............................................5-45
Rear Axle.......................................................5-45
Front Axle......................................................5-46
Headlamp Aiming...........................................5-48
Headlamp Horizontal Aiming...........................5-49
Headlamp Vertical Aiming..............................5-50
Bulb Replacement..........................................5-51
High Intensity Discharge (HID) Lighting............5-51
Halogen Bulbs..............................................5-52
Headlamps..................................................5-52
Front Turn Signal, Sidemarker and Daytime
Running Lamps.........................................5-56
Taillamps, Turn Signal, Sidemarker, Stoplamps
and Back-up Lamps...................................5-57
Replacement Bulbs.......................................5-58
Windshield Wiper Blade Replacement..............5-58
Tires..............................................................5-59
Tire Sidewall Labelling...................................5-60
Tire Terminology and Denitions.....................5-63
Ination - Tire Pressure.................................5-65
Section 5 Service and Appearance Care
5-1
Page 319 of 470
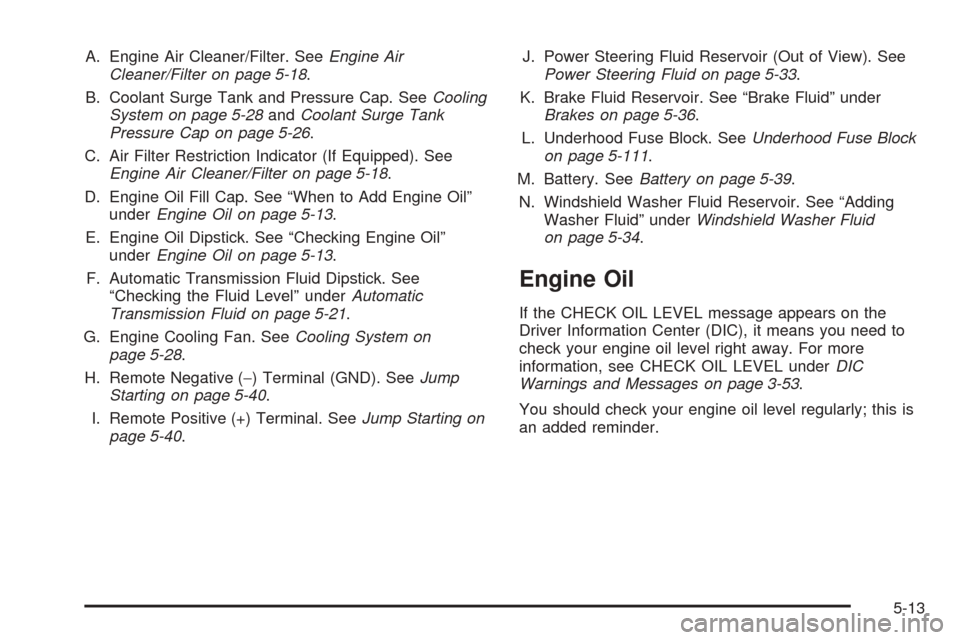
A. Engine Air Cleaner/Filter. SeeEngine Air
Cleaner/Filter on page 5-18.
B. Coolant Surge Tank and Pressure Cap. SeeCooling
System on page 5-28andCoolant Surge Tank
Pressure Cap on page 5-26.
C. Air Filter Restriction Indicator (If Equipped). See
Engine Air Cleaner/Filter on page 5-18.
D. Engine Oil Fill Cap. See “When to Add Engine Oil”
underEngine Oil on page 5-13.
E. Engine Oil Dipstick. See “Checking Engine Oil”
underEngine Oil on page 5-13.
F. Automatic Transmission Fluid Dipstick. See
“Checking the Fluid Level” underAutomatic
Transmission Fluid on page 5-21.
G. Engine Cooling Fan. SeeCooling System on
page 5-28.
H. Remote Negative (−) Terminal (GND). SeeJump
Starting on page 5-40.
I. Remote Positive (+) Terminal. SeeJump Starting on
page 5-40.J. Power Steering Fluid Reservoir (Out of View). See
Power Steering Fluid on page 5-33.
K. Brake Fluid Reservoir. See “Brake Fluid” under
Brakes on page 5-36.
L. Underhood Fuse Block. SeeUnderhood Fuse Block
on page 5-111.
M. Battery. SeeBattery on page 5-39.
N. Windshield Washer Fluid Reservoir. See “Adding
Washer Fluid” underWindshield Washer Fluid
on page 5-34.
Engine Oil
If the CHECK OIL LEVEL message appears on the
Driver Information Center (DIC), it means you need to
check your engine oil level right away. For more
information, see CHECK OIL LEVEL underDIC
Warnings and Messages on page 3-53.
You should check your engine oil level regularly; this is
an added reminder.
5-13
Page 342 of 470

Brakes
Brake Fluid
Your brake master cylinder
reservoir is lled with
DOT-3 brake uid. See
Engine Compartment
Overview on page 5-12
for the location of the
reservoir.
There are only two reasons why the brake uid level in
the reservoir might go down. The rst is that the
brake uid goes down to an acceptable level during
normal brake lining wear. When new linings are put in,
the uid level goes back up. The other reason is
that uid is leaking out of the brake system. If it is, you
should have your brake system xed, since a leak
means that sooner or later your brakes will not work
well, or will not work at all.So, it is not a good idea to top off your brake uid.
Adding brake uid will not correct a leak. If you add uid
when your linings are worn, then you will have too
much uid when you get new brake linings. You should
add or remove brake uid, as necessary, only when
work is done on the brake hydraulic system.
{CAUTION:
If you have too much brake uid, it can spill on
the engine. The uid will burn if the engine is
hot enough. You or others could be burned,
and your vehicle could be damaged. Add brake
uid only when work is done on the brake
hydraulic system. See “Checking Brake Fluid”
in this section.
Refer to the Maintenance Schedule to determine when
to check your brake uid. SeeScheduled Maintenance
on page 6-5.
5-36
Page 343 of 470

Checking Brake Fluid
You can check the brake uid without taking off the cap.
Look at the brake uid
reservoir. The uid level
should be above MIN. If it
is not, have your brake
system checked to
see if there is a leak.
After work is done on the brake hydraulic system,
make sure the level is above the MIN but not over the
MAX mark.
What to Add
When you do need brake uid, use only DOT-3 brake
uid. Use new brake uid from a sealed container
only. SeeRecommended Fluids and Lubricants on
page 6-14.Always clean the brake uid reservoir cap and the area
around the cap before removing it. This will help
keep dirt from entering the reservoir.
{CAUTION:
With the wrong kind of uid in your brake
system, your brakes may not work well, or they
may not even work at all. This could cause a
crash. Always use the proper brake uid.
Notice:
Using the wrong uid can badly damage brake
system parts. For example, just a few drops of
mineral-based oil, such as engine oil, in your
brake system can damage brake system parts so
badly that they will have to be replaced. Do not
let someone put in the wrong kind of uid.
If you spill brake uid on your vehicle’s painted
surfaces, the paint nish can be damaged. Be
careful not to spill brake uid on your vehicle. If
you do, wash it off immediately. SeeAppearance
Care on page 5-97.
5-37
Page 344 of 470

Brake Wear
Your vehicle has four-wheel disc brakes.
Disc brake pads have built-in wear indicators that make
a high-pitched warning sound when the brake pads
are worn and new pads are needed. The sound
may come and go or be heard all the time your vehicle
is moving, except when you are pushing on the
brake pedal rmly.
{CAUTION:
The brake wear warning sound means that
soon your brakes will not work well. That
could lead to an accident. When you hear the
brake wear warning sound, have your vehicle
serviced.Notice:Continuing to drive with worn-out brake
pads could result in costly brake repair.
Some driving conditions or climates may cause a brake
squeal when the brakes are rst applied or lightly
applied. This does not mean something is wrong with
your brakes.
Properly torqued wheel nuts are necessary to help
prevent brake pulsation. When tires are rotated, inspect
brake pads for wear and evenly tighten wheel nuts in
the proper sequence to GM torque specications.
Brake linings should always be replaced as complete
axle sets.Brake Pedal Travel
See your dealer if the brake pedal does not return to
normal height, or if there is a rapid increase in
pedal travel. This could be a sign of brake trouble.
Brake Adjustment
Every time you make a brake stop, your disc brakes
adjust for wear.
5-38
Page 345 of 470
Replacing Brake System Parts
The braking system on a vehicle is complex. Its many
parts have to be of top quality and work well together if
the vehicle is to have really good braking. Your
vehicle was designed and tested with top-quality GM
brake parts. When you replace parts of your braking
system — for example, when your brake linings
wear down and you need new ones put in — be sure
you get new approved GM replacement parts. If you do
not, your brakes may no longer work properly. For
example, if someone puts in brake linings that are wrong
for your vehicle, the balance between your front and
rear brakes can change — for the worse. The braking
performance you have come to expect can change
in many other ways if someone puts in the wrong
replacement brake parts.
Battery
Your vehicle has a maintenance free battery. When it is
time for a new battery, get one that has the replacement
number shown on the original battery’s label. We
recommend an ACDelco
®replacement battery. See
Engine Compartment Overview on page 5-12for battery
location.Warning:Battery posts, terminals and related
accessories contain lead and lead compounds,
chemicals known to the State of California to cause
cancer and reproductive harm. Wash hands after
handling.
Vehicle Storage
If you are not going to drive your vehicle for 25 days
or more, remove the black, negative (−) cable from
the battery. This will help keep your battery from
running down.
{CAUTION:
Batteries have acid that can burn you and gas
that can explode. You can be badly hurt if you
are not careful. SeeJump Starting on
page 5-40for tips on working around a battery
without getting hurt.
5-39
Page 369 of 470
Tire Terminology and Denitions
Air Pressure:The amount of air inside the tire pressing
outward on each square inch of the tire. Air pressure
is expressed in pounds per square inch (psi) or
kilopascal (kPa).
Accessory Weight:This means the combined weight
of optional accessories. Some examples of optional
accessories are, automatic transmission, power steering,
power brakes, power windows, power seats, and air
conditioning.
Aspect Ratio:The relationship of a tire’s height to
its width.
Belt:A rubber coated layer of cords that is located
between the plies and the tread. Cords may be made
from steel or other reinforcing materials.
Bead:The tire bead contains steel wires wrapped by
steel cords that hold the tire onto the rim.
Bias Ply Tire:A pneumatic tire in which the plies are
laid at alternate angles less than 90 degrees to the
centerline of the tread.
Cold Ination Pressure:The amount of air pressure in
a tire, measured in pounds per square inch (psi) or
kilopascals (kPa) before a tire has built up heat
from driving. SeeInation - Tire Pressure on page 5-65.Curb Weight:This means the weight of a motor
vehicle with standard and optional equipment including
the maximum capacity of fuel, oil and coolant, but
without passengers and cargo.
DOT Markings:A code molded into the sidewall of a
tire signifying that the tire is in compliance with the
U.S. Department of Transportation (DOT) motor vehicle
safety standards. The DOT code includes the Tire
Identication Number (TIN), an alphanumeric designator
which can also identify the tire manufacturer, production
plant, brand and date of production.
GVWR:Gross Vehicle Weight Rating, seeLoading
Your Vehicle on page 4-44.
GAWR FRT:Gross Axle Weight Rating for the front
axle, seeLoading Your Vehicle on page 4-44.
GAWR RR:Gross Axle Weight Rating for the rear axle,
seeLoading Your Vehicle on page 4-44.
Intended Outboard Sidewall:The side of an
asymmetrical tire, that must always face outward when
mounted on a vehicle.
Kilopascal (kPa):The metric unit for air pressure.
Light Truck (LT-Metric) Tire:A tire used on light duty
trucks and some multipurpose passenger vehicles.
5-63